


该文主要讲述在nginx环境下如何配置支持php5.6,主要分为三部分:配置安装PHP5.6.25,配置php-fpm组件,配置nginx支持PHP(请自行编译安装nginx)
1、配置安装PHP5.6.25
[root@localhost share]# cp php-5.6.25.tar.gz/usr/local
[root@localhost share]# cd /usr/local
[root@localhost local]# tar -zvxf php-5.6.25.tar.gz
[root@localhost local]# cd php-5.6.25
[root@localhost php-5.6.25]# ./configure--prefix=/usr/local/php --enable-fpm
要想使php支持php-fpm,只需要在编译的时候带上 --enable-fpm 就可以了
configure error xml2-config not found. pleasecheck your libxml2 installation
编译时报以上错误,此时安装相关包再重新编译安装即可。
[root@localhost php-5.6.25]# yum install libxml2
[root@localhost php-5.6.25]# yum install libxml2-devel
[root@localhost php-5.6.25]# ./configure--prefix=/usr/local/php --enable-fastcgi --enable-fpm
[root@localhost php-5.6.25]# make
[root@localhost php-5.6.25]# makeinstall
Installing shared extensions: /usr/local/php/lib/php/extensions/no-debug-non-zts-20131226/
Installing PHP CLI binary: /usr/local/php/bin/
Installing PHP CLI man page: /usr/local/php/php/man/man1/
Installing PHP FPM binary: /usr/local/php/sbin/
Installing PHP FPM config: /usr/local/php/etc/
Installing PHP FPM man page: /usr/local/php/php/man/man8/
Installing PHP FPM status page: /usr/local/php/php/php/fpm/
Installing PHP CGI binary: /usr/local/php/bin/
Installing PHP CGI man page: /usr/local/php/php/man/man1/
Installing build environment: /usr/local/php/lib/php/build/
Installing header files: /usr/local/php/include/php/
Installing helper programs: /usr/local/php/bin/
program: phpize
program: php-config
Installing man pages: /usr/local/php/php/man/man1/
page: phpize.1
page: php-config.1
Installing PEAR environment: /usr/local/php/lib/php/
[PEAR] Archive_Tar - installed: 1.4.0
[PEAR] Console_Getopt - installed: 1.4.1
[PEAR] Structures_Graph- installed: 1.1.1
[PEAR] XML_Util - installed: 1.3.0
[PEAR] PEAR - installed: 1.10.1
Wrote PEAR system config file at:/usr/local/php/etc/pear.conf
You may want to add: /usr/local/php/lib/phpto your php.ini include_path
/usr/local/php-5.6.25/build/shtool install-c ext/phar/phar.phar /usr/local/php/bin
ln -s -f phar.phar /usr/local/php/bin/phar
Installing PDO headers: /usr/local/php/include/php/ext/pdo/
查看是否成功编译安装PHP
[root@localhost php-5.6.25]# php -v
PHP 5.3.3 (cli) (built: May 10 2016 21:39:50)
Copyright (c) 1997-2010 The PHP Group
Zend Engine v2.3.0, Copyright (c) 1998-2010 ZendTechnologies
[root@localhost php-5.6.25]# cd/usr/local/php/sbin/
[root@localhost sbin]# ls
php-fpm
[root@localhost sbin]# cd/usr/local/php/
[root@localhost php]# ls
bin etc include lib php sbin var
[root@localhost fpm]# cd/usr/local/php/etc/
[root@localhost etc]# ls
pear.conf php-fpm.conf.default
[root@localhost etc]#
编译安装完成后PHP不具备配置文件php.ini,此时只需复制php.ini-production到 /usr/local/lib/php.ini即可,php.ini文件一般在/usr/local/lib/和/etc目录下
[root@localhost php-5.6.25]# cp php.ini-production/usr/local/lib/php.ini
也可以在编译时直接在 make install 后面加一个编译参数 --with-config-file-path=/usr/local/php/etc 指定自己的php.ini路径 然后从源码里面cp过去php.ini 源码里面有个php.ini-development和php.ini-production 如果不是本地调试模式的 选择后者
2、配置php-fpm组件
LNMP环境中的nginx是不支持php的,需要通过fastcgi插件来处理有关php的请求。而php需要php-fpm这个组件提供该功能。在php5.3.3以前的版本php-fpm是以一个补丁包的形式存在的,而php5.3.3以后只需在编译安装时使用–enable-fpm加载该模块即可,无需另行安装。
[root@localhost php-5.6.25]#/usr/local/php/sbin/php-fpm
[29-Aug-2016 17:36:05] ERROR: failed toopen configuration file '/usr/local/php/etc/php-fpm.conf': No such file ordirectory (2)
[29-Aug-2016 17:36:05] ERROR: failed toload configuration file '/usr/local/php/etc/php-fpm.conf'
[29-Aug-2016 17:36:05] ERROR: FPMinitialization failed
启动php-fpm发现缺乏配置文件/usr/local/php/etc/php-fpm.conf
此时只需复制php-fpm的配置文件在安装php时提供的配置文件的模版/usr/local/php/etc/php-fpm.conf.default到相应目录下即可,此处有两种方法,均可提供配置文件,即分别将末班复制到/usr/local/php/etc/或者 /usr/local/etc/并重命名为php-fpm.conf
①
[root@localhost etc]# cd /usr/local/php/etc/
[root@localhost etc]# ls
pear.conf php-fpm.conf.default
[root@localhost etc]# cp/usr/local/php/etc/php-fpm.conf /usr/local/etc/php-fpm.conf
利用/usr/local/php/sbin/php-fpm启动FPM
[root@localhost etc]# /usr/local/php/sbin/php-fpm
②
[root@localhost etc]# cp php-fpm.conf.defaultphp-fpm.conf
[root@localhost etc]# /usr/local/php/sbin/php-fpm
至此php-fpm配置完成,鉴于fpm是置于PHP和Nginx之间的一层应用,所以配置成服务开机自启。
下面配置php-fpm以服务形式启动
[root@localhost etc]# cd /usr/local/php-5.6.25/
[root@localhost php-5.6.25]# cp./sapi/fpm/init.d.php-fpm /etc/init.d/php-fpm
[root@localhost php-5.6.25]# ll /etc/init.d/php-fpm
-rw-r--r-- 1 root root 2354 8月 3115:54 /etc/init.d/php-fpm
[root@localhost php-5.6.25]# chmod a+x/etc/init.d/php-fpm
[root@localhost php-5.6.25]# ll /etc/init.d/php-fpm
-rwxr-xr-x 1 root root 2354 8月 3115:54 /etc/init.d/php-fpm
[root@localhost php-5.6.25]# /etc/init.d/php-fpmstart
Starting php-fpm [31-Aug-2016 15:56:00]ERROR: unable to bind listening socket for address '127.0.0.1:9000': Addressalready in use (98)
[31-Aug-2016 15:56:00] ERROR: FPMinitialization failed
Failed
[root@localhost php-5.6.25]# netstat -tunlp |grep9000
tcp 0 0 127.0.0.1:9000 0.0.0.0:* LISTEN 4928/php-fpm
[root@localhost etc]# /etc/init.d/php-fpm stop
Gracefully shutting down php-fpm warning,no pid file found - php-fpm is not running ?
关闭php-fpm服务时发现报错,缺乏pid文件,解决方法为编辑配置文件,启用pid文件
[root@localhost etc]# vim php-fpm.conf
pid = run/php-fpm.pid
[root@localhost etc]# kill -INT `cat/usr/local/php/var/run/php-fpm.pid`
cat: /usr/local/php/var/run/php-fpm.pid: 没有那个文件或目录
[root@localhost etc]# /etc/init.d/php-fpm stop
Gracefully shutting down php-fpm warning,no pid file found - php-fpm is not running ?
尝试关闭服务时再次报错,手动建立php-fpm.pid文件即可
[root@localhost etc]# cd /usr/local/php/var/run/
[root@localhost run]# vim php-fpm.pid
[root@localhost run]# ls
php-fpm.pid
[root@localhost run]# service php-fpm stop
Gracefully shutting down php-fpm . done
[root@localhost run]# service php-fpm start
Starting php-fpm done
[root@localhost run]# netstat -tunlp |grep 9000
tcp 0 0 127.0.0.1:9000 0.0.0.0:* LISTEN 3008/php-fpm
[root@localhost run]# kill -INT `cat/usr/local/php/var/run/php-fpm.pid`
[root@localhost run]# netstat -tunlp |grep 9000
[root@localhost run]# /etc/init.d/php-fpm start
Startingphp-fpm done
将服务添加到chkconfig列表,设置开机启动
[root@localhost run]# chkconfig --add php-fpm
[root@localhost run]# chkconfig php-fpm on
至此,php-fpm配置完成,下面提供两种控制方式
① PHP-FPM使用信号控制:
master进程可以理解以下信号
INT, TERM 立刻终止
QUIT 平滑终止
USR1 重新打开日志文件
USR2 平滑重载所有worker进程并重新载入配置和二进制模块
启动
[root@localhost run]# /usr/local/php/sbin/php-fpm
关闭:
[root@localhost run]# kill -INT `cat/usr/local/php/var/run/php-fpm.pid`
重启:
[root@localhost run]# kill -USR2 `cat/usr/local/php/var/run/php-fpm.pid`
②
服务方式控制
Usage: /etc/init.d/php-fpm {start|stop|force-quit|restart|reload|status}
[root@localhost run]# service php-fpm start
Starting php-fpm done
[root@localhost run]# service php-fpm stop
Gracefully shutting down php-fpm . done
[root@localhost run]# /etc/init.d/php-fpm restart
Gracefully shutting down php-fpm . done
Starting php-fpm done
[root@localhost run]#
3、配置nginx支持PHP
[root@localhost php-5.6.25]# cd /opt/nginx/conf/
[root@localhost conf]# vim nginx.conf
user fieldyang;
error_log logs/error.log;
pid logs/nginx.pid;
events{
use epoll;
worker_connections 1024;
}
………
……..
# pass the PHP scripts to FastCGIserver listening on 127.0.0.1:9000
#
location ~ \.php$ {
root /opt/nginx/sbin/html;
fastcgi_pass 127.0.0.1:9000;
fastcgi_index index.php;
fastcgi_param SCRIPT_FILENAME$document_root$fastcgi_script_name;
include fastcgi_params;
}
创建phpinfo.php测试nginx是否支持PHP
[root@localhost conf]# cd /opt/nginx/sbin
[root@localhost sbin]# ls
html nginx
[root@localhost sbin]# cd html/
[root@localhost html]# vim phpinfo.php
<?php phpinfo(); ?>
启动nginx
[root@localhost conf]# /opt/nginx/sbin/nginx
[root@localhost conf]# netstat -tnlp | grep nginx
tcp 0 0 0.0.0.0:8088 0.0.0.0:* LISTEN 4790/nginx
[root@localhost conf]# kill -USR2 4790
[root@localhost conf]# kill -QUIT 4790
[root@localhost conf]# netstat -tnlp | grep nginx
tcp 0 0 0.0.0.0:8088 0.0.0.0:* LISTEN 5207/nginx
[root@localhost conf]# kill -USR2 5207
[root@localhost conf]# netstat -tnlp | grep nginx
tcp 0 0 0.0.0.0:8088 0.0.0.0:* LISTEN 5207/nginx
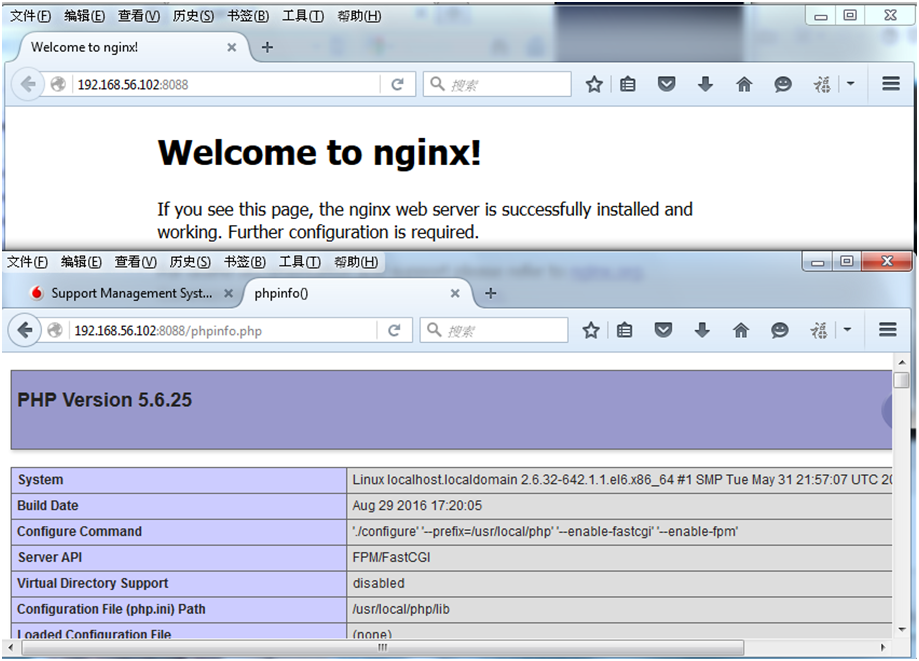
在网页上输入http://192.168.56.102:8088/phpinfo.php进行测试
####################################################################
附:Nginx的启动关闭和重启
nginx可以通过信号指令控制进程,常用的信号有:
QUIT:处理完当前请求后关闭进程
HUP:重新加载配置,也就是关闭原有的进程,开启新的进程,此操作不会中断用户的访问请求,所以又称为平滑重启nginx
USR1:用于nginx的日志切换,也就是重新打开一个日志文件,每天要生成一个新的日志文件时,可以使用该信号控制。
USR2:平滑升级可执行程序
WINCH :从容关闭工作进程
常用的方法控制有:
① kill –XXX主进程号
[root@localhost run]# ps -ef |grep nginx
root 2771 1 0 10:34 ? 00:00:00 nginx: master process/opt/nginx/sbin/nginx
503 2772 2771 010:34 ? 00:00:00 nginx: workerprocess
503 2773 2771 0 10:34 ? 00:00:00 nginx: worker process
503 2774 2771 0 10:34 ? 00:00:00 nginx: worker process
503 2775 2771 0 10:34 ? 00:00:00 nginx: worker process
root 3575 2730 0 12:08 pts/1 00:00:00 grep nginx
[root@localhost run]# kill -QUIT2771
[root@localhost run]# ps -ef |grep nginx
root 3578 2730 0 12:09 pts/1 00:00:00 grep nginx
[root@localhost run]# /opt/nginx/sbin/nginx
[root@localhost run]# ps -ef |grep nginx
root 3580 1 0 12:09 ? 00:00:00 nginx: master process/opt/nginx/sbin/nginx
503 3581 3580 0 12:09 ? 00:00:00 nginx: worker process
503 3582 3580 0 12:09 ? 00:00:00 nginx: worker process
503 3583 3580 0 12:09 ? 00:00:00 nginx: worker process
503 3584 3580 0 12:09 ? 00:00:00 nginx: worker process
root 3588 2730 0 12:10 pts/1 00:00:00 grep nginx
[root@localhost run]# kill -HUP3580
[root@localhost run]# ps -ef |grep nginx
root 3580 1 0 12:09 ? 00:00:00 nginx: master process/opt/nginx/sbin/nginx
503 3590 3580 0 12:10 ? 00:00:00 nginx: worker process
503 3591 3580 0 12:10 ? 00:00:00 nginx: worker process
503 3592 3580 0 12:10 ? 00:00:00 nginx: worker process
503 3593 3580 0 12:10 ? 00:00:00 nginx: worker process
root 3596 2730 0 12:10 pts/1 00:00:00 grep nginx
[root@localhost run]# kill -WINCH3580
[root@localhost run]# ps -ef |grep nginx
root 3580 1 0 12:09 ? 00:00:00 nginx: master process/opt/nginx/sbin/nginx
② kill -信号类型`cat /安装目录/logs/nginx.pid`
使用该方法时需要在nginx.conf配置了pid文件存放路径则该文件存放的就是Nginx主进程号,如果没指定则放在nginx的logs目录下。有了pid文件,我们就不用先查询Nginx的主进程号,而直接向Nginx发送信号了,命令如下:
kill -信号类型`cat /安装目录/logs/nginx.pid`
[root@localhost conf]# cd /opt/nginx/logs/
[root@localhost logs]# ls
access.log error.log nginx.pid
[root@localhost logs]# ps -ef |grep nginx
root 3580 1 0 12:09 ? 00:00:00 nginx: master process/opt/nginx/sbin/nginx
503 3680 3580 0 12:28 ? 00:00:00 nginx: worker process
503 3681 3580 0 12:28 ? 00:00:00 nginx: worker process
503 3682 3580 0 12:28 ? 00:00:00 nginx: worker process
503 3683 3580 0 12:28 ? 00:00:00 nginx: worker process
root 3687 2730 0 12:28 pts/1 00:00:00 grep nginx
[root@localhost logs]# kill -HUP`cat /opt/nginx/logs/nginx.pid`
[root@localhost logs]# ps -ef |grep nginx
root 3580 1 0 12:09 ? 00:00:00 nginx: master process/opt/nginx/sbin/nginx
503 3689 3580 0 12:28 ? 00:00:00 nginx: worker process
503 3690 3580 0 12:28 ? 00:00:00 nginx: worker process
503 3691 3580 0 12:28 ? 00:00:00 nginx: worker process
503 3692 3580 0 12:28 ? 00:00:00 nginx: worker process
root 3694 2730 0 12:28 pts/1 00:00:00 grep nginx
[root@localhost logs]#


 264
264


 被折叠的 条评论
为什么被折叠?
被折叠的 条评论
为什么被折叠?
 到【灌水乐园】发言


