iOS应用安全Part40:在Mac上测试APP

【说明】英文原文发表时间:2015.4.8,原文链接:点击这里 

本文中我们将学习如何在Mac电脑上直接测试APP。为什么不直接在iOS设备上测试呢?原因有很多,有时你可能并没有一个iOS越狱设备,但却想要得到APP中漏洞的POC。所以,这篇博文中我们将讨论在Mac上测试APP时能够做什么。为了在Mac上测试测试APP,首先需要在Mac上安装Xcode,然后我们会在iOS模拟器上运行APP。

从iTunes安装ipa文件到模拟器上

遗憾的是,并没办法直接实现从iTunes安装ipa文件到模拟器上,因为iTunes应用程序编译为ARM平台,而模拟器上运行的应用程序应该编译为x86/x64平台。所以,为了在Mac上正常测试任何APP,必须拥有APP的源代码,然后才能将其在模拟器上运行。

本文中作为例子,我们将对Damn Vulnerable iOS app进行测试。

分析本地数据存储

在对iOS应用进行渗透测试时,其中一个最重要的事情是检测不安全的本地数据存储漏洞。可以很容易地做到这一点,只需要查看Xcode在Mac上创建的该应用对应的文件夹。这个文件夹一般会在下面指定的位置:

iOS 8 – /Users/[username]/Library/Developer/CoreSimulator/Devices/[a unique number]/data/Containers/Data/Application/[another unique number]/

iOS 7 – /Users/[username]/Library/Application Support/iPhone Simulator/[ios version]/Applications/[a unique id]/

接下来就是,确保检查APP的这个文件夹,看看该文件夹下是否存储了任何敏感数据。

检查设备日志

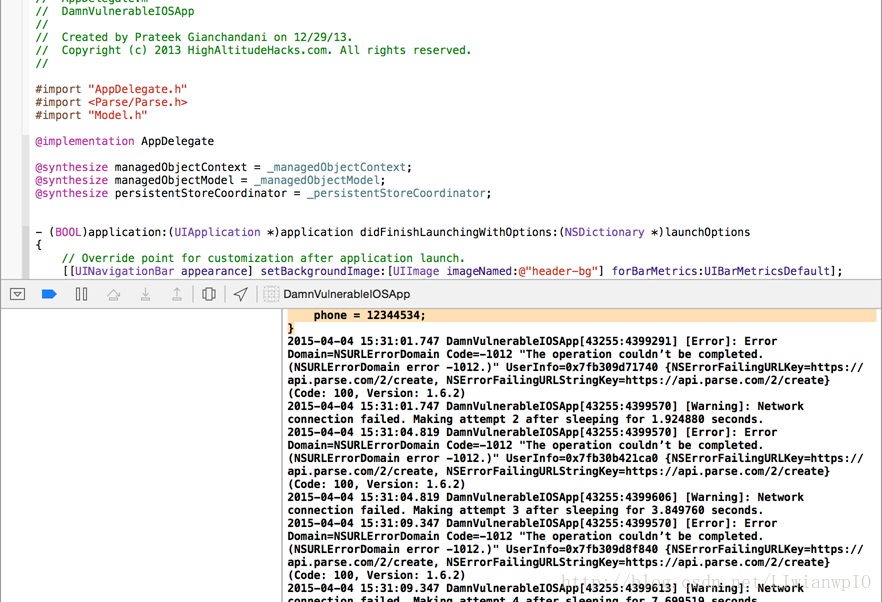
查看设备日志非常容易,只需要查看Xcode中的日志区域就行。例如,在下图中我们可以看到应用打印了敏感数据到设备上。然而,如果你看到了这种日志,那么不要过早断定它是一个漏洞。因为有些开发者会增加一个检测功能来检测应用是否运行在模拟器或真实iOS设备上,只有运行在模拟器上时才会打印日志信息。如果应用中并没有这个检测功能的话,那么可以确定这就是一个漏洞。


附加调试器并跟踪方法调用

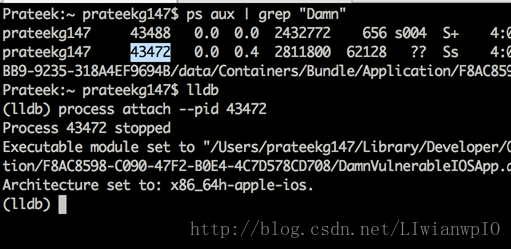
可以将调试器附加在模拟器中正在运行的应用程序上,最好是使用LLDB调试器,因为Xcode中内置了该工具。此时,模拟器中运行的iOS应用程序可以看作是Mac电脑上运行的一个进程,同时也可以用指令“ps aux”来查看该进程的信息。然后,通过使用该进程的pid或者进程名将调试器附加到该进程上面。


使用Xcode内置的调试器LLDB,就可以轻松地跟踪程序的方法调用。不过要做到这一点,需要在Xcode中添加一个符号断点。在左下角看到添加箭头,点击它就可以添加一个符号断点。


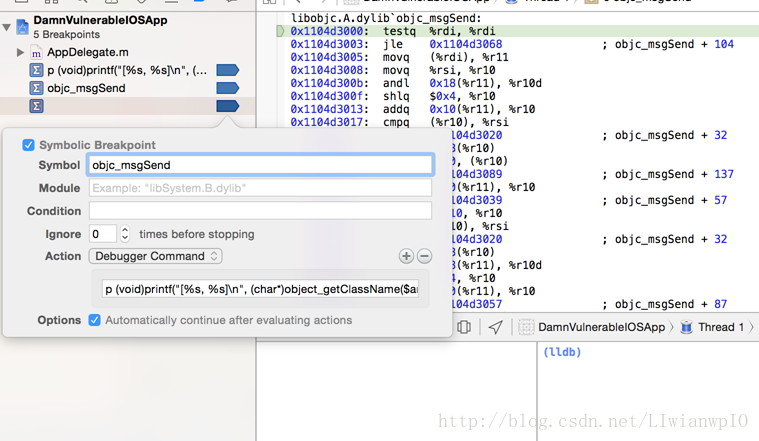
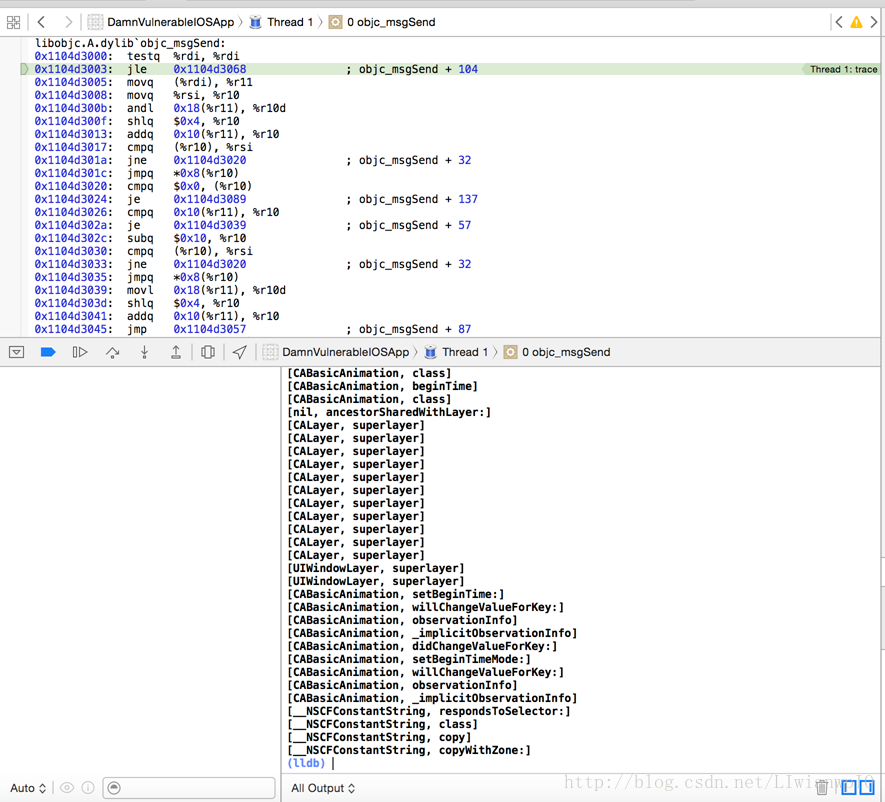
现在,为objc_msgSend调用设置一个断点。点击添加按钮并添加调试器指令“p (void)printf(“[%s, %s]\n”、(char*)object_getClassName($arg1), $arg2)”,并确保将选项设置为程序继续执行,然后就可以发现现在可以跟踪所有的方法调用了。


附加cycript

此外,你甚至可以将Cycript附加到模拟器中正在运行的应用程序,并演示漏洞的POC。Cycript同样可以在Mac上正常工作,而且跟在iOS设备上的使用方法一样。


监控网络流量

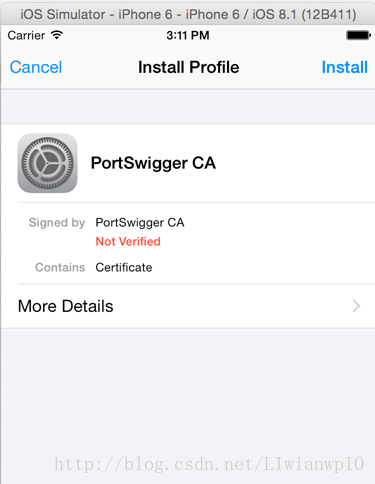
你几乎可以毫不费力地查看到通过HTTP/HTTPS协议的所以网络流量,要实现这一点既可以用Burpsuite也可以是Charles。对于HTTPS流量来说,你需要先在模拟器上安装SSL证书。安装证书也很简单,只需要将证书文件拖拽到模拟器上,然后点击安装该证书就可以。


本篇文章就到此结束,在下一篇文章中,我们将着手于使用调试器LLDB调试iOS应用程序。


  • 0
    点赞
  • 2
    收藏
    觉得还不错? 一键收藏
  • 0
    评论
This book is the complete guide to Apple's home automation technology, HomeKit. You’ll learn the HomeKit platform structure and how it supports devices―existing and planned―and you’ll get a thorough grounding on new and useful apps that deliver a new generation of home automation in a secure and innovative environment. Learn Apple HomeKit on the Mac and iOS shows you how to move to secure, home automation projects that integrate with your digital world automatically―after you set them up as described in the book. Having your calendar and appointments control your lights, locks, thermostat, and other home devices is the heart of home automation. In homes and small offices, you can banish notes taped to switches and controls that say, "Do not turn off this switch" or "Leave the thermostat alone." The book gets you up to speed on HomeKit, and it also answers some of the pesky questions, such as "What happens when the power goes out?" Along the way there are tips and suggestions for app developers, hardware manufacturers, interior designers, and real estate professionals. For programmers, there's an entire chapter (plus sections in other chapters) dedicated to the core coding issues. For non-programmers, this book is the perfect resource mastering the amazing potential of Apple HomeKit. With a knowledge of the framework, you can start from HomeKit and let your imagination run wild as you design compatible devices with unlimited capabilities. Go build your killer app, your game-changing product, or service! What You Will Learn For device developers, understanding the structure of HomeKit―homes, rooms, and accessories―enables you to build devices that are easily managed by a single, simple source and interface. For DIY home networking users will gain a thorough knowledge of how they can adapt HomeKit to their existing spaces. For programmers, there's an entire chapter plus sections in other chapters dedicated to the core coding issues you'll need to learn. For non-programmers, this book is your perfect resource for easily getting your mind around the amazing potential of Apple HomeKit. Author Jesse Feiler develops, consults, and writes about Apple technologies with an emphasis on mobile and location-based apps. Who This Book Is For Device developers, DIY home networking users, programmers, and those interested in integrating their iOS devices with their IoT devices. Table of Contents Chapter 1: Bringing Home Automation Home Chapter 2: Exploring the HomeKit World Chapter 3: Adding Scenes—The Practical Part of HomeKit Chapter 4: Exploring Your Development Environment Chapter 5: Working with HomeKit Accessories Chapter 6: Exploring the HomeKit World as a Developer, Designer, or Device Manufacturer Chapter 7: Dive into Accessories Chapter 8: Imaginative Opportunities: Events, Triggers, and Actions Chapter 9: Working with iCloud and Users with HomeKit
移动安全框架 (MobSF) 是一个智能化、一体化的开源移动应用(Android / iOS)自动测试框架,能够对以上两种移动应用进行静态和动态分析(动态分析目前暂时只支持Android)。它可以有效、快速地对应用APK 和IPA文件 及压缩的源代码进行审计分析。同时,MobSF 也能够通过其API Fuzzer功能模块,对 Web API 的安全性进行检测,如收集信息,分析安全头部信息,识别移动API 的具体漏洞,如XXE、SSRF、路径遍历,IDOR以及其他的与会话和API调用速率限制有关的逻辑问题。运行环境• Python 2.7,下载请点击:Python 2.7• Oracle JDK 1.7或以上版本,下载请点击:Oracle JDK;• Oracle VirtualBox 下载请点击: VirtualBox;• iOS IPA分析(需在 Mac系统上执行)所需命令行工具( Mac系统)下载请点击:Conmand-line tool;• 硬件配置:4GB 或以上内存,5G硬盘空间。安装该框架目前暂时只于Windows 7, 8, 8.1, 10, Ubuntu, OSX Mavericks等系统平台上进行测试。• Windows:解压MobSF压缩文件到C:\MobSF;• Mac:解压MobSF压缩文件到/Users/[username]/MobSF;• Linux:解压MobSF压缩文件到/home/[username]/MobSF。配置静态分析器通过pip安装MobSF Python 依赖包,以下为不同系统的命令执行操作,WindowsC:\Python27\Scripts\pip.exe install -r requirements.txt如果pip.exe在脚本目录中不可用,下载及重新安装最新版本的Python2.7。Unixpip install -r requirements.txt运行MobSFpython manage.py runserver如果需要在具体端口上运行,可以通过以下指令进行,python manage.py runserver port_number如果上述步骤都顺利正常执行的话,那么我们将会看到以下的输出内容,配置动态分析器配置MobSF VM 动态分析器目前只支持针对 Android APK文件进行分析,硬件环境要求为需要计算机拥有4GB 内存和支持完全虚拟化。首先,配置动态分析器我们需要获取以下4个方面的信息,(1)VM UUID(2)快照 UUID(3)主机/代理 IP(4)VM/设备 IP操作步骤1、打开VirtualBox(本文主要以VirtualBox为样例),选择文件->导入应用,并选中MobSF_VM_X.X.ova 文件(下载地址可于前文查看);2、在进行导入过程中,请勿更改任意配置,一切按照默认设置进入下一步;3、一旦OVA文件导入成功,我们将在VirtualBox上看到一个以MobSF_VM_X.X命名的新的条目;4、接下来右击MobSF VM,并选择设置一项,选中到网络选项卡,这里我们需要配置两个网络适配器;(1)适配器1 启用并于attached to 中,选择Host-only Adapter模式,重命名适配器名称,因为我们需要通过该名称来识别主机/代理 IP,配置如下图;(2)适配器2 启用并于attached to中,选择NAT模式,配置如下图。5、保存上述设置,便可启动MobSF VM。当该VM启动的时候,记下VM的 IP地址;6、一旦该虚机启动后,它会停留在一个锁屏状态上,而解锁密码默认为1234;7、获取 主机/代理 IP(1)Windows :在命令提示符中输入ipconfig,记下与适配器1 相同名称的适配器IP地址;(2)Unix :在命令提示符中输入ifconfig,记下与适配器1 相同名称的适配器IP地址;8、接着在MobSF 虚机中选中Wi-Fi设置,设置代理IP(上一步获取到的IP)和端口(1337);9、保存设置,并回到MobSF虚机的Home界面上,等待大约30秒的时间,之后保存好 MobSF虚机的快照;10、一旦快照保存好,右击MobSF虚机,选择“在Explorer中显示”或者“在 Finder中显示”;11、在任意编辑器中打开MobSF_VM_X.X.vbox文件(这里使用的是sublime),记下 VM UUID以及快照UUID;接下来,到了此时,我们已经有了如前文提到的,配置动态分析器所需要的信息,(1)VM UUID(2)快照 UUID(3)主机/代理 IP(4)VM/设备 IP12、接下来我们打开MobSF/settings.py文件,并将其中参数的值设置如下,(1)UUID = VM UUID(2) SUUID = Snapshot UUID(3)VM_IP = VM IP(4)PROXY_IP = Host/Proxy IP以下为配置样本,最后,我们重新再打开服务器即可运行。部分功能如下图静态分析Android APKiOS IPA动态分析Android APKWeb API Fuzzer介绍内容来自 FreeBuf黑客与极客 标签:MobSF

“相关推荐”对你有帮助么?

  • 非常没帮助
  • 没帮助
  • 一般
  • 有帮助
  • 非常有帮助
提交
评论
添加红包

请填写红包祝福语或标题

红包个数最小为10个

红包金额最低5元

当前余额3.43前往充值 >
需支付:10.00
成就一亿技术人!
领取后你会自动成为博主和红包主的粉丝 规则
hope_wisdom
发出的红包
实付
使用余额支付
点击重新获取
扫码支付
钱包余额 0

抵扣说明:

1.余额是钱包充值的虚拟货币,按照1:1的比例进行支付金额的抵扣。
2.余额无法直接购买下载,可以购买VIP、付费专栏及课程。

余额充值