


本篇博客仅作为个人学习笔记所用,各种Android常用属性归纳长期更新,如有错误和建议还望指点~
1.控件透明度和半透明度:
半透明<Button Android:background="#e0000000" ... />
透明<Button android:background="#00000000" ... />
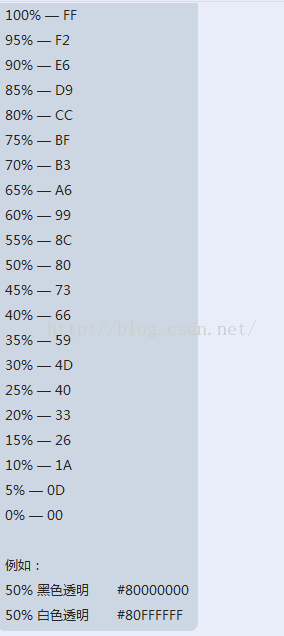
颜色和不透明度 (alpha) 值以十六进制表示法表示。任何一种颜色的值范围都是 0 到 255(00 到 ff)。对于 alpha,00 表示完全透明,ff 表示完全不透明。表达式顺序是“aabbggrr”,其中aa=alpha(00 到 ff);bb=blue(00 到 ff);gg=green(00 到 ff);rr=red(00 到 ff)。例如,如果您希望对某叠加层应用不透明度为 50% 的蓝色,则应指定以下值:7fff0000
View v = findViewById(R.id.content);//找到你要设透明背景的layout 的id
v.getBackground().setAlpha(100);//0~255透明度值 ,0为完全透明,255为不透明
如果美工给你标注透明度多少,此时你不知道怎么变成16进制,可以参考下面的图片,希望对你们有用
2.关于TextView、EditText属性设置
EditText:
解决Andriod软键盘出现把原来的布局给顶上去的方法:http://blog.csdn.net/xww810319/article/details/17397429
android:hint="请输入数字!"//设置显示在空间上的提示信息

android:numeric="integer"//设置只能输入整数,如果是小数则是:decimal

android:singleLine="true"//设置单行输入,一旦设置为true,则文字不会自动换行。

android:gray="top"//多行中指针在第一行第一位置et.setSelection(et.length());//调整光标到最后一行

android:autoText //自动拼写帮助

android:capitalize //首字母大写

android:digits //设置只接受某些数字

android:singleLine //是否单行或者多行,回车是离开文本框还是文本框增加新行

android:numeric //只接受数字

android:password //密码

android:phoneNumber // 输入电话号码

android:editable //是否可编辑

android:autoLink=”all” //设置文本超链接样式当点击网址时,跳向该网址

android:password="true"//设置只能输入密码

android:textColor ="#ff8c00"//字体颜色

android:textStyle="bold"//字体,bold,italic, bolditalic

android:textSize="20dip"//大小

android:capitalize ="characters"//以大写字母写

android:textAlign="center"//EditText没有这个属性,但TextView有

android:textColorHighlight="#cccccc"//被选中文字的底色,默认为蓝色

android:textColorHint="#ffff00"//设置提示信息文字的颜色,默认为灰色

android:textScaleX="1.5"//控制字与字之间的间距

android:typeface="monospace"//字型,normal,sans, serif, monospace

android:background="@null"//空间背景,这里没有,指透明

android:layout_weight="1"//权重在控制控  件显示的大小时蛮有用的。

android:textAppearance="?android:attr/textAppearanceLargeInverse"//文字外观,这里引用的是系统自带的一个外观,?表示系统是否有这种外观,否则使用默认的外观。
android:hint="请输入数字!"//设置显示在空间上的提示信息
android:numeric="integer"//设置只能输入整数,如果是小数则是:decimal
android:singleLine="true"//设置单行输入,一旦设置为true,则文字不会自动换行。
android:gray="top"//多行中指针在第一行第一位置et.setSelection(et.length());//调整光标到最后一行
android:autoText //自动拼写帮助
android:capitalize //首字母大写
android:digits //设置只接受某些数字
android:singleLine //是否单行或者多行,回车是离开文本框还是文本框增加新行
android:numeric //只接受数字
android:password //密码
android:phoneNumber // 输入电话号码
android:editable //是否可编辑
android:autoLink=”all” //设置文本超链接样式当点击网址时,跳向该网址
android:password="true"//设置只能输入密码
android:textColor ="#ff8c00"//字体颜色
android:textStyle="bold"//字体,bold,italic, bolditalic
android:textSize="20dip"//大小
android:capitalize ="characters"//以大写字母写
android:textAlign="center"//EditText没有这个属性,但TextView有
android:textColorHighlight="#cccccc"//被选中文字的底色,默认为蓝色
android:textColorHint="#ffff00"//设置提示信息文字的颜色,默认为灰色
android:textScaleX="1.5"//控制字与字之间的间距
android:typeface="monospace"//字型,normal,sans, serif, monospace
android:background="@null"//空间背景,这里没有,指透明
android:layout_weight="1"//权重在控制控 件显示的大小时蛮有用的。
android:textAppearance="?android:attr/textAppearanceLargeInverse"//文字外观,这里引用的是系统自带的一个外观,?表示系统是否有这种外观,否则使用默认的外观。(1)Android系统中TextView默认行间距比较窄,不美观。
我们可以设置每行的行间距,可以通过属性android:lineSpacingExtra或android:lineSpacingMultiplier来做。
在你要设置的TextView中加入如下代码:
(1)android:lineSpacingExtra 设置行间距,如”8dp”。
(2)android:lineSpacingMultiplier 设置行间距的倍数,如”1.5″。
(2) TextView在代码中如果要修改drawableRight设置的图片可以使 用setCompoundDrawables(Drawable left,Drawable top,Drawable right,Drawable bottom)
Drawable可以通过 Drawable nav_up=getResources().getDrawable(R.drawable.button_nav_up);得到
但是API提示,setCompoundDrawables() 调用的时候,Drawable对象必须调用setBounds(int left, int top, int right, int bottom)方法,于是我们 加一行代码就可以了
代码合在一起是这样的:(3) 通过textColorHint设置edittext提示信息的颜色
在android的输入框里,如果要修改光标的颜色及粗细步骤如下两步即可搞定:
1.在资源文件drawable下新建一个光标控制color_cursor.xml
<?xml version="1.0" encoding="utf-8"?>
<shape xmlns:android="http://schemas.android.com/apk/res/android" android:shape="rectangle">
    <size android:width="1dp" />
    <solid android:color="#008000"  />
</shape>
3.关于ListView属性设置
(1)设置ListView分割线:dividerHight / divider
(2)设置ListView不要右边指示线:android:scrollbars="none"
listview分割线会在头部、数据item、及根部的底部打印,如果要取消头部分割线必须
先设置期方法
addHeaderView(headView, null, true);
addFooterView(footView, null, true);
注意:第三个参数必须为true,否则无效
//显示头部出现分割线
listview.setHeaderDividersEnabled(true);
//禁止底部出现分割线
listview.setFooterDividersEnabled(false);
Android:headerDividersEnabled="true"
android:footerDividersEnabled="false"
(4)任意加头去头,加脚去脚。
我们知道ListView在setAdapter之后再调用addHeader方法会抛出异常,而加脚有时管用,有时不管用。Android开发文档中也明确指出ListView在setAdapter之后不应该再进行setHeader和setFooter方法。这明显不能满足我们的实际需求。
我的解决方案是:在setAdapter之前给ListView先加上一个空头布局和空脚布局,布局高度设为wrap_content,这样当头或脚布局中没有任何组件时,头和脚是看不到的。当需要显示头和脚时,直接向头和脚布局中添加要显示的组件即可。即设置 组件.setVisibility(View.VISIBLE);或者组件.setVisibility(View.GONE);即可
(5)listview滑动监听。
      //listview滑动监听
	mainListView.setOnScrollListener(new OnScrollListener() {

		@Override
		public void onScrollStateChanged(AbsListView view, int scrollState) {
				switch (scrollState) {
	            case OnScrollListener.SCROLL_STATE_IDLE: //停止
	                break;
	            case OnScrollListener.SCROLL_STATE_TOUCH_SCROLL://正在滑动
	                break;
	            case OnScrollListener.SCROLL_STATE_FLING://开始滚动
	                break;
	            }
			}

			@Override
			public void onScroll(AbsListView view, int firstVisibleItem, int visibleItemCount, int totalItemCount) {
			}
});在xml文件里面写死
<ExpandableListView
Android:id="@+id/myExpandableListView"
android:layout_width="fill_parent"
android:layout_height="fill_parent"
android:background="#ffffff"
android:groupIndicator="@null" //去掉图标
android:cacheColorHint="#00000000" //解决点击或者下来背景变黑的问题
android:listSelector="#00000000" >
</ExpandableListView>
在程序里面动态改变
ExpandableListView expandListView = (ExpandableListView) findViewById(R.id.list);
//设置 属性 GroupIndicator 去掉默认向下的箭头
expandListView.setGroupIndicator(null);
ExpandableListView去掉里头的分割线代码:
expandableList.setDivider(null);
xml:
Android:divider="@null"
或者
设置driverHeight="0dip"或者driver="透明的图片",这是设置第一级菜单的分割线的,二级菜单ChildDriver="0dip"
4.关于其他功能属性设置
(1)xml中引入一个布局:
      <include
        android:id="@+id/layout_float"
        layout="@layout/layout_usercenter_floathead"
        android:layout_width="match_parent"
        android:layout_height="<span style="font-family: Arial, Helvetica, sans-serif;">match_parent</span><span style="font-family: Arial, Helvetica, sans-serif;">"</span>/>
(2)drawable属性:
①设置控件选中时和默认时的图片变化
<selector xmlns:android="http://schemas.android.com/apk/res/android" android:exitFadeDuration="@android:integer/config_shortAnimTime">

    <item android:state_pressed="true" android:drawable="@color/background_tab_pressed" />
    <item android:state_focused="true" android:drawable="@color/background_tab_pressed"/>
    <item android:drawable="@android:color/transparent"/>

</selector><selector xmlns:android="http://schemas.android.com/apk/res/android">
<item android:state_checked="true" android:drawable="@drawable/corner_s"></item>
<item android:state_checked="false" android:drawable="@drawable/corner_n"></item>
</selector><selector xmlns:android="http://schemas.android.com/apk/res/android" >
<item android:state_checked="true" android:color="#af0000"/>
<item android:state_checked="false" android:color="#333333"/>
</selector><shape xmlns:android="http://schemas.android.com/apk/res/android" >
<corners android:radius="20dp"/>
<solid android:color="#ffffff"/>
<stroke android:width="0.5dip" android:color="@color/color_d9" />
</shape>设置虚线:
其中,破折线的宽度为dashWith,破折线之间的空隙的宽度为dashGap,当dashGap=0dp时,为实线设置圆角:
设置渐变填充和四个圆角半径:设置渐变点击效果:
5.Android布局自定义Shap圆形ImageView,可以单独设置背景与图片
一、图片预览:

一、实现功能:
需求要实现布局中为圆形图片,图片背景与图标分开且合并到一个ImageView。
二、具体实现:
XML中布局中定义ImageView,关健设置两个参数 Android:backgroup(设置背景),Android:src(设置ImageVIew中图片),圆形图片制作Drawable下定义xml shap样式(solid-color,size-width\hight)
XML代码如下:
<ImageView
  android:id="@+id/zhongjie"
  android:layout_width="wrap_content"
  android:layout_height="wrap_content"
  android:background="@drawable/popwindow_zhongjie"
  android:scaleType="centerInside"
  android:src="@drawable/mark_caller_house_agent" />
Drawable-样式xml如下:
<?xml version="1.0" encoding="utf-8"?>
<shape
  xmlns:android="http://schemas.android.com/apk/res/android"
  android:shape="oval"
  android:useLevel="false">
  <solid android:color="#66CC00"/>
  <size android:width="50dp"
      android:height="50dp"/>
</shape>
6.android获取设备屏幕大小的方法
                // 获取屏幕的默认分辨率
		Display display = getWindowManager().getDefaultDisplay();
		tv1.setText(display.getWidth() + "");
		tv2.setText(display.getHeight() + "");

		// 通过WindowManager获取屏幕的大小
		DisplayMetrics dm = new DisplayMetrics();
		getWindowManager().getDefaultDisplay().getMetrics(dm);
		tv3.setText("width : " + dm.widthPixels);
		tv4.setText("heigth : " + dm.heightPixels);


		// 通过Resources获取获取屏幕的大小
		DisplayMetrics dm2 = getResources().getDisplayMetrics();
		tv5.setText("width2 : " + dm2.widthPixels);
		tv6.setText("heigth2 : " + dm2.heightPixels);
7.ImageView描边
drawable属性:<?xml version="1.0" encoding="utf-8"?>
<shape xmlns:android="http://schemas.android.com/apk/res/android"
android:shape="oval"
android:useLevel="false" >
<solid android:color="@color/color_bg_eee"/>
<size android:width="27dp"
android:height="27dp"/>
</shape>xml:
<ImageView
            android:id="@+id/img_shuju_country"
            android:layout_width="27dp"
            android:layout_height="27dp"
            android:padding="1px"
            android:background="@drawable/shape_calendar_fragment_coutry_bg"
            android:scaleType="centerInside"
            android:src="@drawable/usa"
            android:layout_marginTop="7dp"
            android:layout_gravity="center_horizontal" />
8.ScrollView
9.几个经常用到的字符串的截取
string str="123abc456";
int i=3;
1 取字符串的前i个字符
str=str.Substring(0,i); // or str=str.Remove(i,str.Length-i);
2 去掉字符串的前i个字符:
str=str.Remove(0,i); // or str=str.Substring(i);
3 从右边开始取i个字符:
str=str.Substring(str.Length-i); // or str=str.Remove(0,str.Length-i);
4 从右边开始去掉i个字符:
str=str.Substring(0,str.Length-i); // or str=str.Remove(str.Length-i,i);
5 判断字符串中是否有"abc" 有则去掉之
using System.Text.RegularExpressions;
string str = "123abc456";
string a="abc";
Regex r = new Regex(a);
Match m = r.Match(str);
if (m.Success)
{
//绿色部分与紫色部分取一种即可。
str=str.Replace(a,"");
Response.Write(str);
string str1,str2;
str1=str.Substring(0,m.Index);
str2=str.Substring(m.Index+a.Length,str.Length-a.Length-m.Index);
Response.Write(str1+str2);
}
6 如果字符串中有"abc"则替换成"ABC"
str=str.Replace("abc","ABC");
7.截取字符串
String str="asadsf shjasdhx";
String[] split = str.split(" ");
BUG:Java.util.regex.PatternSyntaxException: Syntax error U_REGEX_RULE_SYNTAX near index 1
str = bundle.getString("location").split("+");
改为
str = bundle.getString("location").split("\\+");
或者
str = bundle.getString("location").split("[+]");
8.获取字符串资源
this.getResources().getString(R.string.setIP)
1、使用subString的方法去删除
- private static void method02() {
- String[] str = { "3", "4", "5" };
- StringBuilder sb = new StringBuilder();
- if (str != null && str.length > 0) {
- for (String s : str) {
- sb.append(s + ","); //循环遍历数组中元素,添加到 StringBuilder 对象中
- }
- }
- if (sb.length() > 0)
- sb.deleteCharAt(sb.length() - 1); //调用 字符串的deleteCharAt() 方法,删除最后一个多余的逗号
- System.out.println(sb.toString());
- }
2、使用substring截取字符串
for (int t = 0; t < memberLen; t++) {
memTemp = stafferMap.get(strMember[t]);
if(memTemp != null){
memberNames += memTemp + ",";
}
}
以上的代码,拼接的字符串会多一个“,”,比如:"str1,str2,str3,",要去除str3后的逗号,可用如下方法:
memberNames = memberNames.substring(0,memberNames.length()-1);
比如当Team1=test ', 'U1-Team ', 'V-Team ', '时
如何改成:
Team1= 'test ', 'U1-Team ', 'V-Team '
可用:
Team1 = " ' " + Team1.Substring(0, Team1.Length - 2);
2、
- private static void method02() {
- String[] str = { "3", "4", "5" };
- StringBuilder sb = new StringBuilder();
- if (str != null && str.length > 0) {
- for (String s : str) {
- sb.append(s + ","); //循环遍历数组中元素,添加到 StringBuilder 对象中
- }
- }
- if (sb.length() > 0)
- sb.deleteCharAt(sb.length() - 1); //调用 字符串的deleteCharAt() 方法,删除最后一个多余的逗号
- System.out.println(sb.toString());
- }
9.解决ScrollView会自动滑动到非顶部bug
//解决ScrollView会自动滑动到非顶部bug
img_comments_ad.setFocusable(true);
img_comments_ad.setFocusableInTouchMode(true);
img_comments_ad.requestFocus();
10.判断网络是否连接
public class ConnectionUtils {
	public static boolean isWIFI(Context context){
		if (isConnected(context))
		{
			ConnectivityManager cm = (ConnectivityManager) context.getSystemService(Context.CONNECTIVITY_SERVICE);
			NetworkInfo info = cm.getActiveNetworkInfo();
			int type = info.getType();
			if (ConnectivityManager.TYPE_WIFI == type)
			{
				return true;
			}
		}
		return false;
	}
	public static boolean isMobile(Context context){
		if (isConnected(context))
		{
			ConnectivityManager cm = (ConnectivityManager) context.getSystemService(Context.CONNECTIVITY_SERVICE);
			NetworkInfo info = cm.getActiveNetworkInfo();
			int type = info.getType();
			if (ConnectivityManager.TYPE_MOBILE == type)
			{
				return true;
			}
		}
		return false;
	}

	public static boolean isConnected(Context context){
		ConnectivityManager cm = (ConnectivityManager) context.getSystemService(Context.CONNECTIVITY_SERVICE);
		NetworkInfo info = cm.getActiveNetworkInfo();
		if (info == null){
			return false;
		}
		boolean available = info.isAvailable();
		return available;
	}
}if (!ConnectionUtils.isConnected(getContext()))
{ //网络无连接状态
}else{//网络连接状态
}11.获取当前时间
SimpleDateFormat format = new SimpleDateFormat("yyyy-MM-dd");
Date curDate = new Date(System.currentTimeMillis());//获取当前时间
String currenTime = format.format(curDate);
clickDay = Integer.parseInt(currenTime.split("-")[2]);//String转成int当前日期
Calendar c = Calendar.getInstance();
String mWeek = String.valueOf(c.get(Calendar.DAY_OF_WEEK));//获取周
if ("1".equals(mWeek)) {
mWeek = "日";
} else if ("2".equals(mWeek)) {
mWeek = "一";
} else if ("3".equals(mWeek)) {
mWeek = "二";
} else if ("4".equals(mWeek)) {
mWeek = "三";
} else if ("5".equals(mWeek)) {
mWeek = "四";
} else if ("6".equals(mWeek)) {
mWeek = "五";
} else if ("7".equals(mWeek)) {
mWeek = "六";
}12.动态添加布局、动态设置relativelayout布局高度
LinearLayout ll = (LinearLayout) findViewById(R.id.ll);
LayoutInflater inflater = getLayoutInflater();
View child = inflater.inflate(R.layout.layout_add, null);
ll.addView(child);RelativeLayout.LayoutParams linearParams = (RelativeLayout.LayoutParams)rl_downup_all.getLayoutParams();
linearParams.height = 800;
rl_downup_all.setLayoutParams(linearParams);2、 动态的获取和设置ImageView的宽度和高度
LayoutParams para;
        para = image.getLayoutParams();

        Log.d(TAG, "layout height0: " + para.height);
        Log.d(TAG, "layout width0: " + para.width);

        para.height = 300;
        para.width = 300;
        image.setLayoutParams(para);

        Log.d(TAG, "layout height: " + para.height);
        Log.d(TAG, "layout width: " + para.width);
13.代码调用value色值
tv_header_title.setTextColor(getResources().getColor(R.color.common_bg_color));<color name="white">#ffffff</color><!--白色 -->
<color name="ivory">#fffff0</color><!--象牙色 -->
<color name="lightyellow">#ffffe0</color><!--亮黄色 -->
<color name="yellow">#ffff00</color><!--黄色 -->
<color name="snow">#fffafa</color><!--雪白色 -->
<color name="floralwhite">#fffaf0</color><!--花白色 -->
<color name="lemonchiffon">#fffacd</color><!--柠檬绸色 -->
<color name="cornsilk">#fff8dc</color><!--米绸色 -->
<color name="seaShell">#fff5ee</color><!--海贝色 -->
<color name="lavenderblush">#fff0f5</color><!--淡紫红 -->
<color name="papayawhip">#ffefd5</color><!--番木色 -->
<color name="blanchedalmond">#ffebcd</color><!--白杏色 -->
<color name="mistyrose">#ffe4e1</color><!--浅玫瑰色 -->
<color name="bisque">#ffe4c4</color><!--桔黄色 -->
<color name="moccasin">#ffe4b5</color><!--鹿皮色 -->
<color name="navajowhite">#ffdead</color><!--纳瓦白 -->
<color name="peachpuff">#ffdab9</color><!--桃色 -->
<color name="gold">#ffd700</color><!--金色 -->
<color name="pink">#ffc0cb</color><!--粉红色 -->
<color name="lightpink">#ffb6c1</color><!--亮粉红色 -->
<color name="orange">#ffa500</color><!--橙色 -->
<color name="lightsalmon">#ffa07a</color><!--亮肉色 -->
<color name="darkorange">#ff8c00</color><!--暗桔黄色 -->
<color name="coral">#ff7f50</color><!--珊瑚色 -->
<color name="hotpink">#ff69b4</color><!--热粉红色 -->
<color name="tomato">#ff6347</color><!--西红柿色 -->
<color name="orangered">#ff4500</color><!--红橙色 -->
<color name="deeppink">#ff1493</color><!--深粉红色 -->
<color name="fuchsia">#ff00ff</color><!--紫红色 -->
<color name="magenta">#ff00ff</color><!--红紫色 -->
<color name="red">#ff0000</color><!--红色 -->
<color name="oldlace">#fdf5e6</color><!--老花色 -->
<color name="lightgoldenrodyellow">#fafad2</color><!--亮金黄色 -->
<color name="linen">#faf0e6</color><!--亚麻色 -->
<color name="antiquewhite">#faebd7</color><!--古董白 -->
<color name="salmon">#fa8072</color><!--鲜肉色 -->
<color name="ghostwhite">#f8f8ff</color><!--幽灵白 -->
<color name="mintcream">#f5fffa</color><!--薄荷色 -->
<color name="whitesmoke">#f5f5f5</color><!--烟白色 -->
<color name="beige">#f5f5dc</color><!--米色 -->
<color name="wheat">#f5deb3</color><!--浅黄色 -->
<color name="sandybrown">#f4a460</color><!--沙褐色 -->
<color name="azure">#f0ffff</color><!--天蓝色 -->
<color name="honeydew">#f0fff0</color><!--蜜色 -->
<color name="aliceblue">#f0f8ff</color><!--艾利斯兰 -->
<color name="khaki">#f0e68c</color><!--黄褐色 -->
<color name="lightcoral">#f08080</color><!--亮珊瑚色 -->
<color name="palegoldenrod">#eee8aa</color><!--苍麒麟色 -->
<color name="violet">#ee82ee</color><!--紫罗兰色 -->
<color name="darksalmon">#e9967a</color><!--暗肉色 -->
<color name="lavender">#e6e6fa</color><!--淡紫色 -->
<color name="lightcyan">#e0ffff</color><!--亮青色 -->
<color name="burlywood">#deb887</color><!--实木色 -->
<color name="plum">#dda0dd</color><!--洋李色 -->
<color name="gainsboro">#dcdcdc</color><!--淡灰色 -->
<color name="crimson">#dc143c</color><!--暗深红色 -->
<color name="palevioletred">#db7093</color><!--苍紫罗兰色 -->
<color name="goldenrod">#daa520</color><!--金麒麟色 -->
<color name="orchid">#da70d6</color><!--淡紫色 -->
<color name="thistle">#d8bfd8</color><!--蓟色 -->
<color name="lightgray">#d3d3d3</color><!--亮灰色 -->
<color name="lightgrey">#d3d3d3</color><!--亮灰色 -->
<color name="tan">#d2b48c</color><!--茶色 -->
<color name="chocolate">#d2691e</color><!--巧可力色 -->
<color name="peru">#cd853f</color><!--秘鲁色 -->
<color name="indianred">#cd5c5c</color><!--印第安红 -->
<color name="mediumvioletred">#c71585</color><!--中紫罗兰色 -->
<color name="silver">#c0c0c0</color><!--银色 -->
<color name="darkkhaki">#bdb76b</color><!--暗黄褐色 -->
<color name="rosybrown">#bc8f8f</color><!--褐玫瑰红 -->
<color name="mediumorchid">#ba55d3</color><!--中粉紫色 -->
<color name="darkgoldenrod">#b8860b</color><!--暗金黄色 -->
<color name="firebrick">#b22222</color><!--火砖色 -->
<color name="powderblue">#b0e0e6</color><!--粉蓝色 -->
<color name="lightsteelblue">#b0c4de</color><!--亮钢兰色 -->
<color name="paleturquoise">#afeeee</color><!--苍宝石绿 -->
<color name="greenyellow">#adff2f</color><!--黄绿色 -->
<color name="lightblue">#add8e6</color><!--亮蓝色 -->
<color name="darkgray">#a9a9a9</color><!--暗灰色 -->
<color name="darkgrey">#a9a9a9</color><!--暗灰色 -->
<color name="brown">#a52a2a</color><!--褐色 -->
<color name="sienna">#a0522d</color><!--赭色 -->
<color name="darkorchid">#9932cc</color><!--暗紫色 -->
<color name="palegreen">#98fb98</color><!--苍绿色 -->
<color name="darkviolet">#9400d3</color><!--暗紫罗兰色 -->
<color name="mediumpurple">#9370db</color><!--中紫色 -->
<color name="lightgreen">#90ee90</color><!--亮绿色 -->
<color name="darkseagreen">#8fbc8f</color><!--暗海兰色 -->
<color name="saddlebrown">#8b4513</color><!--重褐色 -->
<color name="darkmagenta">#8b008b</color><!--暗洋红 -->
<color name="darkred">#8b0000</color><!--暗红色 -->
<color name="blueviolet">#8a2be2</color><!--紫罗兰蓝色 -->
<color name="lightskyblue">#87cefa</color><!--亮天蓝色 -->
<color name="skyblue">#87ceeb</color><!--天蓝色 -->
<color name="gray">#808080</color><!--灰色 -->
<color name="grey">#808080</color><!--灰色 -->
<color name="olive">#808000</color><!--橄榄色 -->
<color name="purple">#800080</color><!--紫色 -->
<color name="maroon">#800000</color><!--粟色 -->
<color name="aquamarine">#7fffd4</color><!--碧绿色 -->
<color name="chartreuse">#7fff00</color><!--黄绿色 -->
<color name="lawngreen">#7cfc00</color><!--草绿色 -->
<color name="mediumslateblue">#7b68ee</color><!--中暗蓝色 -->
<color name="lightslategray">#778899</color><!--亮蓝灰 -->
<color name="lightslategrey">#778899</color><!--亮蓝灰 -->
<color name="slategray">#708090</color><!--灰石色 -->
<color name="slategrey">#708090</color><!--灰石色 -->
<color name="olivedrab">#6b8e23</color><!--深绿褐色 -->
<color name="slateblue">#6a5acd</color><!--石蓝色 -->
<color name="dimgray">#696969</color><!--暗灰色 -->
<color name="dimgrey">#696969</color><!--暗灰色 -->
<color name="mediumaquamarine">#66cdaa</color><!--中绿色 -->
<color name="cornflowerblue">#6495ed</color><!--菊兰色 -->
<color name="cadetblue">#5f9ea0</color><!--军兰色 -->
<color name="darkolivegreen">#556b2f</color><!--暗橄榄绿 -->
<color name="indigo">#4b0082</color><!--靛青色 -->
<color name="mediumturquoise">#48d1cc</color><!--中绿宝石 -->
<color name="darkslateblue">#483d8b</color><!--暗灰蓝色 -->
<color name="steelblue">#4682b4</color><!--钢兰色 -->
<color name="royalblue">#4169e1</color><!--皇家蓝 -->
<color name="turquoise">#40e0d0</color><!--青绿色 -->
<color name="mediumseagreen">#3cb371</color><!--中海蓝 -->
<color name="limegreen">#32cd32</color><!--橙绿色 -->
<color name="darkslategray">#2f4f4f</color><!--暗瓦灰色 -->
<color name="darkslategrey">#2f4f4f</color><!--暗瓦灰色 -->
<color name="seagreen">#2e8b57</color><!--海绿色 -->
<color name="forestgreen">#228b22</color><!--森林绿 -->
<color name="lightseagreen">#20b2aa</color><!--亮海蓝色 -->
<color name="dodgerblue">#1e90ff</color><!--闪兰色 -->
<color name="midnightblue">#191970</color><!--中灰兰色 -->
<color name="aqua">#00ffff</color><!--浅绿色 -->
<color name="cyan">#00ffff</color><!--青色 -->
<color name="springgreen">#00ff7f</color><!--春绿色 -->
<color name="lime">#00ff00</color><!--酸橙色 -->
<color name="mediumspringgreen">#00fa9a</color><!--中春绿色 -->
<color name="darkturquoise">#00ced1</color><!--暗宝石绿 -->
<color name="deepskyblue">#00bfff</color><!--深天蓝色 -->
<color name="darkcyan">#008b8b</color><!--暗青色 -->
<color name="teal">#008080</color><!--水鸭色 -->
<color name="green">#008000</color><!--绿色 -->
<color name="darkgreen">#006400</color><!--暗绿色 -->
<color name="blue">#0000ff</color><!--蓝色 -->
<color name="mediumblue">#0000cd</color><!--中兰色 -->
<color name="darkblue">#00008b</color><!--暗蓝色 -->
<color name="navy">#000080</color><!--海军色 -->
<color name="black">#000000</color><!--黑色 -->
<color name="transparent">#0000</color><!-- 透明 -->
<color name="transparent2">#8000</color><!-- 透明 -->软键盘顶住:xml清单配置这句话即可
Androidmanifest的activity设置成
- android:windowSoftInputMode="stateAlwaysHidden|adjustResize"
     /*
     * 将时间转换为时间戳
     */
    public static String dateToStamp(String s) throws ParseException{
        String res;
        SimpleDateFormat simpleDateFormat = new SimpleDateFormat("yyyy-MM-dd HH:mm:ss");
        Date date = simpleDateFormat.parse(s);
        long ts = date.getTime();
        res = String.valueOf(ts);
        return res;
} /*
* 将时间戳转换为时间
*/
public static String stampToDate(String s){
String res;
SimpleDateFormat simpleDateFormat = new SimpleDateFormat("yyyy-MM-dd HH:mm:ss");
long lt = new Long(s);
Date date = new Date(lt);
res = simpleDateFormat.format(date);
return res;
}BaseActivity.java中打印log知晓当前开启的是哪一个活动:
<?xml version="1.0" encoding="UTF-8"?>
<shape xmlns:android="http://schemas.android.com/apk/res/android"
    android:shape="rectangle" >
    <!-- 填充的颜色 -->
    <solid android:color="#ff000000" />
    <!-- 设置矩形的四个角为弧形 -->
    <!-- android:radius 弧形的半径 -->
    <corners android:radius="7dip" />
</shape>
layout中给button加上background属性
Android:background="@drawable/round_corner_bg"
1.RadioButton
去掉默认的圆圈样式:mButtonleft.setButtonDrawable(Android.R.color.transparent);
在xml内:android:button="@null";
2. 获取windowmager的方法:
WindowManager m = (WindowManager) getView().getContext().getSystemService(getView().getContext().WINDOW_SERVICE);
3.如果view包含parent的情况下不能添加进去到布局里面,先获取view的parent再移除:
ViewGroup g=(ViewGroup) v.getParent();g.removeView(v);;
4. 同一个view只能addview一次到布局里面,否则报已经有parent 的错误。
5. 用代码控制view 与其他view的距离
View.setTranslationX //Sets the horizontal location of this view relative to its left position
6.设置背景为透明:颜色设置为#00000000;
7.measure
只有View类中才有这个方法,也就是说所有的View,像LinearLayout、Button这些控件的measure方法都是从View继承的,onMeasure方法才是真正的测量控件大小的方法,是由View的子类实现的,onMeasure是在measure方法中调用的
8.内存
栈内存一般用于存储基本类型数据以及对象的引用,堆内存一般存储对象的本体。栈的速度比较快,是快速存储。栈有一个很重要的特殊性,就是存在栈中的数据可以共享。比如int a=3; 首先它会在栈中创建一个变量为a的引用,然后查找有没有字面值为3的地址,没找到,就开辟一个存放3这个字面值的地址,然后将a指向3的地址。记住只要是用new()来新建对象的,都会在堆中创建,而且其字符串是单独存值的,即使与栈中的数据相同,也不会与栈中的数据共享。所以 String str = " abc" ;很有可能只是指向共享的数据而没有创建新对象,而已new String("abc");就一定会创建新对象,而且是在堆里面创建对象
使用String str = " abc" ;的方式,可以在一定程度上提高程序的运行速度,因为JVM会自动根据栈中数据的实际情况来决定是否有必要创建新对象。而对于String str = new String(" abc" );的代码,则一概在堆中创建新对象,而不管其字符串值是否相等,是否有必要创建新对象,从而加重了程序的负担。
9.比较
当比较包装类里面的数值是否相等时,用equals()方法;当测试两个包装类的引用是否指向同一个对象时,用==。
1.基本数据类型,也称原始数据类型。byte,short,char,int,long,float,double,boolean
他们之间的比较,应用双等号(==),比较的是他们的值。2.复合数据类型(类)
当他们用(==)进行比较的时候,比较的是他们在内存中的存放地址,所以,除非是同一个new出来的对象,他们的比较后 的结果为true,否则比较后结果为false。 Java当中所有的类都是继承于Object这个基类的,在Object中的基类中定义了 一个equals的方法,这个方法的初始行为是比较对象的内存地 址,但在一些类库当中这个方法被覆盖掉了,如String,Integer,Date在这些类当中equals有其自身的实现,而不再是比较类在堆内存中的存放地址了。
10.退出activity
退出时不把Activity杀死,下次进来还是会加载原来那个Activity而不会重新加载。
11.一键清理后静态变量会初始化。
12.Imageview 加载帧动画
13.代码控制View之间的间距;
14.RadioButton
设置layoutParam 使用radiogroup
15.获取屏幕大小的方法,得到一个屏幕尺寸的三种方法如下:
// 通过WindowManager获取
DisplayMetrics dm = new DisplayMetrics();
getWindowManager().getDefaultDisplay().getMetrics(dm);
// 通过Resources获取
DisplayMetrics dm2 = getResources().getDisplayMetrics();
// 获取屏幕的默认分辨率
Display display = getWindowManager().getDefaultDisplay();
System.out.println("width-display :" + display.getWidth());
System.out.println("heigth-display :" + display.getHeight());
得到一个屏幕尺寸的三种方法如下:
// 通过WindowManager获取
DisplayMetrics dm = new DisplayMetrics();
getWindowManager().getDefaultDisplay().getMetrics(dm);
// 通过Resources获取
DisplayMetrics dm2 = getResources().getDisplayMetrics();
// 获取屏幕的默认分辨率
Display display = getWindowManager().getDefaultDisplay();
System.out.println("width-display :" + display.getWidth());
System.out.println("heigth-display :" + display.getHeight());
在安卓4.2系统中,使用方法一得到了正确的屏幕尺寸值,而使用方法二和三得到的值全部为零。原因不祥。其中方法三中的display.getWidth()和display.getHeight()已被弃用。
DisplayMetrics dm = new DisplayMetrics();
getWindowManager().getDefaultDisplay().getMetrics(dm);//display = getWindowManager().getDefaultDisplay(); display.getMetrics(dm)(把屏幕尺寸信息赋值给DisplayMetrics dm);
width = dm.widthPixels;
height = dm.heightPixels;
xdpi = dm.xdpi;
ydpi = dm.ydpi;
density = dm.densityDpi;
fdensity = dm.density;
查询log,得到各值如下:
D/Lichking(22643): -----------widthpixels---540
D/Lichking(22643): -----------heightpixels---960
D/Lichking(22643): -----------xdpi---244.92857
D/Lichking(22643): -----------ydpi---246.30302
D/Lichking(22643): -----------density---240
D/Lichking(22643): -----------fdensity---1.5
另提一点,我们通常所指的屏幕上的int尺寸是像素单位,比如我用getHitRect()得到控件的矩形坐标的值即使和像素尺寸相匹配的。
DisplayMetrics和Display的关系。
Display指代显示区域这个对象,它可能是真实的物理屏幕,也可能仅指应用程序的显示区域,比如在非全屏Activity里,系统因为有状态栏,因此显示区域要比物理屏幕要小。DisplayMetrics里封装了显示区域的各种属性值。查看源码发现,在DisplayMetrics对各个属性值的注释都说明为真实的物理尺寸。而且也发现display.getMetrics(dm)这一函数基本在应用在获取真实屏幕尺寸的时候。记住这一点即好。
另外xdpi不是指屏幕宽度上以dp为单位的大小。以dp为单位的屏幕宽度需用计算公式:dpWidth = WidthPixels / fdensity = 540 / 1.5 = 360
16.shdaer
Android中提供了Shader类专门用来渲染图像以及一些几何图形,Shader下面包括几个直接子类,分别是BitmapShader、 ComposeShader、LinearGradient、RadialGradient、SweepGradient。 BitmapShader主要用来渲染图像,LinearGradient 用来进行梯度渲染,RadialGradient 用来进行环形渲染,SweepGradient 用来进行梯度渲染,ComposeShader则是一个 混合渲染,可以和其它几个子类组合起来使用。
17.WeakReference
弱引用,用于观察某对象什么时候会被垃圾收集的执行绪清除,你必须要用一个 reference 记住它,以便随时观察,但是却因此造成此对象的 reference 数目一直无法为零, 使得对象无法被清除。这时候可以使用 Weak Reference 这个类。如果你希望能随时取得某对象的信息,但又不想影响此对象的垃圾收集,那么你应该用 Weak Reference 来记住此对象,而不是使用一般的 reference。
18. Soft Reference
Soft Reference 虽然和 Weak Reference 很类似,但是用途却不同。 被 Soft Reference 指到的对象,即使没有任何 Direct Reference,也不会被清除。一直要到 JVM 内存不足时且 没有 Direct Reference 时才会清除,SoftReference 是用来设计 object-cache 之用的。如此一来 SoftReference 不但可以把对象 cache 起来(参考http://blog.csdn.net/yuzhiboyi/article/details/7775963)
19.Assert
断言是一个调试程序时经常使用的宏,在程序运行时它计算括号内的表达式,如果表达式为FALSE (0), 程序将报告错误,并终止执行。如果表达式不为0,则继续执行后面的语句。这个宏通常原来判断程序中是否出现了明显非法的数据,如果出现了终止程序以免导致严重后果,同时也便于查找错误
20.textview.settextsize(float size)
源码可以看到,最终set进去设置的是px单位,它会将转为sp,所以使用时应该使用sp,转为px后set进去:
21.listview 的item去掉默认选中样式:
mListView.setSelector(new ColorDrawable(Color.TRANSPARENT));
22.Application单例问题:
系统只会创建一个application,所以以下方式创建单例application是错误的,虽然获取context 不会报错,可是获取context的服务会出现空指针:
应该这样使用:
23.Liteview item
具有缓存机制,会缓存第一页的view,也就是说第一页的item是null,第二页不是null,因此可以利用holder来快速找打view,但是如果需要listview不同位置显示不一样的话就不可以利用缓存了,缓存机制应该是每个view都是一样的,只是数据不同,但是如果不同位置的view不一样的话就没法利用缓存,只能通过不断的创建view方式。
24.viewpaer的问题一般是出现在缓存问题上,特别要注意。
25.与动画使用放在一起的操作,优化方式有:通过动画监听,动画结束后才做相关操作。
26.relativelayout代码设置子view居中
27.android java.lang.NoSuchFieldError: R$id.xxx异常
第一种情况 参考自http://www.shangxueba.com/jingyan/1856083.html
将引用的自定义控件的xml文件中的最外层布局上面添加xmlns:sat=“http://schemas.android.com/apk/res/控件所在位置的包名”可是在运行时就会报java.lang.NoSuchFieldError:包.R$id.xxx错。同时还会出现no resource identifier found for attribute 的错误。
将xmlns:sat=“http://schemas.android.com/apk/res/控件所在位置的包名”更改为
http://schemas.android.com/apk/res-auto 就不会报错了
第二种 参考:http://www.hankcs.com/program/mobiledev/e-androidruntime-fatal-exception-main-java-lang-nosuchfielderror.html
这个问题是由于主项目覆盖了库项目的xml所致,如果主项目中的某个xml里定义了一个跟库项目中的xml同名的xml,那么库中的xml将会被覆盖。这里的覆盖意思是,编译后只有主项目中的xml以及R.id,完全没有库项目的影子。所以才会有NoSuchFieldError的错误。
这个错误不会在编译的时候提示,算得上一个陷阱了。
解决方法很简单,删除主项目中的xml,整个项目只保留一份xml即可
28.设置relativelayout 子控件剧中
29.List调用toString方法
import org.apache.commons.lang.StringUtils;

public class Test {
    public static void main(String[] args) {

        List<String> list = new ArrayList<String>();
        list.add("1");
        list.add("2");
        list.add("3");

        System.out.println(list.toString());
        System.out.println(StringUtils.strip(list.toString(),"[]"));
    }

}
打印内容:
[1, 2, 3]
1, 2, 3 30.StringUtils工具类的常用方法
下面分别对一些常用方法做简要介绍:
1. public static boolean isEmpty(String str)
判断某字符串是否为空,为空的标准是 str==null 或 str.length()==0
下面是 StringUtils 判断是否为空的示例:
StringUtils.isEmpty(null) = true
StringUtils.isEmpty("") = true
StringUtils.isEmpty(" ") = false //注意在 StringUtils 中空格作非空处理
StringUtils.isEmpty(" ") = false
StringUtils.isEmpty("bob") = false
StringUtils.isEmpty(" bob ") = false
2. public static boolean isNotEmpty(String str)
判断某字符串是否非空,等于 !isEmpty(String str)
下面是示例:
StringUtils.isNotEmpty(null) = false
StringUtils.isNotEmpty("") = false
StringUtils.isNotEmpty(" ") = true
StringUtils.isNotEmpty(" ") = true
StringUtils.isNotEmpty("bob") = true
StringUtils.isNotEmpty(" bob ") = true
3. public static boolean isBlank(String str)
判断某字符串是否为空或长度为0或由空白符(whitespace) 构成
下面是示例:
StringUtils.isBlank(null) = true
StringUtils.isBlank("") = true
StringUtils.isBlank(" ") = true
StringUtils.isBlank(" ") = true
StringUtils.isBlank("\t \n \f \r") = true //对于制表符、换行符、换页符和回车符
StringUtils.isBlank() //均识为空白符
StringUtils.isBlank("\b") = false //"\b"为单词边界符
StringUtils.isBlank("bob") = false
StringUtils.isBlank(" bob ") = false
4. public static boolean isNotBlank(String str)
判断某字符串是否不为空且长度不为0且不由空白符(whitespace) 构成,等于 !isBlank(String str)
下面是示例:
StringUtils.isNotBlank(null) = false
StringUtils.isNotBlank("") = false
StringUtils.isNotBlank(" ") = false
StringUtils.isNotBlank(" ") = false
StringUtils.isNotBlank("\t \n \f \r") = false
StringUtils.isNotBlank("\b") = true
StringUtils.isNotBlank("bob") = true
StringUtils.isNotBlank(" bob ") = true
5. public static String trim(String str)
去掉字符串两端的控制符(control characters, char <= 32) , 如果输入为 null 则返回null
下面是示例:
StringUtils.trim(null) = null
StringUtils.trim("") = ""
StringUtils.trim(" ") = ""
StringUtils.trim(" \b \t \n \f \r ") = ""
StringUtils.trim(" \n\tss \b") = "ss"
StringUtils.trim(" d d dd ") = "d d dd"
StringUtils.trim("dd ") = "dd"
StringUtils.trim(" dd ") = "dd"
6. public static String trimToNull(String str)
去掉字符串两端的控制符(control characters, char <= 32) ,如果变为 null 或"",则返回 null
下面是示例:
StringUtils.trimToNull(null) = null
StringUtils.trimToNull("") = null
StringUtils.trimToNull(" ") = null
StringUtils.trimToNull(" \b \t \n \f \r ") = null
StringUtils.trimToNull(" \n\tss \b") = "ss"
StringUtils.trimToNull(" d d dd ") = "d d dd"
StringUtils.trimToNull("dd ") = "dd"
StringUtils.trimToNull(" dd ") = "dd"
7. public static String trimToEmpty(String str)
去掉字符串两端的控制符(control characters, char <= 32) ,如果变为 null 或 "" ,则返回 ""
下面是示例:
StringUtils.trimToEmpty(null) = ""
StringUtils.trimToEmpty("") = ""
StringUtils.trimToEmpty(" ") = ""
StringUtils.trimToEmpty(" \b \t \n \f \r ") = ""
StringUtils.trimToEmpty(" \n\tss \b") = "ss"
StringUtils.trimToEmpty(" d d dd ") = "d d dd"
StringUtils.trimToEmpty("dd ") = "dd"
StringUtils.trimToEmpty(" dd ") = "dd"
8. public static String strip(String str)
去掉字符串两端的空白符(whitespace) ,如果输入为 null 则返回 null
下面是示例(注意和 trim() 的区别):
StringUtils.strip(null) = null
StringUtils.strip("") = ""
StringUtils.strip(" ") = ""
StringUtils.strip(" \b \t \n \f \r ") = "\b"
StringUtils.strip(" \n\tss \b") = "ss \b"
StringUtils.strip(" d d dd ") = "d d dd"
StringUtils.strip("dd ") = "dd"
StringUtils.strip(" dd ") = "dd"
9. public static String stripToNull(String str)
去掉字符串两端的空白符(whitespace) ,如果变为 null 或"",则返回 null
下面是示例(注意和 trimToNull() 的区别):
StringUtils.stripToNull(null) = null
StringUtils.stripToNull("") = null
StringUtils.stripToNull(" ") = null
StringUtils.stripToNull(" \b \t \n \f \r ") = "\b"
StringUtils.stripToNull(" \n\tss \b") = "ss \b"
StringUtils.stripToNull(" d d dd ") = "d d dd"
StringUtils.stripToNull("dd ") = "dd"
StringUtils.stripToNull(" dd ") = "dd"
10. public static String stripToEmpty(String str)
去掉字符串两端的空白符(whitespace) ,如果变为 null 或"" ,则返回""
下面是示例(注意和 trimToEmpty() 的区别):
StringUtils.stripToNull(null) = ""
StringUtils.stripToNull("") = ""
StringUtils.stripToNull(" ") = ""
StringUtils.stripToNull(" \b \t \n \f \r ") = "\b"
StringUtils.stripToNull(" \n\tss \b") = "ss \b"
StringUtils.stripToNull(" d d dd ") = "d d dd"
StringUtils.stripToNull("dd ") = "dd"
StringUtils.stripToNull(" dd ") = "dd"
以下方法只介绍其功能,不再举例:
11. public static String strip(String str, String stripChars)
去掉 str 两端的在 stripChars 中的字符。
如果 str 为 null 或等于"" ,则返回它本身;
如果 stripChars 为 null 或"" ,则返回 strip(String str) 。
12. public static String stripStart(String str, String stripChars)
和11相似,去掉 str 前端的在 stripChars 中的字符。
13. public static String stripEnd(String str, String stripChars)
和11相似,去掉 str 末端的在 stripChars 中的字符。
14. public static String[] stripAll(String[] strs)
对字符串数组中的每个字符串进行 strip(String str) ,然后返回。
如果 strs 为 null 或 strs 长度为0,则返回 strs 本身
15. public static String[] stripAll(String[] strs, String stripChars)
对字符串数组中的每个字符串进行 strip(String str, String stripChars) ,然后返回。
如果 strs 为 null 或 strs 长度为0,则返回 strs 本身
16. public static boolean equals(String str1, String str2)
比较两个字符串是否相等,如果两个均为空则也认为相等。
17. public static boolean equalsIgnoreCase(String str1, String str2)
比较两个字符串是否相等,不区分大小写,如果两个均为空则也认为相等。
18. public static int indexOf(String str, char searchChar)
返回字符 searchChar 在字符串 str 中第一次出现的位置。
如果 searchChar 没有在 str 中出现则返回-1,
如果 str 为 null 或 "" ,则也返回-1
19. public static int indexOf(String str, char searchChar, int startPos)
返回字符 searchChar 从 startPos 开始在字符串 str 中第一次出现的位置。
如果从 startPos 开始 searchChar 没有在 str 中出现则返回-1,
如果 str 为 null 或 "" ,则也返回-1
20. public static int indexOf(String str, String searchStr)
返回字符串 searchStr 在字符串 str 中第一次出现的位置。
如果 str 为 null 或 searchStr 为 null 则返回-1,
如果 searchStr 为 "" ,且 str 为不为 null ,则返回0,
如果 searchStr 不在 str 中,则返回-1
21. public static int ordinalIndexOf(String str, String searchStr, int ordinal)
返回字符串 searchStr 在字符串 str 中第 ordinal 次出现的位置。
如果 str=null 或 searchStr=null 或 ordinal<=0 则返回-1
举例(*代表任意字符串):
StringUtils.ordinalIndexOf(null, *, *) = -1
StringUtils.ordinalIndexOf(*, null, *) = -1
StringUtils.ordinalIndexOf("", "", *) = 0
StringUtils.ordinalIndexOf("aabaabaa", "a", 1) = 0
StringUtils.ordinalIndexOf("aabaabaa", "a", 2) = 1
StringUtils.ordinalIndexOf("aabaabaa", "b", 1) = 2
StringUtils.ordinalIndexOf("aabaabaa", "b", 2) = 5
StringUtils.ordinalIndexOf("aabaabaa", "ab", 1) = 1
StringUtils.ordinalIndexOf("aabaabaa", "ab", 2) = 4
StringUtils.ordinalIndexOf("aabaabaa", "bc", 1) = -1
StringUtils.ordinalIndexOf("aabaabaa", "", 1) = 0
StringUtils.ordinalIndexOf("aabaabaa", "", 2) = 0
22. public static int indexOf(String str, String searchStr, int startPos)
返回字符串 searchStr 从 startPos 开始在字符串 str 中第一次出现的位置。
举例(*代表任意字符串):
StringUtils.indexOf(null, *, *) = -1
StringUtils.indexOf(*, null, *) = -1
StringUtils.indexOf("", "", 0) = 0
StringUtils.indexOf("aabaabaa", "a", 0) = 0
StringUtils.indexOf("aabaabaa", "b", 0) = 2
StringUtils.indexOf("aabaabaa", "ab", 0) = 1
StringUtils.indexOf("aabaabaa", "b", 3) = 5
StringUtils.indexOf("aabaabaa", "b", 9) = -1
StringUtils.indexOf("aabaabaa", "b", -1) = 2
StringUtils.indexOf("aabaabaa", "", 2) = 2
StringUtils.indexOf("abc", "", 9) = 3
23. public static int lastIndexOf(String str, char searchChar)
基本原理同18
24. public static int lastIndexOf(String str, char searchChar, int startPos)
基本原理同19
25. public static int lastIndexOf(String str, String searchStr)
基本原理同20
26. public static int lastIndexOf(String str, String searchStr, int startPos)
基本原理同22
感谢以下博客:http://blog.csdn.net/qiaoning13256/article/details/6910570
http://blog.csdn.net/lan410812571/article/details/9946991
http://blog.csdn.net/jake9602/article/details/13768525
http://www.tuicool.com/articles/FB7NryV
http://blog.csdn.net/as425017946/article/details/49175635
http://blog.csdn.net/u014614038/article/details/47423757
http://blog.csdn.net/qq_33113141/article/details/52162372


 2025
2025

 被折叠的 条评论
为什么被折叠?
被折叠的 条评论
为什么被折叠?
 到【灌水乐园】发言


