


今天心情不错,就想写点什么,忽然想起以前没用过的TileLayoutControl,便倒腾之,现把总结的一点经验与大家分享一下。
=============开发环境=============
系统: Win7sp1 32位
IDE: Microsoft VisualStudio 2013 Ultimate
工程: .Net Framework4.5.1
控件: DevExpress 13.2.5
================================
程序实现了Tile的分组,单个块的自定义布局(自定义字体),XAML下多种方法读取图片以及TileLayoutControl的布局保存和读取,都是些最基本的最实用的东西。程序关闭时保存布局,启动时读取上次的布局。
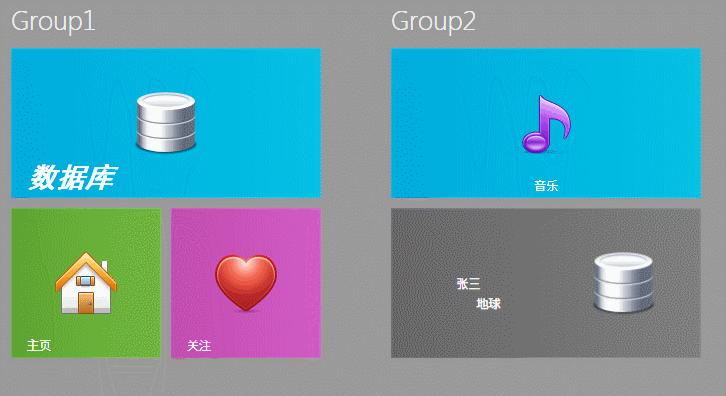
老规矩,无图无真相,先上成果图:
首先在工程添加Model文件夹,正常情况下是应该重新建立一个Model的工程,简化了,代码如下:

接下来建立继承自ICommand接口的类,这步不是必须的,可以选择性跳过,代码如图:

接下来就是建立ViewModel文件夹,然后新建类PeopleViewModel,代码如下

接下来该写前台代码了,拖一个TileLayoutControl到设计窗口,然后加入如下代码,如图所示:
<ScrollViewer>
        <dxlc:TileLayoutControl Background="#EE939393" x:Name="TileLayoutControl1">
            <dxlc:Tile x:Name="Tile1" dxlc:TileLayoutControl.GroupHeader="Group1">
                <dxlc:Tile.HeaderTemplate>
                    <ItemContainerTemplate>
                        <TextBlock Text="数据库" FontFamily="黑体" FontSize="28" FontWeight="Bold" FontStyle="Italic"/>
                    </ItemContainerTemplate>
                </dxlc:Tile.HeaderTemplate>
                <Image x:Name="Image1" Stretch="None" Source="/Images/1.png"/>
            </dxlc:Tile>
            <dxlc:Tile Header="关注" x:Name="Tile2" Size="Small" Background="#FFC14AAF" dxlc:TileLayoutControl.GroupHeader="Group1">
                <Image x:Name="Image2" Stretch="None" Source="../Images/2.png"/>
            </dxlc:Tile>
            <dxlc:Tile Header="主页" x:Name="Tile3" Size="Small" Background="#FF5CA332" dxlc:FlowLayoutControl.IsFlowBreak="False"
                       dxlc:TileLayoutControl.GroupHeader="Group1">
                <Image x:Name="Image3" Stretch="None" Source="pack://application:,,,/Images/3.png"/>
            </dxlc:Tile>
            <dxlc:Tile Header="音乐" x:Name="Tile4" Size="Large" dxlc:FlowLayoutControl.IsFlowBreak="True"
				HorizontalHeaderAlignment="Center" dxlc:TileLayoutControl.GroupHeader="Group2">
                <Image x:Name="Image4" Stretch="None" Source="/Images/4.png"/>
            </dxlc:Tile>
            <dxlc:Tile Name="Tile5" Size="Large" dxlc:TileLayoutControl.GroupHeader="Group2"
                       HorizontalHeaderAlignment="Center" Background="#FF666666"
                       ContentSource="{Binding PeopleList}" ContentChangeInterval="0:0:3" AnimateContentChange="True" Command="{Binding CommClick}">
                <dxlc:Tile.ContentTemplate>
                    <DataTemplate>
                        <Grid>
                            <Grid.ColumnDefinitions>
                                <ColumnDefinition/>
                                <ColumnDefinition/>
                            </Grid.ColumnDefinitions>
                            <TextBlock Grid.Column="0" Text="{Binding Name}" HorizontalAlignment="Center" VerticalAlignment="Center"/>
                            <TextBlock Grid.Column="0" Text="{Binding Address}" HorizontalAlignment="Center" VerticalAlignment="Center" Margin="40,40,0,0"/>
                            <Image Grid.Column="1" Source="{Binding PhotoSource}" Stretch="None" HorizontalAlignment="Center" VerticalAlignment="Center" />
                        </Grid>
                    </DataTemplate>
                </dxlc:Tile.ContentTemplate>
            </dxlc:Tile>
        </dxlc:TileLayoutControl>
    </ScrollViewer>
最后 附上后台代码,如图所示:

虽然文章写的很简略,但是实现的功能却非常实用,如果你喜欢,请自己动手敲一遍。
最后附上我的网盘地址,里面有许多的东西,没准有你喜欢的==> 【猛击这里】


 4万+
4万+

 被折叠的 条评论
为什么被折叠?
被折叠的 条评论
为什么被折叠?
 到【灌水乐园】发言


