


 超级会员免费看
 这篇博客详细介绍了如何在Android中自定义一个菊花进度条View,包括创建attrs.xml文件定义属性、重写测量函数、绘制底层和上层菊花、使用ValueAnimator实现动画效果,以及设置最大和当前进度的方法。通过这个实例,读者可以深入理解Android自定义View的实现过程。
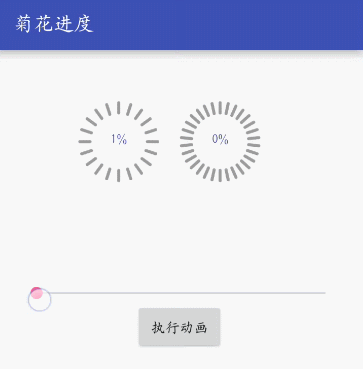
当你看完这篇博客过后,相信你已经可以摸到自定义View的门道了,本篇博客将带你走一遍自定义View之旅废话不多说先上效果图。
实现思路
1. 创建attrs.xml文件,自定义一些我们需要的属性,对于format的取值大家可以搜索一下网上有很多教程,我这里就不重复造轮子了。
<declare-styleable name="a_zhon">
        <!--每条线的粗细-->
        <attr name="paintBold" format="dimension" />
        <!--每条线的长度-->
        <attr name="lineLength" format="dimension" />
        <!--线条个数-->
        <attr name="lines" format="integer" />
        <!--最大进度-->
        <attr name="max" format="integer" />
        <!--当前进度-->
        <attr name="progress" format="integer" />
        <!--背景菊花颜色-->
        <attr name="backgroundColor" format="reference|color" />
        <!--前景菊花颜色-->
        <attr name="beforeColor" format="reference|color" />
        <!--进度文字颜色-->
        <attr name="textColor" format="reference|color" />
  </declare-styleable>
2.定义好了我们的属性,那么我们就需要在我们的view中加载它,这样我们在布局中使用自定义的属性就有效果如下代码:
    /**
     * 在两个参数的构造函数中加载我们在attrs.xml文件的自定义的属性
     */
    private void loadAttrs(Context context, AttributeSet attrs) {
        TypedArray array = context.obtainStyledAttributes(attrs, R.styleable.a_zhon);
        paintBold = array.getDimensionPixelSize(R.styleable.a_zhon_paintBold, 10);
        lineLength = array.getDimensionPixelSize(R.styleable.a_zhon_lineLength, 25);
        bgPaintColor = array.getColor(R.styleable.a_zhon_backgroundColor, Color.GRAY);
        beforePaintColor = array.getColor(R.styleable.a_zhon_beforeColor, Color.YELLOW);
        lines = array.getInt(R.styleable.a_zhon_lines, 20);
        max = array.getInt(R.styleable.a_zhon_max, 100);
        progress = array.getInt(R.styleable.a_zhon_progress, 0);
        textColor = array.getColor(R.styleable.a_zhon_textColor, Color.BLACK);
        array.recycle();//TypedArray需要被回收
}3.我们需要重写onMeasure函数来获取View在布局中所占的大小
@Override
    protected void onMeasure(int widthMeasureSpec, int heightMeasureSpec) {
        super.onMeasure(widthMeasureSpec, heightMeasureSpec);
        //获取view的宽度
        mWidth = getViewSize(100, widthMeasureSpec);
        //获取view的高度
        mHeight = getViewSize(100, heightMeasureSpec);
    }
measureSpec中包含测量模式和宽高信息,这里大家看注释大概就能懂了
    /**
     * 测量模式                 表示意思
     * UNSPECIFIED  父容器没有对当前View有任何限制,当前View可以任意取尺寸
     * EXACTLY      当前的尺寸就是当前View应该取的尺寸
     * AT_MOST      当前尺寸是当前View能取的最大尺寸
     *
     * @param defaultSize 默认大小
     * @param measureSpec 包含测量模式和宽高信息
     * @return 返回View的宽高大小
     */
    private int getViewSize(int defaultSize, int measureSpec) {
        int viewSize = defaultSize;
        //获取测量模式
        int mode = MeasureSpec.getMode(measureSpec);
        //获取大小
        int size = MeasureSpec.getSize(measureSpec);
        switch (mode) {
            case MeasureSpec.UNSPECIFIED: //如果没有指定大小,就设置为默认大小
                viewSize = defaultSize;
                break;
            case MeasureSpec.AT_MOST: //如果测量模式是最大取值为size
                //我们将大小取最大值,你也可以取其他值
                viewSize = size;
                break;
            case MeasureSpec.EXACTLY: //如果是固定的大小,那就不要去改变它
                viewSize = size;
                break;
        }
        return viewSize;
    }
4.准备工作都做好了(这里省略了一些画笔和属性初始化详情见我源码),接下就先开始绘制底层的菊花
        int x = mWidth / 2;
        int y = mHeight / 2;
        int r = x - 5;
        for (int i = 0; i < lines; i++) {
            //绘制下层菊花
            canvas.drawLine(x, y - r, x, y - r + lineLength, bgPaint);
            canvas.rotate(360 / lines, x, y);
        }
5.继续绘制上层菊花,也就是加载的进度
        //获取需要绘制多少个刻度
        int count = (progress * lines) / max;
        //绘制中间的文字进度
        canvas.drawText((progress * 100) / max) + "%", x, y + 5, textPaint);
        //绘制上层菊花,也就是进度
        canvas.rotate(360 / lines, x, y);
        for (; count > 0; count--) {
            canvas.drawLine(x, y - r, x, y - r + lineLength, bfPaint);
            canvas.rotate(360 / lines, x, y);
        }
6.为了达到图中第二个菊花进度的效果,我们需要在内部定义一个动画提供给使用者。这里使用的是ValueAnimator想详细了解的可以搜索一下网上资料也非常多在这里也就不重复造轮子了。
    /**
     * 为进度设置动画
     * ValueAnimator是整个属性动画机制当中最核心的一个类,属性动画的运行机制是通过不断地对值进行操作来实现的,
     * 而初始值和结束值之间的动画过渡就是由ValueAnimator这个类来负责计算的。
     * 它的内部使用一种时间循环的机制来计算值与值之间的动画过渡,
     * 我们只需要将初始值和结束值提供给ValueAnimator,并且告诉它动画所需运行的时长,
     * 那么ValueAnimator就会自动帮我们完成从初始值平滑地过渡到结束值这样的效果。
     *
     * @param start    开始值
     * @param current  结束值
     * @param duration 动画时长
     */
    public void startAnimation(int start, int current, int duration) {
        ValueAnimator progressAnimator = ValueAnimator.ofInt(start, current);
        progressAnimator.setDuration(duration);
        progressAnimator.setTarget(progress);
        progressAnimator.setInterpolator(new BounceInterpolator());
        progressAnimator.addUpdateListener(new ValueAnimator.AnimatorUpdateListener() {
            @Override
            public void onAnimationUpdate(ValueAnimator animation) {
                progress = (int) animation.getAnimatedValue();
                invalidate();
            }
        });
        progressAnimator.start();
    }
7.同时对外提供两个方法,设置最大进度和当前进度
    /*设置进度最大值*/
    public void setMax(int max) {
        this.max = max;
        invalidate();
    }

    /*设置当前进度*/
    public void setProgress(int progress) {
        this.progress = progress;
        invalidate();
    }
8.基本上这个View就说完了,我们就可以开始在布局中使用了一起来看看吧!
<com.zsy.roate.LoadingView
        android:layout_width="80dp"
        android:layout_height="80dp"
        a_zhon:backgroundColor="#9f9c9c"
        a_zhon:beforeColor="#1dcdef"
        a_zhon:lineLength="10dp"
        a_zhon:lines="20"
        a_zhon:max="100"
        a_zhon:paintBold="3dp"
        a_zhon:progress="70"

  <!--不要忘记在们的根布局中添加命名空间哦-->
  <!--xmlns:a_zhon="http://schemas.android.com/apk/res-auto"-->


 2001
2001

 被折叠的 条评论
为什么被折叠?
被折叠的 条评论
为什么被折叠?
 到【灌水乐园】发言


