


这一期我们来做一个实践,在AOSP上建立一个新产品,编译出镜像文件在模拟器emulator上运行。
在实验前我们先整理一下思路,分析一下编译流程必要的定制文件。首先是执行./build/envsetup.sh会扫描device各子目录下的vendorsetup.sh,然后执行lunch时会扫描device各子目录中的AndroidProducts.mk文件;如果lunch中选择的TARGET_PRODUCT与某个AndroidProducts.mk文件指向的PRODUCT_MAKEFILES文件中的PRODUCT_NAME相同,则引用那个AndroidProducts.mk文件指向的PRODUCT_MAKEFILES文件,并引用这个文件中对应的PRODUCT_DEVICE变量,并赋值为TARGET_DEVICE;执行make时会在刚才的目录下搜索并加载AndroidBoard.mk和BoardConfig.mk还有system.prop文件。
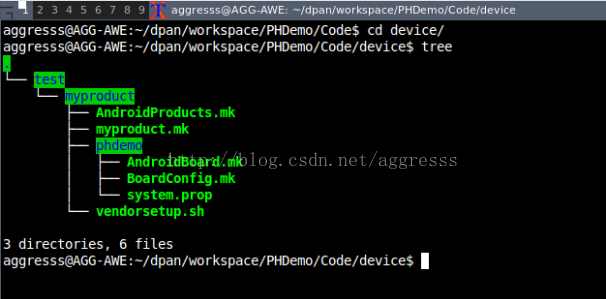
综上所述,我们需要6个文件,分别是:
1. vendorsetup.sh
2. AndroidProducts.mk
3. myproduct.mk
4. AndroidBoard.mk
5. BoardConfig.mk
6. system.prop
这里我们说明一下建立的新产品的几个定义:
vendor ---- test
product ---- myproduct
device ---- phdemo
这三个要素的关系和区别只要在实践中才能体会出来。
@vendorsetup.sh
add_lunch_combo myproduct-eng
@AndoridProduct.mk
PRODUCT_MAKEFILES := \
$(LOCAL_DIR)/myproduct.mk
@myproduct.mk
$(call inherit-product, $(SRC_TARGET_DIR)/product/aosp_base_telephony.mk)
$(call inherit-product, $(SRC_TARGET_DIR)/board/generic/device.mk)

include $(SRC_TARGET_DIR)/product/emulator.mk

# Overrides
PRODUCT_NAME := myproduct
PRODUCT_DEVICE := phdemo
PRODUCT_BRAND := Android_phdemo
PRODUCT_MODEL := phdemo AOSP on ARM Emulator
@AndroidBoard.mk
LOCAL_PATH := $(call my-dir)
@BoardConfig.mk
# config.mk
#
# Product-specific compile-time definitions.
#

# The generic product target doesn't have any hardware-specific pieces.
TARGET_NO_BOOTLOADER := true
TARGET_NO_KERNEL := true
TARGET_ARCH := arm

# Note: we build the platform images for ARMv7-A _without_ NEON.
#
# Technically, the emulator supports ARMv7-A _and_ NEON instructions, but
# emulated NEON code paths typically ends up 2x slower than the normal C code
# it is supposed to replace (unlike on real devices where it is 2x to 3x
# faster).
#
# What this means is that the platform image will not use NEON code paths
# that are slower to emulate. On the other hand, it is possible to emulate
# application code generated with the NDK that uses NEON in the emulator.
#
TARGET_ARCH_VARIANT := armv7-a
TARGET_CPU_VARIANT := generic
TARGET_CPU_ABI := armeabi-v7a
TARGET_CPU_ABI2 := armeabi

HAVE_HTC_AUDIO_DRIVER := true
BOARD_USES_GENERIC_AUDIO := true

# no hardware camera
USE_CAMERA_STUB := true

# Enable dex-preoptimization to speed up the first boot sequence
# of an SDK AVD. Note that this operation only works on Linux for now
ifeq ($(HOST_OS),linux)
ifeq ($(WITH_DEXPREOPT),)
WITH_DEXPREOPT := true
endif
endif

# Build OpenGLES emulation guest and host libraries
BUILD_EMULATOR_OPENGL := true

# Build and enable the OpenGL ES View renderer. When running on the emulator,
# the GLES renderer disables itself if host GL acceleration isn't available.
USE_OPENGL_RENDERER := true

# Set the phase offset of the system's vsync event relative to the hardware
# vsync. The system's vsync event drives Choreographer and SurfaceFlinger's
# rendering. This value is the number of nanoseconds after the hardware vsync
# that the system vsync event will occur.
#
# This phase offset allows adjustment of the minimum latency from application
# wake-up (by Choregographer) time to the time at which the resulting window
# image is displayed. This value may be either positive (after the HW vsync)
# or negative (before the HW vsync). Setting it to 0 will result in a
# minimum latency of two vsync periods because the app and SurfaceFlinger
# will run just after the HW vsync. Setting it to a positive number will
# result in the minimum latency being:
#
# (2 * VSYNC_PERIOD - (vsyncPhaseOffsetNs % VSYNC_PERIOD))
#
# Note that reducing this latency makes it more likely for the applications
# to not have their window content image ready in time. When this happens
# the latency will end up being an additional vsync period, and animations
# will hiccup. Therefore, this latency should be tuned somewhat
# conservatively (or at least with awareness of the trade-off being made).
VSYNC_EVENT_PHASE_OFFSET_NS := 0

TARGET_USERIMAGES_USE_EXT4 := true
BOARD_SYSTEMIMAGE_PARTITION_SIZE := 1610612736
BOARD_USERDATAIMAGE_PARTITION_SIZE := 576716800
BOARD_CACHEIMAGE_PARTITION_SIZE := 69206016
BOARD_CACHEIMAGE_FILE_SYSTEM_TYPE := ext4
BOARD_FLASH_BLOCK_SIZE := 512
TARGET_USERIMAGES_SPARSE_EXT_DISABLED := true

BOARD_SEPOLICY_DIRS += build/target/board/generic/sepolicy

ifeq ($(TARGET_PRODUCT),sdk)
# include an expanded selection of fonts for the SDK.
EXTENDED_FONT_FOOTPRINT := true
endif
@system.prop
#
# system.prop for generic sdk
#

rild.libpath=/system/lib/libreference-ril.so
rild.libargs=-d /dev/ttyS0
这些文件的排列如下:
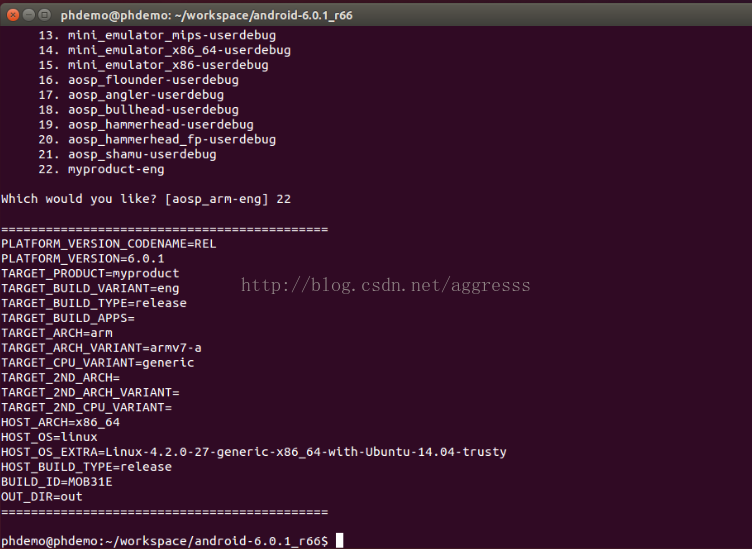
然后执行lunch,选择刚才添加的myproduct-eng
然后执行 make ,编译完成后就可以使用emulator进行模拟运行。
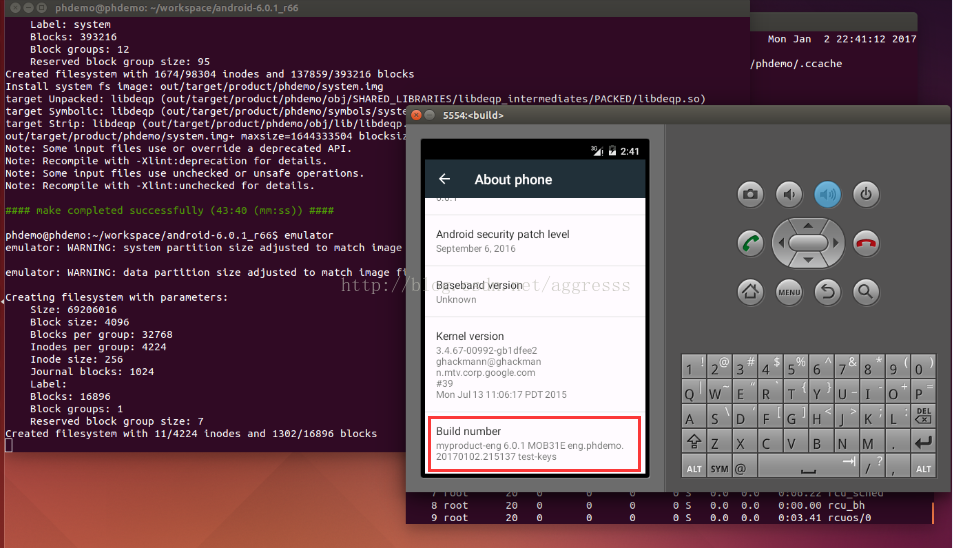
运行后通过 About phone--> Build number 就可以看到我们的定制信息。


 973
973


 被折叠的 条评论
为什么被折叠?
被折叠的 条评论
为什么被折叠?
 到【灌水乐园】发言


