


Android 绘制UI通常有两种方式:
1. 把图形绘制到布局中的View对象中,图形绘制由系统绘制View层次数来来处理。
2. 把图形直接绘制到画布上(Canvas对象),这种方法可以通过独立的线程来管理surfaceView对象,并由独立线程来管理绘制过程。在Androd surfaceView 分析及C/C++通过surface 绘制UI就使用该方法来绘制图形的一种实例。
如果图形绘制到布局中的View,将有Android系统来管理View的绘制。本文将介绍Android 系统如何为一个应用(activity)创建View,后面还将介绍Android系统如何刷新View。整个流程大体如下图所示。
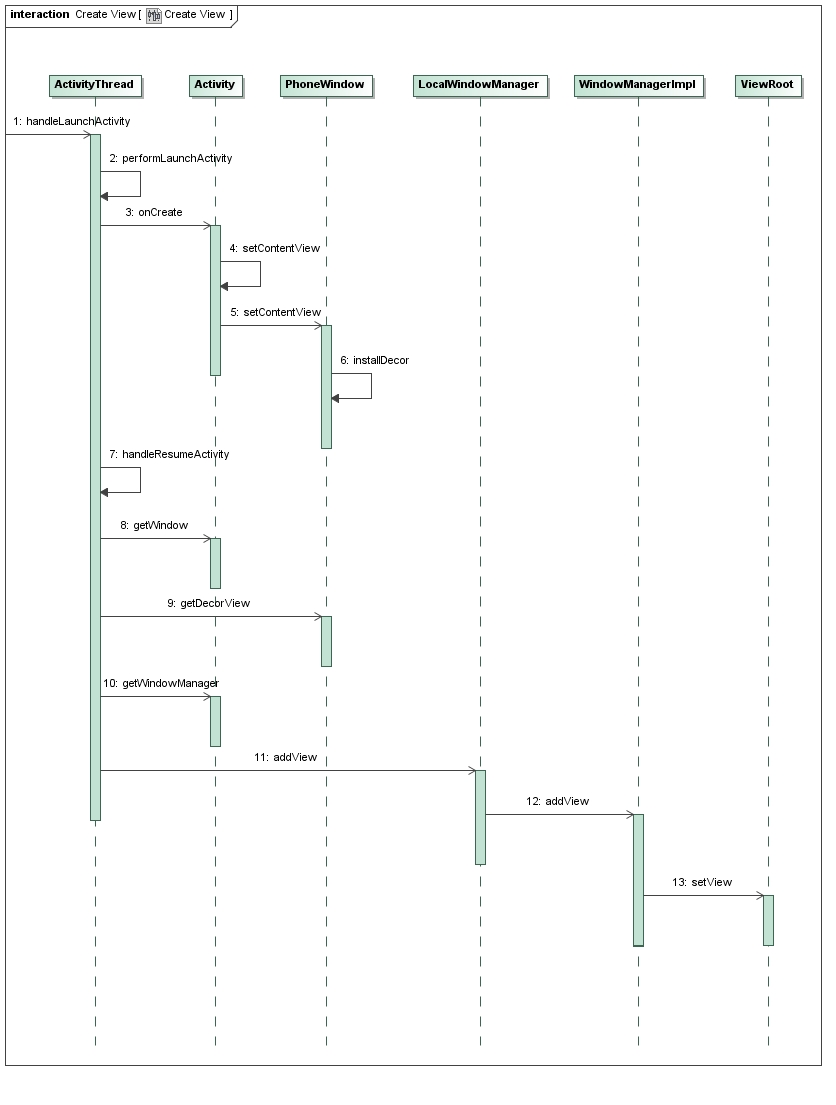
图1:Activity 窗口View的创建过程。
上图1-6步骤是创建DecorView,DecorView类继承了View类,是作为容器(ViewGroup)来使用的。DecorView与ViewRoot一样是Android窗口系统中的重要组成部分,ViewRoot在ActivityThread的handleResumeActivity里创建。下面就从handleResumeActivity开始分析View的创建过程。
    public final class ActivityThread {
        ......

        final void handleResumeActivity(IBinder token, boolean clearHide, boolean isForward) {
            ......

            ActivityClientRecord r = performResumeActivity(token, clearHide);

            if (r != null) {
                final Activity a = r.activity;
                ......

                // If the window hasn't yet been added to the window manager,
                // and this guy didn't finish itself or start another activity,
                // then go ahead and add the window.
                boolean willBeVisible = !a.mStartedActivity;
                if (!willBeVisible) {
                    try {
                        willBeVisible = ActivityManagerNative.getDefault().willActivityBeVisible(
                                a.getActivityToken());
                    } catch (RemoteException e) {
                    }
                }
                if (r.window == null && !a.mFinished && willBeVisible) {
                    r.window = r.activity.getWindow();
                    View decor = r.window.getDecorView();
                    decor.setVisibility(View.INVISIBLE);
                    ViewManager wm = a.getWindowManager();
                    WindowManager.LayoutParams l = r.window.getAttributes();
                    a.mDecor = decor;
                    l.type = WindowManager.LayoutParams.TYPE_BASE_APPLICATION;
                    ......
                    if (a.mVisibleFromClient) {
                        a.mWindowAdded = true;
                        wm.addView(decor, l);    <span class="comment">//这个很关键。</span>
                    }
                }

                ......
            }

            ......
        }

        ......
} public class PhoneWindow extends Window implements MenuBuilder.Callback {
......
// This is the view in which the window contents are placed. It is either
// mDecor itself, or a child of mDecor where the contents go.
private ViewGroup mContentParent;
......
@Override
public void setContentView(int layoutResID) {
if (mContentParent == null) {
installDecor(); // 创建decorView
} else {
mContentParent.removeAllViews();
}
}
......
} private void installDecor() {
if (mDecor == null) {
mDecor = generateDecor(); //生产DecorView
......
}
... ...
}
private void addView(View view, ViewGroup.LayoutParams params, boolean nest)
    {
        ......

        final WindowManager.LayoutParams wparams
                = (WindowManager.LayoutParams)params;

        ViewRoot root;
        View panelParentView = null;

        synchronized (this) {
             ... ...
            root = new ViewRoot(view.getContext());  //ViewRoot 创建
            root.mAddNesting = 1;

            view.setLayoutParams(wparams);

            if (mViews == null) {
                index = 1;
                mViews = new View[1];
                mRoots = new ViewRoot[1];
                mParams = new WindowManager.LayoutParams[1];
            } else {
                index = mViews.length + 1;
                Object[] old = mViews;
                mViews = new View[index];
                System.arraycopy(old, 0, mViews, 0, index-1);
                old = mRoots;
                mRoots = new ViewRoot[index];
                System.arraycopy(old, 0, mRoots, 0, index-1);
                old = mParams;
                mParams = new WindowManager.LayoutParams[index];
                System.arraycopy(old, 0, mParams, 0, index-1);
            }
          ... ...
        }
        // do this last because it fires off messages to start doing things
        root.setView(view, wparams, panelParentView);
} public final class ViewRootImpl extends Handler implements ViewParent,
View.AttachInfo.Callbacks, HardwareRenderer.HardwareDrawCallbacks {
private final Surface mSurface = new Surface();
... ...
public ViewRootImpl(Context context) {
super();
... ...
// Initialize the statics when this class is first instantiated. This is
// done here instead of in the static block because Zygote does not
// allow the spawning of threads.
getWindowSession(context.getMainLooper());
......
}
public void setView(View view, WindowManager.LayoutParams attrs,
View panelParentView) {
synchronized (this) {
if (mView == null) {
mView = view;
mWindowAttributes.copyFrom(attrs);
......
mAttachInfo.mRootView = view;
.......
if (panelParentView != null) {
mAttachInfo.mPanelParentWindowToken
= panelParentView.getApplicationWindowToken();
}
mAdded = true;
......
requestLayout(); // 做UI布局
......
try {
res = sWindowSession.add(mWindow, mWindowAttributes,
getHostVisibility(), mAttachInfo.mContentInsets,
mInputChannel);
} catch (RemoteException e) {
mAdded = false;
mView = null;
......
throw new RuntimeException("Adding window failed", e);
} finally {
if (restore) {
attrs.restore();
}
}
......
}
......
}
view.assignParent(this); //设置DecorView的父是ViewRoot
}
......
}1. 调用ViewRoot类的另外一个成员函数requestLayout来请求对应用程序窗口视图的UI作第一次布局。
2. 调用ViewRoot类的静态成员变量sWindowSession所描述的一个类型为Session的Binder代理对象的成员函数add来请求WindowManagerService增加一个WindowState对象,以便可以用来描述当前正在处理的一个ViewRoot所关联的一个应用程序窗口。
requestLayout就是向Handler中发送消息,在Handler的处理消息函数中最终会调用performTraversals。performTraversals很负责,经过我仔细挑选,目标锁定为下面几个函数。当然,后面我们还会回到performTraversals,不过我们现在更感兴趣的是Surface是如何创建的
private void performTraversals() {

     final View host = mView;
     ... ...

      try {

       ... ...
       relayoutResult = relayoutWindow(params, viewVisibility, insetsPending);
    }
    ... ...
 }
private int relayoutWindow(WindowManager.LayoutParams params, int viewVisibility,
boolean insetsPending) throws RemoteException {
... ...
if (params != null && mOrigWindowType != params.type) {
// For compatibility with old apps, don't crash here.
if (mTargetSdkVersion < android.os.Build.VERSION_CODES.ICE_CREAM_SANDWICH) {
Slog.w(TAG, "Window type can not be changed after "
+ "the window is added; ignoring change of " + mView);
params.type = mOrigWindowType;
}
}
int relayoutResult = sWindowSession.relayout(
mWindow, mSeq, params,
(int) (mView.getMeasuredWidth() * appScale + 0.5f),
(int) (mView.getMeasuredHeight() * appScale + 0.5f),
viewVisibility, insetsPending ? WindowManagerImpl.RELAYOUT_INSETS_PENDING : 0,
mWinFrame, mPendingContentInsets, mPendingVisibleInsets,
mPendingConfiguration, mSurface);
//Log.d(TAG, "<<<<<< BACK FROM relayout");
......
return relayoutResult;
}public int relayoutWindow(Session session, IWindow client, int seq,
WindowManager.LayoutParams attrs, int requestedWidth,
int requestedHeight, int viewVisibility, int flags,
Rect outFrame, Rect outContentInsets, Rect outVisibleInsets,
Configuration outConfig, Surface outSurface) {
......
try {
if (win.mSurface == null) {
surfaceChanged = true;
}
Surface surface = win.createSurfaceLocked(); //创建Surface 并拷贝到ViewRoot的surface中
if (surface != null) {
outSurface.copyFrom(surface);
win.mReportDestroySurface = false;
win.mSurfacePendingDestroy = false;
if (SHOW_TRANSACTIONS) Slog.i(TAG,
" OUT SURFACE " + outSurface + ": copied");
} else {
// For some reason there isn't a surface. Clear the
// caller's object so they see the same state.
outSurface.release();
}
} catch (Exception e) {
......
}
......
}
}


 2185
2185

 被折叠的 条评论
为什么被折叠?
被折叠的 条评论
为什么被折叠?
 到【灌水乐园】发言


