


在Android UI 绘制机制之View创建过程介绍了Android应用绘制View的创建过程,本文将介绍图形如何刷新。我们知道Android的UI界面是通过View和ViewGroup分层树进行定义的,如下图所示。一般在View发生改变时对UI进行重绘,本文介绍重绘的过程。
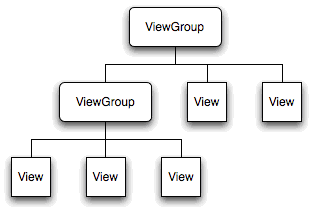
图1:Android UI界面结构
单UI界面上某一个UI变化了,会显示地调用View对象中的invalidate()。这里需要注意的是invalidate只是标记计算脏区,真正的onDraw过程是有UI线程来完成的,下面来分析整个流程。
1. View需要重绘调用
 public void invalidate() {
        invalidate(true);
}void invalidate(boolean invalidateCache) {
if (skipInvalidate()) {
return;
}
if ((mPrivateFlags & (PFLAG_DRAWN | PFLAG_HAS_BOUNDS)) == (PFLAG_DRAWN | PFLAG_HAS_BOUNDS) ||
(invalidateCache && (mPrivateFlags & PFLAG_DRAWING_CACHE_VALID) == PFLAG_DRAWING_CACHE_VALID) ||
(mPrivateFlags & PFLAG_INVALIDATED) != PFLAG_INVALIDATED || isOpaque() != mLastIsOpaque) {
... ...
final ViewParent p = mParent; // 获取父类对象
// noinspection PointlessBooleanExpression,ConstantConditions
if (!HardwareRenderer.RENDER_DIRTY_REGIONS) {
if (p != null && ai != null && ai.mHardwareAccelerated) {
p.invalidateChild(this, null);
return;
}
}
if (p != null && ai != null) {
final Rect r = ai.mTmpInvalRect;
r.set(0, 0, mRight - mLeft, mBottom - mTop); // 设置View的尺寸
p.invalidateChild(this, r); // 调用parent对象让parent对象重绘制child
}
}
}public final void invalidateChild(View child, final Rect dirty) {
... ...
ViewParent parent = this;
final AttachInfo attachInfo = mAttachInfo;
if (attachInfo != null) {
... ...
if (dirty == null) {
......
do {
View view = null;
if (parent instanceof View) {
view = (View) parent;
if (view.mLayerType != LAYER_TYPE_NONE) {
view.mLocalDirtyRect.setEmpty();
if (view.getParent() instanceof View) {
final View grandParent = (View) view.getParent();
grandParent.mPrivateFlags |= INVALIDATED;
grandParent.mPrivateFlags &= ~DRAWING_CACHE_VALID;
}
}
if ((view.mPrivateFlags & DIRTY_MASK) != 0) {
// already marked dirty - we're done
break;
}
}
......
} while (parent != null);
} else {
......
do {
View view = null;
if (parent instanceof View) {
view = (View) parent;
if (view.mLayerType != LAYER_TYPE_NONE &&
view.getParent() instanceof View) {
final View grandParent = (View) view.getParent();
grandParent.mPrivateFlags |= INVALIDATED;
grandParent.mPrivateFlags &= ~DRAWING_CACHE_VALID;
}
}
......
parent = parent.invalidateChildInParent(location, dirty); //层层刷新
.......
} while (parent != null);
}
}
}public ViewParent invalidateChildInParent(final int[] location, final Rect dirty) {
invalidateChild(null, dirty);
return null;
}public void invalidateChild(View child, Rect dirty) {
checkThread(); //检测是否是UI线程
if (dirty == null) {
// Fast invalidation for GL-enabled applications; GL must redraw everything
invalidate();
return;
}
if (mCurScrollY != 0 || mTranslator != null) {
mTempRect.set(dirty);
dirty = mTempRect;
if (mCurScrollY != 0) {
dirty.offset(0, -mCurScrollY);
}
if (mTranslator != null) {
mTranslator.translateRectInAppWindowToScreen(dirty);
}
if (mAttachInfo.mScalingRequired) {
dirty.inset(-1, -1);
}
}
if (!mDirty.isEmpty() && !mDirty.contains(dirty)) {
mAttachInfo.mSetIgnoreDirtyState = true;
mAttachInfo.mIgnoreDirtyState = true;
}
mDirty.union(dirty);
if (!mWillDrawSoon) {
scheduleTraversals();
}
}


 1万+
1万+


 被折叠的 条评论
为什么被折叠?
被折叠的 条评论
为什么被折叠?
 到【灌水乐园】发言


