


很久没有用到图形绘制的东西了,有同事问我问题我只能告诉他用到哪些东西,具体的都忘记了。现在写篇博客做个笔记。
- Paint基本用法
- Canvas基本用法
- Path基本用法
- 自定义View雷达实例
Paint基本用法
Paint直接翻译为油漆,SDK里面的注释为The Paint class holds the style and color information about how to draw geometries, text and bitmaps.简单的可以理解为画笔,控制了绘制出的文本和图片的样式和颜色。
常用的方法:
| 方法 | 作用 |
|---|---|
| setColor | 设置颜色 |
| setAntiAlias | 设置抗锯齿 |
| setAlpha | 设置透明度(值为0-255) |
| setStyle | 设置画笔风格 |
| setStrokeWidth | 设置画笔粗细 |
Canvas基本用法
Canvas可以简单理解为一块画布,有了画布和画笔就可以简单的绘制图形了。
常用的方法:
| 方法 | 作用 |
|---|---|
| drawText | 绘制文字 |
| drawCircle | 绘制圆圈 |
| drawLine | 绘制直线 |
| drawPoint | 绘制点 |
| drawArc | 绘制圆弧 |
| drawRoundRect | 绘制矩形 |
Path基本用法
Path可以简单理解为路径,可以用于画布上使用画笔绘制图形也可以用于图片剪切。
常用的方法:
| 方法 | 作用 |
|---|---|
| moveTo | 把一个点设置为路径起点 |
| lineTo | 从最后一个指定的点到这个点添加一条线 |
| close | 闭合路径 |
| addArc | 给路径添加一个弧形的轮廓(我觉得就是把路径变弧形) |
| offset | 设置路径偏移 |
下面用Path做几个例子。
代码如下:
public class LeidaView extends View {
private Paint mPaint;
private Context context;
@Override
protected void onDraw(Canvas canvas) {
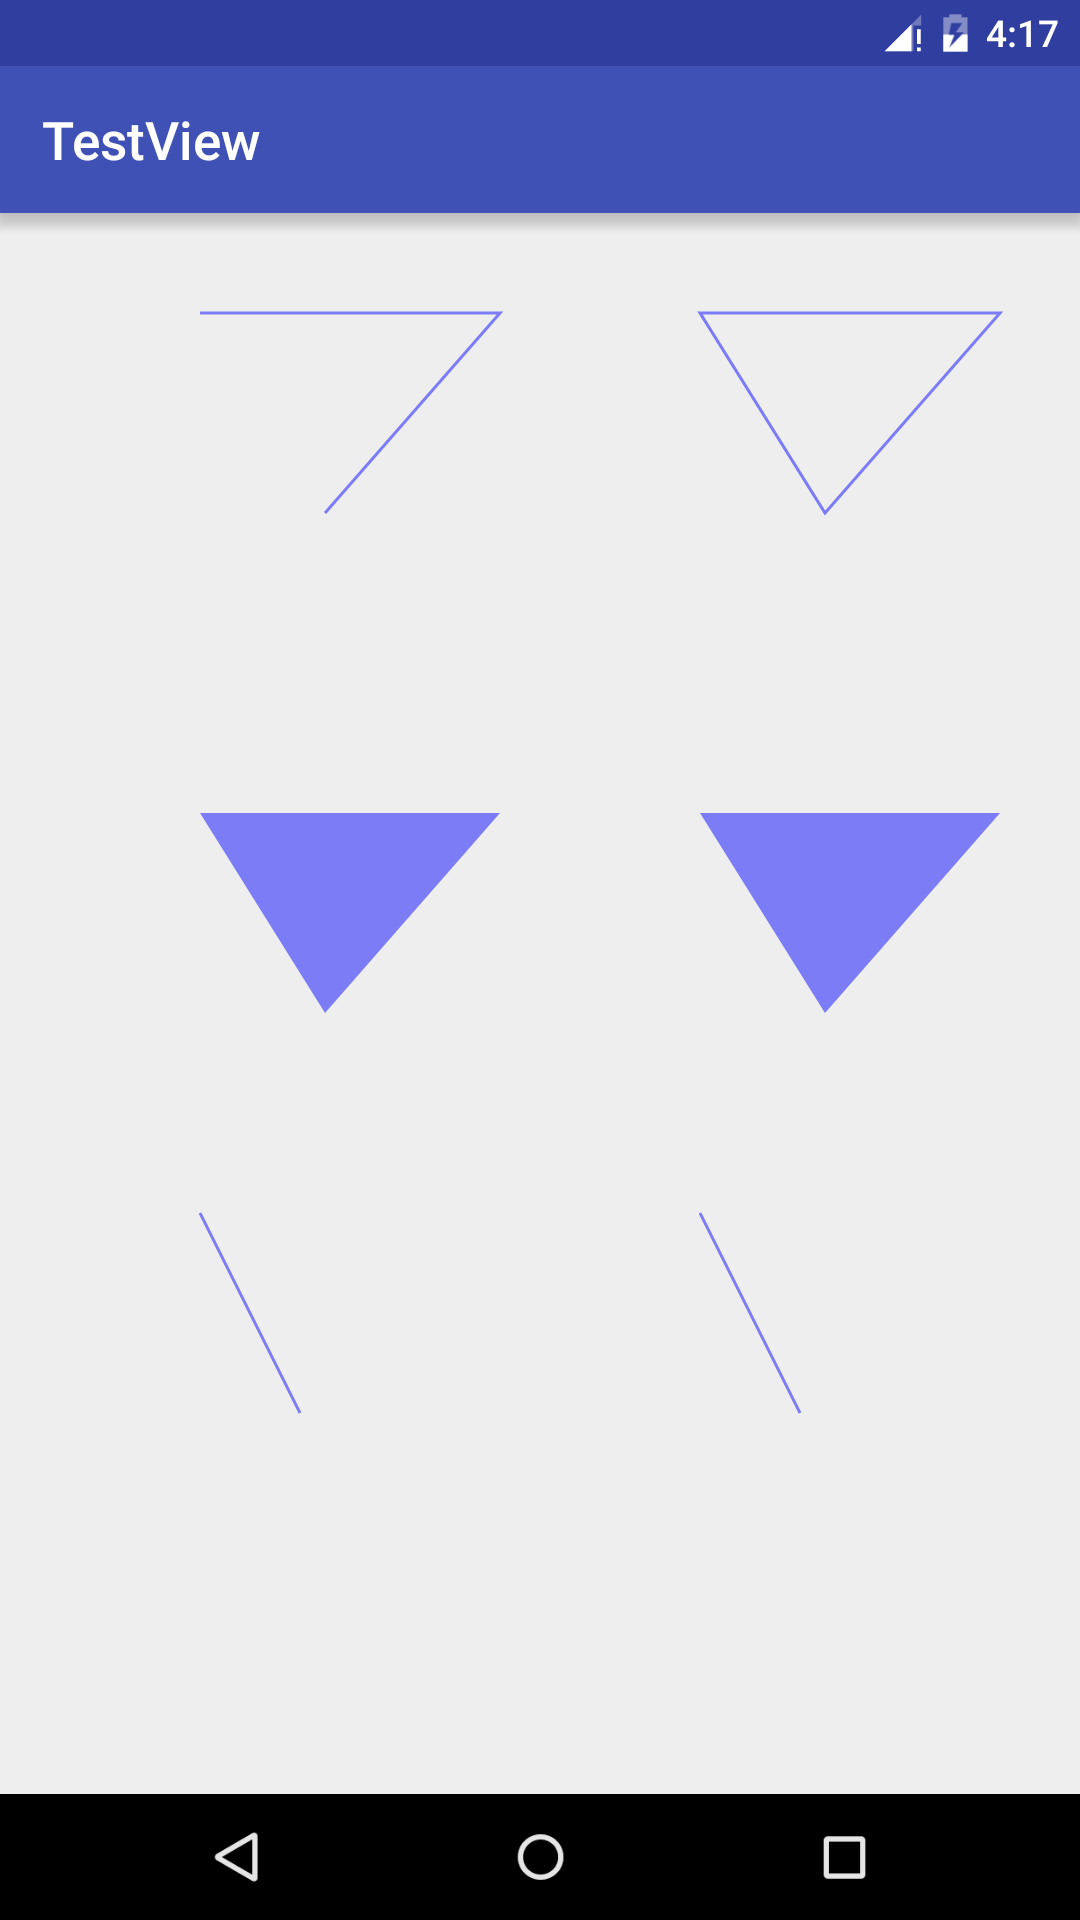
//不封闭的三角形
Path mPath = new Path();
mPath.moveTo(200, 100);
mPath.lineTo(500, 100);
mPath.lineTo(325, 300);
canvas.drawPath(mPath, mPaint);
//封闭的三角形
Path mPath1 = new Path();
mPath1.moveTo(700, 100);
mPath1.lineTo(1000, 100);
mPath1.lineTo(825, 300);
mPath1.close();
canvas.drawPath(mPath1, mPaint);
//画笔设置了FILL之后,掉不掉用Close看起来效果一样
mPaint.setStyle(Paint.Style.FILL);
Path mPath2 = new Path();
mPath2.moveTo(200, 600);
mPath2.lineTo(500, 600);
mPath2.lineTo(325, 800);
canvas.drawPath(mPath2, mPaint);
Path mPath3 = new Path();
mPath3.moveTo(700, 600);
mPath3.lineTo(1000, 600);
mPath3.lineTo(825, 800);
mPath3.close();
canvas.drawPath(mPath3, mPaint);
mPaint.setStyle(Paint.Style.STROKE);//这里如果FILL模式画不出来线
//路径偏移
Path mPath4 = new Path();
mPath4.moveTo(200, 1000);
mPath4.lineTo(300, 1200);
canvas.drawPath(mPath4, mPaint);
//X,Y坐标做加法
mPath4.offset(500,0);
canvas.drawPath(mPath4,mPaint);
}
public LeidaView(Context context) {
this(context, null);
}
public LeidaView(Context context, AttributeSet attrs) {
this(context, attrs, 0);
}
public LeidaView(Context context, AttributeSet attrs, int defStyleAttr) {
super(context, attrs, defStyleAttr);
mPaint = new Paint();
mPaint.setStyle(Paint.Style.STROKE);
mPaint.setColor(Color.BLUE);
mPaint.setAntiAlias(true);
mPaint.setAlpha(122);
mPaint.setTextSize(34);
mPaint.setStrokeWidth(3);
}
}自定义View雷达实例
  WindowManager wm = (WindowManager) getContext().getSystemService(Context.WINDOW_SERVICE);
  //获取屏幕宽高
        int width = wm.getDefaultDisplay().getWidth();
        int height = wm.getDefaultDisplay().getHeight();
        canvas.drawCircle(width/2,height/2,(float)(width/2*0.9),mPaint);
        canvas.drawCircle(width/2,height/2,(float)(width/2*0.6),mPaint);
        canvas.drawCircle(width/2,height/2,(float)(width/2*0.3),mPaint);
        Path mPath=new Path();
        //将路径移动到边上
        mPath.moveTo((float)(width/2+width/2*0.9),height/2);
        mPath.lineTo(width/2,height/2);
        mPath.lineTo((float)981.5733,1100);//这个可能不同分辨率不同,我用的1920*1080测试
        mPath.close();
        canvas.drawPath(mPath,mPaint);
        mPaint.setStrokeWidth(20);
        canvas.drawPoint(width/2,height/2,mPaint);
效果图如下
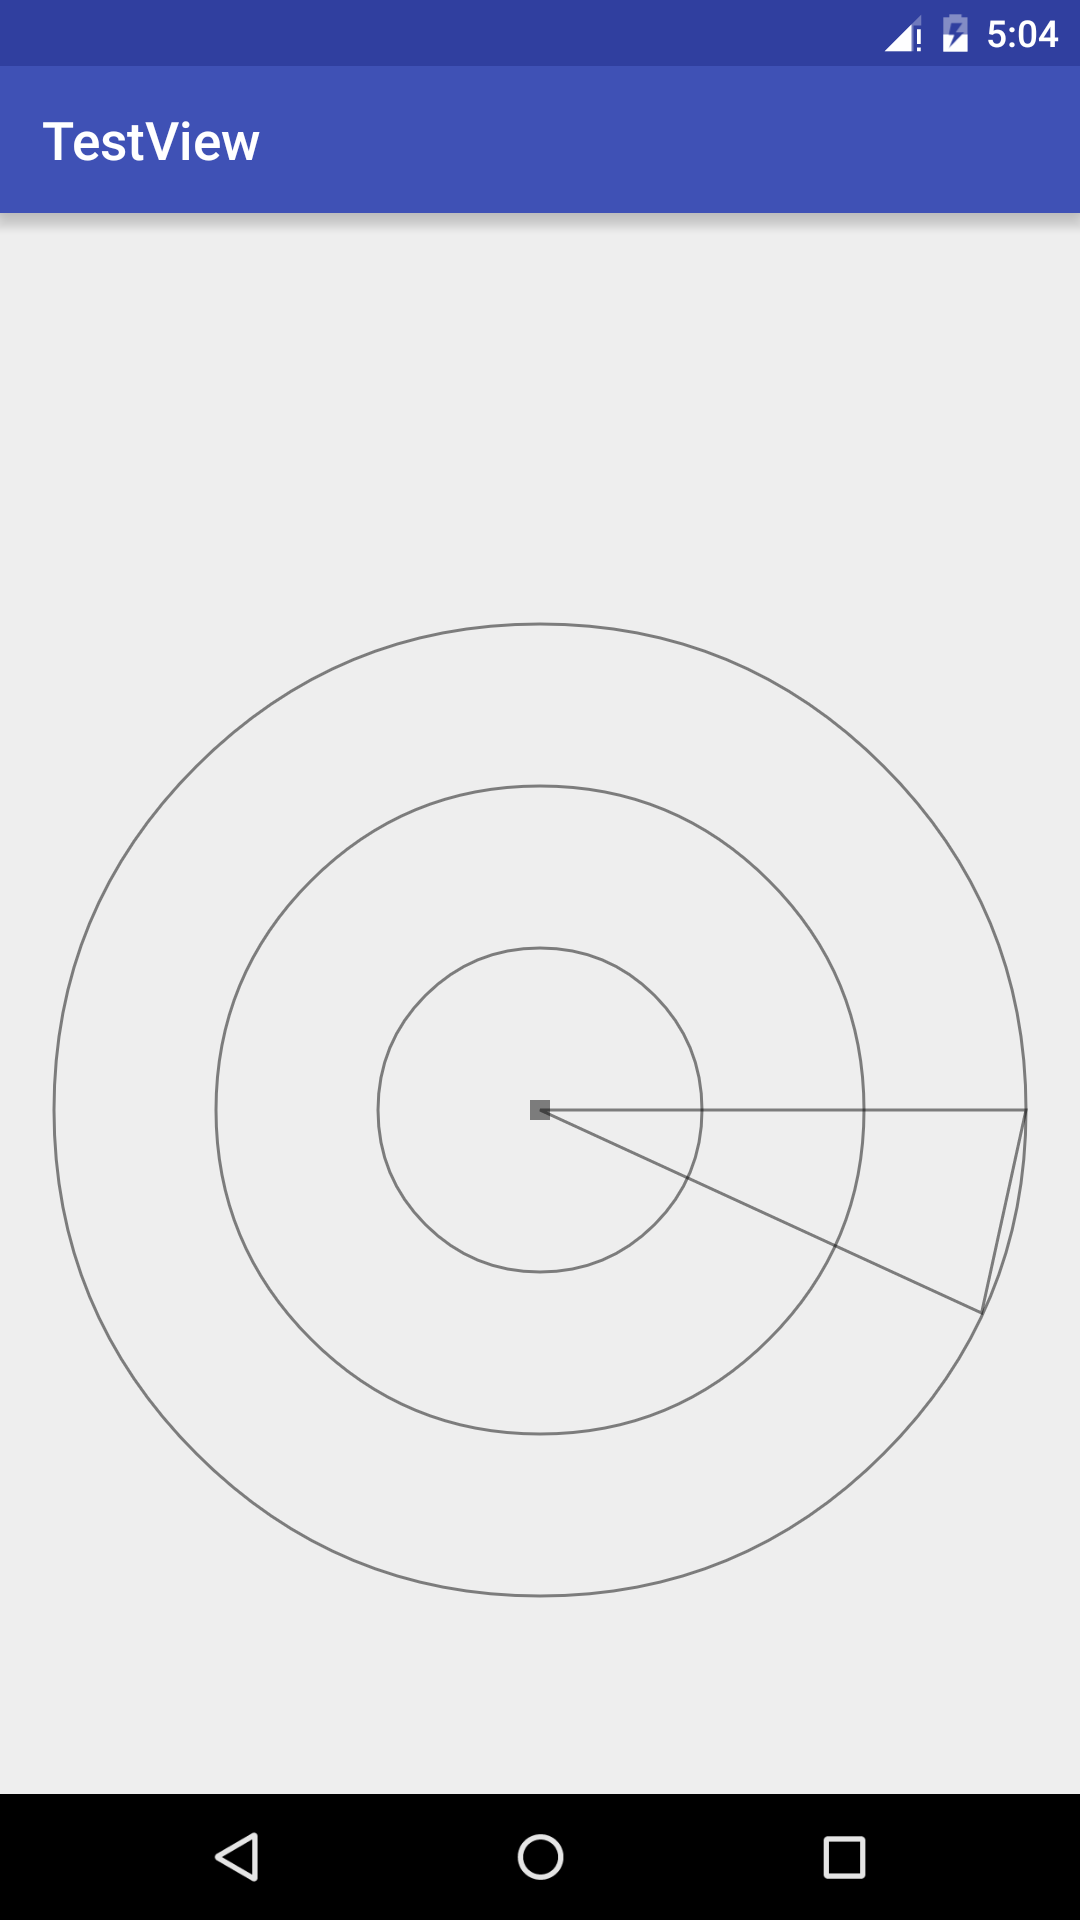
如果想要给雷达加上动画,说一下简单的实现。
雷达的背景是不需要动的,也就是说需要动画效果的只有雷达的指针,也就是说只要给指针添加动画,所以我们将雷达的背景和指针的绘制拆分成为两个自定义的View,绘制方法相同。这里就不贴代码了。然后将雷达指针的view设置动画,如下代码:
Animation anim =new RotateAnimation(0f, 360f, Animation.RELATIVE_TO_SELF, 0.5f,Animation.RELATIVE_TO_SELF, 0.5729f);//这里第四和第六个参数代表旋转的中心,
//比如0.5就应该是x轴的中间,0.5729是因为Y轴长度没有去掉状态栏,这里偷了懒手动算了一个大概的值
anim.setDuration(3000); // 设置动画时间
anim.setInterpolator(new LinearInterpolator()); // 设置插入器,这里设置了一个匀速的
anim.setRepeatCount(10);设置次数
之后将指针的view启动这个anim就好啦。


 845
845

 被折叠的 条评论
为什么被折叠?
被折叠的 条评论
为什么被折叠?
 到【灌水乐园】发言


