 iOS开发技巧:轻松退出键盘


 本文介绍三种方法帮助iOS开发者轻松退出键盘:通过在导航条添加“Done”按钮、将回车键作为退出键盘的响应键、以及在弹出键盘上添加一个专门的退出按钮。实现方式包括设置UITextViewDelegate、重写方法以及使用UIToolbar。文章提供详细代码示例和效果展示。
这里介绍三种方法:
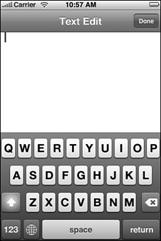
1.如果你程序是有导航条的,可以在导航条上面加多一个Done的按钮,用来退出键盘,当然要先实UITextViewDelegate。
代码如下:
- (void)textViewDidBeginEditing:(UITextView *)textView {
   UIBarButtonItem *done =    [[[UIBarButtonItem alloc] initWithBarButtonSystemItem:UIBarButtonSystemItemDone target:self action:@selector(leaveEditMode)] autorelease];
   self.navigationItem.rightBarButtonItem = done;
}

- (void)textViewDidEndEditing:(UITextView *)textView {
    self.navigationItem.rightBarButtonItem = nil;
}

- (void)leaveEditMode {
    [self.textView resignFirstResponder];
}
效果类似这样:
代码如下:
#pragma mark - UITextView Delegate Methods
-(BOOL)textView:(UITextView *)textView shouldChangeTextInRange:(NSRange)range replacementText:(NSString *)text
{
    if ([text isEqualToString:@"\n"]) {
        [textView resignFirstResponder];
        return NO;
    }
    return YES;
}
这样无论你是使用电脑键盘上的回车键还是使用弹出键盘里的return键都可以达到退出键盘的效果。
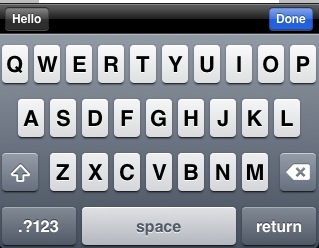
3.第三种方法感觉效果比上面两种都好,就是在弹出的键盘上面加一个view来放置退出键盘的Done按钮。
代码如下:
 UIToolbar * topView = [[UIToolbar alloc]initWithFrame:CGRectMake(0, 0, 320, 30)];
    [topView setBarStyle:UIBarStyleBlack];

    UIBarButtonItem * helloButton = [[UIBarButtonItem alloc]initWithTitle:@"Hello" style:UIBarButtonItemStyleBordered target:self action:nil];

    UIBarButtonItem * btnSpace = [[UIBarButtonItem alloc]initWithBarButtonSystemItem:UIBarButtonSystemItemFlexibleSpace target:self action:nil];

    UIBarButtonItem * doneButton = [[UIBarButtonItem alloc]initWithTitle:@"Done" style:UIBarButtonItemStyleDone target:self action:@selector(dismissKeyBoard)];


    NSArray * buttonsArray = [NSArray arrayWithObjects:helloButton,btnSpace,doneButton,nil];
    [doneButton release];
    [btnSpace release];
    [helloButton release];

    [topView setItems:buttonsArray];
    [tvTextView setInputAccessoryView:topView];

-(IBAction)dismissKeyBoard
{
    [tvTextView resignFirstResponder];
}
主要是使用了uitextview的InputAccessoryView的属性来达到这样的效果,下面是效果图:
先写到这里,以后有好的在补充!


 2289
2289

 被折叠的 条评论
为什么被折叠?
被折叠的 条评论
为什么被折叠?
 到【灌水乐园】发言


