


demo自带的例子不符合现在项目的业务需求,摸索了下,总算做出个能跑的,感觉很多地方的用法还是有些不规范,不过好歹跑起来了。
开发环境:
JDK1.6
Activiti5.13
Eclipse
MYSQL5
简单起见,这里没有做一个web的项目,只是一个Java程序。
业务场景说明:
预算填报员选取期间填写预算表单,表单是与流程独立的,因此在流程节点只记录表单的ID,预算填报员填报完后,提交领导审批,审批人是通过前台选择,也就是流程运行中动态指定的,审批时显示表单不同于填报表单,审批结束后流程结束。
表单的属性包括填报单位。
流程实例中记录的变量有
period 填报期间
任务节点记录的变量有
accountCode 账号编码
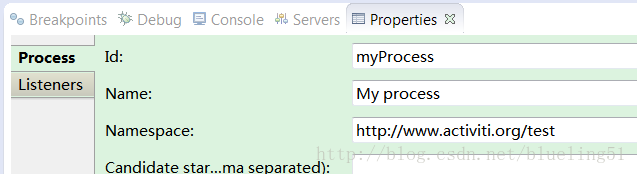
1. 画流程图

设置流程id
设置节点表单id

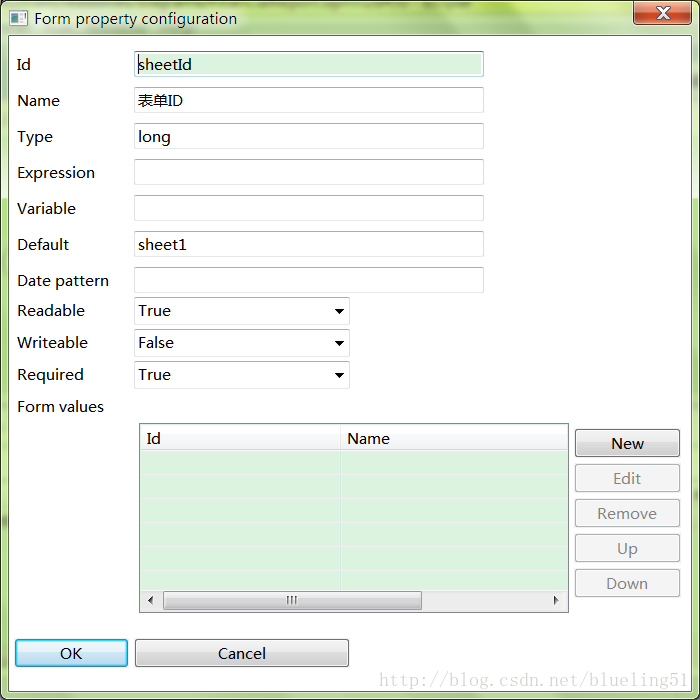
填写预算节点表单id为sheet1,预算审批节点的表单id为sheet2
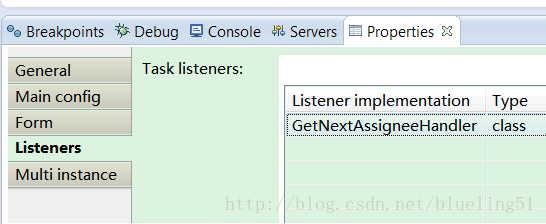
2. 编写监听,更新流程图
流程运行时,究竟流向何人,是通过程序来确定,而不是固定的一个人或者一个角色组。
因此这里使用添加监听的方式来添加下一个节点的执行人。
只是做一个demo方便起见,我在流程执行实例中添加了一个变量nextAssignee,用来存储流程的下个执行人,监听的代码如下:
import org.activiti.engine.ProcessEngine;
import org.activiti.engine.RuntimeService;
import org.activiti.engine.delegate.DelegateTask;
import org.activiti.engine.delegate.TaskListener;
import org.springframework.context.support.ClassPathXmlApplicationContext;
public class GetNextAssigneeHandler implements TaskListener {
    /**
     *
     */
    private static final long serialVersionUID = 3385759189120775989L;
    @Override
    public void notify(DelegateTask task) {
        // 加载配置
        ClassPathXmlApplicationContext ctx = new ClassPathXmlApplicationContext(
                "applicationContext.xml");
        ProcessEngine processEngine = (ProcessEngine) ctx
                .getBean("processEngine");
        RuntimeService runtimeService = processEngine.getRuntimeService();
        // 获取存储在流程实例中的nextAssignee变量的值
        String next = (String) runtimeService.getVariable(
                task.getExecutionId(), "nextAssignee");
        // 设置节点的下个执行人
        task.setAssignee(next);
    }
}
修改流程图两个节点的配置,添加监听,两个节点用的是同一个监听

3. 流程测试例子
kermit为预算填报员,是从前台传入的
fozzie为预算审批员,也是从前台传入的
import java.util.HashMap;
import java.util.List;
import java.util.Map;

import org.activiti.engine.FormService;
import org.activiti.engine.ProcessEngine;
import org.activiti.engine.RepositoryService;
import org.activiti.engine.RuntimeService;
import org.activiti.engine.TaskService;
import org.activiti.engine.form.FormProperty;
import org.activiti.engine.task.Task;
import org.springframework.context.support.ClassPathXmlApplicationContext;

public class TestFinancial {

	/**
	 * @param args
	 */
	public static void main(String[] args) {

		// 加载spring配置
		ClassPathXmlApplicationContext ctx = new ClassPathXmlApplicationContext(
				"applicationContext.xml");

		RuntimeService runtimeService = (RuntimeService) ctx
				.getBean("runtimeService");
		ProcessEngine processEngine = (ProcessEngine) ctx
				.getBean("processEngine");

		FormService formService = processEngine.getFormService();

		// 发布流程
		RepositoryService repositoryService = processEngine
				.getRepositoryService();
		// Deploy the process definition
		repositoryService.createDeployment()
				.addClasspathResource("diagrams/FinancialReport.bpmn").deploy();

		TaskService taskService = (TaskService) ctx.getBean("taskService");

		// 流程起始参数,会保存在流程实例的变量中
		Map<String, Object> map = new HashMap<String, Object>();
		map.put("period", "2013-06");
		map.put("nextAssignee", "kermit");

		// 开始流程
		runtimeService.startProcessInstanceByKey("myProcess", map);

		// query kermit's tasks;
		List<Task> tasks = taskService.createTaskQuery().taskAssignee("kermit")
				.processVariableValueEquals("period", "2013-06").list();
		for (Task task : tasks) {

			if ("usertask1".equals(task.getTaskDefinitionKey())) {
				System.out.println("任务已经成功分配给了kermit");

				// 设置节点的填报账号,这个值应该是要从前台获得的
				taskService.setVariableLocal(task.getId(), "accountCode",
						"A1106");

				// 从节点中获取表单ID
				Map<String, FormProperty> propMap = createMap(formService
						.getTaskFormData(task.getId()).getFormProperties());
				String sheetId = propMap.get("sheetId").getValue();

				// 从流程实例中获取填报期间
				String period = (String) runtimeService.getVariable(
						task.getProcessInstanceId(), "period");
				// 从节点实例中获取账户编码
				String accountCode = (String) taskService.getVariable(
						task.getId(), "accountCode");

				// 打印填报信息
				System.out.println("填报期间:" + period);
				System.out.println("填报表单:" + sheetId);
				System.out.println("填报单位:" + accountCode);

				// 设置下个节点审批人
				runtimeService.setVariable(task.getExecutionId(),
						"nextAssignee", "fozzie");

				// 节点任务结束
				taskService.complete(task.getId());
				System.out.println("kermit填写预算单任务已完成");
			}
		}

		// query fozzie's tasks;
		List<Task> ftasks = taskService.createTaskQuery()
				.taskAssignee("fozzie")
				.processVariableValueEquals("period", "2013-06").list();
		for (Task task : ftasks) {
			taskService.setVariableLocal(task.getId(), "accountCode", "A1100");

			if ("usertask2".equals(task.getTaskDefinitionKey())) {
				System.out.println("任务已经成功分配给了fozzie");

				// 设置节点的填报账号,这个值应该是要从前台获得的
				taskService.setVariableLocal(task.getId(), "accountCode",
						"A1100");

				// 从节点中获取表单ID
				Map<String, FormProperty> propMap = createMap(formService
						.getTaskFormData(task.getId()).getFormProperties());
				String sheetId = propMap.get("sheetId").getValue();
				// 从流程实例中获取填报期间
				String period = (String) runtimeService.getVariable(
						task.getProcessInstanceId(), "period");
				// 从节点实例中获取账户编码
				String accountCode = (String) taskService.getVariable(
						task.getId(), "accountCode");

				// 打印填报信息
				System.out.println("填报期间:" + period);
				System.out.println("填报表单:" + sheetId);
				System.out.println("填报单位:" + accountCode);

				// 节点任务结束
				taskService.complete(task.getId());
				System.out.println("fozzie审批任务已完成");
			}
		}
	}

	private static Map<String, FormProperty> createMap(List<FormProperty> props) {
		Map<String, FormProperty> re = new HashMap<String, FormProperty>();
		for (FormProperty p : props) {
			re.put(p.getId(), p);
		}
		return re;
	}
}
测试结果:

附applicationContext.xml,数据库使用MYSQL5
<?xml version="1.0" encoding="UTF-8" ?>
<beans xmlns="http://www.springframework.org/schema/beans"
    xmlns:xsi="http://www.w3.org/2001/XMLSchema-instance" xmlns:context="http://www.springframework.org/schema/context"
    xsi:schemaLocation="http://www.springframework.org/schema/beans
    http://www.springframework.org/schema/beans/spring-beans-3.1.xsd">
    <bean id="dataSource"
        class="org.springframework.jdbc.datasource.SimpleDriverDataSource">
        <property name="driverClass" value="com.mysql.jdbc.Driver" />
        <property name="url" value="jdbc:mysql://127.0.0.1:3306/test_activiti" />
        <property name="username" value="root" />
        <property name="password" value="root" />
    </bean>
    <bean id="transactionManager"
        class="org.springframework.jdbc.datasource.DataSourceTransactionManager">
        <property name="dataSource" ref="dataSource" />
    </bean>
    <!-- Activiti begin -->
    <bean id="processEngineConfiguration" class="org.activiti.spring.SpringProcessEngineConfiguration">
        <property name="dataSource" ref="dataSource" />
        <property name="transactionManager" ref="transactionManager" />
        <property name="databaseSchemaUpdate" value="true" />
        <property name="jobExecutorActivate" value="false" />
        <property name="history" value="full" />
        <property name="processDefinitionCacheLimit" value="10" />
    </bean>
    <bean id="processEngine" class="org.activiti.spring.ProcessEngineFactoryBean">
        <property name="processEngineConfiguration" ref="processEngineConfiguration" />
    </bean>
    <bean id="repositoryService" factory-bean="processEngine"
        factory-method="getRepositoryService" />
    <bean id="runtimeService" factory-bean="processEngine"
        factory-method="getRuntimeService" />
    <bean id="formService" factory-bean="processEngine"
        factory-method="getFormService" />
    <bean id="identityService" factory-bean="processEngine"
        factory-method="getIdentityService" />
    <bean id="taskService" factory-bean="processEngine"
        factory-method="getTaskService" />
    <bean id="historyService" factory-bean="processEngine"
        factory-method="getHistoryService" />
    <bean id="managementService" factory-bean="processEngine"
        factory-method="getManagementService" />
    <!-- Activiti end -->

</beans>
项目引用jar包就是activiti-explorer里用的所有jar包+mysql的驱动
END


 3470
3470


 被折叠的 条评论
为什么被折叠?
被折叠的 条评论
为什么被折叠?
 到【灌水乐园】发言


