


 这篇博客介绍了如何在iOS应用中通过纯代码方式为多个UIView添加UIImage、文字和UIButton。首先,创建一个plist文件作为数据源,存储图片和文字信息。接着,将plist文件导入项目,并读取其内容。在for循环中,为每个小视图添加相应的图片和文字描述。最后,展示了点击按钮后的效果。
承接上一篇 http://blog.csdn.net/bun12345/article/details/46137329点击打开链接
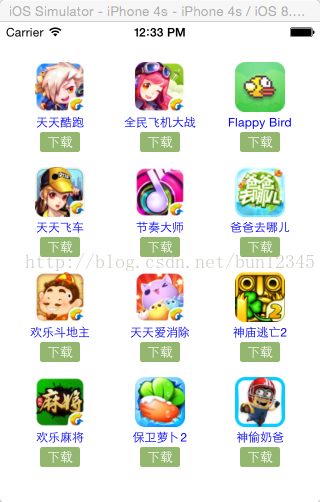
在UIView中添加了若干的小uiview之后,我们来继续为其添加响应的图像、文字和按钮,效果图如下
1:先为这个应用创建plist文件数据源,大家都知道这个是可以拿来存储数据信息的吧,这就不多说了
如我创建的是 app.plist
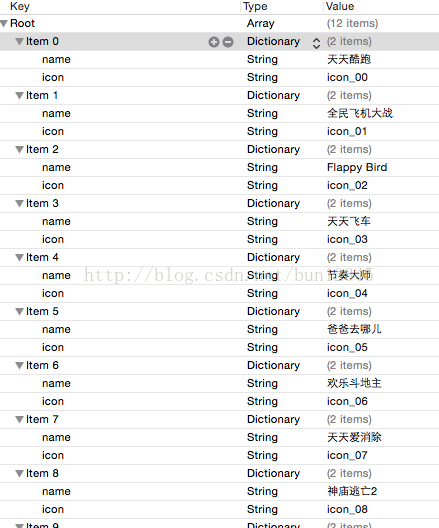
大家可以自己另选图片和添加文字信息
2:先将plist文件读取到我们的项目中
//plist
-(NSArray *)apps
{
    if (_apps == nil) {
        //初始化

        //1.获得plist的全路径

        NSBundle *bundle = [NSBundle mainBundle];
        NSString *plistPath = [bundle pathForResource:@"app.plist" ofType:nil];

        //2.加载数组
        _apps = [NSArray arrayWithContentsOfFile:plistPath];

    }
    return _apps;
}
3:我们可以根据plist里面字典的数量而创建小框框的数量
即只需要修改
//5.根据个数创建对应的框框( index 0 ~ index 11)
    for (int index = 0; index < 18; index++) {
//5.根据个数创建对应的框框( index 0 ~ index 11)
    for (int index = 0; index < self.apps.count; index++) {
        //创建小框框
4.为小框框添加响应的图片和文字说明,还是在那个for循环里面添加
 //将小框框添加到控制器的view中
        [self.view addSubview:appView];


      /**  将三个组件添加到小框框中*/
          //0.index位置对应的应用信息
        NSDictionary *appInfo = self.apps[index];

         //1.添加图像
        UIImageView *image = [[UIImageView alloc]init];
          //1.1设置图像的大小和位置
        CGFloat imagewidth = 50;
        CGFloat imageheight = 50;
        CGFloat imagex = (appwith - imagewidth)*0.5;
        CGFloat imagey = 0;

        image.frame = CGRectMake(imagex, imagey, imagewidth, imageheight);
          //1.2设置图像的背景色
        //image.backgroundColor = [UIColor blueColor];
             //设置图片
        image.image = [UIImage imageNamed:appInfo[@"icon"]];
          //1.3将图像添加到小框框中
        [appView addSubview:image];


        //2.添加图像名的lable
        UILabel *name = [[UILabel alloc]init];
        //1.1设置图像名的大小和位置
        CGFloat namewidth = appwith;
        CGFloat nameheight = 20;
        CGFloat namex = 0;
        CGFloat namey = imagey + imageheight;
        name.frame = CGRectMake(namex, namey, namewidth, nameheight);
        //1.2设置图像名的背景色
        //name.backgroundColor = [UIColor grayColor];
          //设置图像名的文字
        name.text = appInfo[@"name"];
        name.font = [UIFont systemFontOfSize:12]; //字体
        name.textColor = [UIColor blueColor]; //字的颜色
        name.textAlignment = NSTextAlignmentCenter; //使字体居中
        //1.3将图像名添加到小框框中
        [appView addSubview:name];


        //3.添加下载按钮
        UIButton *downBtn = [[UIButton alloc]init];
        //1.1设置按钮的大小和位置
        CGFloat downBtnx = 20;
        CGFloat downBtny = namey + nameheight;
        CGFloat downBtnwidth = appwith - 2 * downBtnx;
        CGFloat downBtnheight = 20;
        downBtn.frame = CGRectMake(downBtnx, downBtny, downBtnwidth, downBtnheight);
        //1.2设置按钮的背景色
        //downBtn.backgroundColor = [UIColor yellowColor];
          //正常状态下的图片
        UIImage *normal = [UIImage imageNamed:@"buttongreen"];
        [downBtn setBackgroundImage:normal forState:UIControlStateNormal];
         //高亮状态下的图片
        UIImage *highlighted = [UIImage imageNamed:@"buttongreen_highlighted"];
        [downBtn setBackgroundImage:highlighted forState:UIControlStateHighlighted];
           //按钮里的文字
        [downBtn setTitle:@"下载" forState:UIControlStateNormal];
            //文字的颜色
        //[downBtn setTitleColor:[UIColor orangeColor] forState:UIControlStateNormal];
            //文字的大小
        downBtn.titleLabel.font = [UIFont systemFontOfSize:13];
        //1.3将按钮添加到小框框中
        [appView addSubview:downBtn];


        //为按钮添加响应事件
        [downBtn addTarget:self action:@selector(btn) forControlEvents:UIControlEventTouchUpInside];
5.里面有个按钮的响应事件,我就随便搞了个弹框提醒
//弹框提醒
-(void)showAlertViewWithMsg:(NSString *)msg
{
    [[NSOperationQueue mainQueue] addOperationWithBlock: ^ {
        UIAlertView *alert = [[UIAlertView alloc] initWithTitle:@"提示" message:msg delegate:nil cancelButtonTitle:@"确定" otherButtonTitles:nil, nil];

        [alert show];
    }];
}
//按钮添加响应事件的实现
-(void)btn{
    [self showAlertViewWithMsg:@"确定要下载么"];

}
点击按钮后的效果图为


 190
190

 被折叠的 条评论
为什么被折叠?
被折叠的 条评论
为什么被折叠?
 到【灌水乐园】发言


