


http://cuishen.iteye.com/blog/430735
大家平日使用spring + hibernate做项目的时候大概都接触过下面的spring配置代码:下面是使用普通的jdbc驱动获得DataSource的配置


- <bean id="dataSource" class="org.springframework.jdbc.datasource.DriverManagerDataSource">
- <property name="driverClassName"><value>oracle.jdbc.OracleDriver</value></property>
- <property name="url"><value>jdbc:oracle:thin:@caij-b815c8aab6:1521:cui</value></property>
- <property name="username"><value>cuishen</value></property>
- <property name="password"><value>cuishen</value></property>
- </bean>
- <bean id="sessionFactory" class="org.springframework.orm.hibernate3.LocalSessionFactoryBean">
- <property name="mappingResources"><list>
- <value>com/cuishen/testDao/pojo/Test.hbm.xml</value>
- </list></property>
- <property name="hibernateProperties"><props>
- <prop key="dialect">org.hibernate.dialect.Oracle9Dialect</prop>
- <prop key="connection.autocommit">true</prop>
- </props></property>
- <property name="dataSource"><ref local="dataSource"/></property>
- </bean>
- <bean id="txManager" class="org.springframework.orm.hibernate3.HibernateTransactionManager">
- <property name="sessionFactory"><ref local="sessionFactory"/></property>
- </bean>
- <bean id="dao" class="com.conserv.dao.impl.HibernateDaoImpl" init-method="init" destroy-method="destroy">
- <property name="transactionManager"><ref local="txManager"/></property>
- <property name="dialect"><value>Oracle9</value></property>
- </bean>
    <bean id="dataSource" class="org.springframework.jdbc.datasource.DriverManagerDataSource">
        <property name="driverClassName"><value>oracle.jdbc.OracleDriver</value></property>
        <property name="url"><value>jdbc:oracle:thin:@caij-b815c8aab6:1521:cui</value></property>
        <property name="username"><value>cuishen</value></property>
        <property name="password"><value>cuishen</value></property>
    </bean>
    <bean id="sessionFactory" class="org.springframework.orm.hibernate3.LocalSessionFactoryBean">
        <property name="mappingResources"><list>
             <value>com/cuishen/testDao/pojo/Test.hbm.xml</value>
        </list></property>
        <property name="hibernateProperties"><props>
            <prop key="dialect">org.hibernate.dialect.Oracle9Dialect</prop>
            <prop key="connection.autocommit">true</prop>
        </props></property>
        <property name="dataSource"><ref local="dataSource"/></property>
    </bean>
    <bean id="txManager" class="org.springframework.orm.hibernate3.HibernateTransactionManager">
        <property name="sessionFactory"><ref local="sessionFactory"/></property>
    </bean>
    <bean id="dao" class="com.conserv.dao.impl.HibernateDaoImpl" init-method="init" destroy-method="destroy">
        <property name="transactionManager"><ref local="txManager"/></property>
        <property name="dialect"><value>Oracle9</value></property>
    </bean>
下面是通过JNDI获得的DataSource的配置,只要将上面的id为"dataSource"的bean换成下面的配置就行了
- <bean id="dataSource" class="org.springframework.jndi.JndiObjectFactoryBean">
- ;property name="jndiName" value="cs" />
- </bean>
    <bean id="dataSource" class="org.springframework.jndi.JndiObjectFactoryBean">
	<property name="jndiName" value="cs" />
    </bean>
配置很简单,使用也非常方便,spring毫不挑食,不管是jdbc版的DataSource也好,是JNDI版的也好,它都能接受,那这个兼容性是怎么做到的呢??现在从源代码入手来一探究竟:
1. 先看看jdbc版的DataSource - org.springframework.jdbc.datasource.DriverManagerDataSource
- public class DriverManagerDataSource extends AbstractDataSource
public class DriverManagerDataSource extends AbstractDataSource
再看看这个AbstractDataSource:
- public abstract class AbstractDataSource implements javax.sql.DataSource
public abstract class AbstractDataSource implements javax.sql.DataSource
哈哈,原来DriverManagerDataSource是javax.sql.DataSource的实现类,那做为bean注入给sessionFactory真是无可厚非
我们再看看它内部的实现细节
- return DriverManager.getConnection(url, props);
return DriverManager.getConnection(url, props);
哈哈,这代码是不是再熟悉也不过啦?原来DriverManagerDataSource实现了javax.sql.DataSource接口,本质是对jdbc连接数据库的简单封装
2. 接下来看看JNDI版的DataSource - org.springframework.jndi.JndiObjectFactoryBean
- public class JndiObjectFactoryBean extends JndiObjectLocator implements FactoryBean
public class JndiObjectFactoryBean extends JndiObjectLocator implements FactoryBean
追溯JndiObjectFactoryBean的父类和实现的接口以及父类的父类,都和javax.sql.DataSource接口八竿子打不着,没有一点点渊源,oh,my God! 这怎么可能!?完全不相干的对象怎么能够被注入?这完全有悖java的精神!但事实摆在眼前,测试是完全通过的!静下心来,我注意到了JndiObjectFactoryBean实现了FactoryBean接口,一直以来脑子里对FactoryBean模式感到有点模糊,不能完全领会其本质,难道真的是这里面有文章??好,借此机会,好好研究下FactoryBean接口,下面是org.springframework.beans.factory.FactoryBean源代码里一段注释:
- /**
- * Interface to be implemented by objects used within a BeanFactory
- * that are themselves factories. If a bean implements this interface,
- * it is used as a factory, not directly as a bean.
- *
- * <p><b>NB: A bean that implements this interface cannot be used
- * as a normal bean.</b> A FactoryBean is defined in a bean style,
- * but the object exposed for bean references is always the object
- * that it creates.
- */
/**
 * Interface to be implemented by objects used within a BeanFactory
 * that are themselves factories. If a bean implements this interface,
 * it is used as a factory, not directly as a bean.
 *
 * <p><b>NB: A bean that implements this interface cannot be used
 * as a normal bean.</b> A FactoryBean is defined in a bean style,
 * but the object exposed for bean references is always the object
 * that it creates.
 */
翻译过来是说:所有实现FactoryBean接口的类都被当作工厂来使用,而不是简单的直接当作bean来使用,FactoryBean实现类里定义了要生产的对象,并且由FactoryBean实现类来造该对象的实例,看到这里聪明的你大概已经能猜出个八九不离十了吧
我们回过头来看看JndiObjectFactoryBean的实现细节
- private Object jndiObject;
- /**
- * Look up the JNDI object and store it.
- * 广义上说是造对象的过程,就本例而言,是通过JNDI获得DataSource对象
- */
- public void afterPropertiesSet() throws IllegalArgumentException, NamingException {
- super.afterPropertiesSet();
- if (this.proxyInterface != null) {
- if (this.defaultObject != null) {
- throw new IllegalArgumentException(
- "'defaultObject' is not supported in combination with 'proxyInterface'");
- }
- // We need a proxy and a JndiObjectTargetSource.
- this.jndiObject = JndiObjectProxyFactory.createJndiObjectProxy(this);
- }
- else {
- if (!this.lookupOnStartup || !this.cache) {
- throw new IllegalArgumentException(
- "Cannot deactivate 'lookupOnStartup' or 'cache' without specifying a 'proxyInterface'");
- }
- if (this.defaultObject != null && getExpectedType() != null &&
- !getExpectedType().isInstance(this.defaultObject)) {
- throw new IllegalArgumentException("Default object [" + this.defaultObject +
- "] of type [" + this.defaultObject.getClass().getName() +
- "] is not of expected type [" + getExpectedType().getName() + "]");
- }
- // Locate specified JNDI object.
- this.jndiObject = lookupWithFallback();
- }
- }
- /**
- * Return the singleton JNDI object.
- * 返回JNDI对象(DataSource对象)
- */
- public Object getObject() {
- return this.jndiObject;
- }
- public Class getObjectType() {
- if (this.proxyInterface != null) {
- return this.proxyInterface;
- }
- else if (this.jndiObject != null) {
- return this.jndiObject.getClass();
- }
- else {
- return getExpectedType();
- }
- }
	private Object jndiObject;
	/**
	 * Look up the JNDI object and store it.
	 * 广义上说是造对象的过程,就本例而言,是通过JNDI获得DataSource对象
	 */
	public void afterPropertiesSet() throws IllegalArgumentException, NamingException {
		super.afterPropertiesSet();

		if (this.proxyInterface != null) {
			if (this.defaultObject != null) {
				throw new IllegalArgumentException(
						"'defaultObject' is not supported in combination with 'proxyInterface'");
			}
			// We need a proxy and a JndiObjectTargetSource.
			this.jndiObject = JndiObjectProxyFactory.createJndiObjectProxy(this);
		}

		else {
			if (!this.lookupOnStartup || !this.cache) {
				throw new IllegalArgumentException(
				    "Cannot deactivate 'lookupOnStartup' or 'cache' without specifying a 'proxyInterface'");
			}
			if (this.defaultObject != null && getExpectedType() != null &&
					!getExpectedType().isInstance(this.defaultObject)) {
				throw new IllegalArgumentException("Default object [" + this.defaultObject +
						"] of type [" + this.defaultObject.getClass().getName() +
						"] is not of expected type [" + getExpectedType().getName() + "]");
			}
			// Locate specified JNDI object.
			this.jndiObject = lookupWithFallback();
		}
	}
	/**
	 * Return the singleton JNDI object.
	 * 返回JNDI对象(DataSource对象)
	 */
	public Object getObject() {
		return this.jndiObject;
	}

	public Class getObjectType() {
		if (this.proxyInterface != null) {
			return this.proxyInterface;
		}
		else if (this.jndiObject != null) {
			return this.jndiObject.getClass();
		}
		else {
			return getExpectedType();
		}
	}
现在揭晓谜底:很简单,对于JndiObjectFactoryBean对象,spring IOC容器启动时确实造了它的对象,只不过这时是工厂本身,spring会自动调用工厂里的afterPropertiesSet()方法去造真正需要的bean,然后调用getObject()和getObjectType()方法返回已造好的对象和类型,再将其准确的注入依赖它的其他bean里面,所以并没有违背java的精神!
有兴趣也可以看看org.springframework.orm.hibernate3.LocalSessionFactoryBean,它也实现了FactoryBean接口,内部实现如出一辙,只不过它担负的重任不是造JNDI object,而是要造SessionFactory对象
=========http://blog.csdn.net/turkeyzhou/article/details/3139258
在此之前,我已经接触到了DataSource和JTA事务了,我们都应用到了JNDI技术;在Spring中提供了JNDI技术的整合支持,JNDI如何使用,我就不累赘了,具体我们来看一下整合的源代码:
代码类结构:
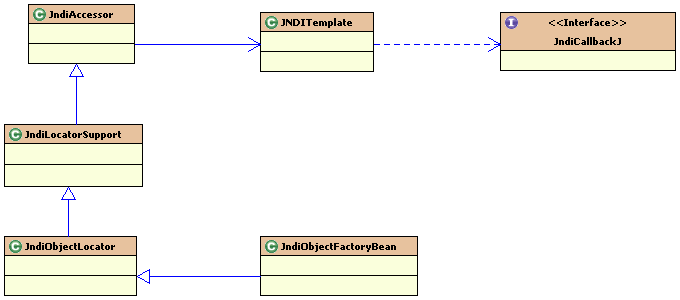
我们从上而下进行分析;
首先是:
JndiTemplate:
jndiTemplate提供了对JNDI服务器的vjndi对象的绑定,查询,撤销绑定和重新绑定,从一定意义上来说他跟JdbcTemplate等是同意概念的类,直接与资源管理器进行交互,并且同样的是采用的回调机制,我们可以看见其依赖了JndiCallbake接口:
其对绑定,差性能,撤销,重新绑定的实现的源代码如下:
- public Object execute(JndiCallback contextCallback) throws NamingException {
- Context ctx = createInitialContext();
- try {
- return contextCallback.doInContext(ctx);
- }
- finally {
- try {
- ctx.close();
- }
- catch (NamingException ex) {
- logger.debug("Could not close JNDI InitialContext", ex);
- }
- }
- }
- protected Context createInitialContext() throws NamingException {
- return new InitialContext(getEnvironment());
- }
这段代码生成了上下文,进而把上下文传递给了JndiCallBack,在这个接口的回调方法,我们直接使用context对资源管理器进行curd交互;
绑定对象:
- public Object lookup(final String name) throws NamingException {
- if (logger.isDebugEnabled()) {
- logger.debug("Looking up JNDI object with name [" + name + "]");
- }
- return execute(new JndiCallback() {
- public Object doInContext(Context ctx) throws NamingException {
- Object located = ctx.lookup(name);
- if (located == null) {
- throw new NameNotFoundException(
- "JNDI object with [" + name + "] not found: JNDI implementation
- returned null");
- }
- return located;
- }
- });
- }
- public void bind(final String name, final Object object) throws NamingException {
- if (logger.isDebugEnabled()) {
- logger.debug("Binding JNDI object with name [" + name + "]");
- }
- execute(new JndiCallback() {
- public Object doInContext(Context ctx) throws NamingException {
- ctx.bind(name, object);
- return null;
- }
- });
- }
重新绑定:
- public void rebind(final String name, final Object object) throws NamingException {
- if (logger.isDebugEnabled()) {
- logger.debug("Rebinding JNDI object with name [" + name + "]");
- }
- execute(new JndiCallback() {
- public Object doInContext(Context ctx) throws NamingException {
- ctx.rebind(name, object);
- return null;
- }
- });
- }
撤销绑定:
- public void unbind(final String name) throws NamingException {
- if (logger.isDebugEnabled()) {
- logger.debug("Unbinding JNDI object with name [" + name + "]");
- }
- execute(new JndiCallback() {
- public Object doInContext(Context ctx) throws NamingException {
- ctx.unbind(name);
- return null;
- }
- });
- }
- }
通过JndiTemplate,我们实现了底层访问代码;形成了具体实现层;与上层开来;
JndiAccessor:只是单纯的对JndiTemplate进行了包装,隔离了底层的实现细节;
JndiLocatorSupport的主要扩展的功能是,如果我们在配置JndiObjectFactoryBean的时候,配置了参数:resourceRef为true的话,那么就会如果我们查找的资源中间不包含:或者java:等前缀,我们会自动的会该路径加上java:comp/env,主要是匹配在j2ee容器里面的jndi资源的查找;
- protected String convertJndiName(String jndiName) {
- // Prepend container prefix if not already specified and no other scheme given.
- if (isResourceRef() && !jndiName.startsWith(CONTAINER_PREFIX) && jndiName.indexOf(':') == -1) {
- jndiName = CONTAINER_PREFIX + jndiName;
- }
- return jndiName;
- }
最后,我们再来看一下:
在JndiObjectFactoryBean我们实际上得到的是:
jndiObject :
初始化生成如下:
- public void afterPropertiesSet() throws IllegalArgumentException, NamingException {
- super.afterPropertiesSet();
- if (this.proxyInterface != null) {
- if (this.defaultObject != null) {
- throw new IllegalArgumentException(
- "'defaultObject' is not supported in combination with 'proxyInterface'");
- }
- // We need a proxy and a JndiObjectTargetSource.
- this.jndiObject = JndiObjectProxyFactory.createJndiObjectProxy(this);
- }
- else {
- if (!this.lookupOnStartup || !this.cache) {
- throw new IllegalArgumentException(
- "Cannot deactivate 'lookupOnStartup' or 'cache' without specifying a 'proxyInterface'");
- }
- if (this.defaultObject != null && getExpectedType() != null &&
- !getExpectedType().isInstance(this.defaultObject)) {
- throw new IllegalArgumentException("Default object [" + this.defaultObject +
- "] of type [" + this.defaultObject.getClass().getName() +
- "] is not of expected type [" + getExpectedType().getName() + "]");
- }
- // Locate specified JNDI object.
- this.jndiObject = lookupWithFallback();
- }
- }
当proxyTnterface不为空的时候
this.jndiObject = JndiObjectProxyFactory.createJndiObjectProxy(this);
生成了一个从Jndi目录中取得了的对象的代理类:
- private static class JndiObjectProxyFactory {
- private static Object createJndiObjectProxy(JndiObjectFactoryBean jof) throws NamingException {
- // Create a JndiObjectTargetSource that mirrors the JndiObjectFactoryBean's configuration.
- JndiObjectTargetSource targetSource = new JndiObjectTargetSource();
- targetSource.setJndiTemplate(jof.getJndiTemplate());
- targetSource.setJndiName(jof.getJndiName());
- targetSource.setExpectedType(jof.getExpectedType());
- targetSource.setResourceRef(jof.isResourceRef());
- targetSource.setLookupOnStartup(jof.lookupOnStartup);
- targetSource.setCache(jof.cache);
- targetSource.afterPropertiesSet();
- // Create a proxy with JndiObjectFactoryBean's proxy interface and the JndiObjectTargetSource.
- ProxyFactory proxyFactory = new ProxyFactory();
- proxyFactory.addInterface(jof.proxyInterface);
- proxyFactory.setTargetSource(targetSource);
- return proxyFactory.getProxy();
- }
- }
否则直接将从目录服务器中得到的对象暴露出来;如果查找出现异常,将会把DefaultObject暴露出来;


 187
187

 被折叠的 条评论
为什么被折叠?
被折叠的 条评论
为什么被折叠?
 到【灌水乐园】发言


