


Overview
NavigationExperimental是react native的一个新的导航系统,重点是改进<Navigator/>组件. 本文章对应的react native 版本为0.23
- 单向数据流, 它使用reducers 来操作最顶层的state 对像,而在<Navigator/>中,当你在子导航页中,不可能操作到app最初打开页面时的state对像,除非,一级级的通过props传递过方法名或函数名,然后在子页面中调用这些方法或者函数,来修改某个顶层的数据。
- 为了允许存在本地和基于 js的导航视图,导航的逻辑和路由,必须从视图逻辑中独立出来。
- 改进了切换时的场景动画,手势和导航栏
如果你对react native 中的三个导航感到困惑,可以查看导航比较的文章
三个导航系统的比较
Navigator 和 NavigatorIOS 对于新人来说,不知道如何区别它们。一个是基于JS的,而NavigatorIOS则是第三方的开发的只针对ios的本地组件. 而Facebook正在将Navigator 过渡到NavigationExperimental. NavigationExperimental向前兼容navigation库。
NavigationExperimental 通常称为”新的导航”, 但其实它是以一种新的方法实现导航逻辑,这样允许作何的视图都可以作为导航的视图 。它包含了一个预编异的组件NavigationAnimatedView来管理场景间的动画。它内部的每一个视图都可以有自己的手势和动画。这些预编译的场景和overlay组件,看起来就会跟平台相一致(ios, android)
Navigator and NavigatorIOS两个都是有状态(即保存各个导航的序顺)的组件,允许你的APP在多个不同的场景(屏幕)之间管理你的导航。这两个导航管理了一个路由栈(route stack),这样就允许我们使用pop(), psh(), and replace()来管理状态。这类似于html5的history API. 这两者的主要区别在于NavigatorIOS是使用了iOS的 UINavigationController类,而Navigator都是基于Javascript。 Navigator适用于两个平台,而NavigatorIOS只能适用于iOS. 如果在一个APP中应用了多个导航组件(Navigator and NavigatorIOS一起使用). 那么在两者之间进行导航过渡,会变得非常困难.
NavigationExperimental
- NavigationRootContainer允许导航的各个状态(屏幕)保存在app的最顶层.
- 使用reducer在导航状态中声明设置转换过渡
- 可以将state永久保存存到硬盘,这样刷新和app更新后,还能获得之前的导航状态
- 监听打开中的url链接,BackAndroid便于支持返回按纽
- NavigationReducers 包含了预置的reducers, 用来管理导航状态之间的转换过渡。
- Reducers可以彼此之前进行组合,设置更高级的导航逻辑
- 导航逻辑可以用于任何的视图
- NavigationAnimatedView 是一个用来管理不同场景动画的组件,也可以用于Navigator和NavigatorIOS组件
- 每一个scene可以完全自定义,并且管理它自己的动画和手势
- 可以有一个Overlay/header, 用于跟场景的动画同步
- NavigationCard 和NavigationHeader可以作为预编译的scenes和overlays. 然后跟NavigationAnimatedView一起使用
Navigator
- Facebook会慢慢不支持Navigator, 重点会放在NavigationExperimental
- 它有自己的navigations state和API,这违返了React的单向数据流原则
- Scene animations and gestures很难自定义
- 手势可以通过Navigator处理,但是不能基于每一个预编译scene进行自定义
- Animation 的自定义是模糊的,因为它在Animated库出来之前就有了
- 可以用于iOS和Android
- 跟NavigatorIOS一样,只有一个简单的导航条:Navigator.NavigatorBar, 和一个breadcrumbs Navigator.BreadcrumbNavigatorBar. 可以看看React Native的官方UIExplorer demo 看看如何使用它们。
- 动画不如Apple的精致,你可以使用NavigatorIOS.
- 你可以通过navigationBar属性,提供你自己的navigation bar
NavigatorIOS
- 包含一 个专有的API, 不能很好的兼容其它的app
- API很小,所以限制了它对Navigator or NavigationStackView的自定义
- 开发这个组件不是React Native团队,而是属于开源的社区
- 有很多积压的bug
- 如果社区将它重构为声明性的(declarative), 它将跟NavigationExperimental一起使用的很好
- 它在iOS UIKit的基础上包装的, 所以它跟其它的本地app是一样的。
- 仅支持iOS
- 包含一个默认的navigation bar. 这个navigation bar不是一个React Native view组件,它的样式只能轻微调整
NavigationExperimental Guide
我们通过一个简单的聊天APP开始,学习一个使用NavigationExperimental. 首先,我们需要确应用程序state的结构,因为我们的app有多个屏幕栈组成(类似于一个网站由多个网页组成). 所以我们需要在state中定义一个数组,用来保存场景列表。
class MyApp extends React.Component {
  constructor(props) {
    super(props);
    this.state = {
      scenes: [
        {key: 'home'}, // 表示应用程序主页
      ],
    };
  }
对于应用程序的render function, 我们想要显示scene stack中最顶层/当前(scenes数组中最后一项)的scene.
render() {
    const scene = this.state.scenes[this.state.scenes.length - 1];
    if (scene.key === 'home') {
      return <HomeView />;
    }
    if (scene.type === 'chat') {
      return <ChatView id={scene.key} />;
    }
    return null;
  }
为了打开聊天页,我们要添加一个openChat的方法
render() {
    const scene = this.state.scenes[this.state.scenes.length - 1];
    if (scene.key === 'home') {
      return <HomeView />;
    }
    if (scene.type === 'chat') {
      return <ChatView id={scene.key} />;
    }
    return null;
  }
如果我们想要返回,我们需要实现一个back方法
  goBack() {
    if (this.state.scenes.length > 1) {
      this.setState({
        scenes: this.state.scenes.slice(0, this.state.scenes.length - 1),
      });
    }
  }
可是,这会变得难以维护,因为在你的应用中,每次导航都依赖于具体的方法。为此,我们需要将所有的导航逻辑都委托给一个reducer进行处理, 所以我们需要修改上面的代码。上面的代码修改如下。
  constructor(props) {
    super(props);
    this.state = AppReducer(null, { type: 'init' });
  }
  dispatch(action) {
    this.setState(AppReducer(this.state, action));
  }
我们的reducer看起来如下所示,一个Reducer接受上一次的状态,以及一个action, 同时返回一个state. 可以在NavigationExperimental文档中,查看Reducer的定义
function AppReducer(lastState, action) {
  let state = lastState;
  if (!state) {
    state = {
      scenes: [
        {key: 'home'}
      ],
    };
  }
  if (action.type === 'back' && state.scenes.length > 1) {
    return {
      scenes: state.scenes.slice(0, this.state.scenes.length - 1),
    };
  }
  if (action.type === 'openChat') {
    return {
      scenes: [
        ...state.scenes,
        {
          type: 'chat',
          key: action.id
        }
      ],
    };
  }
  return state;
}
现在,我们可以非常容易的实现我们的导航的方法,如下所示
 openChat(id) {
    this.dispatch({ type: 'openChat', id });
  }
  goBack() {
    this.dispatch({ type: 'back' });
  }
我们现在实现了this.dispatch方法,所以通过props,将dispatch方法传定给子组件(子页面). 那么就可以在子页面中访问到dispatch action.
render() {
    const scene = this.state.scenes[this.state.scenes.length - 1];
    if (scene.key === 'home') {
      return (
        <HomeView
          dispatch={this.dispatch.bind(this)}
        />
      );
    }
    if (scene.type === 'chat') {
      return (
        <ChatView
          id={scene.key}
          dispatch={this.dispatch.bind(this)}
        />
      );
    }
    return null;
  }
function HomeView(props) {
return
<Text
onPress={() => {
props.dispatch({ type: 'openChat', id: 'A' });
}}>
This is the home screen. Tap to open Chat A.
</Text>;
}
function ChatView(props) {
return
<Text
onPress={() => {
props.dispatch({ type: 'back' });
}}>
This is chat {props.id}. Tap to go back home.
</Text>;
}现在我们的应用就可以打开一个chat view 和一个主页,完成的代码如下
function MyChatAppReducer(lastState, action) {
  let state = lastState;
  if (!state) {
    state = {
      scenes: [
        {key: 'home'}
      ],
    };
  }
  if (action.type === 'back' && state.scenes.length > 1) {
    return {
      scenes: state.scenes.slice(0, state.scenes.length - 1),
    };
  }
  if (action.type === 'openChat') {
    return {
      scenes: [
        ...state.scenes,
        {
          type: 'chat',
          key: action.id
        }
      ],
    };
  }
  return state;
}

function HomeView(props) {
  return (
    <Text
      onPress={() => {
        props.dispatch({ type: 'openChat', id: 'A' });
      }}>
      This is the home screen. Tap to open Chat A.
    </Text>
  );
}

function ChatView(props) {
  return (
    <Text
      onPress={() => {
        props.dispatch({ type: 'back' });
      }}>
      This is chat {props.id}. Tap to go back home.
    </Text>
  );
}

class MyChatApp extends React.Component {
  constructor(props) {
    super(props);
    this.state = MyChatAppReducer(null, { type: 'init' });
  }
  dispatch(action) {
    this.setState(MyChatAppReducer(this.state, action));
  }
  render() {
    return (
      <View style={styles.container}>
        {this.renderCurrentScene()}
      </View>
    );
  }
  renderCurrentScene() {
    const scene = this.state.scenes[this.state.scenes.length - 1];
    if (scene.key === 'home') {
      return (
        <HomeView
          dispatch={this.dispatch.bind(this)}
        />
      );
    }
    if (scene.type === 'chat') {
      return (
        <ChatView
          id={scene.key}
          dispatch={this.dispatch.bind(this)}
        />
      );
    }
    return null;
  }
}

const styles = StyleSheet.create({
  container: {
    flex: 1,
    backgroundColor: 'white',
    padding: 10,
    paddingTop: 30,
  },
});
名词解释
本章内容太理论化,一开始会看不懂的,可以先记信概念,在结合后面的例子,进行详细的理解
Navigation State
state是一个Javascript对像,在React Native中可以能过this.setState()进行设置,它的几个字段,由NavigationStates中定义。你可以在库文件/node_modules/react-native/Libraries/NavigationExperimental/NavigationTypeDefinition.js中看到它对NavigationStates的定义.
const myState = {
  key: 'myPage0',
}
一个NavigationParentState 包含一组路由(routes), 并且有一个index字段,表示当前的路由.
const myState = {
  key: 'myAppTabs',
  children: [
    {key: 'home'},
    {key: 'notifs'},
    {key: 'settings'},
  ],
  index: 1, // points to the 'notifs' tab
}
navigation state types在NavigationStateUtils中保存,同时在NavigationStateUtils还有一些函数,通过这些函数可以改变NavigationParentState。
Containers
在NavigationExperimental中提供了一个最顶级的组件,用于维护导航的状态以及处理永久性(将导航保存到硬盘或者从硬盘中读取导航的状态数据)。
如果你使用redux 或者flux, 你可以不需要NavigationContainer. 你可以使用现有的stores and providers.
NavigationRootContainer
开发者可以为根容器设置一个reducer, reducer会包含整个app的导航逻辑。我们的navigation reducers将会接受最后的导航状态,一个我们需要处理的action. 然后它为我们的app输出一个新的导航装态。为了获得初始化的state, reducers可以在调用时,不需要上一个状态或者action.
<NavigationRootContainer
  reducer={MyReducer}
  renderNavigation={(navigationState, onNavigate) => (
    <Text>Currently at {navigationState.routes[navigationState.index]}</Text>
它也提供了一个针对navigation action的处理器,并且允许reducer被自定义.
NavigationContainer.create
在整个应用中,都要传递onNavigate会非常繁锁,因此我们可以提供一个更高阶的”container”组件, 就不需要每次都传递onNavigate属性。
<NavigationRootContainer
  reducer={MyReducer}
  renderNavigation={(navigationState) => <ExampleComponent />}
...

class ExampleComponent {
  render() {
    <Text onPress={() => { this.props.onNavigate(new ExampleAction()) }}>
      This action will work, even though `onNavigate` was not directly passed in
    </Text>
  }
}
ExampleComponent = NavigationContainer.create(ExampleComponent);
如果onNavigation作为一个属性被传递给container, 它会覆盖处理程序中包含的组件和所有的子容器.
Reducers
一个导航的reducer是一个action 处理器,它返回当前的navigation state.当调用navigation reducers, 你要提供一个可选的previous state和一个字符串类型的 navigation action.
let state = MyReducer(null, { type: 'InitialAction' });
//output
> {
    key: 'Root',
    index: 0,
    routes: [
      {key: 'Home'},
    ]
  }
state = MyReducer(state, { type: 'PushPerson', name: 'Christopher' });
//output
> {
    key: 'Root',
    index: 1,
    routes: [
      {key: 'Home'},
      {key: 'Person0', name: 'Christopher'},
    ]
  }
Stack Reducer
常见的导航逻辑是一个’stack’(栈), 这可以通过stack reducer来处理
const MyReducer = NavigationStackReducer({
  // First, define the initial parent state that will be used if there was no previous state.
  initialState: {
    key: 'Root',
    index: 0,
    children: [ //routes
      {key: 'Home'},
    ]
  },
  getPushedReducerForAction: (action) => {
    if (action.type === 'PushPerson') {
      // We need to push some additional state, that will be defined by this reducer:
      return () => ({
        key: 'Person'+(i++),
        name: action.name,
      });
    }
    // In this case we do not need to push, so our reducer for this action is nothing
    return null;
  },
});

let state = MyReducer(null, { type: 'InitAction' });
> {
    key: 'Root',
    index: 0,
    routes: [
      {key: 'Home'},
    ]
  }

state = MyReducer(state, { type: 'PushPerson', name: 'Christopher' });
> {
    key: 'Root',
    index: 1,
    children: [
      {key: 'Home'},
      {key: 'Person0', name: 'Christopher'},
    ]
  }

// The back action can be used to pop:
state = MyReducer(state, NavigationRootContainer.getBackAction());
> {
    key: 'Root',
    index: 0,
    children: [
      {key: 'Home'},
    ]
  }
stack reducer中也可以包含sub-reducers, 它需要你实现getReducerForState. 它会为sub-state 返回一个sub-reducer. 当前的sub-state的sub-reducer将会被使用.
源文件分析
node_modules/react-native/Libraries/NavigationExperimental/Reducer/NavigationStackReducer.js
NavigationStackReducer是一个高阶函数,它返回一个StackReducer的函数
/*

 Example:
 let ExampleStackReducer = NavigationReducer.StackReducer({
    initialState: {
      key: "key1",
      index:0,
      children: [
        {key: "first route"}
      ]
    },
    getPushedReducerForAction: (action) => {
    if (action.type === 'push') {
      return (state) => state || {key: action.key};
    }
    return null;
  },
  //返回一个用于处理子路由的sub-reducer. 它返回的函数将在处理子sub-state(在children中保存存的对像)时调用.
  //默认情况为,直接返回state或者initalState,
  //但这个函数也可以定义为(initialState) => (state, action) => {//根据action, 返回相应的state}
  getReducerForState: (initialState) => (state) => state || initialState,

 })
 ExampleStackReducer(); //返回整个应用的初始路由
 ExampleStackReducer(this.state, {type:'push', key: 'push key #1'});// 将当前路由添加到栈,即state中的children字段中

*/
//defaultGetReducerForState是一个函数,它接受一个initialState的参数
//它返回一个一个函数,返回的这个函数,接受一个state参数,如果有传递这个state, 则返回state, 否则,这个函数,返回initialState;
const defaultGetReducerForState = (initialState) => (state) => state || initialState;

function NavigationStackReducer(
{initialState, getReducerForState, getPushedReducerForAction}: StackReducerConfig): NavigationReducer {
  /*
   * initialState,指定的初始路由状态, 它的类型为NavigationParentState
   * source file: /node_modules/react-native/Libraries/NavigationExperimental/NavigationTypeDefinition.js
   * export type NavigationParentState = {
   *  index: number,
   *  key: string,
   *  children: Array<NavigationState>,
   * };
   * export type NavigationState = {
   *    key: string,
   * };
   * 实际对像
   * {
   *   children: [
   *     {key: 'subState0'},
   *     {key: 'subState1'},
   *   ],
   *   index: 0,
   *   key: 'navStackKey'
   * }
   * getReducerForState 返回一个用于处理子路由的sub-reducer. 它返回的函数将在处理子sub-state(在children中保存存的对像)时调用.
   * 如果没有返回reducer, 则action不会被接受
   *
   * getPushedReducerForAction 返回一个sub-reducer, 这个sub-reducer将会用于添加一个新的路由
   * 如果返回一个reducer, 这个reducer会被调用,并且获得添加了路由后的新state.
   */

  //如果有传递getReducerForState, 则使用传入的这个函数,否则调用上面定义的defaultGetReducerForState函数
  const getReducerForStateWithDefault = getReducerForState || defaultGetReducerForState;

  //返回一个reducer,这个函数接受一个state和一个必须的action.
  return function (lastState: ?NavigationState, action: any): NavigationState {

    //如果没有指定state, 则返回调用NavigationReducer.StackReducer指定的initialState.
    if (!lastState) {
      return initialState;
    }
    /*
     /node_modules/react-native/Libraries/NavigationExperimental/NavigationStateUtils.js
     getParent 判断传入的state是否符合NavigationParentState的定义,
     即
     let lastState = {
        key: "root",
        index: 0, //必须存在,且为数值
        children: [{key: "first route"}]  //必须为数组,index指定的元素也同时存在
     }
     符合以上的要求时,返回这个state, 不符合,则返回null;
    */
    const lastParentState = NavigationStateUtils.getParent(lastState);

    //如果上次没有state, 则返回传入的state,或者初始的initialState;
    if (!lastParentState) {
      return lastState;
    }

    //返回或者栈的类型,必须为"back" or "BackAction"
    //如果lastParentState的index为0,或者路由children只有一个元素时,则直接返回
    switch (action.type) {
      case 'back':
      case 'BackAction':
        if (lastParentState.index === 0 || lastParentState.children.length === 1) {
          return lastParentState;
        }
        return NavigationStateUtils.pop(lastParentState);
    }
    //从children子路由中,获取到state, 保存为activeSubState
    //默认为 activeSubState = {key: "first route"}
    const activeSubState = lastParentState.children[lastParentState.index];

    // StackReducer初始化时,传入的getReducerForState,
    // 即调用NavigationReducer.StackReducer指定的getReducerForState.
    // 通常这个函数的格式为
    // getReducerForState: (initialState) => (state) => state || initialState
    // 它返回一个reducer(即有initialState, 所有的后续操作都是基于这个initialState上下文中),
    // 默认情况下,它返回(state) => state || initialState函数,
    // initialState对于没有sub-state的情况下为 {key: "first route"},
    // 而不是{key:"first route", index:0, children: [{key: "sub first route"}]}
    // 所以activeSubReduer = (state) => state || initialState //initalState = {key: "first route"}
    const activeSubReducer = getReducerForStateWithDefault(activeSubState);

    //调用上面返回的方法, 获取新的state
    //假设 getReducerForState: (initialState) => (state) => state || initialState
    //则返回activeSubState, 即{key: "first route"}
    const nextActiveState = activeSubReducer(activeSubState, action);

    //如果接下来的state,跟当前的sub-state不同,即getReducerForState中会根据不同的action返回不同的state.
    //则将接下来的state, 合并到lastParentState的children[index] 为新的state
    //以下通过代码来说明(**还没有实际中发现会使用到这种情况**)
    /*
    lastParentState为
    {
      key: "root",
      index: "1",
      children: [
        {
          key: "home page"
        },
        {
          key: "company",
          index: 0,
          children: [
            {key: "profile"},
            {key: "culture"},
            {key: "history"},
          ]
        },

      ]
    }
    那么
    activeSubState = {
      key: "company",
      index: 0,
      children: [
        {key: "profile"},
        {key: "culture"},
        {key: "history"},
      ]
    }
    如果在调用getReducerForState, 根据某一个action条件,改变当前ActiveState,
    nextActiveState = {
      key: "product"
    }
    则,整个reducer返回
    {
      key: "root",
      index: "1",
      children: [
        {
          key: "home page"
        },
        {
          key: "product"
        }
      ]
    }
    */
    if (nextActiveState !== activeSubState) {
      const nextChildren = [...lastParentState.children];
      nextChildren[lastParentState.index] = nextActiveState;
      return {
        ...lastParentState,
        children: nextChildren,
      };
    }
    //调用传入的getPushedReducerForAction方法
    //这个方法返回一个reducer
    const subReducerToPush = getPushedReducerForAction(action, lastParentState);

    if (subReducerToPush) {
      //NavigationStateUtils将subReducerToPush返回的state, 添加到lastParentState
      //然后返回整个state, subReducerToPush会修改lastParentState中的index.
      return NavigationStateUtils.push(
        lastParentState,
        subReducerToPush(null, action)
      );
    }
    return lastParentState;
  };
}
Tabs Reducer
Tabs reducer允许你有多个子sub-reducers, 但有一个是激活状态。对于每一个action, 都会被发送给tabs reducer, 它会首先使用active状态的sub-reducer. 如果reducers没有返回一个新的sub-state, 则另外的reducers将会获得机会,并进行处理。如果一个不同的tab reducer处理了它,tabs reducer将返回一个新的new sub-state, 并且交换active tab. 它可处处理两种类型的action, 一个是切换tab, 即action的类型为{type: ActionTypes.JUMP_TO, index: 1}, 则直接修改 tab state中的index, 返回它的一个state. 另一种是点击子页面的按钮,则需要调用sub-state所对应的Reducer进行处理,比如,一个App有4个tab, 每个tab对应的页面中,有一个Add按钮,当点击这个按纽时,则在当前tab中添加一个子页面(有向左回到第一个页面的按钮). 那么就需要调用这个页面state, 所对应的StackReducer.
node_modules/react-native/Libraries/NavigationExperimental/Reducer/NavigationTabsReducer.js
//传入给NavigationReducer.TabsReducer的初始函数
type TabsReducerConfig = {
  key: string;
  initialIndex: number;
  tabReducers: Array<NavigationReducer>;
};

//实际例子
const ExampleTabsReducer = NavigationReducer.TabsReducer({
  tabReducers: [
    (lastRoute) => lastRoute || {key: 'one'},
    (lastRoute) => lastRoute || {key: 'two'},
    (lastRoute) => lastRoute || {key: 'three'},
  ],
});
主要功能实现
/*
const ExampleTabsReducer = NavigationReducer.TabsReducer({
  key: "tabs",
  index: 0,
  tabReducers: [
    (lastRoute) => lastRoute || {key: 'one'}, //reducer函数
    (lastRoute) => lastRoute || {key: 'two'},
    (lastRoute) => lastRoute || {key: 'three'},
  ],
});

*/
function NavigationTabsReducer({key, initialIndex, tabReducers}: TabsReducerConfig): NavigationReducer {
  return function(lastNavState: ?NavigationState, action: ?any): NavigationState {
    //调用tab reducer时,没有传入lastNavState
    //则lastNavState为
    /*
      key: "tabs",
      index: 0
      children: [
        {key: "one"},
        {key: "two"},
        {key: "three"},
      ]
    */
    if (!lastNavState) {
      lastNavState = {
        children: tabReducers.map(reducer => reducer(null, null)), //调用tabReducer数组中的每个函数, 生成所有的sub-state
        index: initialIndex || 0,
        key,
      };
    }
    //判断lastNavState是否符合NavigationParentState标准,可以看上一节的StackReducer.
    const lastParentNavState = NavigationStateUtils.getParent(lastNavState);

    //如果没有指定action或者lastParentNavState, 则直接返回,这主要针对reducer的空调用
    if (!action || !lastParentNavState) {
      return lastNavState;
    }
    //如果action的类型为定义的常量JUMP_TO(源文件头部定义的常量)
    //JUMP_TO = "react-native/NavigationExperimental/tabs-jumpTo"
    //相对于stackreducer,action还多了一个index
    //只有当action中的index跟reducer中保存的index不同时,才进行跳转
    if (
      action.type === ActionTypes.JUMP_TO &&
      action.index !== lastParentNavState.index
    ) {
    //jumpToIndex接受一个要跳转的state和要跳转到state中index的位置
    //它返回如下的参数
    /*
      {
        ...lastParentNavState,
        index //action.index
      }
      在react中,... spread the object(扩展一个对像)
      this.state = ExampleTabsReducer();
      this.state = {children: [{key:"one"}, {key:"two"}], index: 0, key: undefined}
      NavigationReducer.TabsReducer.JumpToAction(1) 则返回{index:1}
      const newState = ExampleTabsReducer(this.state, NavigationReducer.TabsReducer.JumpToAction(1))
      NavigationStateUtils.jumpToIndex({children: [{key:"one"}, {key:"two"}], index: 0, key: undefined}, 1)
      返回{children: [{key:"one"}, {key:"two"}], index: 1, key: undefined}
      有一个问题:为什么传入的是1,而不是{index:1}, 即可以在修改this.state中对应的index?
      这是因为在NavigationStateUtils.jumpToIndex中,第二个参数名为index, 所以它会根据参数名,修改第一个参数中对应的字段,
      如果参数命名为i, 则返回的对像为
      {children: [{key:"one"}, {key:"two"}], index: 0, key: undefined, i: 1}
    */
      return NavigationStateUtils.jumpToIndex(
        lastParentNavState,
        action.index,
      );
    }
      /*
      NavigationReducer.TabsReducer.JumpToAction(1),传入action, 即能过index对
      tab切换
      */
      //如果传入的action类型为非{type: ActionTypes.JUMP_TO, index: 1},
      //则调用sub-reducer进行处理, 常见的应用就tabsReducer为四个NavigationReducer.StackReducer, 然后在子页面中,点击某一个为当前tab添加子页面的按纽。
      /*
       返回各sub-reducer
       const ExampleAppReducer = NavigationReducer.TabsReducer({
          key: 'AppNavigationState',
          initialIndex: 0,
          tabReducers: [
            NavigationReducer.StackReducer({
              getPushedReducerForAction: (action) => {
                if (PageAction.match(action)
                && !ExampleProfilePageAction.match(action)) {
                  return (state) => (state || pageStateActionMap(action));
                }
                return null;
              },
              initialState: {
                key: 'notifs',
                index: 0,
                children: [
                  {key: 'base', type: 'NotifsPage'},
                ],
              },
            }),
             ....
            ]
        });
      */

      const subReducers = tabReducers.map((tabReducer, tabIndex) => {
      return function(navState: ?NavigationState, tabAction: any): NavigationState {
        //在处理子页面的action时,如果没有传入它当前的子页面的state, 则直接返回整个app的状态.
        if (!navState) {
          return lastParentNavState;
        }
        const parentState = NavigationStateUtils.getParent(navState);
        //subReducers所对应的tabState
        const tabState = parentState && parentState.children[tabIndex];
        //调用sub-reducer,即,在TabsReducer中的StackReducer. 返回一个当前页面的
        //的导航状态.
        const nextTabState = tabReducer(tabState, tabAction);
        //如果调用StackReducer返回的状态跟当前的tab状态不同,
        //
        if (nextTabState && tabState !== nextTabState) {
          //获取整个tab的状态,并且将它的index,修改为当前的页面所对应的index.
          const tabs = parentState && parentState.children || [];
          tabs[tabIndex] = nextTabState;

          //lastParentNavState 为上一次tab的state, 即第一个参数传入的state
          //tabs为当前调用了sub-reducer,产生的新的state,
          //tab的index个改为tabIndex.
          return {
            ...lastParentNavState,
            tabs,
            index: tabIndex,
          };
        }
        return lastParentNavState;
      };
    });

     //根据当前tabs的index,在subReducers中,找到当前Tab所对应的reducer
     //并且将它从subReducers中删除
     let selectedTabReducer = subReducers.splice(lastParentNavState.index, 1)[0];
     //sbuReducers开头添加一个reducer. 这个reducer的用途是,将当前的tabs的状态lastParentNavState保存到这个reducer, 之后在调用subReducers的第一个子reducers时,其action如果为
     //构建一个BackAction,
     //如果当前的selectedTabReducer没有处理BackAction的方法,则返回传入的第一个参数state, 并且将它的index设置为0. 而如果tab中的tabsReducer中的sub reducer为StackRecuder, 它是可以处理BackAction的,所以会先调用sub reducer的action, 返回到上一个页面,而不是返回到第一个Tab。

     subReducers.unshift(function(navState: ?NavigationState, action: any): NavigationState {
      if (navState && action.type === 'BackAction') {
        return NavigationStateUtils.jumpToIndex(
          lastParentNavState,
          initialIndex || 0
        );
      }
      return lastParentNavState;
    });
    //接着刚刚删除的sub reducer,在重新添加到最前面, 这样可以从当前的tab所对应的reducer进行查询action.
    subReducers.unshift(selectedTabReducer);
    //NavigationFindReducer接受一个reducers数组,然后返回一个reducer,
    //返回的reducer可以接受当前的tabs state,和action, 然后遍历所有的subReducers数组中的元素,
    //并且将tabs state和action 传递给subReducers中的每个sub reducer.
    //当其中每个sub reducer返回的状态,跟传入的state不同时(即在所有的subReducers中找到了相应的action), 返回更新后的状态
    const findReducer = NavigationFindReducer(subReducers, lastParentNavState);
    return findReducer(lastParentNavState, action);


  };
}
Find Reducer
Reducers的一个常见模式是组合了多个reducers, 当其中一个reducer返回一个新的state时停止。Find Reducer会接受一个reducers数组,然后遍历数据中的每一个元素,直到state改变时,返回这个reducer. 如果这些reducers没有返回一个新的state, find reducer将返回默认的state.
Views
Scenes
在App的导航中,每个state都会对应一个页面,比如<HomeView> <SettingsView>它们保存在state的Scenes中,当导航处于不同的action,render不同的scene.
NavigationTypeDefinition对 scene的定义
export type NavigationScene = {
  index: number,
  isStale: boolean,
  key: string,
  navigationState: NavigationState, //当前场景对应的路由值,即navigationState children中的元素
};
而/react-native/Libraries/NavigationExperimental/Reducer/NavigationScenesReducer.js可以基于上一个scene以及导航的state, 返回一个scene
//code from NavigationAnimatedView
/*
NavigationScenesReducer首先接收的第一个参数为scenes类型的数组,
*/
//实始化, 案例1
/*
navigationState = {
        key: "root",
        index: 0,
        children: [{key:"first route"}]
      }
返回
scenes1 = [{key: "first route", index: 0, isStale: false, navigationState: {"key":"frist route"}}]
*/
scenes: NavigationScenesReducer([], this.props.navigationState),

//改变了navigationState时, 案例2
/*
nextNavigationState = {
        key: "root",
        index: 1,
        children: [{key:"first route"}, {key: "second route"}]
      }
prevNavigationState = {
        key: "root",
        index: 0,
        children: [{key:"first route"}]
      }
scenes2的值为[{key: "first route", index: 0, isStale: false, navigationState: {"key":"frist route"}}, {key: "second route", index: 1, isStale: false, navigationState: {"key":"second route"}}]
scenes2 = NavigationScenesReducer(scene1, nextNavigationState, prevNavigationState),

//如果从案例2 返回到案例1

scenes3的值为
[{key: "first route", index: 0, isStale: false, navigationState: {"key":"frist route"}}, {key: "second route", index: 1, isStale: true, navigationState: {"key":"second route"}}]
*/
//源代码
function NavigationScenesReducer(
  scenes: Array<NavigationScene>,
  nextState: NavigationParentState,
  prevState: ?NavigationParentState,
): Array<NavigationScene> {

  const prevScenes = new Map();   //将传入的第一个scenes参数,保存到上一个场景及中
  const freshScenes = new Map();  //保存新鲜场景,即根据state.children路由,新创建的scene
  const staleScenes = new Map();  //保存过期场景, 比如从第三个导航,返回到第1个时,那么第三个scene就会标记为过期,可以从scenes中删除

  // 从scenes中提取出过期的场景,同时将scenes中的场景,都保存到prevScenes
  scenes.forEach(scene => {
    const {key} = scene;
    if (scene.isStale) {
      staleScenes.set(key, scene);
    }
    //对于案例2来说,prevScenes为{"scene_first route": {key: "first route", index: 0, isStale: false, navigationState: {"key":"frist route"}}}
    prevScenes.set(key, scene);
  });

  const nextKeys = new Set();
  //读取导航的state中的children(路由),根据路由的顺序,构建一个对应的数组类型的scenes

  nextState.children.forEach((navigationState, index) => {
    const key = SCENE_KEY_PREFIX + navigationState.key; //scene_ + key
    //构建一个scene对像
    const scene = {
      index,
      isStale: false,
      key,
      navigationState,  //当前场景对应的路由值,即navigationState children中的元素
    };

    invariant(
      !nextKeys.has(key),
      `navigationState.children[${index}].key "${key}" conflicts with` +
        'another child!'
    );
    nextKeys.add(key);

    if (staleScenes.has(key)) {
      //如果传入的scenes参数中,有这个key值的scene,并且它已经过期了
      //而这时又新建了一个scene, 则将它从staleScenes中删除
      // A previously `stale` scene is now part of the nextState, so we
      // revive it by removing it from the stale scene map.
      staleScenes.delete(key);
    }
    //将新创建的scence保存到freshScens
    freshScenes.set(key, scene);
  });
  //如果有传递prevState, 则遍历上一个状态的所有children中的路由
  //如果当前nextState中children包含了上一次prevState的路由,则直接跳过
  //如果上次的路由,没有包含在新的路由中,则把它置为isStale为true.
  //比如从案例2回到案例1的情况
  if (prevState) {
    // Look at the previous children and classify any removed scenes as `stale`.
    prevState.children.forEach((navigationState, index) => {
      const key = SCENE_KEY_PREFIX + navigationState.key;
      if (freshScenes.has(key)) {
        return;
      }
      staleScenes.set(key, {
        index,
        isStale: true,
        key,
        navigationState,
      });
    });
  }

  const nextScenes = [];

  /*
用于合并staleScenes,freshScenes中与prevScenes中上相同的值,这样就可以重用prevScenes中的场景(没有理解,可以先不管prevScenes, 即nextScenes为staleScenes和freshScenes的合集)
  */
  const mergeScene = (nextScene => {
    const {key} = nextScene;
    //prevScenes为传入的第一个参数
    const prevScene = prevScenes.has(key) ? prevScenes.get(key) : null;
    if (prevScene && areScenesShallowEqual(prevScene, nextScene)) {
      // 重用`prevScene`,这样view可以避免re-render
      nextScenes.push(prevScene);
    } else {
      nextScenes.push(nextScene);
    }
  });
  staleScenes.forEach(mergeScene);
  freshScenes.forEach(mergeScene);
  //按照scene中的index升序排列
  return nextScenes.sort(compareScenes);
}
NavigationView
最简单的视图. 常用于tabs, 因为在不同tab之前不需要动画转换。
NavigationAnimateView
NavigationAnimateView 采用声明API, 它使用Animate library向scenes委派动画和手势
NavigationCard和NavigationHeader分别实现了NavigationAnimateView的scene(实现的页面内容<HomeView>) 和 overlays。通过这两个,使用得页面动画在iOS和android上看起来更统一.
//实际使用的例子
/*
传递给NavigationAnimatedView的属性
const propTypes = {
  applyAnimation: PropTypes.func,
  navigationState: NavigationPropTypes.navigationState.isRequired,
  onNavigate: PropTypes.func.isRequired,
  renderOverlay: PropTypes.func,
  renderScene: PropTypes.func.isRequired,
};
*/

render() {
    return (
      <NavigationAnimatedView
        navigationState={this.state} //App state is generated by StackReducer
        style={styles.animatedView}  //自定义页面样式
        onNavigate={this._handleAction} //点击按钮时的动作
        renderOverlay={this._renderHeader} //读取导航的头部,leftButton, Title
        applyAnimation={(pos, navState) => { //指定动画
          Animated.timing(pos, {toValue: navState.index, duration: 500}).start();
        }}
        renderScene={this._renderCard}//render scene.
      />
    );
  }
NavigationCard
NavigationCard的源文件在node_modules/react-native/Libraries/CustomComponents/NavigationExperimental/NavigationCard.js
//renderScence是在新建NavigationCard是传入给它的属性, 用于读取页面的内容, 并且将接受到的属性,继续传递给renderScene()
 render(): ReactElement {
    let {
      style,
      panHandlers,
      renderScene,
      ...props,
    } = this.props;

    if (style === undefined) {
      // fall back to default style.
      //NavigationCardStackSylteInterpolator会根据从NavigationAnimatedView
      //中传递过的的动画值position,以及scene和layout来决定动画的方式
      //react-native/Libraries/CustomComponents/NavigationExperimental/NavigationCardStackStyleInterpolator.js
      /*
       const index = scene.index;
       //position的变化范围
       const inputRange = [index - 1, index, index + 1];
       const width = layout.initWidth;
       //width的输出范围,对应于position的值
       /*
         第一张card时,它的position为0, index为0, width: 375
         当push 第二张卡片时
         position from 0 到 1时
         第一张卡片的scene的index为0, inputRange [-1, 0, 1]
         第二张卡片的scene的index为1, inputRange [0, 1, 2]
         第一张卡片的opacity输入的值[0,1] [-1, 0, 1] [1,1,0.3] = 后半段范围
         第一张卡片translateX的值为 375到-10
         第二张卡片的opacity输入的值[0,1] [0,1,2] [1,1,0.3] = 对应前半段
         第三张卡片push时,opacity [1,2] [1,2,3][1,1,0.3] =同样对应前半段
         这时,第二张卡的opacity输入的值为[1,2] [0,1,2][1,1,0.3],它的值变为0.3
         当从第三张回到第二张时position的值为[2,1]
         所以第三张的opacity[2,1][1,2,3][1,1,0.3] opaicty不变
         对于x的位置
         card1 to card2
         card1 0-1 [-1,0,1] [375, 0, -10] = 0 to -10
         card2 0-1 [0,1,2] [375, 0, -10]  = 375 to 0
         card2 to card1
         card2 1-0 [0,1,2] [375, 0 -10] = 0 to 375
         card1 1-0 [-1,0,1] [375, 0, -10] = -10 to 0
       */
       const opacity = position.interpolate({
         inputRange,
         outputRange: [1, 1, 0.3],
       });
       const translateX = position.interpolate({
         inputRange,
         outputRange: [width, 0, -10],
       });
       return {
         opacity,
         transform: [
           { scale },
           { translateX },
           { translateY },
        ],
      };
     */
      style = NavigationCardStackStyleInterpolator.forHorizontal(props);
    }

    if (panHandlers === undefined) {
      // fall back to default pan handlers.
      // 用于响应手势动作    //reactnative/Libraries/NavigationExperimental/NavigationLinearPanResponder.js
      panHandlers = NavigationLinearPanResponder.forHorizontal(props);
    }

    return (
      <Animated.View {...panHandlers} style={[styles.main, style]}>
        {renderScene(props)}
      </Animated.View>
    );
}<NavigationAnimatedView
navigationState={navigationState}
renderScene={(props) => (
<NavigationCard
key={props.navigationState.key}
index={props.index}
navigationState={props.navigationParentState}
position={props.position}
layout={props.layout}>
<MyInnerView info={props.navigationState} />
</NavigationCard>
)}
/>NavigationHeader
NavigationHeader在没有指定左边的按钮时,会在scene.index不为0时,render一个返回按纽. 在NavigationHeaderBackButton组件中,而整个NavigationHeader是一个NavigationContainer.create创建,所以
NavigationHeaderBackButton会自动获取到传递给NavigationHeader的props.onNavigation处理函数,当点击Back时,调用回调函数, 一般为为handleAction, 并且传递{type:”BackAction”}参数
renderLeftComponent: (props, scene) => scene.index !== 0 ? <NavigationHeaderBackButton /> : null<NavigationAnimatedView
navigationState={navigationState}
renderOverlay={(props) => (
<NavigationHeader
navigationState={props.navigationParentState}
position={props.position}
getTitle={state => state.key}
/>
)}
renderScene={this._renderScene}
/>NavigationCardStack
包装了NavigationAnimateView, 类似于过时的Navigator. 这是因为它内置了animations和gestures
使用:
render() {
  return (
    <NavigationCardStack
      style={styles.main}
      renderScene={props =>
        <MyPetView
          name={props.navigationState.key}
          species={props.navigationState.species}
        />
      }
      renderOverlay={props => <NavigationHeader {...props} />}
      navigationState={{
        key: 'MyPetStack',
        index: 2,
        routes: [
          {key: 'Pluto', species: 'dog'},
          {key: 'Snoopy', species: 'dog'},
          {key: 'Garfield', species: 'cat'},
        ]
      }}
    />
  );
}
NavigationExperimental 实际例子
NavigationBasicExample
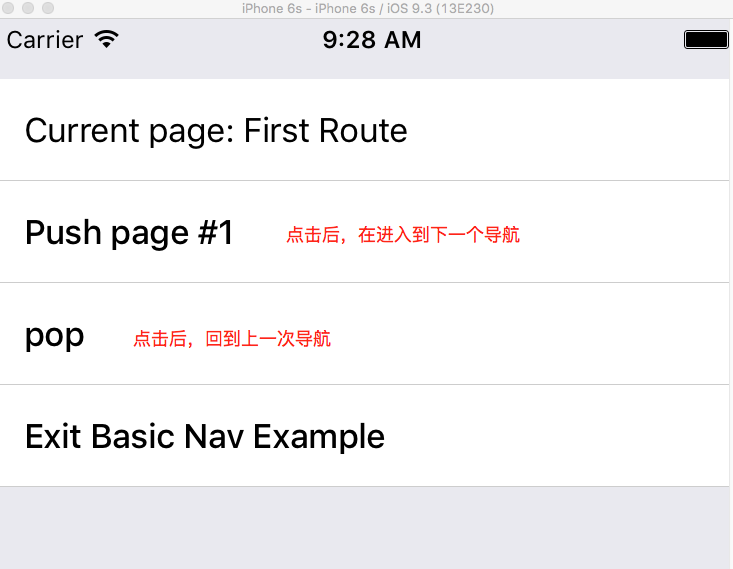
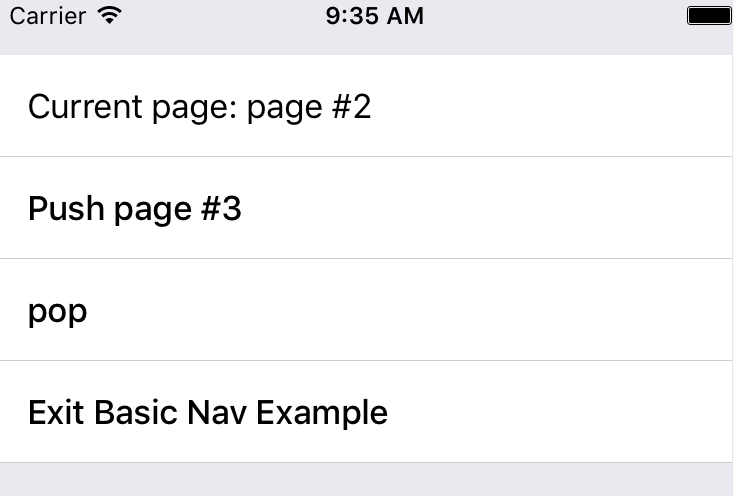
点击Push后
首先我们定一个通用组件,即上面中每一行的外观组件, NavigationExampleRow.js
import React, {
    View,
    Component,
    Text,
    TextInput,
    StyleSheet,
    TouchableHighlight,
    PixelRatio,
} from 'react-native';

export default class NavigationExampleRow extends Component {
    render() {
        //如果这一行有链接,则返回TouchableHighlight, 否则返回纯文本的一行
        if (this.props.onPress) {
            return (<TouchableHighlight
                style={styles.row}
                underlayColor="#D0D0D0"
                onPress={this.props.onPress}>
                <Text style={styles.buttonText}>
                    {this.props.text}
                </Text>
            </TouchableHighlight>);
        }
        return (
            <View style={styles.row}>
                <Text style={styles.rowText}>
                    {this.props.text}
                </Text>
            </View>
        );
    }
}


const styles = StyleSheet.create({
    row: {
        padding: 15,
        backgroundColor: 'white',
        borderBottomWidth: 1 / PixelRatio.get(),
        borderBottomColor: '#CDCDCD',
    },
    rowText: {
        fontSize: 17,
    },
    buttonText: {
        fontSize: 17,
        fontWeight: '500',
    },
});


/*
//app.js
import NavigationExampleRow from "./NavigationExampleRow.js";
class App extends Component {
    constructor(props) {
        super(props)

    }
    componentDidMount() {

    }

    render() {
        return <NavigationExampleRow text="Hello"></NavigationExampleRow>
    }
}
*/
NavigationBasicExample 完整代码
'use strict'
import React, {
AppRegistry,
Component,
StyleSheet,
Text,
Linking,
View,
ScrollView,
NavigationExperimental,
} from 'react-native';
const {
Reducer: NavigationReducer,
} = NavigationExperimental
import NavigationExampleRow from "./NavigationExampleRow.js";
//ExampleReducer是一个函数,接受一个App的state和一个action,返回一个state
//
const ExampleReducer = NavigationReducer.StackReducer({
initialState: {
key: "BaseExampleStackKey",
index: 0,
children: [
{key: "First Route"}
]
},
//获取sub-state的reducer, 通常不用指定这个方法
//getReducerForState: (initialState) => (state) => state || initialState,
getPushedReducerForAction: (action) => {
if (action.type === 'push'){
return (state) => state || {key: action.key}; //返回一个新的reducer (函数), 返回的这个函数会在接下来被ExampleReducer调用,请参考上一节中StackReducer中的源代码解释
}
return null;
}
})
class App extends Component {
constructor(props) {
super(props)
this.state = ExampleReducer();
/*
//console.log(this.state.toString())
{
key: "BaseExampleStackKey",
index: 0,
routes: [
{key: "First Route"}
]
}
*/
}
/*
* Exit Base Nav example一行的行为可以不用理解
* 它主要调用创建App时,传递给它回调属性
* */
render() {
return (<ScrollView>
<NavigationExampleRow
text={`Current page: ${this.state.children[this.state.index].key}`}
/>
<NavigationExampleRow
text={`Push page #${this.state.children.length}`}
onPress={()=> {
this.handleAction({type: 'push', key: 'page #'+(this.state.children.length + 1)})
}
}
/>
<NavigationExampleRow
text="Pop"
onPress={()=>{
this.handleBackAction();
}}
/>
<NavigationExampleRow
text="Exit Basic Nav example"
onPress={this.props.onExameleExit}
/>
</ScrollView>);
}
//action arguments: {type:'push', key: 'page #2'}
handleAction(action){
if (!action) {
return false;
}
//每一次导航,都是通过ExampleReducer函数,传递当前的state, 和action类型,
//然后由Reducer决定,返回新的state, 可以查看上一节中的state和reducer名词解释
let newState = ExampleReducer(this.state, action);
if (newState === this.state){
return false;
}
this.setState(newState)
return true;
}
handleBackAction(){
return this.handleAction({type: 'BackAction'})
}
}
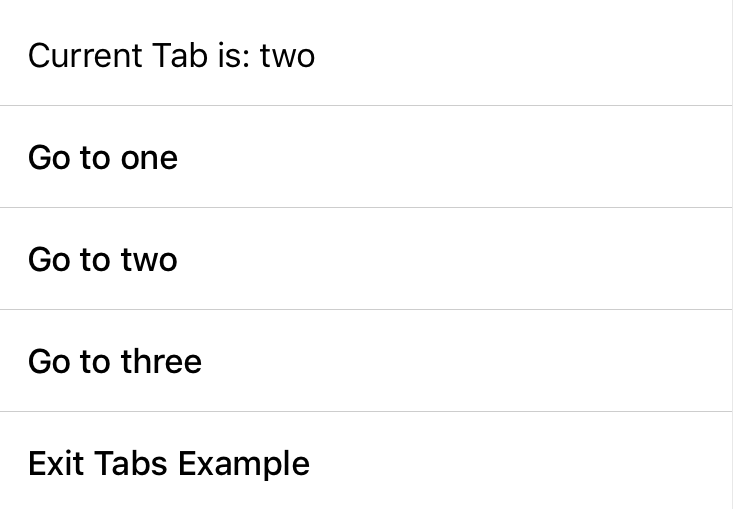
AppRegistry.registerComponent('App', () => App);NavigationExampleTabBar
'use strict'

import React, {
    AppRegistry,
    Component,
    StyleSheet,
    Text,
    Linking,
    View,
    ScrollView,
    NavigationExperimental,
} from 'react-native';


const {
    Reducer: NavigationReducer,
    } = NavigationExperimental

import NavigationExampleRow from "./NavigationExampleRow";
import NavigationExampleTabBar from "./NavigationExampleTabBar" //底部tabs的View
//首先创建每个tab页面,显示tab按纽,以及当前在哪个tab页面中。
class ExampleTabPage extends Component {
    render() {
        const currentTabRoute = this.props.tabs[this.props.index];
        return (
            <ScrollView style={styles.tabPage}>
                <NavigationExampleRow
                    text={`Current Tab is: ${currentTabRoute.key}`}
                />
                {this.props.tabs.map((tab, index) => (
                    <NavigationExampleRow
                        key={tab.key}
                        text={`Go to ${tab.key}`}
                        onPress={
                            ()=> {
                                //调用一个static函数JumpToAction,返回一个action, 如{index:1}
                                this.props.onNavigate(NavigationReducer.TabsReducer.JumpToAction(index));
                            }
                        }
                    />
                ))}
                <NavigationExampleRow
                    text="Exit Tabs Example"/>
            </ScrollView>
        );

    }
}

//创建tabs reducer函数
//调用这个函数时,返回一个navigationState对像
/*
 {children: [{key:"one"}, {key:"two"}, key: "three"], index: 0, key: undefined}
 */
const ExampleTabsReducer = NavigationReducer.TabsReducer({
    tabReducers: [
        (lastRoute) => lastRoute || {key: 'one'},
        (lastRoute) => lastRoute || {key: 'two'},
        (lastRoute) => lastRoute || {key: 'three'},
    ],
});
class App extends Component {
    constructor(props) {
        super(props)

        this.state = ExampleTabsReducer();
    }

    render() {
        return (<View style={styles.topView}>
            <ExampleTabPage
                tabs={this.state.children}
                index={this.state.index}
                onNavigate={this.handleAction.bind(this)}
            ></ExampleTabPage>
            <NavigationExampleTabBar
                tabs={this.state.children}
                index={this.state.index}
                onNavigate={this.handleAction.bind(this)}
            />
        </View>);
    }

    //action arguments: {index:1}
    //此方法会在ExampleTabPage中的点击tab后调用
    handleAction(action) {
        if (!action) {
            return false;
        }
        const newState = ExampleTabsReducer(this.state, action)
        if (newState === this.state) {
            return false
        }
        this.setState(newState)
        return true;
    }
}
const styles = StyleSheet.create({
    topView: {
        flex: 1,

        paddingTop: 30,
    },
    tabPage: {
        backgroundColor: '#E9E9EF',
    },
});
AppRegistry.registerComponent('App', () => App);
Tab导航的定义

/*自定义一个底部tab导航*/
import React, {
View,
Component,
Text,
StyleSheet,
TouchableOpacity,
PixelRatio,
NavigationExperimental,
} from 'react-native';
const {
Reducer: NavigationReducer,
} = NavigationExperimental
const {
JumpToAction
} = NavigationReducer.TabsReducer; //从TabsReducer提取出JumpToAction函数
export default class NavigationExampleTabBar extends Component {
render() {
return (
<View style={styles.tabBar}>
{this.props.tabs.map(this._renderTab.bind(this))}
</View>
)
}
_renderTab(tab, index) {
const textStyle = [styles.tabButtonText];
if (this.props.index === index) {
textStyle.push(styles.selectedTabButtonText)
}
return (
<TouchableOpacity
style={styles.tabButton}
key={tab.key}
onPress={()=>{
this.props.onNavigate(JumpToAction(index));
}}
>
<Text style={textStyle}>
{tab.key}
</Text>
</TouchableOpacity>
)
}
}
const styles = StyleSheet.create({
tabBar: {
height: 50,
flexDirection: 'row',
},
tabButton: {
flex: 1,
},
tabButtonText: {
paddingTop: 20,
textAlign: 'center',
fontSize: 17,
fontWeight: '500',
},
selectedTabButtonText: {
color: 'blue',
},
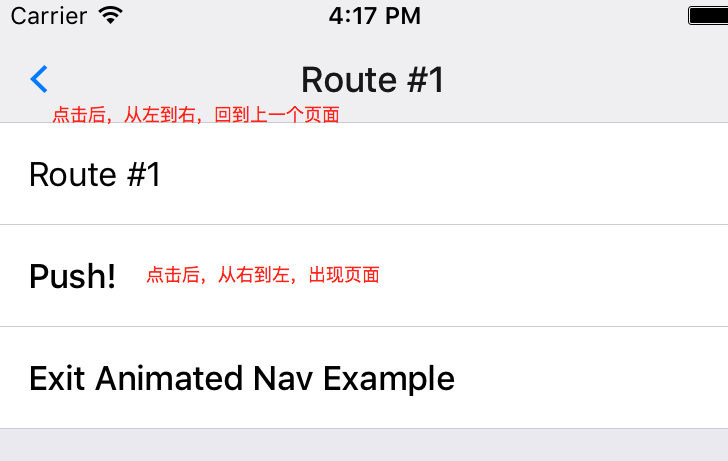
});NavigationAnimateExample
'use strict'

import React, {
    AppRegistry,
    Animated,
    Component,
    StyleSheet,
    Text,
    Linking,
    View,
    ScrollView,
    NavigationExperimental,
} from 'react-native';


const {
    Reducer: NavigationReducer,
    AnimatedView: NavigationAnimatedView,
    Card: NavigationCard,
    Header: NavigationHeader,
    } = NavigationExperimental

import NavigationExampleRow from "./NavigationExampleRow";

const ExampleReducer = NavigationReducer.StackReducer({
    getPushedReducerForAction: (action) => {
        if (action.type === 'push') {
            return (state) => state || {key: action.key};
        }
        return null;
    },
    getReducerForState: (initialState) => (state) => state || initialState,
    initialState: {
        key: 'AnimatedExampleStackKey',
        index: 0,
        children: [
            {key: 'First Route'},
        ],
    },
});

class App extends Component {
    constructor(props) {
        super(props);
        this.state = ExampleReducer();
    }

    componentWillMount() {
        //将定义的方法绑定到当前上下文中,如果直接调用,比如在_renderCard中,需要调用_renderScene
        //因为调用_renderCard是在NavigationAnimatedView中,而它是没有_renderScene
        //所以会出现_rednerScene没有定义的错误
        this._renderCard = this._renderCard.bind(this);
        this._renderHeader = this._renderHeader.bind(this);
        this._renderScene = this._renderScene.bind(this);
        this._renderTitleComponent = this._renderTitleComponent.bind(this);
        this._handleAction = this.handleAction.bind(this);
    }

    render() {
        return (<View>
            <NavigationAnimatedView
                navigationState={this.state}
                style={styles.animatedView}
                onNavigate={this._handleAction}
                renderOverlay={this._renderHeader}
                applyAnimation={(pos, navState) => {
          Animated.timing(pos, {toValue: navState.index, duration: 500}).start();
        }}
                renderScene={this._renderCard}
            >
            </NavigationAnimatedView>
        </View>);
    }

    _renderCard(props) {
        return (
            <NavigationCard
                {...props}
                key={'card_' + props.scene.navigationState.key}
                renderScene={this._renderScene}
            >
            </NavigationCard>
        )
    }
    _renderHeader(/*NavigationSceneRendererProps*/ props) {
        return (
            <NavigationHeader
                navigationProps={props}
                renderTitleComponent={this._renderTitleComponent}
            />
        );
    }

    _renderTitleComponent(/*NavigationSceneRendererProps*/ props) {
        return (
            <NavigationHeader.Title>
                {props.scene.navigationState.key}
            </NavigationHeader.Title>
        );
    }

    _renderScene(props) {

        return (
            <ScrollView style={styles.scrollView}>
                <NavigationExampleRow
                    text={props.scene.navigationState.key}
                />
                <NavigationExampleRow
                    text="Push!"
                    onPress={() => {
            props.onNavigate({
              type: 'push',
              key: 'Route #' + props.scenes.length,
            });
          }}
                />
                <NavigationExampleRow
                    text="Exit Animated Nav Example"
                    onPress={this.props.onExampleExit}
                />
            </ScrollView>
        )
    }

    //action arguments: {index:1}
    //此方法会在ExampleTabPage中的点击tab后调用
    handleAction(action) {
        if (!action) {
            return false;
        }
        const newState = ExampleReducer(this.state, action);
        if (newState === this.state) {
            return false;
        }
        this.setState(newState);
        return true;
    }
    /*可以不需要,需要在push之后,ReactNative会自动为我们添加BackAction.
    handleBackAction(): boolean {
        return this._handleAction({ type: 'BackAction', });
    }
}
const styles = StyleSheet.create({
    animatedView: {
        flex: 1,
    },
    scrollView: {
        marginTop: NavigationHeader.HEIGHT,
    },
});


AppRegistry.registerComponent('App', () => App);


 2180
2180

 被折叠的 条评论
为什么被折叠?
被折叠的 条评论
为什么被折叠?
 到【灌水乐园】发言


