


 本文介绍如何使用 iOS 开发中的 Storyboard 进行界面切换及数据传递,包括创建 TableViewController 和多个 ViewController,以及通过定制的 Novel 类实现数据绑定。
StoryBoard是iOS开发中重要的角色,可以实现可视化的程序页面切换逻辑控制。下面我们通过简单的例子来看看StoryBoard的使用方法。
- 我们新建一个SingleViewApplication,注意选择StoryBoard选项;
- 删除自动生成的Controller头文件和.m文件;
- 在MainStoryboard.storyboard中,删除默认生成的View Controller;
- 新建一个Table View Controller作为程序入口;
- 新建两个View Controller组件作为后续的界面;
- 然后对入口的Table View Controller,选择Editor->Embed in->Navigation Controller菜单,添加一个Nav Controller;
- 在每个添加的ViewController组件中添加组件,并且通过“control+拖拽”的形式拖到另一个Controller上,完成点击按钮导航到下一个界面的操作;
- 对于不需要添加到导航视图的内容直接通过按钮上Control+鼠标拖拽的方式完成窗口切换逻辑;
- 设置一些必要的控件属性:设置导航标签、设置按钮文字等,同时将一些封面图片拷贝到Supporting Files目录;
- 操作完成的MainStoryboard是这样子的:
- 我们如果这时候run发现是不能完成导航的,必须在AppDelegate.m中添加:
@synthesize window;
- 我们接着完善,我们新建一个用来传递数据的类:
头文件:
#import <Foundation/Foundation.h>

@interface Novel : NSObject

@property(nonatomic, strong) NSString* name;
@property(nonatomic, strong) NSString* cover;
@property(nonatomic, strong) NSString* content;

@end
.m文件:
#import "Novel.h"

@implementation Novel

@synthesize name, cover, content;

@end
- 接下来我们需要创建几个ViewController,新建两个UIViewController的子类,和一个UITabelViewController的子类,分别对应我们的列表视图、封面视图和内容视图,注意不能选择"With XIB for user interface"选项;
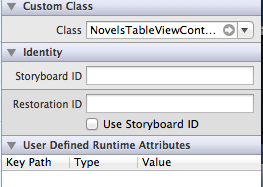
- 下面我们要做的是界面(视图,View)和我们刚才创建的类文件(控制器,Controller)的关联。我们回到Storyboard,点击需要设置的View例如第一个列表,选择右侧的Identity inspector,在Class中选择我们的UITableViewController的子类:
- 接着将剩下来的两个界面同样做好关联;
- NovelsTableViewController需要使用Novel作为传递参数,并且需要传递到Cover页面,所以我们需要import头文件并定义变量:
#import <UIKit/UIKit.h>

#import "Novel.h"
#import "CoverViewController.h"

@interface NovelsTableViewController : UITableViewController

// 定义小说列表
@property (nonatomic, strong) NSMutableArray *novels;
// 定义当前小说
@property (nonatomic, strong) Novel *curNovel;

@end
.m文件的内容是:
-(void) prepareForSegue:(UIStoryboardSegue *)segue sender:(id)sender {
    // 页面切换,需要保证storyboard中的这个跳转的storyboard segue是showCover
    if ([segue.identifier isEqualToString:@"showCover"] ) {
        CoverViewController *cover = [segue destinationViewController];
        NSIndexPath *path = [self.tableView indexPathForSelectedRow];
        Novel *novel = [novels objectAtIndex:[path row]];
        [cover setCurNovel: novel];
    }
}

- (id)initWithStyle:(UITableViewStyle)style
{
    self = [super initWithStyle:style];
    if (self) {
        // Custom initialization
    }
    return self;
}

- (void)viewDidLoad
{
    [super viewDidLoad];

    // 初始化小说列表
    novels = [[NSMutableArray alloc] init];

    Novel *novel = [[Novel alloc] init];
    [novel setName: @"Fifty shades Freed"];
    [novel setCover: @"fifty_shades_freed"];
    [novel setContent: @"NO 1. 《Fifty shades Freed》by E L James"];
    [novels addObject: novel];

    novel = [[Novel alloc] init];
    [novel setName: @"Gone Girl"];
    [novel setCover: @"gone_girl"];
    [novel setContent: @"NO 2. 《Gone Girl》 by Gillian Flynn"];
    [novels addObject: novel];

    novel = [[Novel alloc] init];
    [novel setName: @"Fifty Shades Trilogy"];
    [novel setCover: @"fifty_shades_trilogy"];
    [novel setContent: @"NO 3.《Fifty Shades Trilogy》:Fifty Shades of Grey, Fifty Shades Darker, Fifty Shades Freed 3-volume by E.L. James"];
    [novels addObject: novel];

    novel = [[Novel alloc] init];
    [novel setName: @"Bared to You"];
    [novel setCover: @"bared_to_you"];
    [novel setContent: @"NO 4.《Bared to You》by Sylvia Day"];
    [novels addObject: novel];

    novel = [[Novel alloc] init];
    [novel setName: @"No Easy Day"];
    [novel setCover: @"no_easy_day"];
    [novel setContent: @"NO 5. 《No Easy Day》by Mark Owen"];
    [novels addObject: novel];


    // Uncomment the following line to preserve selection between presentations.
    // self.clearsSelectionOnViewWillAppear = NO;

    // Uncomment the following line to display an Edit button in the navigation bar for this view controller.
    // self.navigationItem.rightBarButtonItem = self.editButtonItem;
}

- (void)didReceiveMemoryWarning
{
    [super didReceiveMemoryWarning];
    // Dispose of any resources that can be recreated.
}

#pragma mark - Table view data source

- (NSInteger)numberOfSectionsInTableView:(UITableView *)tableView
{
    // 返回一个列表区域
    return 1;
}

- (NSInteger)tableView:(UITableView *)tableView numberOfRowsInSection:(NSInteger)section
{
    // 返回列表数目
    return [novels count];
}

- (UITableViewCell *)tableView:(UITableView *)tableView cellForRowAtIndexPath:(NSIndexPath *)indexPath
{
    // 返回列表显示内容
    static NSString *CellIdentifier = @"NovelCell";
    UITableViewCell *cell = [tableView dequeueReusableCellWithIdentifier:CellIdentifier];

    if (cell == nil) {
        cell = [[UITableViewCell alloc] initWithStyle:UITableViewCellStyleDefault reuseIdentifier:CellIdentifier];
    }

    curNovel = [novels objectAtIndex: [indexPath row]];
    [[cell textLabel] setText: [curNovel name]];

    return cell;
}
- 接着我们在Cover中获取内容并且显示:
头文件:
#import <UIKit/UIKit.h>

#import "Novel.h"
#import "ContentViewController.h"

@interface CoverViewController : UIViewController

@property (strong, nonatomic) IBOutlet UIImageView *imageViewCover;

@property (nonatomic, strong) Novel *curNovel;

@end
.m文件:
#import "CoverViewController.h"

@interface CoverViewController ()

@end

@implementation CoverViewController

@synthesize imageViewCover;
@synthesize curNovel;

- (id)initWithNibName:(NSString *)nibNameOrNil bundle:(NSBundle *)nibBundleOrNil
{
    self = [super initWithNibName:nibNameOrNil bundle:nibBundleOrNil];
    if (self) {
        // Custom initialization
    }
    return self;
}

- (void)viewDidLoad
{
    [super viewDidLoad];

    // 设置图片和标题
    UIImage *image = [UIImage imageNamed:[curNovel cover]];
    [imageViewCover setImage:image];
    [self setTitle:[curNovel name]];
}


-(void) prepareForSegue:(UIStoryboardSegue *)segue sender:(id)sender {
    ContentViewController *content = [segue destinationViewController];
    [content setCurNovel: curNovel];
}

- (void)didReceiveMemoryWarning
{
    [super didReceiveMemoryWarning];
    // Dispose of any resources that can be recreated.
}

@end
- 接着内容界面:
头文件:
#import <UIKit/UIKit.h>

#import "Novel.h"

@interface ContentViewController : UIViewController

@property (strong, nonatomic) IBOutlet UILabel *labelNovel;

@property (nonatomic, strong) Novel *curNovel;

- (IBAction)dismiss:(id)sender;

@end
.m文件:
#import "ContentViewController.h"

@interface ContentViewController ()

@end

@implementation ContentViewController

@synthesize curNovel;
@synthesize labelNovel;


- (id)initWithNibName:(NSString *)nibNameOrNil bundle:(NSBundle *)nibBundleOrNil
{
    self = [super initWithNibName:nibNameOrNil bundle:nibBundleOrNil];
    if (self) {
        // Custom initialization
    }
    return self;
}

- (void)viewDidLoad
{
    [super viewDidLoad];

    // 设置内容
    [labelNovel setText:[curNovel content]];

}

- (void)didReceiveMemoryWarning
{
    [super didReceiveMemoryWarning];
    // Dispose of any resources that can be recreated.
}

- (IBAction)dismiss:(id)sender {
    [self dismissViewControllerAnimated:YES completion: nil];
}
@end
大功告成!


 3180
3180

 被折叠的 条评论
为什么被折叠?
被折叠的 条评论
为什么被折叠?
 到【灌水乐园】发言


