


SpringMVC作为一个MVC框架,有控制层,当我们在浏览器发出了一个请求,SpringMVC是怎么处理请求,而且通过请求找到对应的类的方法?我们今天带着这么问题来解析SpringMVC源代码处理过程。
我们在实现SpringMVC控制层时,标示了请求路径,并标示请求地址对应的哪个方法,源代码如下:
@Controller
@RequestMapping(value="/test")
public class TestController2 {
	@Autowired
	private TestService testService;

	@RequestMapping(value="/index")
	public ModelAndView getIndex(Model model){
       ModelAndView mv = new ModelAndView();
		  return mv;
	}
}注解@RequestMapping是处理方法的映射。我们在类上面注解和方法上注解这样会更加的清晰,我们在类上标示更能清晰的知道这个路径是请求这个类,并在方法上注解比较清楚的是请求哪个方法。例如:http://127.0.0.1:8080/test/index.jhtml。如图所示:
我们先介绍两个比较重要的组件HandlerMapping和HandlerAdapter是@Contoller和@RequestMapping注解的处理器, HandlerMapping是处理请求映射的处理器;HandlerAdapter适配器处理器(动态调用方法和处理参数)。我们在XML配置文件中进行配置这两种处理器。代码如下:
 <bean class="org.springframework.web.servlet.mvc.method.annotation.RequestMappingHandlerMapping"/>
<bean class="org.springframework.web.servlet.mvc.method.annotation.RequestMappingHandlerAdapter">一:我们通过解析SpringMVC处理请求深度解析,并介绍HandlerMapping映射处理器
我们讲到这个这个XML配置,找到@RequestMapping和@Controller并封装成RequestMappingInfo,为后面我们解析处理请求会比较清晰,我在这在补充一下,我们在初始化Bean时我们在上一篇有介绍过,对@RequestMapping注解处理这部分我们没介绍,所以我在这里在补充一下,RequestMappingHandlerMapping间接实现了InitializingBean接口,如图所示:
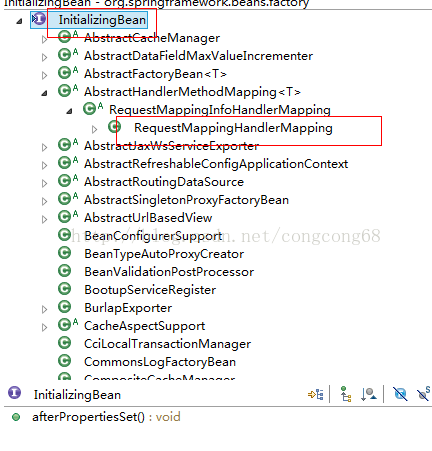
RequestMappingHandlerMapping间接实现了InitializingBean接口重写了afterPropertiesSet方法,初始化RequestMappingHandlerMapping时,会调用afterPropertiesSet方法,跟 <bean class="" init-method=""/>属性init-method处理一样。afterPropertiesSet调用了RequestMappingHandlerMapping的initHandlerMethods实现的。处理@RequestMapping的,我们这边来分析一下它是怎么实现的。源代码:
 protected void initHandlerMethods() {
		String[] beanNames = (this.detectHandlerMethodsInAncestorContexts ?
				BeanFactoryUtils.beanNamesForTypeIncludingAncestors(getApplicationContext(), Object.class) :
				getApplicationContext().getBeanNamesForType(Object.class));
		for (String beanName : beanNames) {
			if (isHandler(getApplicationContext().getType(beanName))){
				<span style="color:#cc0000;">detectHandlerMethods(beanName);</span>
			}
		}
		handlerMethodsInitialized(getHandlerMethods());
	}

	@Override
	protected boolean isHandler(Class<?> beanType) {
		return ((AnnotationUtils.findAnnotation(beanType, <span style="color:#cc0000;">Controller.class</span>) != null) ||
				(AnnotationUtils.findAnnotation(beanType, <span style="color:#cc0000;">RequestMapping.class</span>) != null));
	}
说明:
(1)isHandler这个方法是判断是否被@Controller和@RequestMapping标记
(2)如果有被@Controller和@RequestMapping标记,然后生成RequestMappingInfo实例注册到缓存中,供我们在请求时通过URL能匹配找到。
我们来看怎么生成RequestMappingInfo实例注册到缓存,由detectHandlerMethods这个方法实现的。源代码如下:
	protected void detectHandlerMethods(final Object handler) {
		Class<?> handlerType =
				(handler instanceof String ? getApplicationContext().getType((String) handler) : handler.getClass());

		final Map<Method, T> mappings = new IdentityHashMap<Method, T>();
		final Class<?> userType = ClassUtils.getUserClass(handlerType);
		Set<Method> methods = HandlerMethodSelector.selectMethods(userType, new MethodFilter() {
			public boolean matches(Method method) {
				T mapping = <span style="color:#cc0000;">getMappingForMethod(method, userType);</span>
				if (mapping != null) {
					mappings.put(method, mapping);
					return true;
				}
				else {
					return false;
				}
			}
		});

		for (Method method : methods) {
                        //注册到缓存中
			<span style="color:#cc0000;">registerHandlerMethod(handler, method, mappings.get(method))</span>;
		}
	}


   @Override
	protected RequestMappingInfo getMappingForMethod(Method method, Class<?> handlerType) {
		RequestMappingInfo info = null;
               //查找该类下注解的@RequestMapping的所有方法
		RequestMapping methodAnnotation = AnnotationUtils.findAnnotation(method, RequestMapping.class);
		if (methodAnnotation != null) {
			RequestCondition<?> methodCondition = getCustomMethodCondition(method);
                       //创建RequestMappingInfo
			info = createRequestMappingInfo(methodAnnotation, methodCondition);
                       //对类进行查找有没有标示@RequestMapping注解
			RequestMapping typeAnnotation = AnnotationUtils.findAnnotation(handlerType, RequestMapping.class);
			if (typeAnnotation != null) {
				RequestCondition<?> typeCondition = getCustomTypeCondition(handlerType);
                                //成成RequestMappingInfo。类别和方法级别的RequestMapping注解进行组合
				info = <span style="color:#ff0000;">createRequestMappingInfo(typeAnnotation, typeCondition).combine(info);</span>
			}
		}
		return info;
	}
   //设置RequestMappingInfo的属性然后创建<span style="font-family: 宋体;">RequestMappingInfo</span>
  protected RequestMappingInfo createRequestMappingInfo(RequestMapping annotation, RequestCondition<?> customCondition) {
		String[] patterns = resolveEmbeddedValuesInPatterns(annotation.value());
		return new RequestMappingInfo(
				new PatternsRequestCondition(patterns, getUrlPathHelper(), getPathMatcher(),
						this.useSuffixPatternMatch, this.useTrailingSlashMatch, this.fileExtensions),
				new RequestMethodsRequestCondition(annotation.method()),
				new ParamsRequestCondition(annotation.params()),
				new HeadersRequestCondition(annotation.headers()),
				new ConsumesRequestCondition(annotation.consumes(), annotation.headers()),
				new ProducesRequestCondition(annotation.produces(), annotation.headers(), getContentNegotiationManager()),
				customCondition);
	}
当我们在浏览器发送了http://127.0.0.1:8080/test/index.jhtml这样的请求,SpringMVC注册在web.xml中的前端转发器DispatcherServlet接收,在这个之前,我们对initHandlerMappings和initHandlerAdapters初始化,这个在上一篇有介绍过。接下来我们开始分析DispatcherServlet处理请求。
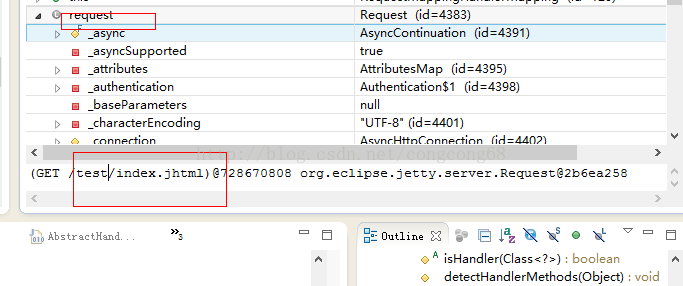
DispatcherServlet是间接的继承了HttpSevlet,由父类FrameworkServlet实现了doPost和doGet方法,然后在调用子类,DispatcherServlet的doDispatch方法处理请求,实现了设计原则接口隔离原则。请求的包含了一些头部的信息等,如图所示:
doDispatch方法的源代码如下:
 protected void doDispatch(HttpServletRequest request, HttpServletResponse response) throws Exception {
		       HttpServletRequest processedRequest = request;
                               //判断是否是文件流请求
				processedRequest = checkMultipart(request);
                                //获取了映射处理器,里面是通过请求的URL获取对应的类并获取实例化的Bean,包装成HandlerMethod
				mappedHandler = <span style="color:#990000;">getHandler(processedRequest, false);</span>
				if (mappedHandler == null || mappedHandler.getHandler() == null) {
					noHandlerFound(processedRequest, response);
					return;
				}
                               //获取HandlerAdapter
				HandlerAdapter ha = getHandlerAdapter(mappedHandler.getHandler());
				String method = request.getMethod();
				boolean isGet = "GET".equals(method);
				if (isGet || "HEAD".equals(method)) {
					long lastModified = ha.getLastModified(request, mappedHandler.getHandler());
					if (logger.isDebugEnabled()) {
						String requestUri = urlPathHelper.getRequestUri(request);
						logger.debug("Last-Modified value for [" + requestUri + "] is: " + lastModified);
					}
					if (new ServletWebRequest(request, response).checkNotModified(lastModified) && isGet) {
						return;
					}
				}
				try {
				   mv = <span style="color:#cc0000;">ha.handle(processedRequest, response, mappedHandler.getHandler());</span>
				}
				applyDefaultViewName(request, mv);
				mappedHandler.applyPostHandle(processedRequest, response, mv);
			    processDispatchResult(processedRequest, response, mappedHandler, mv, dispatchException);
		}
	}


	protected HandlerExecutionChain getHandler(HttpServletRequest request) throws Exception {
		for (HandlerMapping hm : this.handlerMappings) {
			HandlerExecutionChain handler = <span style="color:#990000;">hm.getHandler(request);</span>
			if (handler != null) {
				return handler;
			}
		}
		return null;
	}
说明:
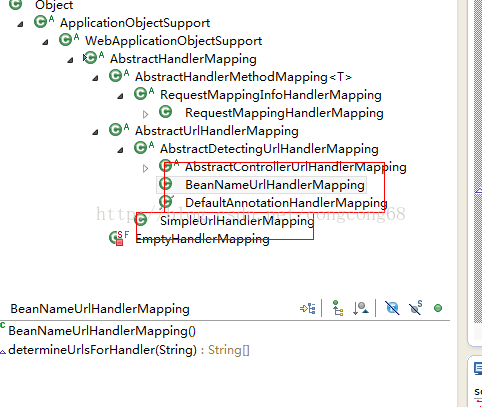
(1)Spring3.1开始的版本,建议使用RequestMappingHandlerMapping和RequestMappingHandlerAdapter,所以我们在XML配置了这个Bean组件。 List<HandlerMapping> handlerMappings里面存放的是映射处理器,Spring内置了很多映射处理器,例如SimpleUrlHandlerMapping、BeanNameUrlHandlerMapping等,如图所示:
(2)HandlerExecutionChain包含了处理该请求的处理器,还包含一系列可以拦截请求的拦截器。
RequestMappingHandlerMapping也是继承了AbstractHandlerMapping,getHandler具体实现是由AbstractHandlerMapping来实现的,源代码如下:
public final HandlerExecutionChain getHandler(HttpServletRequest request) throws Exception {
		Object handler = getHandlerInternal(request);
		if (handler == null) {
			handler = getDefaultHandler();
		}
		if (handler == null) {
			return null;
		}
		// Bean name or resolved handler?
		if (handler instanceof String) {
			String handlerName = (String) handler;
			handler = getApplicationContext().getBean(handlerName);
		}
		return <span style="color:#990000;">getHandlerExecutionChain(handler, request);</span>
	}
说明:
(1)getHandlerInternal方法是处理映射的,获取request获取了请求路径,然后找到对应的RequestMappingInfo获取了Controller类,并找到了对应的方法。
(2)HandlerExecutionChain带了一系列的interceptors
第一:getHandlerInternal方法是通过URL找到对应的处理映射的,并找到对应的Bean实例,我们通过源代码分析是怎么处理的?
getHandlerInternal方法源代码如下:
protected HandlerMethod getHandlerInternal(HttpServletRequest request) throws Exception {
               //通过UrlPathHelper获取request获取了请求路径  例如:test/index.jhtml
		String lookupPath = getUrlPathHelper().getLookupPathForRequest(request);
		if (logger.isDebugEnabled()) {
			logger.debug("Looking up handler method for path " + lookupPath);
		}
                //
		HandlerMethod handlerMethod = lookupHandlerMethod(lookupPath, request);
		if (logger.isDebugEnabled()) {
			if (handlerMethod != null) {
				logger.debug("Returning handler method [" + handlerMethod + "]");
			}
			else {
				logger.debug("Did not find handler method for [" + lookupPath + "]");
			}
		}
               //返回对handlerMethod 进行设置已经初始化Bean并设置属性的handlerMethod
		return (handlerMethod != null ? handlerMethod.<span style="color:#990000;">createWithResolvedBean</span>() : null);
	}
     //对bean进行初始化
   public HandlerMethod createWithResolvedBean() {
		Object handler = this.bean;
		if (this.bean instanceof String) {
			String beanName = (String) this.bean;
                         //获取对应的Bean
			handler = this.beanFactory.getBean(beanName);
		}
		return new HandlerMethod(this, handler);
	}
 //设置bean、还有beanFactory 、method、parameters 等属性
private HandlerMethod(HandlerMethod handlerMethod, Object handler) {
		Assert.notNull(handlerMethod, "HandlerMethod is required");
		Assert.notNull(handler, "Handler object is required");
		this.bean = handler;
		this.beanFactory = handlerMethod.beanFactory;
		this.method = handlerMethod.method;
		this.bridgedMethod = handlerMethod.bridgedMethod;
		this.parameters = handlerMethod.parameters;
	}
说明:
(1)UrlPathHelper是分析请求的URL,LookupPathForRequest(request)这个方法中有alwaysUseFullPath默认是false使用相对路径。
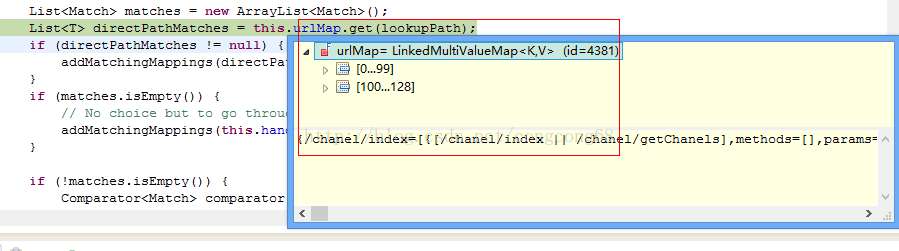
(2)lookupHandlerMethod通过URL查看映射到哪个方法和类,MultiValueMap<String, T> urlMap 存放的key是url,value是RequestMappingInfo信息(params等),通过lookupPath查找对应的RequestMappingInfo,然后通过RequestMappingInfo到Map<T, HandlerMethod> handlerMethods查找对应的HandlerMethod,并返回。MultiValueMap<String, T> urlMap这个缓存中是我们在最开始时有介绍,处理@RequestMapping和@Controll 并封装成RequestMappingInfo并放到缓存,如图所示:
如果查找对应的方法时,放到Match,里面有包含的 HandlerMethod ,如图所示:
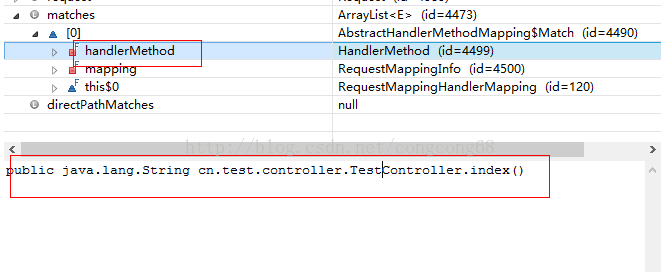
然后通过HandlerMethod的createWithResolvedBean方法实现了通过beanName获取已经初始化的 Bean。然后重新初始化HandlerMethod对象,并设置bean、还有beanFactory 、method、parameters 等属性。
第二:HandlerExecutionChain 包含了一系列拦截器。会在调用Controller类对应方法之前、处理完方法还没返回视图、返回视图之后,这些动态加以拦截。
HandlerExecutionChain这个类属性很很多添加一系列的拦截器,源代码如下:
public class HandlerExecutionChain {
	private HandlerInterceptor[] interceptors;
	private List<HandlerInterceptor> interceptorList;
}
getHandler 具体实现是由 AbstractHandlerMapping中,在这个 方法中实现了加入了拦截器,我们在看一下我们怎么加入拦截器,源代码如下:
protected HandlerExecutionChain getHandlerExecutionChain(Object handler, HttpServletRequest request) {
		HandlerExecutionChain chain =
			(handler instanceof HandlerExecutionChain) ?
				(HandlerExecutionChain) handler : new HandlerExecutionChain(handler);
                //添加拦截器
		<span style="color:#990000;">chain.addInterceptors(getAdaptedInterceptors());</span>
		String lookupPath = urlPathHelper.getLookupPathForRequest(request);
		for (MappedInterceptor mappedInterceptor : mappedInterceptors) {
			if (mappedInterceptor.matches(lookupPath, pathMatcher)) {
				chain.addInterceptor(mappedInterceptor.getInterceptor());
			}
		}

		return chain;
	}
}
说明:
我们在XML里没配置自己的拦截器,所以这边都是为空的。
HandlerInterceptor拦截器接口,里面有三个方法:
(1)preHandle方法:请求处理之前执行的这个方法,在Controller方法调用之前调用。例如:调用之前判断是否有登陆。
(2)postHandle方法: 请求进行处理之后,在Controller 方法调用之后执行,会在DispatcherServlet 调用ModelView视图之前调用。
(3)afterCompletion方法:是在DispatcherServlet 调用ModelView视图之后调用。
既然HandlerInterceptor是接口,我们可以自己实现一个类实现这个接口,这样我们就自己定义自己的拦截器,然后加到SpringMVC拦截中?当然可以。
我们自己定义了一个类实现了HandlerInterceptor 接口,例如:public class myInterceptor implements HandlerInterceptor 然后重写了这个3个方法。我们在XML配置这个类,把自己定义的拦截器加到SpringMVC拦截中。在配置文件加入了
<span style="color:#990000;"><beans xmlns:mvc="http://www.springframework.org/schema/mvc"
     xsi:schemaLocation="http://www.springframework.org/schema/mvc http://www.springframework.org/schema/mvc/spring-mvc-3.0.xsd"></span>
 <mvc:interceptors>
<mvc:interceptor>
  <!--拦截哪个包下的类例如:-->
      <mvc:mapping path="/test/*"/>
      <bean class="test.myInterceptor "></bean>
    </mvc:interceptor>
</mvc:interceptors>这样就把我们定义好的拦截器加到SpringMVC的拦截器中。
到这里,我们对 HandlerMapping映射处理器介绍完了,
二:我们通过解析SpringMVC处理请求深度解析,并介绍HandlerAdapter适配器处理器(动态调用方法和处理参数)
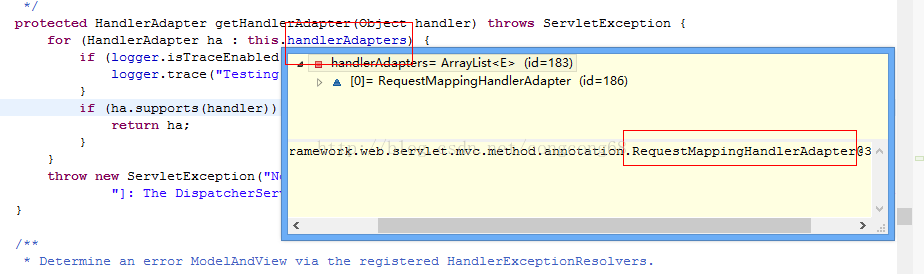
HandlerAdapter处理HandlerMethod映射并返回了视图和数据的对象。getHandlerAdapter获取了我们在配置文件的如图所示:
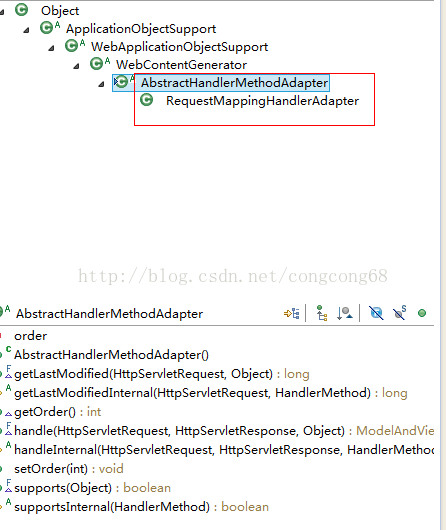
父类AbstractHandlerMethodAdapter实现的,我们先看一下 继承关系,这种开封闭原则。如图所示:
我们来看一下这个handle(processedRequest, response, mappedHandler.getHandler());动态的调用方法和处理参数的具体实现。源代码如下:
public final ModelAndView handle(HttpServletRequest request, HttpServletResponse response, Object handler)
			throws Exception {
		return handleInternal(request, response, (HandlerMethod) handler);
	}

  @Override
	protected final ModelAndView handleInternal(HttpServletRequest request,
			HttpServletResponse response, HandlerMethod handlerMethod) throws Exception {

		if (getSessionAttributesHandler(handlerMethod).hasSessionAttributes()) {
			// Always prevent caching in case of session attribute management.
			checkAndPrepare(request, response, this.cacheSecondsForSessionAttributeHandlers, true);
		}
		else {
			// Uses configured default cacheSeconds setting.
			checkAndPrepare(request, response, true);
		}

		// Execute invokeHandlerMethod in synchronized block if required.
		if (this.synchronizeOnSession) {
			HttpSession session = request.getSession(false);
			if (session != null) {
				Object mutex = WebUtils.getSessionMutex(session);、
				synchronized (mutex) {
					return invokeHandleMethod(request, response, handlerMethod);
				}
			}
		}
         //动态的调用方法和处理参数
		return invokeHandleMethod(request, response, handlerMethod);
	}
说明:
通过HandlerAdapter动态的调用方法和处理参数,调用方法。我们这边具体怎么动态调用方法和处理参数,并返回视图,等下一章在具体的介绍,这里涉及也比较多。
总结:
(1) 当我们在浏览器发送了http://127.0.0.1:8080/test/index.jhtml这样的请求,SpringMVC注册在web.xml中的前端转发器DispatcherServlet接收时。
(2)通过URL查看映射到哪个方法和类,MultiValueMap<String, T> urlMap 存放的key是url,value是RequestMappingInfo信息(params等),RequestMappingInfo获取了Controller类,并找到了对应的方法。并包装返回了HandlerMethod。
(3)通过BeanName,到工厂获取已经初始化的Bean,然后重新初始化HandlerMethod对象,并设置bean、还有beanFactory 、method、parameters 等属性。
(4)对HandlerExecutionChain添加拦截器和handler然后返回HandlerExecutionChain
(5)HandlerAdapter对HandlerExecutionChain进行动态的调用方法会返回ModelAndView。
浏览器请求已经获取到了,也找到了对应的类和方法,那怎么动态的请求方法和处理参数等,执行完方法并返回ModelAndView等?,带着这些问题我们继续前进。


 474
474


 被折叠的 条评论
为什么被折叠?
被折叠的 条评论
为什么被折叠?
 到【灌水乐园】发言


