


本文旨在从Android系统源码出发,简单梳理Instrumentation框架的行为及逻辑结构,供有兴趣的同学一起学习
从am instrument谈起
am instrument命令的执行
我们知道,命令行运行Android测试的命令是adb shell am instrument,这个命令是如何调起我们的测试代码来进行测试的呢,让我们从am命令的处理源码来开始一步步的查看吧。
am.java是android系统处理am命令的类,其位于/frameworks/base/cmds/am/src/com/android/commands/am/下,有Android源码的同学可以到相关目录下自行查看
onRun方法是am处理各个不同命令的分发处,我们可以看到am命令有多种用法,其中am instrumentation命令会调用runInstrument()方法
public void onRun() throws Exception {

    mAm = ActivityManagerNative.getDefault();
    if (mAm == null) {
        System.err.println(NO_SYSTEM_ERROR_CODE);
        throw new AndroidException("Can't connect to activity manager; is the system running?");
    }

    String op = nextArgRequired();

    if (op.equals("start")) {
        runStart();
    } else if (op.equals("startservice")) {
        runStartService();
    } else if (op.equals("stopservice")) {
        runStopService();
    } else if (op.equals("force-stop")) {
        runForceStop();
    } else if (op.equals("kill")) {
        runKill();
    } else if (op.equals("kill-all")) {
        runKillAll();
    } else if (op.equals("instrument")) {
        runInstrument();
    } else if (op.equals("broadcast")) {
        sendBroadcast();
    } else if (op.equals("profile")) {
        runProfile();
    } else if (op.equals("dumpheap")) {
        runDumpHeap();
    } else if (op.equals("set-debug-app")) {
        runSetDebugApp();
    } else if (op.equals("clear-debug-app")) {
        runClearDebugApp();
    } else if (op.equals("bug-report")) {
        runBugReport();
    } else if (op.equals("monitor")) {
        runMonitor();
    } else if (op.equals("hang")) {
        runHang();
    } else if (op.equals("restart")) {
        runRestart();
    } else if (op.equals("idle-maintenance")) {
        runIdleMaintenance();
    } else if (op.equals("screen-compat")) {
        runScreenCompat();
    } else if (op.equals("to-uri")) {
        runToUri(0);
    } else if (op.equals("to-intent-uri")) {
        runToUri(Intent.URI_INTENT_SCHEME);
    } else if (op.equals("to-app-uri")) {
        runToUri(Intent.URI_ANDROID_APP_SCHEME);
    } else if (op.equals("switch-user")) {
        runSwitchUser();
    } else if (op.equals("start-user")) {
        runStartUserInBackground();
    } else if (op.equals("stop-user")) {
        runStopUser();
    } else if (op.equals("stack")) {
        runStack();
    } else if (op.equals("lock-task")) {
        runLockTask();
    } else if (op.equals("get-config")) {
        runGetConfig();
    } else {
        showError("Error: unknown command '" + op + "'");
    }
}
以下是runInsturmentation方法的源码
private void runInstrument() throws Exception {
    String profileFile = null;
    boolean wait = false;
    boolean rawMode = false;
    boolean no_window_animation = false;
    int userId = UserHandle.USER_CURRENT;
    Bundle args = new Bundle();
    String argKey = null, argValue = null;
    IWindowManager wm = IWindowManager.Stub.asInterface(ServiceManager.getService("window"));
    String abi = null;

    String opt;
    while ((opt=nextOption()) != null) {
        if (opt.equals("-p")) {
            profileFile = nextArgRequired();
        } else if (opt.equals("-w")) {
            wait = true;
        } else if (opt.equals("-r")) {
            rawMode = true;
        } else if (opt.equals("-e")) {
            argKey = nextArgRequired();
            argValue = nextArgRequired();
            args.putString(argKey, argValue);
        } else if (opt.equals("--no_window_animation")
                || opt.equals("--no-window-animation")) {
            no_window_animation = true;
        } else if (opt.equals("--user")) {
            userId = parseUserArg(nextArgRequired());
        } else if (opt.equals("--abi")) {
            abi = nextArgRequired();
        } else {
            System.err.println("Error: Unknown option: " + opt);
            return;
        }
    }

    if (userId == UserHandle.USER_ALL) {
        System.err.println("Error: Can't start instrumentation with user 'all'");
        return;
    }

    String cnArg = nextArgRequired();
    ComponentName cn = ComponentName.unflattenFromString(cnArg);
    if (cn == null) throw new IllegalArgumentException("Bad component name: " + cnArg);

    InstrumentationWatcher watcher = null;
    UiAutomationConnection connection = null;
    if (wait) {
        watcher = new InstrumentationWatcher();
        watcher.setRawOutput(rawMode);
        connection = new UiAutomationConnection();
    }

    float[] oldAnims = null;
    if (no_window_animation) {
        oldAnims = wm.getAnimationScales();
        wm.setAnimationScale(0, 0.0f);
        wm.setAnimationScale(1, 0.0f);
    }

    if (abi != null) {
        final String[] supportedAbis = Build.SUPPORTED_ABIS;
        boolean matched = false;
        for (String supportedAbi : supportedAbis) {
            if (supportedAbi.equals(abi)) {
                matched = true;
                break;
            }
        }

        if (!matched) {
            throw new AndroidException(
                    "INSTRUMENTATION_FAILED: Unsupported instruction set " + abi);
        }
    }

    if (!mAm.startInstrumentation(cn, profileFile, 0, args, watcher, connection, userId, abi)) {
        throw new AndroidException("INSTRUMENTATION_FAILED: " + cn.flattenToString());
    }

    if (watcher != null) {
        if (!watcher.waitForFinish()) {
            System.out.println("INSTRUMENTATION_ABORTED: System has crashed.");
        }
    }

    if (oldAnims != null) {
        wm.setAnimationScales(oldAnims);
    }
}
该方法主要做了这么几件事:
- 解析参数并处理异常,目前支持的参数为(-w,-p,-r,-e,–no_window_animation,–no-window-animation,–user,–abi)
- 获取测试包名和TestRunner,格式为测试包名/TestRunner
- 进行一些参数的逻辑处理(通常没有使用到,可以暂不关注)
- 启动TestRunner进行测试(mAm.startInstrumentation(cn, profileFile, 0, args, watcher, connection, userId, abi))
- 如果附带了-w参数,会等待至执行完成,否则直接结束处理
各个指令含义解析:
- -w, 等待执行完成后才返回,否则直接返回(Instrumentation的执行在不同线程,不管是否带该参数都会正确执行)
- -p, 带1个参数,将一些配置写入指定文件(具体用处还未研究,后续有需要再补充)
- -r, 输出原始的数据(具体用处还未研究,后续有需要再补充)
- -e, 带两个参数,将这两个参数作为键值对传递给TestRunner,由TestRunner处理(后面会提到)
- –no_window_animation或–no-window-animation,执行Instrumentation过程中禁用动画效果,执行完后会恢复
- –user, 带1个参数,使用指定的uid运行(具体用处还未研究,后续有需要再补充)
- –abi, 带1个参数,使用指定的abi运行(具体用处还未研究,后续有需要再补充)
mAm是一个IActivityManager的对象,调用其startInstrumentation方法开始处理Instrumentation,下面我们来看看ActivityManager相关的知识
ActivityManager相关知识
ActivityManager是android框架的一个重要部分,它负责一新ActivityThread进程创建,Activity生命周期的维护,下图为这几个类之间的层次关系:
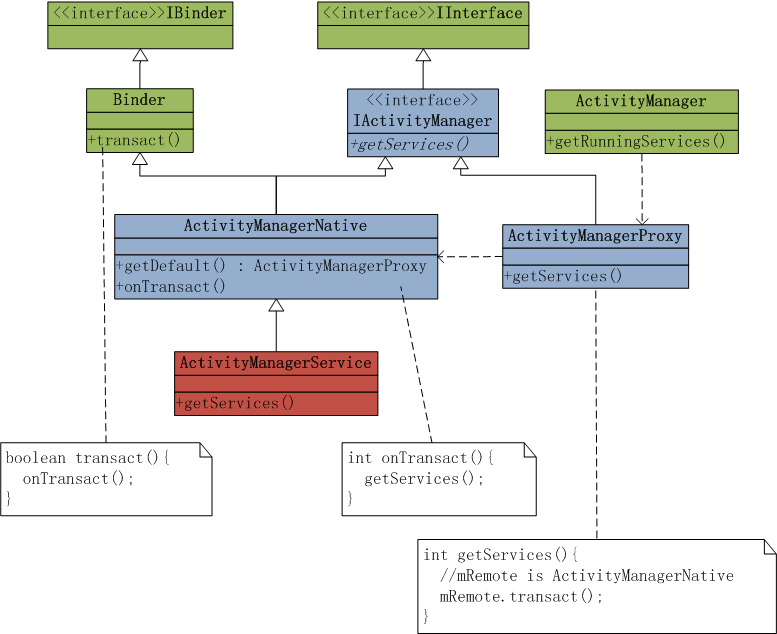
在这张图中,绿色的部分是在SDK中开放给应用程序开发人员的接口,蓝色的部分是一个典型的Proxy模式,红色的部分是底层的服务实现,是真正的动作执行者。这里的一个核心思想是Proxy模式,关于代理模式相关知识,请参考(暂却,后续补上)。以上仅是简单的介绍了下者几个类的关系,随着我们上文的步伐,我们会一点点分析出am命令是如何让Android系统跑起来测试用例的。
获取ActivityManager
还记得之前在am命令中启动Instrumentation的命令么?对的就是这个mAm.startInstrumentation(cn, profileFile, 0, args, watcher, connection, userId, abi)
其中的mAm为mAm = ActivityManagerNative.getDefault();
接下来便是要研究ActivityManagerNative.getDefault()了:
static public IActivityManager getDefault() {
    return gDefault.get();
}
gDefault的定义是IActivityManager的一个单例对象
private static final Singleton<IActivityManager> gDefault = new Singleton<IActivityManager>() {
    protected IActivityManager create() {
        IBinder b = ServiceManager.getService("activity");
        if (false) {
            Log.v("ActivityManager", "default service binder = " + b);
        }
        IActivityManager am = asInterface(b);
        if (false) {
            Log.v("ActivityManager", "default service = " + am);
        }
        return am;
    }
};
获取到名为activity的服务后,调用asInterface方法:
static public IActivityManager asInterface(IBinder obj) {
    if (obj == null) {
        return null;
    }
    IActivityManager in =
        (IActivityManager)obj.queryLocalInterface(descriptor);
    if (in != null) {
        return in;
    }

    return new ActivityManagerProxy(obj);
}
返回的是一个ActivityManagerProxy对象,然后按照原来的流程应该执行的是startInstrumentation方法
public boolean startInstrumentation(ComponentName className, String profileFile,
        int flags, Bundle arguments, IInstrumentationWatcher watcher,
        IUiAutomationConnection connection, int userId, String instructionSet)
        throws RemoteException {
    Parcel data = Parcel.obtain();
    Parcel reply = Parcel.obtain();
    data.writeInterfaceToken(IActivityManager.descriptor);
    ComponentName.writeToParcel(className, data);
    data.writeString(profileFile);
    data.writeInt(flags);
    data.writeBundle(arguments);
    data.writeStrongBinder(watcher != null ? watcher.asBinder() : null);
    data.writeStrongBinder(connection != null ? connection.asBinder() : null);
    data.writeInt(userId);
    data.writeString(instructionSet);
    mRemote.transact(START_INSTRUMENTATION_TRANSACTION, data, reply, 0);
    reply.readException();
    boolean res = reply.readInt() != 0;
    reply.recycle();
    data.recycle();
    return res;
}
将相关参数写入打包后调用mRemote.transact方法,这个mRemote即初始化ActivityManagerProxy时传入的IBinder对象,即ServiceManager.getService(“activity”)
public static IBinder getService(String name) {
    try {
        IBinder service = sCache.get(name);
        if (service != null) {
            return service;
        } else {
            return getIServiceManager().getService(name);
        }
    } catch (RemoteException e) {
        Log.e(TAG, "error in getService", e);
    }
    return null;
}
可见ServiceManager会先从sCache缓存中查看是否有对应的Binder对象,有则返回,没有则调用getIServiceManager().getService(name),那么要获取这个以activity命名的Service,它是在哪里创建的呢?通过全局搜索,我们找到这个调用关系,由于中间的方法实在是太太太太太长了,大家有兴趣的自己去看源码吧,其调用过程如下:zygote->main->new SystemServer().run()->[SystemServer]startBootstrapServices()->[SystemServer]mActivityManagerService.setSystemProcess()->[ActivityManagerService]ServiceManager.addService(Context.ACTIVITY_SERVICE, this, true)
由此可见,这个名为mRemote的Binder对应的是ActivityManagerService,ActivityManagerService的transact方法继承了Binder的实现:
public final boolean transact(int code, Parcel data, Parcel reply,
        int flags) throws RemoteException {
    if (false) Log.v("Binder", "Transact: " + code + " to " + this);
    if (data != null) {
        data.setDataPosition(0);
    }
    boolean r = onTransact(code, data, reply, flags);
    if (reply != null) {
        reply.setDataPosition(0);
    }
    return r;
}
会调用onTransact方法:
public boolean onTransact(int code, Parcel data, Parcel reply, int flags)
        throws RemoteException {
    if (code == SYSPROPS_TRANSACTION) {
        // We need to tell all apps about the system property change.
        ArrayList<IBinder> procs = new ArrayList<IBinder>();
        synchronized(this) {
            final int NP = mProcessNames.getMap().size();
            for (int ip=0; ip<NP; ip++) {
                SparseArray<ProcessRecord> apps = mProcessNames.getMap().valueAt(ip);
                final int NA = apps.size();
                for (int ia=0; ia<NA; ia++) {
                    ProcessRecord app = apps.valueAt(ia);
                    if (app.thread != null) {
                        procs.add(app.thread.asBinder());
                    }
                }
            }
        }

        int N = procs.size();
        for (int i=0; i<N; i++) {
            Parcel data2 = Parcel.obtain();
            try {
                procs.get(i).transact(IBinder.SYSPROPS_TRANSACTION, data2, null, 0);
            } catch (RemoteException e) {
            }
            data2.recycle();
        }
    }
    try {
        return super.onTransact(code, data, reply, flags);
    } catch (RuntimeException e) {
        // The activity manager only throws security exceptions, so let's
        // log all others.
        if (!(e instanceof SecurityException)) {
            Slog.wtf(TAG, "Activity Manager Crash", e);
        }
        throw e;
    }
}
由于statusCode不为SYSPROPS_TRANSACTION会调用父类ActivityManagerNative的onTransact方法,方法由于statusCode很多,我们只挑选了符合我们要求的部分的源码:
case START_INSTRUMENTATION_TRANSACTION: {
    data.enforceInterface(IActivityManager.descriptor);
    ComponentName className = ComponentName.readFromParcel(data);
    String profileFile = data.readString();
    int fl = data.readInt
最低0.47元/天 解锁文章


 344
344


 被折叠的 条评论
为什么被折叠?
被折叠的 条评论
为什么被折叠?
 到【灌水乐园】发言


