


PopupWindow在界面弹出一窗口,效果相信大家常常看到,不废话,下面代码,有简单的先来。
分三种使用方式:
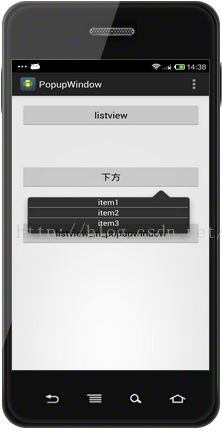
1.直接相对某个控件弹出
实现代码:
布局:popu_bg.xml
<LinearLayout xmlns:android="http://schemas.android.com/apk/res/android"
    xmlns:tools="http://schemas.android.com/tools"
    android:layout_width="100dp"
    android:layout_height="wrap_content"
    android:background="@drawable/aa" >
    <LinearLayout
        android:id="@+id/show"
        android:layout_width="match_parent"
        android:layout_height="wrap_content"
        android:gravity="center_vertical"
        android:orientation="vertical" >
        <TextView
            android:id="@+id/menu_start_chart"
            android:layout_width="match_parent"
            android:layout_height="wrap_content"
            android:gravity="center"
            android:text="item1"
            android:textColor="@android:color/white"
            android:textSize="15sp" />
        <View
            android:layout_width="match_parent"
            android:layout_height="1dp"
            android:background="#999999" />
        <TextView
            android:id="@+id/menu_scan"
            android:layout_width="match_parent"
            android:layout_height="wrap_content"
            android:gravity="center"
            android:text="item2"
            android:textColor="@android:color/white"
            android:textSize="15sp" />

        <View
            android:layout_width="match_parent"
            android:layout_height="1dp"
            android:background="#999999" />

        <TextView
            android:id="@+id/menu_scan"
            android:layout_width="match_parent"
            android:layout_height="wrap_content"
            android:gravity="center"
            android:text="item3"
            android:textColor="@android:color/white"
            android:textSize="15sp" />
    </LinearLayout>

</LinearLayout>
btn2=(Button)findViewById(R.id.btn2);
		btn2.setOnClickListener(new OnClickListener() {
			@Override
			public void onClick(View v) {
				showPopuwindown(v);
			}
		});
protected void showPopuwindown(View v) {
// TODO Auto-generated method stub
if(popupWindow==null){
infate=LayoutInflater.from(MainActivity.this);
view=infate.inflate(R.layout.popu_bg,null);
//创建PopupWindow构造函数,同时必须设置宽高参数,否则不显示
popupWindow = new PopupWindow(view, LayoutParams.WRAP_CONTENT,
LayoutParams.WRAP_CONTENT);
//初始化PopupWindow的View
popupWindow.setContentView(view);
}
//setFocusable设置PopupWindow的焦点
//如果PopupWindow中有Editor的话,focusable要为true
popupWindow.setFocusable(true);
popupWindow.setOutsideTouchable(true);
//想要让点击PopupWindow之外的地方PopupWindow消失你需要
//调用setBackgroundDrawable(new BitmapDrawable());
popupWindow.setBackgroundDrawable(new BitmapDrawable());
//在btn2下面显示
popupWindow.showAsDropDown(btn2);
popupWindow.update();
}2.在弹出的PopupWindow里添加listview进行滑动效果
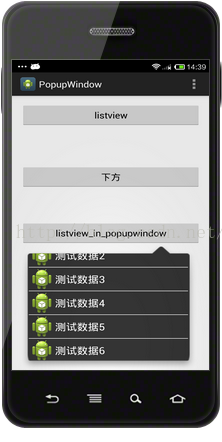
此效果点击按钮是弹出Popuwindow,内嵌一个listview,可以进行滑动,像微信右上角+一样,点击其中的item,Popuwindow消失,执行相应发操作,在这里一个toast提示。
布局代码:
<LinearLayout xmlns:android="http://schemas.android.com/apk/res/android"
    xmlns:tools="http://schemas.android.com/tools"
    android:layout_width="100dp"
    android:layout_height="140dp"
    android:background="@drawable/aa" >
    <ListView
        android:id="@+id/listview_bg"
        android:layout_width="match_parent"
        android:layout_height="wrap_content"
        android:divider="@android:color/white"
        android:dividerHeight="1dp"
         >
    </ListView>
</LinearLayout>
protected void showPopuwindownListview(View v) {
		// TODO Auto-generated method stub
		if(popupWindow1==null){
			LayoutInflater infate1=(LayoutInflater) getSystemService(Context.LAYOUT_INFLATER_SERVICE);
			listView=infate1.inflate(R.layout.listview_popu_bg,null);
			lv=(ListView)listView.findViewById(R.id.listview_bg);
			adapter=new MyAdater(MainActivity.this, getData());
			lv.setAdapter(adapter);
			popupWindow1 = new PopupWindow(listView);
			popupWindow1.setWidth(LayoutParams.WRAP_CONTENT);
			popupWindow1.setHeight(LayoutParams.WRAP_CONTENT);

			popupWindow1.setContentView(listView);
		}
		popupWindow1.setFocusable(true);
		popupWindow1.setOutsideTouchable(true);
		popupWindow1.setBackgroundDrawable(new BitmapDrawable());
		popupWindow1.showAsDropDown(btn3);
		popupWindow1.update();
		lv.setOnItemClickListener(new OnItemClickListener() {

			@Override
			public void onItemClick(AdapterView<?> parent, View view, int position, long id) {
				// TODO Auto-generated method stub
				Toast.makeText(MainActivity.this, adapter.getItem(position), Toast.LENGTH_SHORT).show();
				popupWindow1.dismiss();
			}
		});
	}

	 private List<String> getData(){

		  List<String> data = new ArrayList<String>();
         data.add("测试数据1");
         data.add("测试数据2");
         data.add("测试数据3");
         data.add("测试数据4");
         data.add("测试数据5");
         data.add("测试数据6");
         return data;
     }
class MyAdater extends BaseAdapter{
List<String> list=new ArrayList<String>();
public Context context;
private LayoutInflater infate;
public MyAdater(Context context,List<String> list) {
// TODO Auto-generated constructor stub
this.context=context;
this.list=list;
infate=LayoutInflater.from(context);
}
@Override
public int getCount() {
// TODO Auto-generated method stub
return list.size();
}
@Override
public String getItem(int position) {
// TODO Auto-generated method stub
return list.get(position);
}
@Override
public long getItemId(int position) {
// TODO Auto-generated method stub
return 0;
}
@Override
public View getView(int position, View convertView, ViewGroup parent) {
// TODO Auto-generated method stub
ViewHold hold=null;
if(convertView==null){
hold=new ViewHold();
convertView = infate.inflate(R.layout.item,null);
hold.tv=(TextView)convertView.findViewById(R.id.tv_name);
convertView.setTag(hold);
}
hold=(ViewHold) convertView.getTag();
hold.tv.setText(list.get(position));
return convertView;
}
class ViewHold{
ImageView iv;
TextView tv;
}
}3.在listview的点击每个item,在相应的item处弹出PopupWindow

QQ消息有这效果,长按消息列表中的每条信息,就会在此条消息上方弹出-置顶|删除
布局就是和2一样,listview+item,然后就是PopupWindow的布局
list_tip_menu.xml
<LinearLayout xmlns:android="http://schemas.android.com/apk/res/android"
    xmlns:tools="http://schemas.android.com/tools"
    android:layout_width="match_parent"
    android:layout_height="match_parent"
    android:gravity="center"
   >
    <LinearLayout
        android:id="@+id/w"
        android:layout_width="180dp"
        android:layout_height="60dp"
        android:gravity="center"
        android:orientation="vertical"
        android:background="#6d6d6d" >

        <TextView
            android:id="@+id/tip_show"
            android:layout_width="match_parent"
            android:layout_height="60dp"
            android:gravity="center"
            android:paddingLeft="5dp"
            android:paddingRight="5dp"
            android:text="测试数据w"
            android:textColor="@android:color/holo_orange_light"
            android:textSize="18sp" />
    </LinearLayout>

</LinearLayout>
protected void onCreate(Bundle savedInstanceState) {
super.onCreate(savedInstanceState);
setContentView(R.layout.activity_popuwindow);
lv=(ListView)findViewById(R.id.listview);
adapter=new MyAdater(this, getData());
lv.setAdapter(adapter);
lv.setOnItemLongClickListener(new OnItemLongClickListener() {
@Override
public boolean onItemLongClick(AdapterView<?> parent, View view, int position, long id) {
// TODO Auto-generated method stub
if(popupWindow==null){
infate=PopuwindowActivity.this.getLayoutInflater();
tipView =infate.inflate(R.layout.list_tip_menu, null);
tv=(TextView)tipView.findViewById(R.id.tip_show);
//PopupWindow(View contentView, int width, int height)
//contentView为要显示的view,
//width和height为宽和高,值为像素值,也可以是MATCHT_PARENT和WRAP_CONTENT
popupWindow=new PopupWindow(tipView, 200, 60);
}
tv.setText(adapter.getItem(position));
popupWindow.setFocusable(true);
popupWindow.setOutsideTouchable(true);
popupWindow.setBackgroundDrawable(new BitmapDrawable());
//相对view下方的位置,可以设置负值向相反方向移动,默认左上角为(0,0)
// popupWindow.showAsDropDown(view, view.getWidth()/2,0-(3*view.getHeight())/2 );
int[] location = new int[2];
view.getLocationOnScreen(location);
//在点击的item上方中间 view为item,根据view,popuWindown计算的他们的宽长,从而确定位置
popupWindow.showAtLocation(view, Gravity.NO_GRAVITY,
location[0]+view.getWidth()/2-popupWindow.getWidth()/2,
location[1]-popupWindow.getHeight());
//左方
// popupWindow.showAtLocation(view, Gravity.NO_GRAVITY, location[0]-popupWindow.getWidth(), location[1]);
//右边
//popupWindow.showAtLocation(view, Gravity.NO_GRAVITY, location[0]+v.getWidth(), location[1]);
popupWindow.update();
return true;
}
});
}
private List<String> getData() {
// TODO Auto-generated method stub
List<String> datas = new ArrayList<String>();
for (int i = 0; i < 100; i++) {
datas.add("test数据"+i);
}
return datas;
}1> LayoutInflater 实例的三种方式
1.LayoutInflater inflater = getLayoutInflater(); //调用Activity的getLayoutInflater()
2.LayoutInflater localinflater =(LayoutInflater)context.getSystemService(Context.LAYOUT_INFLATER_SERVICE);
3. LayoutInflater inflater = LayoutInflater.from(context);
 /**
     * Obtains the LayoutInflater from the given context.
     */
    public static LayoutInflater from(Context context) {
        LayoutInflater LayoutInflater =
                (LayoutInflater) context.getSystemService(Context.LAYOUT_INFLATER_SERVICE);
        if (LayoutInflater == null) {
            throw new AssertionError("LayoutInflater not found.");
        }
        return LayoutInflater;
    }
Activity 的 getLayoutInflater() 方法是调用 PhoneWindow 的getLayoutInflater()方法,源码:
public PhoneWindow(Context context) {
		   super(context);
		   mLayoutInflater = LayoutInflater.from(context);

		 }
所以最终本质都是调用的是 (LayoutInflater) context.getSystemService(Context.LAYOUT_INFLATER_SERVICE);
2>popupWindow = new PopupWindow(view, LayoutParams.WRAP_CONTENT,LayoutParams.WRAP_CONTENT);这里的 WRAP_CONTENT也可以换成MATCH_PARENT,或是具体数值,它指的是popuwindow的大小,也就是contentview的大小,注意popupwindow根据这个大小显示你的View,如果你的View本身是从xml得到的,那么xml的第一层view的大小属性将被忽略。所以这相当于popupWindow的width和height属性直接和第一层View相对应。
要设置具体数值,得额外在添加一层,如上布局LinearLayout中又加了LinearLayout进行宽高属性设置。
4.在3情况下,改下代码,在adapter中设置监听,添加一些方法:
在adapter中:
	@Override
	public View getView(int position, View convertView, ViewGroup parent) {
		// TODO Auto-generated method stub
		ViewHold hold=null;
		if(convertView==null){
			hold=new ViewHold();
			convertView = infate.inflate(R.layout.item,null);
			hold.tv=(TextView)convertView.findViewById(R.id.tv_name);
			convertView.setTag(hold);
		}
		hold=(ViewHold) convertView.getTag();
		hold.tv.setText(list.get(position));
		final String content = list.get(position);
		hold.tv.setOnLongClickListener(new OnLongClickListener() {
			@Override
			public boolean onLongClick(View v) {
				// TODO Auto-generated method stub
				if(onPressLongItemClik!=null){
					onPressLongItemClik.longPress(v,content);
					return true;
				}
				return false;
			}
		});
		return convertView;
	}
	public void setOnPressLongItemClik(OnPressLongItemClik onPressLongItemClik){
		this.onPressLongItemClik=onPressLongItemClik;
	}
	interface OnPressLongItemClik{
		void longPress(View view,String conttent);
	}
public class PopuwindowActivity1 extends Activity implements OnPressLongItemClik {

	private Button btn11;
	private ListView lv;
	private MyAdater1 adapter;
	private LayoutInflater infate;
	private View tipView;
	private PopupWindow popupWindow;
	private TextView tv;
	@Override
	protected void onCreate(Bundle savedInstanceState) {
		super.onCreate(savedInstanceState);
		setContentView(R.layout.activity_popuwindow);

		lv=(ListView)findViewById(R.id.listview);
		adapter=new MyAdater1(this, getData());
		//设置监听
		adapter.setOnPressLongItemClik(this);
		lv.setAdapter(adapter);
	}
	//实现接口
	@Override
	public void longPress(View view,String content) {
		// TODO Auto-generated method stub
		if(popupWindow==null){
			infate=PopuwindowActivity1.this.getLayoutInflater();
			tipView =infate.inflate(R.layout.list_tip_menu, null);
			tv=(TextView)tipView.findViewById(R.id.tip_show);
			//PopupWindow(View contentView, int width, int height)
			//contentView为要显示的view,
			//width和height为宽和高,值为像素值,也可以是MATCHT_PARENT和WRAP_CONTENT
			popupWindow=new PopupWindow(tipView, 200, 60);
		}

		tv.setText(content);

		popupWindow.setFocusable(true);
		popupWindow.setOutsideTouchable(true);
		popupWindow.setBackgroundDrawable(new BitmapDrawable());

		//相对view下方的位置,可以设置负值向相反方向移动,默认左上角为(0,0)
//		popupWindow.showAsDropDown(view, view.getWidth()/2,0-(3*view.getHeight())/2 );
		 int[] location = new int[2];
		 view.getLocationOnScreen(location);
		 //在点击的item上方中间 view为item,根据view,popuWindown计算的他们的宽长,从而确定位置
		  popupWindow.showAtLocation(view, Gravity.NO_GRAVITY,
				 location[0]+view.getWidth()/2-popupWindow.getWidth()/2,
				 location[1]-popupWindow.getHeight());
		//左方
//		 popupWindow.showAtLocation(view, Gravity.NO_GRAVITY, location[0]-popupWindow.getWidth(), location[1]);

		  //右边
		  //popupWindow.showAtLocation(view, Gravity.NO_GRAVITY, location[0]+v.getWidth(), location[1]);
		popupWindow.update();
	}
	private List<String> getData() {
		// TODO Auto-generated method stub
		  List<String> datas = new ArrayList<String>();
		for (int i = 0; i < 100; i++) {
			datas.add("test数据"+i);
		}
		return datas;
	}


 2393
2393

 被折叠的 条评论
为什么被折叠?
被折叠的 条评论
为什么被折叠?
 到【灌水乐园】发言


