


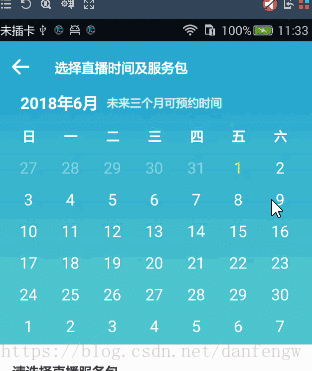
前阵子app里需要用到日历,效果图如上,做日历我本来是不担心的,因为之前就有写过,比如我之前的文章
https://blog.csdn.net/danfengw/article/details/72764995
就是写自定义日历的,但是看到具体的产品需求以及效果图,我就”嗯,很好……“,不是我不喜欢自定义,而是效果图里面的细节真的是有点多,好了,我们来看看细节:
1、产品需求只显示近3个月,当天时间之前的日期灰色,三个月后当前日期之后的日期也是灰色人,嗯,不明白?那我们来举个例子:今天6月3号,显示3个月,也就是6-8月,6.3号之前是灰色,6.3号是黄色,8.3号之后是灰色。
2、选择日期,第一次选择是开始日期,第二次选择是结束日期,再次选择则是开始日期(这里你可能会考虑为什么不是我第三次选择日期如果日期比结束日期晚则作为结束日期,比开始日期早则作为开始日期呢?这个逻辑我之前也尝试过,对于用户操作(1)有时候操作不方便(2)关于选择日期会有疑惑,所以才采用了这种相对容易理解的方式)。
3、选择的开始日期与结束日期分别加了圆圈背景,同时在开始日期与结束日期之间的区域,周六跟周天分别是右半圆跟左半圆背景,其他日期都是矩形背景。
好了,细节大概是说完了,如果想要理解这篇自定义view建议先去看我上面链接里的自定义日历这篇文章,循序渐进。
下面再说一下实现思路:recyclerview嵌套,一个水平方向LinearLayoutManager嵌套一个GridLayoutManager说完你大概是理解了吧?
ps:定制版控件,只适合用来学习思路,如果要用到你自己的项目,还是需要修改的。
Github 地址
https://github.com/danfengfirst/DfCalendar
代码思路
1、recyclerview嵌套,设置日期
2、继承textview自定义textview,主要用于修改开始日期与结束日期的圆形背景
3、继承relativelayout自定义relativelayout,主要用于设置被选中日期的中间时间段。
4、使用。
1、CalendarView
(0)初始化布局
 private void bindView(Context context) {
        View view = LayoutInflater.from(context).inflate(R.layout.appoint_calendarview, this, false);
        title = (TextView) view.findViewById(R.id.calendar_title);
        title.setTextColor(titleColor);
        title.setTextSize(titleSize);
        recyclerView = (RecyclerView) view.findViewById(R.id.calendar_rv);
        linearLayoutManager = new LinearLayoutManager(this.context, LinearLayoutManager.HORIZONTAL, false);
        recyclerView.setLayoutManager(linearLayoutManager);
        PagerSnapHelper snapHelper = new PagerSnapHelper();
        snapHelper.attachToRecyclerView(recyclerView);
        addView(view);
    }
appoint_calendarview.xml(可以将布局直接拷贝到自己项目,能更好的理解,所以我把布局给贴出来了)
<?xml version="1.0" encoding="utf-8"?>
<LinearLayout xmlns:android="http://schemas.android.com/apk/res/android"
    android:layout_width="match_parent"
    android:layout_height="match_parent"
    android:layout_marginTop="@dimen/y42"
    android:orientation="vertical">

    <RelativeLayout
        android:layout_width="match_parent"
        android:layout_height="wrap_content"
        android:gravity="center_vertical"
        android:orientation="horizontal">

        <TextView
            android:id="@+id/calendar_title"
            android:layout_width="wrap_content"
            android:layout_height="wrap_content"
            android:layout_marginLeft="@dimen/x60"
            android:text="2018年"
            android:textColor="@color/white"
            android:textSize="@dimen/text_size_14"
            android:textStyle="bold" />

        <TextView
            android:layout_width="wrap_content"
            android:layout_height="wrap_content"
            android:layout_centerVertical="true"
            android:layout_marginLeft="@dimen/x20"
            android:layout_toRightOf="@+id/calendar_title"
            android:text="未来三个月可预约时间"
            android:textColor="@color/transparent80_white"
            android:textSize="@dimen/text_size_13"
            android:textStyle="bold" />
    </RelativeLayout>

    <LinearLayout
        android:id="@+id/calendar_week_header"
        android:layout_width="match_parent"
        android:layout_height="@dimen/y42"
        android:layout_marginLeft="@dimen/x30"
        android:layout_marginRight="@dimen/x30"
        android:layout_marginTop="@dimen/y34"
        android:gravity="center_vertical"
        android:orientation="horizontal"
        >
        <TextView
            android:layout_width="0dp"
            android:layout_height="wrap_content"
            android:layout_gravity="center_vertical"
            android:layout_weight="1"
            android:text="日"
            android:textAlignment="center"
            android:textColor="@color/white"
            android:textSize="@dimen/text_size_15"
            android:textStyle="bold" />

        <TextView
            android:layout_width="0dp"
            android:layout_height="wrap_content"
            android:layout_gravity="center_vertical"
            android:layout_weight="1"
            android:text="一"
            android:textAlignment="center"
            android:textColor="@color/white"
            android:textSize="@dimen/text_size_15"
            android:textStyle="bold" />

        <TextView
            android:layout_width="0dp"
            android:layout_height="wrap_content"
            android:l
最低0.47元/天 解锁文章


 792
792


 被折叠的 条评论
为什么被折叠?
被折叠的 条评论
为什么被折叠?
 到【灌水乐园】发言


