


 本文回顾了Qt从4.0到4.8版本的发展历程,重点介绍了每个版本中引入的关键特性和改进,包括双缓冲机制、延时控件创建、AlienWidget、透明窗口支持及图形效果等。
| Qt 4.0 | automatically double-buffers |
| Qt 4.1 | QWidget::autoFillBackground |
| Qt 4.2 | delayed widget creation (DWC) |
| stylesheet | |
| Qt 4.3 | QWidget::render |
| Qt 4.4 | Alien Widget |
| Qt 4.5 | Translucent Windows |
| Qt 4.6 | widget's graphics effect |
| Qt 4.8 | lighthouse (qpa) |
Qt4.0
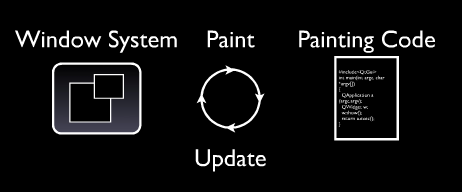
- 在Qt 4.0中,启用双缓冲,不必在paintEvent()中编写双缓冲代码来避免闪烁。
Qt4.1
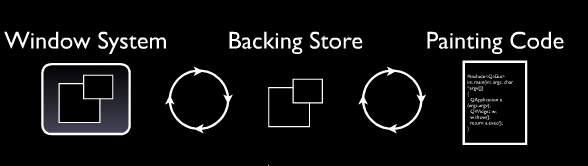
- 在Qt 4.1中,通过启用背景自动传递(propagation),widget不再有任何默认的背景。引入backingstore这个东西。
Qt4.2
- 在Qt 4.2中,延时控件创建(delayed widget creation)的引入,使得widget可以在没有真实窗口句柄的情况下被创建。
QWindowSurface 与 QWidgetBackingStore
Even though QWidget is a QPaintDevice subclass, one will never render directly into a QWidget’s surface. Instead, during the paintEvent, the painting is redirected to an offscreen surface which is represented by the internal class QWindowSurface.
QWidgetBackingStore is responsible for figuring out which parts of the window surface needs to be updated prior to showing it to screen, so its really a repaint manager.
When the concept of backingstore was introduced in Qt 4.1, the two classes were the same, but the introduction of more varying ways to get content to screen made us split it in two.
Qt4.4
-
在Qt 4.4中,Alien Widget诞生了,这样一来,Window和Widget尽管仍是同一个类,却是不同的东西。Window负责与窗口系统的联系。Alien被号称是所有闪烁的终结者,见Qt Invaded By Aliens — The End of All Flicker。
| Qt::WA_NativeWindow | 创建原生窗体,即带句柄 |
| Qt::WA_PaintOnScreen | 强制创建原生窗体 |
| Qt::Window | 顶级窗口,必须是原生窗体 (?) |
| QGLWidget | 必须是原生窗体 |
如果一个widget已经是alien Widget,如果对其设置上述标志,或者对其调用winId()函数,都会导致其重新创建为一个native widget。
Qt4.5
-
在Qt 4.5中,graphics system的概念被引入(比如选项有:raster|opengl|x11|native 等)。引人了一个Qt::WA_TranslucentBackground 属性,这个东西和QWidget::setWindowOpacity()有些比较容易混哈。
QWidget::setWindowOpacity()函数,设置窗体(即:isWindow()为真的widget)的整体不透明度, 从0.0到1.0之间, 值越大越不透明。
Qt::WA_TranslucentBackground,这个属性每个QWidget都可以单独设置。不被绘制的区域(背景)都是透明的,绘制的区域的透明程度通过颜色或图片的Alpha Channel值来控制。
Qt4.6
- 在Qt 4.6中,graphics effect被引入。但是,现在,已经不建议使用:
Graphics Effects
State: Deprecated
Reasoning: flawed design, we don’t recommend taking maintainership of this code.
QGraphicsEffect 的子类需要重新实现draw()函数。
以安装了QGraphicsOpacityEffect了QWidget为例,当每次需要重绘时,QWidgetPrivate::drawWidget()不是发送QPaintEvent事件,以调用我们的paintEvent()函数;而是调用QGraphicsOpacityEffect的draw()函数,该函数内,通过QWidget::render()调用paintEvent()将内容绘制在一个QPixmap中,而后设置QPainter的不透明度,绘制QPixmap到目标。
Qt4.8
- 在Qt 4.8中,正式引入lighthouse了,...
参考
-
http://labs.qt.nokia.com/2009/12/16/qt-graphics-and-performance-an-overview/
-
http://labs.qt.nokia.com/2008/02/04/qt-44-and-painting-performance/
-
http://labs.qt.nokia.com/2008/05/12/qwidget-vs-graphics-view-ding-ding-ding
-
http://labs.qt.nokia.com/2007/08/09/qt-invaded-by-aliens-the-end-of-all-flicker/


 1078
1078

 被折叠的 条评论
为什么被折叠?
被折叠的 条评论
为什么被折叠?
 到【灌水乐园】发言


