


原文网址链接:vuejs2 + wp-rest-api开发web app
之前我写了一篇《利用Cordova,jqurey与wp-rest-api制作一个属于自己博客的移动APP》,使用的是jQuery mobile的方式进行web app的开发,今天我就说一下使用vuejs 与 wp-reset-api开发一个web app的方法。
先看看做好以后的效果吧:
一、首先安装nodejs
安装方法请自行去官方网站查看
二、安装vue-cli
1、直接打开nodejs的命令窗口输入以下命令:
npm install -g vue-cli //全局安装vue-cli
vue init webpack egtch //生成项目名为egtch的模板,这里的项目名egtch随你自己写
输入这个目录后会出现如下所示
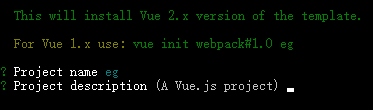
? Project name 自己填写一个项目名称 ? Project description (A Vue.js project)
这里是项目描述,随便填写 ? Author 这个是开发者信息,会自动获取,也可以自己设置Runtime + Compiler: recommended for most users Runtime-only: about 6KB lighter min+gzip, but templates (or any Vue-specific HTML) are
ONLY allowed in .vue files - render functions are required elsewhere看到这个,直接回车跳过 ? Install vue-router? (Y/n)
//这里选择y,安装vue-router(路由)功能,以便我们进行相应的开发。 ? Use ESLint to lint your
code? (Y/n) //如果你想要使用eslint提示,那么你选择y,不知道这个是什么东西的同学,直接选择n吧。 ? Setup
unit tests with Karma + Mocha? //这两个是js测试框架,选择n ? Setup e2e tests with
Nightwatch? (Y/n) //这个也直接选择n
2、以上步骤都完成后,即将看到如下的提醒哦
vue-cli · Generated "egtch". To get started: cd egtch npm install npm
run dev 3、然后我们在执行以下命令 cd egtch //进入项目所在目录 npm install //初始化安装依赖
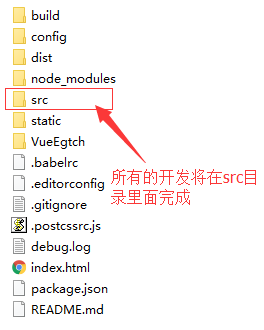
这样我们在回来看我们的目录结构,将在egtch目录下生成如下目录结构 vue-cli项目目录
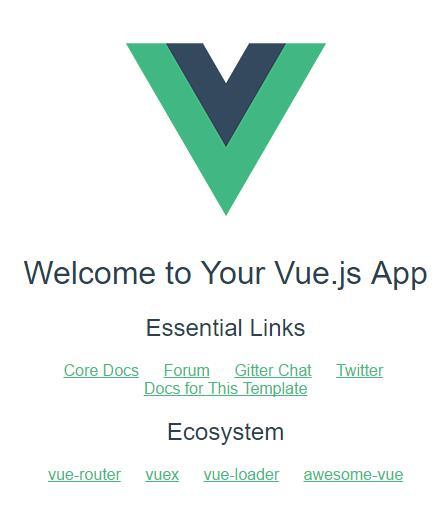
npm run dev //在浏览器中运行当前的vue项目
这样就可以看到vue-cli默认的一个页面展现在我们眼前了,如下图:
vue-cli演示页面
4、在我们开发中会用到vue-resource与stylus
我们可以通过命令 npm install vue-resource -save来进行下载vue-resource安装
npm install stylus -save
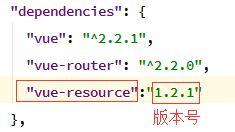
当然也可以修改egtch根目录下的packge.json文件中的代码后,在执行npm install,修改如图
packge.json修改
并且修改
"devDependencies": {
…………
"css-loader": "^0.26.1", //在这个下面添加stylus
//必须要添加2个关于stylus的依赖库
"stylus-loader": "^2.5.0",
"stylus": "0.52.4",
…………
}
三、wp-rest-api v2使用
(官方地址http://v2.wp-api.org/)
比如,如果想要获取wordpress中最新的文章,你可以直接在浏览器中输入: http://www.egtch.com/wp-json/...,大家可以通过本站的相关api去访问 如果想获取指定的文章(按文章ID),可以输入: http://www.egtch.com/wp-json/... 获取第一页的文章http://www.egtch.com/wp-json/... 第二页page=2以此类推 更多关于wp-rest-api用法,请参考官方文档api
四、进入vue开发
1、打开根目录下的index.html,修改title,并且在head中增加手机端设备支持代码
并且导入reset.css(自行到网上寻找适合自己的reset.css),并且将其放在static目录中
2、在main.js中引入vue-resource
import VueResource from 'vue-resource'
Vue.use(VueResource)
3、在src/assets下新建一个css目录,并在目录下建立一个public.styl文件,其代码如下
注意:使用stylus中,缩进必须正确,否则就会出现严重的问题
font-rem($num)
  font-size ($num/16)rem
bg-change($color)
  background $color
body
  background #CCC
  font-family "Microsoft Yahei","Helvetica Neue",Helvetica,Arial,sans-serif
  font-weight lighter
  height 100%
h1,h2,h3,h4,h5,h6
  font-weight 400
  color black
  border-left 2px #CCC solid
  margin 10px 0
  padding 0 0 0 8px
  line-height 1
  font-rem(18)
//手机端真正实现1px的线
.line
  width 90%
  margin 0 auto
  flex 1
  position relative
  top -6px
  border-bottom 1px solid #F2F2F2
.line-k
  width 100%
  margin 10px auto 0 auto
  flex 1
  position relative
  top -6px
  border-bottom 1px solid #F2F2F2
.codecolorer-container
  width 90%
  background #f2f2f2
  margin 0 auto
  color dimgrey
  overflow auto
  border 1px #CCC solid
  padding 3%
  font-rem(14)
.wp-caption
  text-align center
4、修改src目录下的App.vue如下
<template>
  <div id="app">
    <top></top>
    <transition :name="$router.app.pageTransition">
        <router-view></router-view>
    </transition>
    <bottom></bottom>
  </div>
</template>

<script>
import Top from './components/Top.vue'
import Bottom from './components/Bottom.vue'
export default {
  components:{
    'top':Top,
    'bottom':Bottom
  }
}
</script>
<style lang="stylus" rel="stylesheet/stylus">
@import "./assets/css/public.styl"
@import "./assets/css/font-awesome.min.css"
#app
  width 100%
  height 100%
  display table
  overflow auto
  /*right start*/
  .slide-right-enter-active
    transition all .4s ease
  .slide-right-enter
    opacity 0.9;
    transform translate3d(100%, 0, 0)
  .slide-right-leave
    transform translate3d(0, 0, 0)
  .slide-right-leave-active
    transition all .4s ease
    opacity .5
    transform translate3d(-20%, 0, 0)
  /*right end*/
  /*left start*/
  .slide-left-enter-active
    transition all .4s ease;
    transform translate3d(0%, 0, 0);
    z-index 1998
  .slide-left-enter
    opacity .5
    transform translate3d(-20%, 0, 0)
    z-index 1998
  .slide-left-leave
    transform translate3d(0, 0, 0)
  .slide-left-leave-active
    transition all .4s ease
    opacity 0.9
    transform translate3d(100%, 0, 0)
  /*left end*/
  .slide-fade-enter-active
    transition all .4s ease
  .slide-fade-leave-active
    transition all .4s ease
  .slide-fade-enter,
  .slide-fade-leave-active
    opacity 0
  .slide-fade-enter
    padding-top 80%
  .slide-fade-leave-active
    padding-top -100%
</style>
5、我们在src目录下的commponents目录下建立一个Posts.vue来获取,代码如下:
<template>
<div class="po">
<div class="posts">
<div class="box" v-for="(item, index) in posts">
<div class="post">
<router-link :to="{path:'/article',query: {id:posts[index].id}}">{{posts[index].title.rendered}}</router-link>
<div class="line-k"></div>
<div class="posts-img" v-html="getFirstImg(posts[index].content.rendered)"></div>
<div class="description" v-html="replaceDS(posts[index].excerpt.rendered)"></div>
</div>
</div>
<a id="pre" @click="pre"><i class="fa fa-angle-left" aria-hidden="true"></i>PREVIOUS</a>
<a id="next" @click="next">NEXT<i class="fa fa-angle-right" aria-hidden="true"></i></a>
</div>
</div>
</template>
<style lang="stylus" rel="stylesheet/stylus">
@import "../assets/css/public.styl"
@import "../assets/css/font-awesome.min.css"
.po
background #ffffff
width 100%
.posts
width 100%
height 100%
overflow auto
margin 40px auto 68px auto
& a
color darkcyan
padding 5px
border-radius 2px
&#pre
float left
font-rem(18)
padding 5px 10px 10px 10px
line-height 32px
& i
font-rem(28)
margin-right 10px
float left
&#next
float right
font-rem(18)
padding 5px 10px 10px 10px
line-height 32px
& i
font-rem(28)
margin-left 10px
float right
.box
width 100%
margin 10px auto
background #ffffff
padding 10px 0
line-height 1.5
border-bottom 6px solid #F2F2F2
.post
width 96%
margin 0 auto
& a
color darkcyan
background none
font-rem(18)
margin 0 auto 5px auto
padding 5px 0
.posts-img
width 90%
margin 0 auto
padding 5px 0 0 0
& > img
max-width 100%
border 2px solid #CCC
border-radius 5px
.description
font-rem(16)
padding-top 5px
color dimgrey
</style>
<script>
export default{
name:'iposts',
data() {
return{
apiUrl:'http://www.egtch.com/wp-json/wp/v2/posts',
posts:{},
page: 1,
show: false
}
},
created(){
this.getPosts(this.page)
},
watch: {
// 如果路由有变化,会再次执行该方法
'page': 'getPosts'
},
methods:{
getPosts(p){
if(p<1){
p = 1
}
this.$http.get(this.apiUrl+'?page='+p).then(response => {
// get body data
response = response.body
if(response.length > 0){
this.posts = response
document.getElementById('next').style.display='block';
}
if(response.length < 10){
document.getElementById('next').style.display='none';
}
//alert(response);
//console.log(this.posts);
//alert(this.page)
})
},
//获取class对象
$class(domclass){
var odiv = document.getElementsByTagName("*");
var aResult = []; //定义一个空数组,用来存放与目标className相同的元素
for(var i = 0; i<odiv.length; i++)
{//这个是遍历页面中所有元素然后拿他们的class进行对比。如果和我们传进来的domclass这个参数一样就把他放进数组 aResult中。
if(odiv[i].className == domclass)
{
aResult.push(oDiv[i]); //获取到的元素推进数组中
}
return aResult; //返回这个放进了domclass元素的数组
}
},
getFirstImg(strs){
var content = strs;
var str = /<img [^>]*src=['"]([^'"]+)([^>]*>)/gi;
var src = str.exec(content);
if(src===null || src===undefined || src===[]) {
src='';
}else {
src = src[0];
src = src.replace(/ height="\d+"/g, '');
src = src.replace(/ width="\d+"/g, '');
}
/*document.getElementById('imgs').src = src;
console.log(src);
alert(src)*/
return src;
},
replaceDS(str){
/*[…]*/
var dc = str.replace(/\[…\]/g, '');
return dc;
},
next(){
scrollTo(0,0);
this.page++;
this.showClose();
},
pre(){
scrollTo(0,0);
this.page--;
},
showClose(){
this.show = !this.show;
}
}
}
</script>
6、建立一个Article.vue获取文章内容
<template>
  <div class="artic">
    <div class="article" v-if="article">
      <div class="box">
        <div class="title">{{article.title.rendered}}</div>
        <div class="line-k"></div>
        <div class="content" v-html="replaceImgHW(article.content.rendered)"></div>
      </div>
    </div>
  </div>
</template>
<style lang="stylus" rel="stylesheet/stylus">
  @import "../assets/css/public.styl"
.artic
  background #ffffff
  width 100%
  .article
    width 100%
    height 100%
    overflow auto
    margin 40px auto 68px auto
    display block
    background #ffffff
    .box
      width 100%
      margin 0 auto
      line-height 2.5
      .title
        font-weight 600
        text-align center
        margin 0 auto 10px auto
        font-rem(20)
        background darkcyan
        color #f2f2f2
      .content
        font-rem(16)
        word-break break-all
        color dimgrey
        padding 8px
        & img
          max-width 90%
          border 1px #ccc solid
          border-radius 5px
          margin-left 5%
        .wp-caption
          width 100%
          text-align center
          & img
            max-width 90%
            border 1px #ccc solid
            border-radius 5px
</style>
<script>
  export default{
    name:'iarticle',
    data() {
      return{
        apiUrl:'http://www.egtch.com/wp-json/wp/v2/posts/',
        article:{},
        id: this.$route.query.id
      }
    },
    created(){
      this.getArticle();
    },
    watch: {
      // 如果路由有变化,会再次执行该方法
      'this.id': 'getArticle'
    },
    methods:{
      getArticle(){
        // GET /someUrl
        this.$http.get(this.apiUrl+this.id).then(response => {
          // get body data
          response = response.body
          this.article = response
          //alert(response);
          //console.log(this.article);
          //alert(this.id)
        })
      },
      replaceImgHW(strs){
        var st1 = strs.replace(/ height="\d+"/g,'');
        var st2 = st1.replace(/ width="\d+"/g,'');
        var st3 = st2.replace(/width: \d+px/g,'');
        var st4 = st3.replace(/ style/g,'');
        var st5 = st4.replace(/=""/g,'');
        var st = st5.replace(/href=/g,'target="_blank" href=');
        return st;
      }
    }
  }
</script>
7、再新建一个Categories.vue读取分类
<template>
<div class="cats">
<div class="categories" v-if="categories">
<div v-for="(item, index) in categories">
<div class="categories-item" v-if="categories[index].parent != 0">
<router-link :to="{path:'/postcat',query: {id:categories[index].id}}"><span v-html="icoIn[index]"></span><span>{{categories[index].name}}</span><span class="cat">{{categories[index].slug}}</span><i class="fa fa-angle-right" aria-hidden="true"></i></router-link>
</div>
</div>
</div>
</div>
</template>
<script></script>
<!-- Add "scoped" attribute to limit CSS to this component only -->
<style lang="stylus" rel="stylesheet/stylus">
@import "../assets/css/public.styl"
.cats
background #ffffff
width 100%
.categories
width 95%
height 100%
overflow auto
margin 48px auto 68px auto
display block
.categories-item
text-align center
width 100%
height 60px
background #ffffff
border-bottom 1px #f2f2f2 solid
float left
display block
& > a
display block
color #000
height 100%
padding 10px 0
font-rem(16)
& span
float left
padding-left 5px
line-height 40px
&.cat
color #CCC
font-rem(14)
& i
font-rem(14)
color darkcyan
& i
float right
padding-right 10px
font-rem(24)
color #CCC
line-height 40px
</style>
8、建立一个Postcat.vue来获取分类目录下的文章
<template>
<div class="psc">
<div class="postcat">
<div class="box" v-for="(item, index) in postcat">
<div class="post">
<router-link :to="{path:'/article',query: {id:postcat[index].id}}">{{postcat[index].title.rendered}}</router-link>
<div class="line-k"></div>
<div class="postcat-img" v-html="getFirstImg(postcat[index].content.rendered)"></div>
<div class="description" v-html="replaceDS(postcat[index].excerpt.rendered)"></div>
</div>
</div>
<a id="ipre" @click="ipre"><i class="fa fa-angle-left" aria-hidden="true"></i>PREVIOUS</a>
<a id="inext" @click="inext">NEXT<i class="fa fa-angle-right" aria-hidden="true"></i></a>
</div>
</div>
</template>
<style lang="stylus" rel="stylesheet/stylus">
@import "../assets/css/public.styl"
@import "../assets/css/font-awesome.min.css"
.psc
background #ffffff
width 100%
.postcat
width 100%
height 100%
overflow auto
margin 40px auto 68px auto
display block
& a
color darkcyan
padding 5px
border-radius 2px
&#ipre
float left
font-rem(18)
padding 5px 10px 10px 10px
line-height 32px
& i
font-rem(28)
margin-right 10px
float left
&#inext
float right
font-rem(18)
padding 5px 10px 10px 10px
line-height 32px
& i
font-rem(28)
margin-left 10px
float right
.box
width 100%
margin 10px auto
background #ffffff
padding 10px 0
line-height 1.5
border-bottom 6px solid #F2F2F2
.post
width 96%
margin 0 auto
& a
color darkcyan
background none
font-rem(18)
margin 0 auto 5px auto
padding 5px 0
.postcat-img
width 90%
margin 0 auto
padding 5px 0 0 0
& > img
max-width 100%
border 2px solid #CCC
border-radius 5px
.description
font-rem(16)
padding-top 5px
color dimgrey
</style>
<script>
export default{
name:'ipostcat',
data() {
return{
postcatUrl:'http://www.egtch.com/wp-json/wp/v2/posts?categories='+this.$route.query.id+'&page=',
postcat:{},
ipage: 1,
show: false
}
},
created(){
this.getPostcat(this.ipage)
},
watch: {
// 如果路由有变化,会再次执行该方法
'ipage': 'getPostcat'
},
methods:{
getPostcat(p){
// GET /someUrl
if(p<1){
p = 1
}
this.$http.get(this.postcatUrl+p).then(response => {
// get body data
response = response.body
if(response.length > 0){
this.postcat = response
document.getElementById('inext').style.display='block';
}
if(response.length < 10){
document.getElementById('inext').style.display='none';
}
//alert(response);
//console.log(this.postcat);
//alert(this.ipage)
})
},
getFirstImg(strs){
var content = strs;
var str = /<img [^>]*src=['"]([^'"]+)([^>]*>)/gi;
var src = str.exec(content);
if(src===null || src===undefined || src===[]) {
src='';
}else {
src = src[0];
src = src.replace(/ height="\d+"/g, '');
src = src.replace(/ width="\d+"/g, '');
}
/*document.getElementById('imgs').src = src;
console.log(src);
alert(src)*/
return src;
},
replaceDS(str){
/*[…]*/
var dc = str.replace(/\[…\]/g, '');
return dc;
},
inext(){
scrollTo(0,0);
this.ipage++;
},
ipre(){
scrollTo(0,0);
this.ipage--;
},
showClose(){
this.show = !this.show;
}
}
}
</script>
以上我们就可以完成了获得文章以及分类目录下的文章的相关代码。看上去是不是很简单,使用vuejs确实可以让我们省去很多的DOM操作。
更多代码和实例,请直接查看本项目在github中的实例地址为:
https://github.com/king2088/V...,如果你喜欢本实例,请记得在github上给我加星哦!
演示地址:
http://www.egtch.com/VueEgtch/
本程序会后续还会进行相应的更新维护,希望大家关注,也希望大家关注vuejs


 1275
1275


 被折叠的 条评论
为什么被折叠?
被折叠的 条评论
为什么被折叠?
 到【灌水乐园】发言


