本文转载自 前端_Logic 的博文,
原文地址:http://blog.csdn.net/lx376693576/article/details/54602957
写于:2017-1-18
上半段:react+redux框架配置从无到有直到正常运行全流程(上)
开始在项目中使用react和redux
项目的基本目录结构:
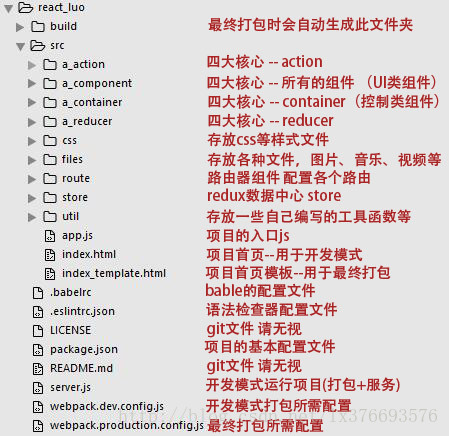
因为把项目上传到Git了,所以出现了一些额外的文件,并且项目名字也跟上一篇中的不一样。
注:为什么要命名为a_action,a_component… 只是为了方便,这样这4个文件夹就会排序排在最前面,开发中这4个文件夹是用得最多的
1、配置app.js
配置入口js文件:
import React from 'react';
import ReactDOM from 'react-dom';
import {Provider} from 'react-redux';
import { Router, browserHistory } from 'react-router';
import 'babel-polyfill';
import store from './store';
import 'antd/dist/antd.less';
import './css/css.css';
import AppRoutes from './route';
ReactDOM.render(
<Provider store={store}>
<Router routes={AppRoutes} history={browserHistory} queryKey={false} />
</Provider>,
document.getElementById('app-root')
);
- 1
- 2
- 3
- 4
- 5
- 6
- 7
- 8
- 9
- 10
- 11
- 12
- 13
- 14
- 15
- 16
- 17
- 18
- 19
- 20
- 21
- 22
- 23
- 24
- 25
- 26
- 27
- 28
- 1
- 2
- 3
- 4
- 5
- 6
- 7
- 8
- 9
- 10
- 11
- 12
- 13
- 14
- 15
- 16
- 17
- 18
- 19
- 20
- 21
- 22
- 23
- 24
- 25
- 26
- 27
- 28
2、配置store
在src/store下创建index.js,其内容为:
import { createStore, applyMiddleware } from 'redux';
import ReduxThunk from 'redux-thunk';
import RootReducer from '../a_reducer';
const store = createStore(RootReducer, applyMiddleware(ReduxThunk));
export default store;
3、配置route
在src/route中创建index.js:
import React from 'react';
import { Route, Redirect, IndexRedirect } from 'react-router';
import RootContainer from '../a_container/root';
import TestContainer from '../a_container/home';
export default (
<Route path="/" component={RootContainer}>
<IndexRedirect to="/home" />
<Route path="/home" component={TestContainer} />
<Redirect from='*' to='/' />
</Route>
);
4、写一个rootContainer作为所有组件的包裹层
创建src/a_container/root/index.js
import React, { PropTypes as P } from 'react';
import { connect } from 'react-redux';
const mapStoreStateToProps = (state) => ({
dispatch: state.dispatch,
});
class RootContainer extends React.Component {
constructor(props) {
super(props);
}
render() {
return (
<div className="boss">
{this.props.children}
</div>
);
}
}
RootContainer.propTypes = {
dispatch: P.func,
children: P.any,
};
export default connect(mapStoreStateToProps)(RootContainer);
- 1
- 2
- 3
- 4
- 5
- 6
- 7
- 8
- 9
- 10
- 11
- 12
- 13
- 14
- 15
- 16
- 17
- 18
- 19
- 20
- 21
- 22
- 23
- 24
- 25
- 26
- 27
- 28
- 29
- 30
- 31
- 32
- 1
- 2
- 3
- 4
- 5
- 6
- 7
- 8
- 9
- 10
- 11
- 12
- 13
- 14
- 15
- 16
- 17
- 18
- 19
- 20
- 21
- 22
- 23
- 24
- 25
- 26
- 27
- 28
- 29
- 30
- 31
- 32
5、写一个compont用于测试
创建src/a_compont/test/index.js:
import React, { PropTypes as P } from 'react';
class Com extends React.Component {
constructor(props) {
super(props);
this.state = {
};
}
componentDidMount() {
}
render() {
return (
<div>
<span>{this.props.value}</span>
<button onClick={() => this.props.onClick(this.props.value)}>点击</button>
</div>
);
}
}
Com.propTypes = {
value: P.number,
onClick: P.func,
};
export default Com;
- 1
- 2
- 3
- 4
- 5
- 6
- 7
- 8
- 9
- 10
- 11
- 12
- 13
- 14
- 15
- 16
- 17
- 18
- 19
- 20
- 21
- 22
- 23
- 24
- 25
- 26
- 27
- 28
- 29
- 30
- 31
- 32
- 33
- 34
- 1
- 2
- 3
- 4
- 5
- 6
- 7
- 8
- 9
- 10
- 11
- 12
- 13
- 14
- 15
- 16
- 17
- 18
- 19
- 20
- 21
- 22
- 23
- 24
- 25
- 26
- 27
- 28
- 29
- 30
- 31
- 32
- 33
- 34
以上是一个很简单的纯ui组件,渲染后的效果就是页面中有一个span和一个button,button绑定了一个事件,这个事件的实体需要其父级传给它
span中的this.props.value也需要父级传给他。
6、写一个container用于测试
创建src/a_container/home/index.js:
import React, { PropTypes as P } from 'react';
import { connect } from 'react-redux';
import { Link } from 'react-router';
import Test from '../../a_component/test';
import appAction from '../../a_action/app-action';
const mapStoreStateToProps = (state) => ({
dispatch: state.dispatch,
testvalue: state.app.inputvalue,
});
const mapDispatches = (dispatch) => ({
fn: {
onTestAdd: (v) => {
dispatch(appAction.onTestAdd(v));
},
},
});
class HomePageContainer extends React.Component {
constructor(props) {
super(props);
this.state = {
};
}
render() {
return (
<div>
<Test
value={this.props.testvalue}
onClick={this.props.fn.onTestAdd}
/>
</div>
);
}
}
HomePageContainer.propTypes = {
dispatch: P.func,
fn: P.object,
testvalue: P.number,
location: P.any,
};
export default connect(mapStoreStateToProps, mapDispatches)(HomePageContainer);
- 1
- 2
- 3
- 4
- 5
- 6
- 7
- 8
- 9
- 10
- 11
- 12
- 13
- 14
- 15
- 16
- 17
- 18
- 19
- 20
- 21
- 22
- 23
- 24
- 25
- 26
- 27
- 28
- 29
- 30
- 31
- 32
- 33
- 34
- 35
- 36
- 37
- 38
- 39
- 40
- 41
- 42
- 43
- 44
- 45
- 46
- 47
- 48
- 49
- 50
- 51
- 52
- 53
- 54
- 55
- 56
- 57
- 58
- 59
- 60
- 61
- 62
- 63
7、创建一个action
创建src/a_action/app_action.js
export default class AdviserActions {
static onTestAdd(num) {
return {
type: 'TEST::add',
payload: num + 1,
};
}
}
8、创建根reducer
因为reducer可以创建很多个,但传给redux的只能是一个,所以创建一个根reduer,将其他所有reducer结合在一起
创建src/a_reducer/index.js
import { combineReducers } from 'redux';
import { routerReducer } from 'react-router-redux';
import appReducer from './app-reducer';
const RootReducer = combineReducers({
routing: routerReducer,
app: appReducer,
});
export default RootReducer;
- 1
- 2
- 3
- 4
- 5
- 6
- 7
- 8
- 9
- 10
- 11
- 12
- 13
- 14
- 15
- 16
- 17
- 18
- 19
- 20
- 21
- 22
- 1
- 2
- 3
- 4
- 5
- 6
- 7
- 8
- 9
- 10
- 11
- 12
- 13
- 14
- 15
- 16
- 17
- 18
- 19
- 20
- 21
- 22
9、创建自定义的reducer
创建src/a_reducer/app-reducer.js
const initState = {
  inputvalue: 0, // 初始值
};

/* action 对应的处理方法,用于更新state中的数据 */
const actDefault = (state) => state;

const testAdd = (state, action) => {
  const { payload } = action;
  // 原本初始的时候,inputvalue,这里将最新的payload覆盖原来的值
  return Object.assign({}, state, {
    inputvalue: payload,
  });
};

const reducerFn = (state = initState, action) => {
  switch (action.type) {
  // 匹配type来执行对应的方法,action中返回对应的type,这里就会执行对应的方法
  case 'TEST::add':
    return testAdd(state, action);
  default:
    return actDefault(state, action);
  }
};

export default reducerFn;
- 1
- 2
- 3
- 4
- 5
- 6
- 7
- 8
- 9
- 10
- 11
- 12
- 13
- 14
- 15
- 16
- 17
- 18
- 19
- 20
- 21
- 22
- 23
- 24
- 25
- 26
- 27
- 1
- 2
- 3
- 4
- 5
- 6
- 7
- 8
- 9
- 10
- 11
- 12
- 13
- 14
- 15
- 16
- 17
- 18
- 19
- 20
- 21
- 22
- 23
- 24
- 25
- 26
- 27
如此一来,所有需要的东西都创建好了,形成了一个闭环
①、用户点击页面中的button,
②、button上绑定了点击事件
③、这个点击事件最终执行的是第5步中创建的Container中的onTestAdd方法
④、而onTestAdd方法是在第6步中创建的app-action.js中定义的
⑤、这个方法把参数的值+1后发出一个action,redux会自动去调用reducer
⑥、这个action的type是TEST::add,reducer中有一个对应的type
⑦、所以那个对应的type所对应的方法被执行,把最新的值覆盖了原来state中的值,这样值就被改变了
⑧、react会自动去重新渲染页面,所以看到页面中的值被加了1
到此为止,配置了一个最基本的react+redux框架,在开发中需要写大量的组件,大量的逻辑。
这套体系的优点在于:
①、组件复用
②、专注于数据,只需要关心数据的变化,不用去考虑事件触发等


 380
380

 被折叠的 条评论
为什么被折叠?
被折叠的 条评论
为什么被折叠?
 到【灌水乐园】发言


