


在编写第一个Hibernate例子之前先来准备Hibernate开发环境。在Eclipse中进行Hibernate开发我们可以添加
一个Hibernate Tools for Eclipse Plugins。Hibernate Tools是由JBoss推出的一个Eclipse综合开发工具插件,该插
件可以简化ORM框架Hibernate,以及JBoss Seam,EJB3等的开发。那么接下来就在Eclipse开发这款插件:
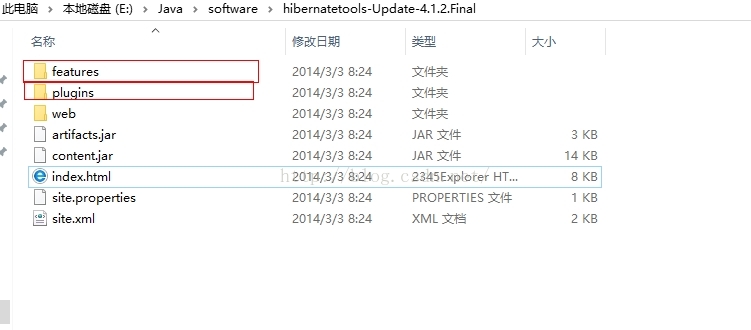
将下载好的hibernatetools-Update-4.1.2.Final.zip包解压,我们可以看下一目录:
再来看一下Eclipse的安装目录:
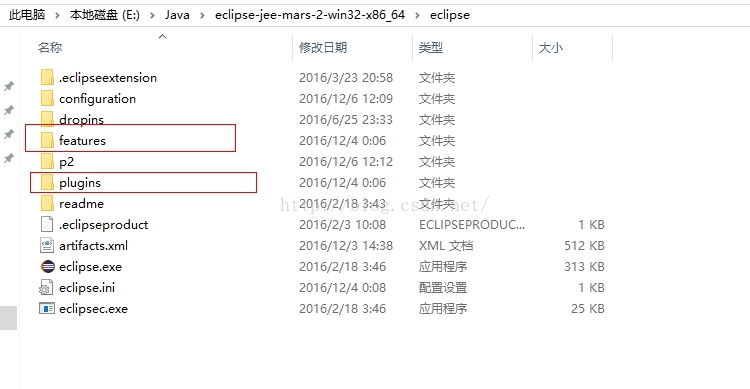
我们发现这两个都有相同的文件目录就是features和plugins,我们将hibernatetools-Update-4.1.2.Final下的
两个features和plugins下的所有文件都复制到eclipse下的两个同名的目录下,然后重启Eclipse。
点击File,选择New,选择Other,我们就会看到下面的关于Hibernate目录,那么安装成功了。

接下来我们编写第一个Hibernate例子:
创建一个Java工程,构建开发Hibernate开发的环境(导入相关jar包)
导入Hibernate核心jar包:hibernate-release-4.2.21.Final\lib\required
导入MySQL的JDBC驱动包:mysql-connector-java-5.1.22-bin.jar
导入Junit4的jar包:junit-4.10.jar
创建Hibernate的配置文件hibernate.cfg.xml
<!DOCTYPE hibernate-configuration PUBLIC
	"-//Hibernate/Hibernate Configuration DTD 3.0//EN"
	"http://hibernate.sourceforge.net/hibernate-configuration-3.0.dtd">

<hibernate-configuration>
	<session-factory>
	        <!-- 连接数据库参数 -->
		<property name="hibernate.connection.driver_class">com.mysql.jdbc.Driver</property>
		<property name="hibernate.connection.url">jdbc:mysql://localhost:3306/demo</property>
		<property name="hibernate.connection.username">root</property>
		<property name="hibernate.connection.password">root</property>

		<!-- MySQL数据库方言 -->
		<property name="hibernate.dialect">org.hibernate.dialect.MySQLDialect</property>

		<!-- 打印和格式化SQL语句 -->
		<property name="hibernate.show_sql">true</property>
		<property name="hibernate.format_sql">true</property>

		<!-- 自动将hbm映射文件生成ddl语句 -->
		<property name="hibernate.hbm2ddl.auto">update</property>

	</session-factory>
</hibernate-configuration>
创建持久化类Students
package com.demo.domain;

import java.util.Date;

/**
 * 学生实体类
 * @author Administrator
 * @date 2016年12月3日
 */
public class Students {

	private int sid;
	private String sname;
	private String gender;
	private Date birthday;
	private String address;

	public Students(){

	}

	public Students(int sid, String sname, String gender, Date birthday, String address) {
		this.sid = sid;
		this.sname = sname;
		this.gender = gender;
		this.birthday = birthday;
		this.address = address;
	}


	public int getSid() {
		return sid;
	}

	public void setSid(int sid) {
		this.sid = sid;
	}

	public String getSname() {
		return sname;
	}

	public void setSname(String sname) {
		this.sname = sname;
	}

	public String getGender() {
		return gender;
	}

	public void setGender(String gender) {
		this.gender = gender;
	}

	public Date getBirthday() {
		return birthday;
	}

	public void setBirthday(Date birthday) {
		this.birthday = birthday;
	}

	public String getAddress() {
		return address;
	}

	public void setAddress(String address) {
		this.address = address;
	}

	@Override
	public String toString() {
		return "Students [sid=" + sid + ", sname=" + sname + ", gender=" + gender + ", birthday=" + birthday
				+ ", address=" + address + "]";
	}

}
创建对象-关系映射文件Student.hbm.xml
<?xml version="1.0" encoding="UTF-8"?>
<!DOCTYPE hibernate-mapping PUBLIC
	"-//Hibernate/Hibernate Mapping DTD 3.0//EN"
	"http://hibernate.sourceforge.net/hibernate-mapping-3.0.dtd">

<hibernate-mapping>
	<class name="com.demo.domain.Students" table="students">
		<id name="sid" type="int">
			<generator class="assigned"/>
		</id>
		<property name="sname" type="java.lang.String"/>
		<property name="gender" type="java.lang.String"/>
		<property name="birthday" type="java.util.Date"/>
		<property name="address" type="java.lang.String"/>
	</class>
</hibernate-mapping>然后在hibernate.cfg.xml配置文件加入对象关系映射文件地址:
<!-- 对象关系映射文件地址 -->
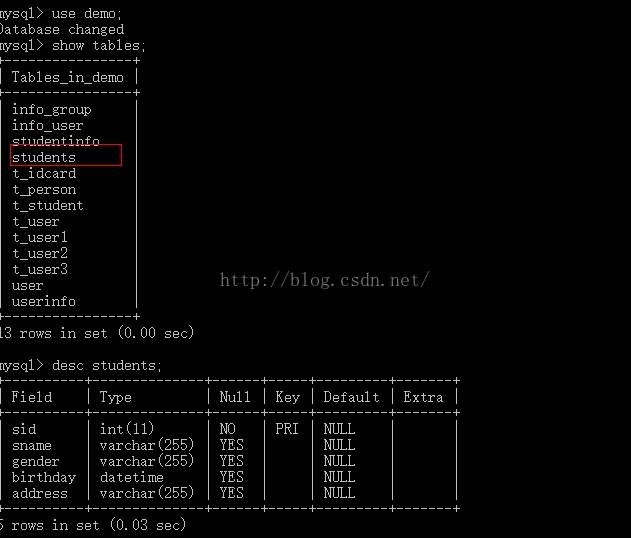
<mapping resource="com/demo/domain/Students.hbm.xml"/>在MySQL数据库中创建数据库
create database demo charset utf8;在写测试类之前,我们编写一个导出SQL语句的类ExportDB
package com.demo.domain;
import org.hibernate.cfg.Configuration;
import org.hibernate.tool.hbm2ddl.SchemaExport;
/**
* 将hbm生成ddl
* @author Administrator
* @date 2016年12月4日
*/
public class ExportDB {
public static void main(String[] args) {
//默认读取hibernate.cfg.xml文件
Configuration cfg = new Configuration().configure();
//将配置文件导成DDL语句
SchemaExport export = new SchemaExport(cfg);
//打印到控制台,写入到数据库
export.create(true, true);
}
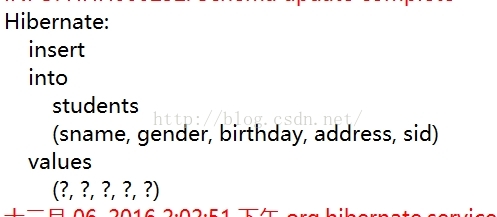
}控制台显示:

数据库显示:
通过Hibernate API编写访问数据的代码,创建测试类TestStudents
package com.demo.test;

import java.util.Date;

import org.hibernate.Session;
import org.hibernate.SessionFactory;
import org.hibernate.Transaction;
import org.hibernate.cfg.Configuration;
import org.hibernate.service.ServiceRegistry;
import org.hibernate.service.ServiceRegistryBuilder;
import org.junit.After;
import org.junit.Before;
import org.junit.Test;

import com.demo.domain.Students;

public class TestStudents {

	private SessionFactory sessionFactory;
	private Session session;
	private Transaction transaction;

	@Before
	public void init() {
		//创建配置对象
               Configuration config =new Configuration().configure();
               //创建服务注册对象
               ServiceRegistry ServiceRegitry=new ServiceRegistryBuilder().applySettings(config.getProperties()).buildServiceRegistry();
               //创建会话工厂对象
               sessionFactory =config.buildSessionFactory(ServiceRegitry);
               //会话对象
               session =sessionFactory.openSession();
               //开启事务
              transaction = session.beginTransaction();

	}

    @Test
    public void testStudents()
    {
            Students s =new Students(1,"张三","男",new Date(),"天津");
            session.save(s);//保存对象进入数据库
    }

    @After
    public void destory(){
    	  transaction.commit();//提交事务
    	  session.close();//关闭会话
    	  sessionFactory.close();//关闭会话工厂

    }

}
控制台输出:
数据库显示:
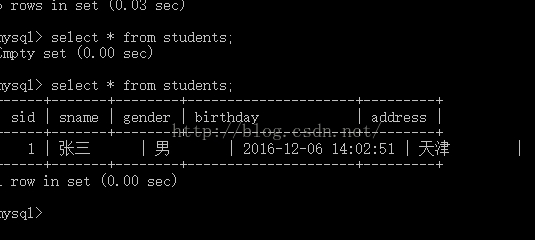
那么第一个Hibernate例子就完成了。


 被折叠的 条评论
为什么被折叠?
被折叠的 条评论
为什么被折叠?
 到【灌水乐园】发言


