


Google在Android 5.0 开始推出的一个 Material Design 风格的导航控件Toolbar,取代之前使用的Actionbar,Toolbar比actionbar要灵活很多。
Google 为了将这一设计向下兼容,我们需要在工程中引入 appcompat-v7 的兼容包,使用 android.support.v7.widget.Toolbar 进行开发,所以首先加上这一句话compile ‘com.android.support:appcompat-v7:23.4.0’(Studio中)。
我们看一下都有哪些东西呢,常用的依旧一下几种:
- 导航栏图标
- App的logo
- 标题和子标题
- 自定义控件
- ActionMenu
首先查看布局activity_main:

 <?xml version="1.0" encoding="utf-8"?>
<RelativeLayout xmlns:android="http://schemas.android.com/apk/res/android"
    android:layout_width="match_parent"
    android:layout_height="match_parent"
    >
    <android.support.v7.widget.Toolbar
        android:id="@+id/toolbar"
        android:layout_width="match_parent"
        android:layout_height="wrap_content"
        android:background="#ff0fff"
        >
        <TextView
            android:layout_width="wrap_content"
            android:layout_height="wrap_content"
            android:text="测试使用" />
    </android.support.v7.widget.Toolbar>

</RelativeLayout>
其次查看代码MainActivity(MainActivity extends BaseActivity extends Activity)
public class MainActivity extends BaseActivity {
private Toolbar toolbar;
@Override
protected void onCreate(Bundle savedInstanceState) {
super.onCreate(savedInstanceState);
setContentView(R.layout.activity_main);
toolbar=(Toolbar)findViewById(R.id.toolbar);
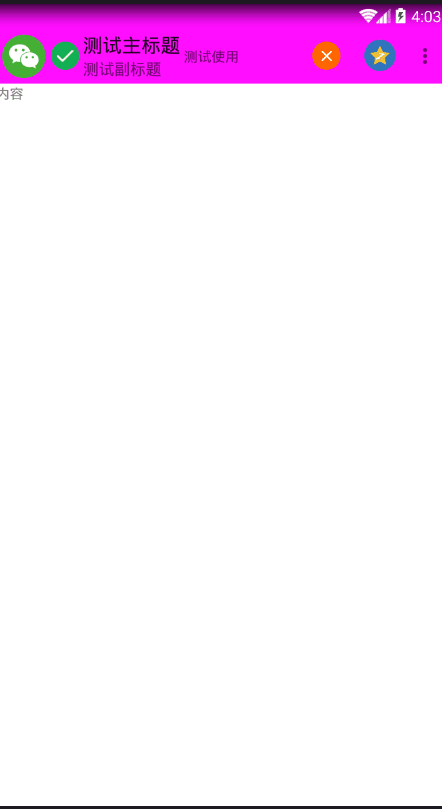
toolbar.setLogo(getResources().getDrawable(R.mipmap.one));//设置app logo
toolbar.setNavigationIcon(getResources().getDrawable(R.mipmap.two));//设置导航栏图标
toolbar.setTitle("测试主标题");
toolbar.setSubtitle("测试副标题");
toolbar.inflateMenu(R.menu.base_toolbar_menu);
toolbar.setOnMenuItemClickListener(new Toolbar.OnMenuItemClickListener() {
@Override
public boolean onMenuItemClick(MenuItem item) {
int menuItemId = item.getItemId();
if (menuItemId == R.id.action_search) {
Toast.makeText(MainActivity.this , ".点击1" , Toast.LENGTH_SHORT).show();
} else if (menuItemId == R.id.action_notification) {
Toast.makeText(MainActivity.this ,"点击2" , Toast.LENGTH_SHORT).show();
} else if (menuItemId == R.id.action_item1) {
Toast.makeText(MainActivity.this ,"测试1" , Toast.LENGTH_SHORT).show();
} else if (menuItemId == R.id.action_item2) {
Toast.makeText(MainActivity.this ,"测试2", Toast.LENGTH_SHORT).show();
}
return true;
}
});
}
}public class BaseActivity extends Activity {
@Override
protected void onCreate(Bundle savedInstanceState) {
super.onCreate(savedInstanceState);
requestWindowFeature(Window.FEATURE_NO_TITLE);
}
}最后建立menu(base_toolbar_menu):
<?xml version="1.0" encoding="utf-8"?>
<menu xmlns:android="http://schemas.android.com/apk/res/android"
    xmlns:app="http://schemas.android.com/apk/res-auto">

    <item
        android:id="@+id/action_search"
        android:icon="@mipmap/three"
        android:title="点击1"
        app:showAsAction="ifRoom" />

    <item
        android:id="@+id/action_notification"
        android:icon="@mipmap/four"
        android:title="点击2"
        app:showAsAction="ifRoom" />

    <item
        android:id="@+id/action_item1"
        android:title="测试1"
        app:showAsAction="never" />

    <item
        android:id="@+id/action_item2"
        android:title="测试2"
        app:showAsAction="never" />
</menu>
注意:android:theme=”@style/AppTheme”
 <!-- Base application theme. -->
    <style name="AppTheme" parent="Theme.AppCompat.Light.DarkActionBar">
        <!-- Customize your theme here. -->
        <item name="colorPrimary">@color/colorPrimary</item>
        <item name="colorPrimaryDark">@color/colorPrimaryDark</item>
        <item name="colorAccent">@color/colorAccent</item>
    </style>
此时,Toolbar就已经基本完成了
另外一种写法是:
xml文件Ttwo_activity_xml:但是一定要注意在布局根目录下加上xmlns:toolbar=”http://schemas.android.com/apk/res-auto”
<?xml version="1.0" encoding="utf-8"?>
<LinearLayout xmlns:android="http://schemas.android.com/apk/res/android"
    xmlns:toolbar="http://schemas.android.com/apk/res-auto"
    android:layout_width="match_parent"
    android:layout_height="match_parent">

    <android.support.v7.widget.Toolbar
        android:id="@+id/toolbar"
        android:layout_width="match_parent"
        android:layout_height="wrap_content"
        android:background="#ff0fff"
        toolbar:logo="@mipmap/one"
        toolbar:navigationIcon="@mipmap/two"
        toolbar:subtitle="测试副标题"
        toolbar:title="测试主标题">
        <TextView
            android:layout_width="wrap_content"
            android:layout_height="wrap_content"
            android:text="测试" />
    </android.support.v7.widget.Toolbar>
</LinearLayout>
代码类TwoActivity:
public class TwoActivity extends  BaseActivity{
    @Override
    protected void onCreate(Bundle savedInstanceState) {
        super.onCreate(savedInstanceState);
        setContentView(R.layout.two_activity_xml);
    }
}
这样就完成了另外一种写法。
改变menu中item的文字颜色:
布局文件three_activity_xml : 注意popupTheme
<?xml version="1.0" encoding="utf-8"?>
<LinearLayout xmlns:android="http://schemas.android.com/apk/res/android"
    android:layout_width="match_parent"
    android:layout_height="match_parent"
    xmlns:toolbar="http://schemas.android.com/apk/res-auto"
    >
    <android.support.v7.widget.Toolbar
        android:id="@+id/toolbar"
        android:layout_width="match_parent"
        android:layout_height="wrap_content"
        android:background="#ff0fff"
        toolbar:popupTheme="@style/Theme.ToolBar.Base">

        <TextView
            android:id="@+id/textview"
            android:layout_height="wrap_content"
            android:layout_width="match_parent"
            android:text="测试使用"
            />
    </android.support.v7.widget.Toolbar>
</LinearLayout>
类ThreeActivity:
package com.example.machao.toolbardemo;

import android.os.Bundle;
import android.support.v7.widget.Toolbar;
import android.view.MenuItem;
import android.widget.Toast;

/**
 *
 * 改变menu的item文字颜色和大小
 */
public class Three extends  BaseActivity{
    private Toolbar toolbar;
    @Override
    protected void onCreate(Bundle savedInstanceState) {
        super.onCreate(savedInstanceState);
        setContentView(R.layout.three_activity_xml);
        toolbar=(Toolbar)findViewById(R.id.toolbar);
        toolbar.setLogo(getResources().getDrawable(R.mipmap.one));
        toolbar.setNavigationIcon(getResources().getDrawable(R.mipmap.two));
        toolbar.setTitle("测试主标题");
        toolbar.setSubtitle("测试副标题");
        toolbar.inflateMenu(R.menu.toolbarmenu);
        toolbar.setOnMenuItemClickListener(new Toolbar.OnMenuItemClickListener() {
            @Override
            public boolean onMenuItemClick(MenuItem item) {
                int menuItemId = item.getItemId();
                if (menuItemId == R.id.action_search) {
                    Toast.makeText(Three.this , ".点击1" , Toast.LENGTH_SHORT).show();

                } else if (menuItemId == R.id.action_notification) {
                    Toast.makeText(Three.this ,"点击2" , Toast.LENGTH_SHORT).show();

                } else if (menuItemId == R.id.action_item1) {
                    Toast.makeText(Three.this ,"测试1" , Toast.LENGTH_SHORT).show();

                } else if (menuItemId == R.id.action_item2) {
                    Toast.makeText(Three.this ,"测试2", Toast.LENGTH_SHORT).show();

                }
                return true;
            }
        });

    }
}
popupTheme中的样式:Theme.ToolBar.Base:
 <!--代码中menu中文字的大小和颜色-->
    <style name="Theme.ToolBar.Base" parent="Theme.AppCompat.Light.NoActionBar">
        <item name="android:textColorPrimary">#000fff</item>
        <item name="android:textSize">40sp</item>
    </style>
如果想实现类似Ios中导航栏和通知栏一样的颜色可以了解下Translucent System Bar 新特性
有两种,一种是图片,一种是颜色,可能现在你还不是很清楚,看到下面你就会明白了
第一种:图片
类Image
public class Image extends Activity{
    @Override
    protected void onCreate(Bundle savedInstanceState) {
        super.onCreate(savedInstanceState);
        setContentView(R.layout.image_xml);
    }
}
布局image_xml
<?xml version="1.0" encoding="utf-8"?>
<RelativeLayout xmlns:android="http://schemas.android.com/apk/res/android"
    android:layout_width="match_parent"
    android:layout_height="match_parent"
    android:background="@mipmap/image"
    android:fitsSystemWindows="true">
</RelativeLayout>
清单文件
<activity android:name="com.example.administrator.translucentsystembartest.Image" android:theme="@style/ImageTranslucentTheme" />style:
values/style.xml
<style name="ImageTranslucentTheme" parent="AppTheme">
    <!--在Android 4.4之前的版本上运行,直接跟随系统主题-->
</style>

values-v19/style.xml
<style name="ImageTranslucentTheme" parent="Theme.AppCompat.Light.DarkActionBar">
    <item name="android:windowTranslucentStatus">true</item>
    <item name="android:windowTranslucentNavigation">true</item>
</style>

values-v21/style.xml
<style name="ImageTranslucentTheme" parent="Theme.AppCompat.Light.DarkActionBar">
    <item name="android:windowTranslucentStatus">false</item>
    <item name="android:windowTranslucentNavigation">true</item>
    <!--Android 5.x开始需要把颜色设置透明,否则导航栏会呈现系统默认的浅灰色-->
    <item name="android:statusBarColor">@android:color/transparent</item>
</style>
这样图片就完成了,但是要注意android:fitsSystemWindows=”true”,这句必须加在跟布局中
第二种:颜色

类Color
public class Color extends Activity {
    @Override
    protected void onCreate(Bundle savedInstanceState) {
        super.onCreate(savedInstanceState);
        setContentView(R.layout.color_xml);
    }
}
布局color_xml
<?xml version="1.0" encoding="utf-8"?>
<LinearLayout xmlns:android="http://schemas.android.com/apk/res/android"
    android:layout_width="match_parent"
    android:layout_height="match_parent"
    android:background="@color/colorgreen"
    android:fitsSystemWindows="true"
    android:orientation="vertical">

    <!--标题-->
    <RelativeLayout
        android:layout_width="match_parent"
        android:layout_height="50dp"
        android:background="@color/colorgreen">
        <TextView
            android:layout_width="wrap_content"
            android:layout_height="wrap_content"
            android:layout_centerInParent="true"
            android:text="导航栏"
            android:textColor="@android:color/white"
            android:textSize="25sp" />
    </RelativeLayout>

    <!--内容-->
    <LinearLayout
        android:layout_width="match_parent"
        android:layout_height="match_parent"
        android:background="@android:color/white"
        android:orientation="vertical">
        <TexView
            android:id="@+id/btn_show_toast"
            android:layout_width="match_parent"
            android:layout_height="100dp"
            android:text="内容" />
    </LinearLayout>
</LinearLayout>
清单文件
<activity android:name="com.example.administrator.translucentsystembartest.Color" android:theme="@style/ColorTranslucentTheme"/>style:
values/style.xml
<style name="ColorTranslucentTheme" parent="AppTheme">
    <!--在Android 4.4之前的版本上运行,直接跟随系统主题-->
</style>

values-v19/style.xml
<style name="ColorTranslucentTheme" parent="Theme.AppCompat.Light.DarkActionBar">
    <item name="android:windowTranslucentStatus">true</item>
    <item name="android:windowTranslucentNavigation">true</item>
</style>

values-v21/style.xml
<style name="ColorTranslucentTheme" parent="Theme.AppCompat.Light.DarkActionBar">
    <item name="android:windowTranslucentStatus">false</item>
    <item name="android:windowTranslucentNavigation">true</item>
    <!--Android 5.x开始需要把颜色设置透明,否则导航栏会呈现系统默认的浅灰色-->
    <item name="android:statusBarColor">@android:color/transparent</item>
</style>
这样颜色也完成了,但是一样要注意android:fitsSystemWindows=”true”,这句必须加在跟布局中
最后利用Toolbar和Translucent System Bar可以做出很漂亮的界面,只需在清单文件中Activity上加theme属性,然后再style中配置一下就可以了;
附上最后的图:


 589
589

 被折叠的 条评论
为什么被折叠?
被折叠的 条评论
为什么被折叠?
 到【灌水乐园】发言


