


指定widget在container的相对位置,包括:android:layout_alignParentTop, android:layout_alignParentBottom, android:layout_alignParentLeft, android:layout_alignParentRight, android:layout_centerHorizontal, android:layout_centerVertical, android:layout_centerInParent,他们的值是false|true。
如果是相对其他widget的位置,可以使用:android:layout_above, android:layout_below, android:layout_toLeftOf, android:layout_toRightOf。与其他widget位置对齐,可以使用:android:layout_alignTop, android:layout_alignBottom, android:layout_alignLeft, android:layout_alignRigh, android:layout_alignBaseline, 最后一个通常用于label的对齐。语法格式例子:layout_toRightOf="@id/widget_a"
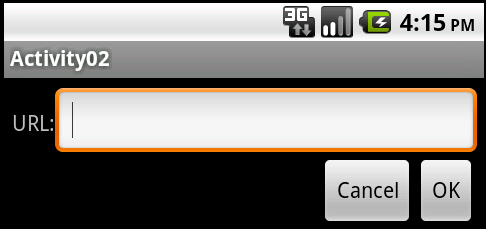
我们将创建下面的Activity,Android XML如下:
<?xml version="1.0" encoding="utf-8"?>
<!-- 我们采用RelativeLayout的布局,并设置了pad的留边,需要注意pad属于widget的有效范围 -->
<RelativeLayout xmlns:android="http://schemas.android.com/apk/res/android"
android:orientation="vertical"
android:layout_width="fill_parent"
android:layout_height="wrap_content"
android:padding="5px"
>
<!-- textview是我们第一个基准widget,我们设置了android:paddingTop="15px"。-->
<TextView android:id="@+id/label"
android:layout_width="wrap_content"
android:layout_height="wrap_content"
android:text="URL:"
android:paddingTop="15px" />
<!-- 在label的右面有一edittext,填满余下的空间,并和label进行对齐 -->
<EditText android:id="@+id/entry"
android:layout_width="fill_parent"
android:layout_height="wrap_content"
android:layout_toRightOf="@id/label"
android:layout_alignBaseline="@id/label"
/>
<!-- 在edittext的下面并对齐最右方有一个OK button -->
<Button android:id="@+id/ok"
android:layout_width="wrap_content"
android:layout_height="wrap_content"
android:layout_below="@id/entry"
android:layout_alignRight="@id/entry"
android:text="OK"
/>
<!-- 在OK按键的左边增加一个Cancel button,并对齐。如果我们要求和OK的button之间增加间距,我们可以在下面增加设置android:laytou_marginRight="10px"-->
<Button android:id="@+id/cancel"
android:layout_width="wrap_content"
android:layout_height="wrap_content"
android:layout_toLeftOf="@id/ok"
android:layout_alignTop="@id/ok"
android:text="Cancel"
/>
</RelativeLayout>
textview是我们第一个基准widget,我们设置了android:paddingTop="15px",否则由于后面我们按此进行对齐,editiew会向上移并被chip最上端。由于editview上移,也导致了和下面button之间的间距过大。android是根据网格来安排widget的位置,每个widget都有一个确定的高度并匹配网格,如果widget被拉高,因为网格定位的缘故,button的相对位置并不会被抬高。同样的如果我们设置 android:paddingTop="30px",editview的位置下沉,同样由于网格的缘故,下面的button不会随着下沉,将和eidtiew的位置有所重叠,如图所示。

然则,我们怎么知道要给label设置15px,如果布局都需要根据这样的经验值,就相当郁闷,另一个解决方式,就是在定义edittext之前,就将label的对应位置根据其进行调整,然后再定义edittext。这在1.5版本之前有问题,因此我们需要设置AndroidManifest.xml,设定我们的最小运行版本环境,例如2.2,我们在manifest中设置:<uses-sdk android:minSdkVersion="8" /> 并且在default.properties文件中设置target=android-8,在Android的XML文件,处理如下:
<TextView android:id="@+id/label"
android:layout_width="wrap_content"
android:layout_height="wrap_content"
android:text="URL:"
android:layout_alignBaseline="@+id/entry"
android:layout_alignParentLeft="true"
/>
<EditText android:id="@id/entry"
android:layout_width="fill_parent"
android:layout_height="wrap_content"
android:layout_toRightOf="@id/label"
android:layout_alignParentTop="true"
/>
相关链接:我的Android开发相关文章


 278
278

 被折叠的 条评论
为什么被折叠?
被折叠的 条评论
为什么被折叠?
 到【灌水乐园】发言


