


下面是客户端的启动代码
public static void main(String[] args) throws UnknownHostException, IOException {
		// TODO Auto-generated method stub
		//获取配置文件
		Properties pro = new Properties();
		pro.load(new FileInputStream("freshbin/freshbinIP.properties"));

		//通过配置文件中的ip与端口port连接server服务端
		String ip = pro.getProperty("ip");
		int port = Integer.parseInt(pro.getProperty("port"));

		Socket s = new Socket(ip, port);

		//创建一个客户端的读与写对象
		ClientInputStream inputThread = new ClientInputStream(s);
		ClientOutputStream outputThread = new ClientOutputStream(s);

//		inputThread.setPriority(1);
//		outputThread.setPriority(10);
		//启动客户端读与写的线程
		inputThread.start();
		outputThread.start();
	}
下面是客户端发送类中的线程run方法的代码
		OutputStream os = null;
		Scanner sc = null;
		try {
			os = this.socket.getOutputStream();
			sc = new Scanner(System.in);

			while (true) {

				//发送请求信息(查询或者更新)
				String message = sc.nextLine();

				os.write(message.getBytes());
				os.flush();
下面是客户端接收类的线程的run方法的代码
InputStream is = null;
		try {
			is = this.socket.getInputStream();

			byte[] buffer = new byte[1024];
			int len = 0;
			String message = null;

				while (-1 != (len = is.read(buffer))) {

					//把从服务端接收到的信息打印在控制台
					message = new String(buffer, 0, len);
					String s = "服务器端:" + message;
					System.out.println(s);
下面是服务端的启动代码
public static void main(String[] args) throws IOException {

		//获取配置文件
		Properties pro = new Properties();
		pro.load(new FileInputStream("freshbin/freshbinIP.properties"));

		//通过配置文件中的ip与端口port连接server服务端
		int port = Integer.parseInt(pro.getProperty("port"));

		ServerSocket ss = new ServerSocket(port);

		//进行监听
		Socket s = ss.accept();

		//创建一个服务端的读与写对象
		ServerInputStream inputThread = new ServerInputStream(s);
		ServerOutputStream outputThread = new ServerOutputStream(s);

//		inputThread.setPriority(1);
//		outputThread.setPriority(10);
		//启动服务端的读与写线程
		outputThread.start();
		inputThread.start();

//		s.close();
//		ss.close();
	}
下面是服务发送端的run方法的代码
	JdbcCommit jc = new JdbcCommit();
		OutputStream os = null;
		Scanner sc = null;
		try {
			os = this.socket.getOutputStream();
			sc = new Scanner(System.in);

			//发送功能
			while (true) {
				//主要代码,其实服务端这个发送功能的类,暂时就只有下面这条语句有用...
				os.write(("请输入1或2(1为查询,2为更新):\n").getBytes());
				String message = sc.nextLine();
下面是服务端接收端的run方法
	//主要核心功能代码
	@Override
	public void run() {
		JdbcCommit jc = new JdbcCommit();
		OutputStream os = null;
		InputStream is = null;
		try {
			is = this.socket.getInputStream();
			os = this.socket.getOutputStream();
			byte[] buffer = new byte[1024];
			int len = 0;
			String message = null;
//			if(ClientMain.flag) {
				while (-1 != (len = is.read(buffer))) {

					//接收客户端发送的数据,打印在控制台
					message = new String(buffer, 0, len);
					String s = "客户端:" + message;
					System.out.println(s);

					//当客户端发送的数据为1时进行查询操作
					if ("1".equals(message)) {
						//从mysql数据库仓库中查询数据
						jc.mysqlSelect("select * from cangku");

//						//从oracle数据库订单表中查询数据
//						jc.oracleSelect("select * from freshbin_dingdan");

						//当oracle数据中连接不上时候,就从本地的mysql数据库的订单表获取数据
						jc.mysqlSelectDingDan("select * from dingdan");

						//获取订单表与仓库表比较后,数量不同的结果
						jc.writeIO();

						//将两张表比较后的结果返回给客户端
						os.write(jc.writeIO().toString().getBytes());
						os.flush();
					}
下面是查询仓库表的方法
//查询mysql仓库表的数据
	public Map<Integer,Integer> mysqlSelect(String sql) {

		mysqlMap = new HashMap<Integer, Integer>();

		//调用MysqlPool的方法进行对mysql仓库表的查询
		msPool.getQPstmt(sql);
		ResultSet rs = msPool.getQRs();

		try {
			while(rs.next()) {
				mysqlMap.put(rs.getInt(1), rs.getInt(2));
			}
		} catch (SQLException e) {
			// TODO Auto-generated catch block
			e.printStackTrace();
		}

		//如果启用定时器执行查询任务的话,下面这条关闭语句必须注释掉,不然会有异常
	//	msPool.close();
		return mysqlMap;
	}
下面是查询订单表的方法
//查询mysql订单表的数据
	public Map<Integer,Integer> mysqlSelectDingDan(String sql) {

		mysqlDingDanMap = new HashMap<Integer, Integer>();

		//调用MysqlPool的方法进行对mysql仓库表的查询
		msPool.getQPstmt(sql);
		ResultSet rs = msPool.getQRs();

		try {
			while(rs.next()) {
				mysqlDingDanMap.put(rs.getInt(1), rs.getInt(2));
			}
		} catch (SQLException e) {
			// TODO Auto-generated catch block
			e.printStackTrace();
		}

		//如果启用定时器执行查询任务的话,下面这条关闭语句必须注释掉,不然会有异常
	//	msPool.close();
		return mysqlDingDanMap;
	}
下面是比较仓库表与订单表的结果
	//将仓库表与订单表的数量进行比较
	public StringBuffer writeIO() {
		sb = new StringBuffer();
		//获取仓库表的所有数据
		Set<Integer> mysqlSet = mysqlMap.keySet();
//		//获取订单表的所有数据
//		Set<Integer> oracleSet = oracleMap.keySet();
		//获取订单表的数据(代替oracle订单表)
		Set<Integer> mysqlDingDanSet = mysqlDingDanMap.keySet();
//		System.out.println("测试是否能得到mysqlMap与oracleMap的值");
		for(Integer mn : mysqlSet) {
			//定义一个boolean类型的变量来表示当仓库的商品编号在订单表中不存在时,就设置为true
			boolean flag = true;
			for(Integer on : mysqlDingDanSet) {
				if(mn.intValue() == on.intValue()) {
					sb.append("商品编号为:" + mn + ",仓库的数量为:" + mysqlMap.get(mn) + ",订单的数量为:" + mysqlDingDanMap.get(on) + "\r\n");
					flag = false;
				}
			}
			//当flag为true时,就把订单表中没有仓库表中的商品编号打印出来
			if(flag) {
				sb.append("商品编号为:" + mn + ",仓库的数量为:" + mysqlMap.get(mn) + ",订单的数量为:订单表中暂未有此商品编号的商品" + "\r\n");
			}
		}
		return sb;
	}
下面是进行数据库连接的方法
package com.freshbin.jdbcconn;

import java.io.FileInputStream;
import java.io.FileNotFoundException;
import java.io.IOException;
import java.sql.Connection;
import java.sql.DriverManager;
import java.sql.PreparedStatement;
import java.sql.ResultSet;
import java.sql.SQLException;
import java.util.Properties;

public class MysqlPool {

	private Connection conn = null;
	private PreparedStatement qpstmt = null;
	private PreparedStatement uPstmt = null;
	private ResultSet rs = null;
	private String url;
	private String user;
	private String password;
	private Properties pro = null;
	private static MysqlPool msPool = null;

	static {
		try {
			Class.forName("com.mysql.jdbc.Driver");
		} catch (ClassNotFoundException e) {
			// TODO Auto-generated catch block
			e.printStackTrace();
		}
	}

	private MysqlPool() {

	}

	public static MysqlPool getInstance() {

		if(msPool == null) {
			synchronized(MysqlPool.class) {
				if(msPool == null) {
					msPool = new MysqlPool();
				}
			}
		}

		return msPool;
	}

	//连接数据库
	public Connection getConn() {

		if(conn != null) {
			return conn;
		}

		try {
			pro = new Properties();
			pro.load(new FileInputStream("properties/mysql.properties"));
			conn = DriverManager.getConnection(pro.getProperty("url"), pro.getProperty("user"), pro.getProperty("password"));
//			System.out.println("连接状态:" + !conn.isClosed());
		} catch (FileNotFoundException e) {
			// TODO Auto-generated catch block
			e.printStackTrace();
		} catch (IOException e) {
			// TODO Auto-generated catch block
			e.printStackTrace();
		} catch (SQLException e) {
			// TODO Auto-generated catch block
			e.printStackTrace();
		}

		return conn;
	}

	//查询所有数据
	public PreparedStatement getQPstmt(String sql) {
		try {
			qpstmt = conn.prepareStatement(sql);
		} catch (SQLException e) {
			// TODO Auto-generated catch block
			e.printStackTrace();
		}
		return qpstmt;
	}

	//执行查询语句
	public ResultSet getQRs() {

		try {
			rs = qpstmt.executeQuery();
		} catch (SQLException e) {
			// TODO Auto-generated catch block
			e.printStackTrace();
		}

		return rs;
	}

	//执行更新仓库数据
		public PreparedStatement getUPstmt(String updateSql, int id, int mysqlNumber) {
			try {
				conn.setAutoCommit(false);
				uPstmt = conn.prepareStatement(updateSql);
				uPstmt.setInt(1, mysqlNumber);
				uPstmt.setInt(2, id);
				uPstmt.executeUpdate();
				conn.commit();

			} catch (SQLException e) {
				// TODO Auto-generated catch block
				e.printStackTrace();
			} catch (Exception e) {
				try {
					conn.rollback();
				} catch (SQLException e1) {
					// TODO Auto-generated catch block
					e1.printStackTrace();
				}
			}

			return uPstmt;
		}


	//关闭数据库
	public void close() {

			try {
				if(rs != null) {
					rs.close();
				}
				if(qpstmt != null) {
					qpstmt.close();
				}
				if(conn != null) {
				conn.close();
				}
			} catch (SQLException e) {
				// TODO Auto-generated catch block
				e.printStackTrace();
			}

	}

}
最后上图,首先是仓库表与订单表在数据库中的情况

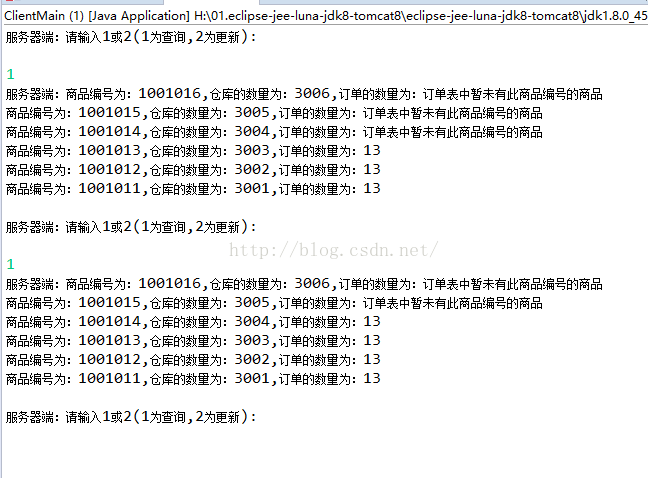
然后是客户端进行查询的结果
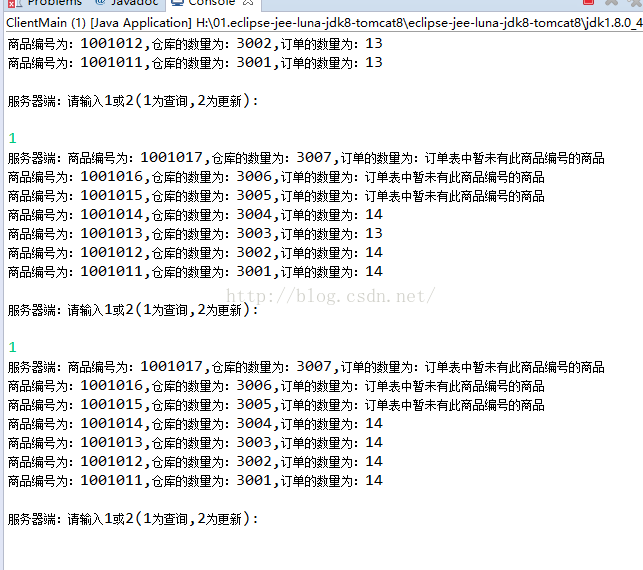
接着是数据库的两张表都修改后,客户端再次查询的结果

自此,对数据库的查询操作就算是搞定了,对数据库的插入与更新下次再写


 2994
2994

 被折叠的 条评论
为什么被折叠?
被折叠的 条评论
为什么被折叠?
 到【灌水乐园】发言


