


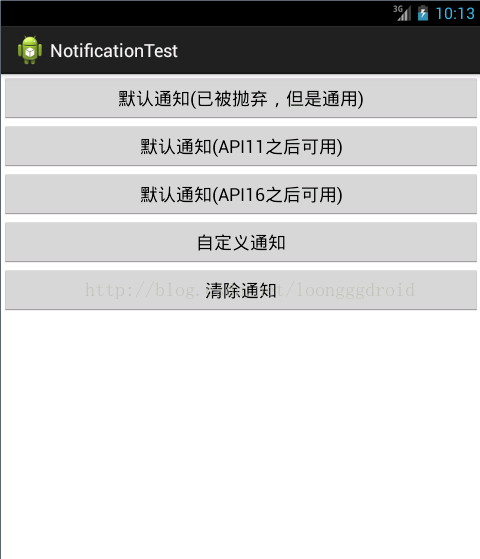
我们也知道Android系统也是在不断升级的,有关Notification的用法也就有很多种,有的方法已经被android抛弃了,现在我实现了三种不同的方法,并适应不同的android版本。现在我就把代码公布出来,我喜欢把解释写在代码中,在这里我就不多说了,先看效果图:
再看代码,主要的代码如下:
- package net.loonggg.notification;
- import android.app.Activity;
- import android.app.Notification;
- import android.app.NotificationManager;
- import android.app.PendingIntent;
- import android.content.Context;
- import android.content.Intent;
- import android.os.Bundle;
- import android.view.View;
- import android.widget.RemoteViews;
- public class MainActivity extends Activity {
- private static final int NOTIFICATION_FLAG = 1;
- @Override
- protected void onCreate(Bundle savedInstanceState) {
- super.onCreate(savedInstanceState);
- setContentView(R.layout.activity_main);
- }
- public void notificationMethod(View view) {
- // 在Android进行通知处理,首先需要重系统哪里获得通知管理器NotificationManager,它是一个系统Service。
- NotificationManager manager = (NotificationManager) getSystemService(Context.NOTIFICATION_SERVICE);
- switch (view.getId()) {
- // 默认通知
- case R.id.btn1:
- // 创建一个PendingIntent,和Intent类似,不同的是由于不是马上调用,需要在下拉状态条出发的activity,所以采用的是PendingIntent,即点击Notification跳转启动到哪个Activity
- PendingIntent pendingIntent = PendingIntent.getActivity(this, 0,
- new Intent(this, MainActivity.class), 0);
- // 下面需兼容Android 2.x版本是的处理方式
- // Notification notify1 = new Notification(R.drawable.message,
- // "TickerText:" + "您有新短消息,请注意查收!", System.currentTimeMillis());
- Notification notify1 = new Notification();
- notify1.icon = R.drawable.message;
- notify1.tickerText = "TickerText:您有新短消息,请注意查收!";
- notify1.when = System.currentTimeMillis();
- notify1.setLatestEventInfo(this, "Notification Title",
- "This is the notification message", pendingIntent);
- notify1.number = 1;
- notify1.flags |= Notification.FLAG_AUTO_CANCEL; // FLAG_AUTO_CANCEL表明当通知被用户点击时,通知将被清除。
- // 通过通知管理器来发起通知。如果id不同,则每click,在statu那里增加一个提示
- manager.notify(NOTIFICATION_FLAG, notify1);
- break;
- // 默认通知 API11及之后可用
- case R.id.btn2:
- PendingIntent pendingIntent2 = PendingIntent.getActivity(this, 0,
- new Intent(this, MainActivity.class), 0);
- // 通过Notification.Builder来创建通知,注意API Level
- // API11之后才支持
- Notification notify2 = new Notification.Builder(this)
- .setSmallIcon(R.drawable.message) // 设置状态栏中的小图片,尺寸一般建议在24×24,这个图片同样也是在下拉状态栏中所显示,如果在那里需要更换更大的图片,可以使用setLargeIcon(Bitmap
- // icon)
- .setTicker("TickerText:" + "您有新短消息,请注意查收!")// 设置在status
- // bar上显示的提示文字
- .setContentTitle("Notification Title")// 设置在下拉status
- // bar后Activity,本例子中的NotififyMessage的TextView中显示的标题
- .setContentText("This is the notification message")// TextView中显示的详细内容
- .setContentIntent(pendingIntent2) // 关联PendingIntent
- .setNumber(1) // 在TextView的右方显示的数字,可放大图片看,在最右侧。这个number同时也起到一个序列号的左右,如果多个触发多个通知(同一ID),可以指定显示哪一个。
- .getNotification(); // 需要注意build()是在API level
- // 16及之后增加的,在API11中可以使用getNotificatin()来代替
- notify2.flags |= Notification.FLAG_AUTO_CANCEL;
- manager.notify(NOTIFICATION_FLAG, notify2);
- break;
- // 默认通知 API16及之后可用
- case R.id.btn3:
- PendingIntent pendingIntent3 = PendingIntent.getActivity(this, 0,
- new Intent(this, MainActivity.class), 0);
- // 通过Notification.Builder来创建通知,注意API Level
- // API16之后才支持
- Notification notify3 = new Notification.Builder(this)
- .setSmallIcon(R.drawable.message)
- .setTicker("TickerText:" + "您有新短消息,请注意查收!")
- .setContentTitle("Notification Title")
- .setContentText("This is the notification message")
- .setContentIntent(pendingIntent3).setNumber(1).build(); // 需要注意build()是在API
- // level16及之后增加的,API11可以使用getNotificatin()来替代
- notify3.flags |= Notification.FLAG_AUTO_CANCEL; // FLAG_AUTO_CANCEL表明当通知被用户点击时,通知将被清除。
- manager.notify(NOTIFICATION_FLAG, notify3);// 步骤4:通过通知管理器来发起通知。如果id不同,则每click,在status哪里增加一个提示
- break;
- // 自定义通知
- case R.id.btn4:
- // Notification myNotify = new Notification(R.drawable.message,
- // "自定义通知:您有新短信息了,请注意查收!", System.currentTimeMillis());
- Notification myNotify = new Notification();
- myNotify.icon = R.drawable.message;
- myNotify.tickerText = "TickerText:您有新短消息,请注意查收!";
- myNotify.when = System.currentTimeMillis();
- myNotify.flags = Notification.FLAG_NO_CLEAR;// 不能够自动清除
- RemoteViews rv = new RemoteViews(getPackageName(),
- R.layout.my_notification);
- rv.setTextViewText(R.id.text_content, "hello wrold!");
- myNotify.contentView = rv;
- Intent intent = new Intent(Intent.ACTION_MAIN);
- PendingIntent contentIntent = PendingIntent.getActivity(this, 1,
- intent, 1);
- myNotify.contentIntent = contentIntent;
- manager.notify(NOTIFICATION_FLAG, myNotify);
- break;
- case R.id.btn5:
- // 清除id为NOTIFICATION_FLAG的通知
- manager.cancel(NOTIFICATION_FLAG);
- // 清除所有的通知
- // manager.cancelAll();
- break;
- default:
- break;
- }
- }
- }
- <LinearLayout xmlns:android="http://schemas.android.com/apk/res/android"
- xmlns:tools="http://schemas.android.com/tools"
- android:layout_width="match_parent"
- android:layout_height="match_parent"
- android:orientation="vertical"
- tools:context=".MainActivity" >
- <Button
- android:id="@+id/btn1"
- android:layout_width="fill_parent"
- android:layout_height="wrap_content"
- android:onClick="notificationMethod"
- android:text="默认通知(已被抛弃,但是通用)" />
- <Button
- android:id="@+id/btn2"
- android:layout_width="fill_parent"
- android:layout_height="wrap_content"
- android:onClick="notificationMethod"
- android:text="默认通知(API11之后可用)" />
- <Button
- android:id="@+id/btn3"
- android:layout_width="fill_parent"
- android:layout_height="wrap_content"
- android:onClick="notificationMethod"
- android:text="默认通知(API16之后可用)" />
- <Button
- android:id="@+id/btn4"
- android:layout_width="fill_parent"
- android:layout_height="wrap_content"
- android:onClick="notificationMethod"
- android:text="自定义通知" />
- <Button
- android:id="@+id/btn5"
- android:layout_width="fill_parent"
- android:layout_height="wrap_content"
- android:onClick="notificationMethod"
- android:text="清除通知" />
- </LinearLayout>
- <?xml version="1.0" encoding="utf-8"?>
- <LinearLayout xmlns:android="http://schemas.android.com/apk/res/android"
- android:layout_width="match_parent"
- android:layout_height="wrap_content"
- android:background="#ffffff"
- android:orientation="vertical" >
- <TextView
- android:id="@+id/text_content"
- android:layout_width="wrap_content"
- android:layout_height="wrap_content"
- android:textSize="20sp" />
- </LinearLayout>
转载请注明出处:http://blog.csdn.net/loongggdroid/article/details/17616509
Android 中Notification的运用
Notification在手机的运用中是很常见的,比如我们收到一个短信,在我们的通知栏就会显示一个消息的图标用来提示我们,这种我们就可以用Notification来实现。他有很多的用法,比如类似消息的一个提示,进度条式的提示,折叠式啊,或者悬挂式等。下面我们可以看一个简单的也是最基本的Notification:
第一种:基本的Notification
1.API 11 以下的,现在被弃用了,它的简单用法是这样的
1.1这里需要使用PendingIntent,跟Intent相似,Intent 是及时启动,intent 随所在的activity 消失而消失,而PendingIntent它不是马上被调用,它主要用于即将发生的事情,在Notification中,它在下拉状态条点击时候才会发生activity的跳转
PendingIntent pendingIntent = PendingIntent.getActivity(this, 0, new Intent(this, MainActivity.class), 0);
1.2然后我们在来看Notification 的使用方法
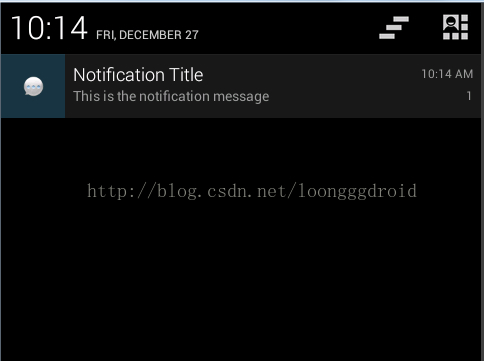
 Notification notify = new Notification();
    notify.icon = R.drawable.ic_launcher;
    notify.tickerText = "有新短消息了!";
    notify.when = System.currentTimeMillis();
    notify.setLatestEventInfo(this, "通知的消息title",     在后来的版本中基本上会提示找不到,或者提示不建议使用
       "消息内容", pendingIntent);
     notify.number = 1;  //消息的数量
     notify.flags |= Notification.FLAG_AUTO_CANCEL; // FLAG_AUTO_CANCEL表明当通知被用户点击时,通知将被清除。
简单提一下2.x版本的处理方式:
Notification notify1 = new Notification(R.drawable.message, "有新短消息了", System.currentTimeMillis());
1.3然后我们需要使用系统的通知管理器来发起通知
 NotificationManager manager = (NotificationManager) getSystemService(Context.NOTIFICATION_SERVICE);
    manager.notify(NOTIFICATION_FLAG, notify);  //发起通知
我们看一下效果图:是不是很熟悉的感觉啊

2.API11以后 主要是通过Notification.Builder来创建通知,我们看一下代码实现
PendingIntent pendingIntent = PendingIntent.getActivity(this, 0,  new Intent(this, MainActivity.class), 0);

Notification notify= new Notification.Builder(this)
         .setSmallIcon(R.mipmap.ic_launcher) // 设置状态栏中的小图片,尺寸一般建议在24×24, 这里也可以设置大图标
         .setTicker(有新短消息了!")// 设置显示的提示文字
         .setContentTitle("Title")// 设置显示的标题
         .setContentText("This is message content")// 消息的详细内容
         .setContentIntent(pendingIntent) // 关联PendingIntent
         .setNumber(1) // 在TextView的右方显示的数字,可以在外部定义一个变量,点击累加setNumber(count),这时显示的和
          .getNotification(); // 需要注意build()是在API level16及之后增加的,在API11中可以使用getNotificatin()来代替
          notify.flags |= Notification.FLAG_AUTO_CANCEL;
NotificationManager manager =(NotificationManager) getSystemService(Context.NOTIFICATION_SERVICE);
          manager.notify(NOTIFICATION_FLAG, notify);
总体上来是没有什么变化,同时我们还可以设置下面的一些属性:
 //设置优先级
   notify.setPriority(Notification.PRIORITY_DEFAULT);
    //设置通知类别
   notify.setCategory(Notification.CATEGORY_MESSAGE);
3.我们也可以使用自定义的Notification:主要使用RemoteViews,
第一步:写好你想要  Notification样式的xml 文件
第二步:在上面的列子中加入下面的代码:
RemoteViews remote = new RemoteViews(getPackageName(),
                    R.layout.my_notification);
            rv.setTextViewText(R.id.content, "hello!");
            myNotify.contentView = rv;
可以使用它做折叠视图,简单说一下,它主要是用来显示长文本,它拥有2个视图,一个是普通状态下的,一个是展开状态下的,
Intent intent = new Intent(Intent.ACTION_MAIN);
               PendingIntent contentIntent = PendingIntent.getActivity(this, 1,
                       intent, 0);
               Notification.Builder buider = new Notification.Builder(this)
                       .setSmallIcon(R.mipmap.ic_launcher)
                       .setTicker("您有新短消息")
                       .setContentTitle("Notification Title")
                       .setContentText("This is message")
                       .setContentIntent(contentIntent)
                       .setAutoCancel(true)
                       .setLargeIcon(BitmapFactory.decodeResource(getResources(), R.mipmap.ic_launcher));

               RemoteViews contentView = new RemoteViews(getPackageName(),
                       R.layout.my_notification);
               contentView.setTextViewText(R.id.text_content, "show!");
               Notification notification1=buider.build();
               //指定视图Notification 正常状态下的视图
               notification1.contentView=contentView;
               RemoteViews expandView = new RemoteViews(getPackageName(),
                       R.layout.my_notification_expand);
               //展开时的视图
               notification1.bigContentView = expandView;

               manager.notify(NOTIFICATION_FLAG, notification1);
4.悬挂式Notification,他是5.0中新增的,也就是API中的Headsup的Notification,可以子啊不打断用户操作的时候,给用户通知
它跟其他的不同,主要在下面这句代码:
 //设置为悬挂,主要设置 setFullScreenIntent
   notify.setContentText("Heads-Up,Notification on5.0").setFullScreenIntent(pendingIntent, true);
如下图:

5.进度条的Notification,我们一般常见的是下载软件的时候,显示的会有一个下载进度的通知,其实这个也是很好实现的‘
在Api中是这样介绍的:
To use a progress indicator on platforms starting with Android 4.0, call setProgress() . For previous versions, you must create your own custom notification layout that includes a ProgressBar view.
它的意思是在android4.0以上平台,我们可以直接setProgress()的方法,但是对于之前的我们只能自定义布局。
我们来简单看一下:这个是api给的一个demo。 下面我们重点看一下着色的部分
mNotificationManager =
                        (NotificationManager) getSystemService(Context.NOTIFICATION_SERVICE);
                builder = new NotificationCompat.Builder(this);
                builder.setContentTitle("Picture Download")
                        .setContentText("Download in progress")
                        .setSmallIcon(R.mipmap.ic_launcher);
                new Thread(
                        new Runnable() {
                            @Override
                            public void run() {
                                int incr;
                                // Do the "lengthy" operation 20 times
                                for (incr = 0; incr <= 100; incr+=5) {
                                    // Sets the progress indicator to a max value, the
                                    // current completion percentage, and "determinate"
                                    // state
                                    builder.setProgress(100, incr, false);
                                    // Displays the progress bar for the first time.
                                    mNotificationManager.notify(0, builder.build());
                                    // Sleeps the thread, simulating an operation
                                    // that takes time
                                    try {
                                        // Sleep for 5 seconds
                                        Thread.sleep(5*1000);
                                    } catch (InterruptedException e) {
                                        Log.d(TAG, "sleep failure");
                                    }
                                }
                                // When the loop is finished, updates the notification
                                builder.setContentText("Download complete")
                                        // Removes the progress bar
                                        .setProgress(0,0,true);
                                mNotificationManager.notify(NOTIFICATION_FLAG, builder.build());
                            }
                        }
// Starts the thread by calling the run() method in its Runnable
                ).start();
mBuilder.setProgress(100, incr, false);和 mBuilder.setProgress(0, 0, true);的区别,如果把蓝色的部分替换为前者,在运行的时候,我们会看见是它下载完成后会给我们一个通知说下载完成,但是后者会给我们提示下载完成的同时,进度条是在运行的,不断的和滚动,也就是效果是有所不同 如下图:第一个图是下载在进行的时候,第二个是我使用后 mBuilder.setProgress(0, 0, true),下载完成的时候,我们可以发现他还存在进度条,但是一直在滚动,我这里是静态图片,大家可以运行一下看看效果,第三个图,mBuilder.setProgress(100,incr,false) ,下载完成时显示的通知
还有一些其他的,辟比如锁屏下的,显示等级的Notification,在这里我就不写了,大家可以没事看看api。介绍的很详细。


本文简单介绍安卓 Notification 的用法,并简单对比 5.0 前后 Notification 的变化和处理方法。
1. Notification 效果举例
以微信为例,我们看下 Notification 的效果图:
2. 常用方法及作用
Notification 通常可以分为2个部分:Status Bar 中的部分和下拉通知栏后显示的部分。各个部分的名称如下图:
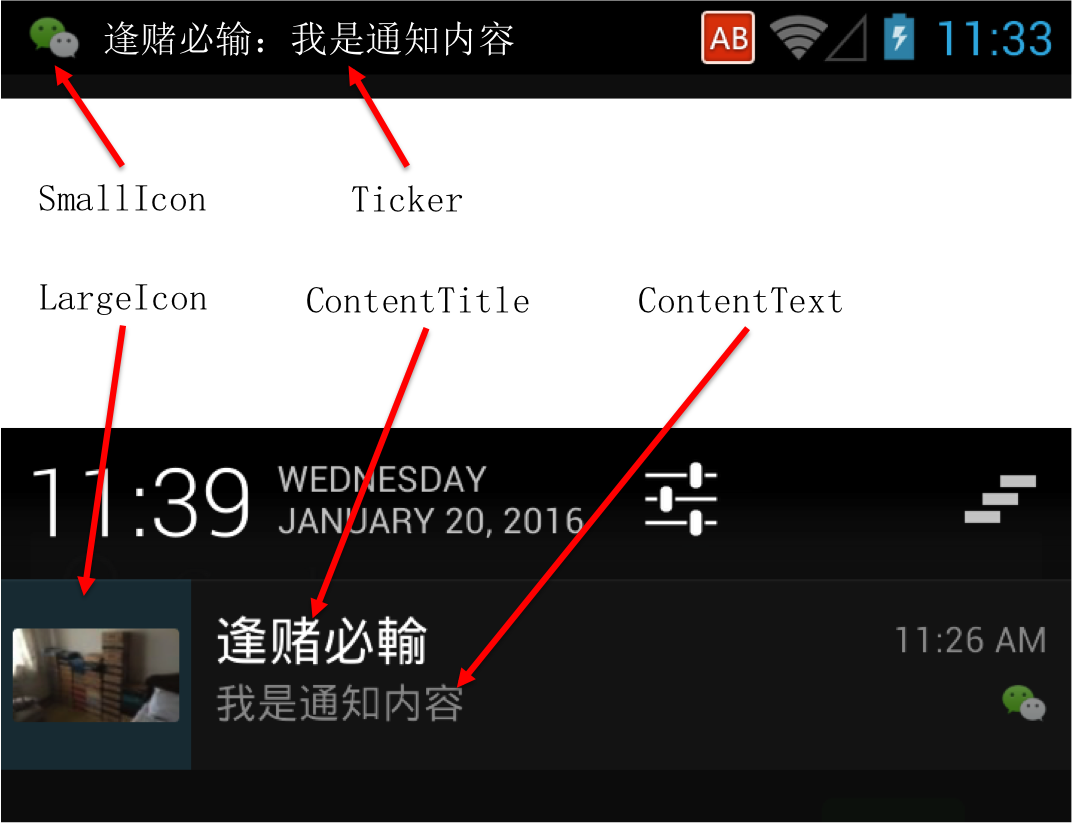
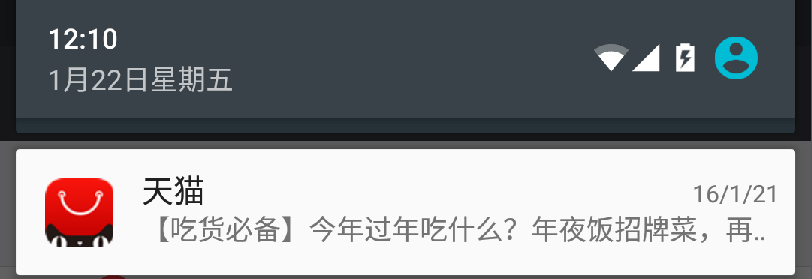
需要说明的是,下拉后的部分的布局是系统默认的,该布局可以通过 contentView 字段自定义设置。如天猫 APP 就使用了自定义布局如下图(Nexus 5X,Tmall V4.7.2):

我们用一段代码来说明图中上述项如何进行设置:
<code class="hljs avrasm has-numbering">
import android<span class="hljs-preprocessor">.app</span><span class="hljs-preprocessor">.Notification</span><span class="hljs-comment">;</span>
import android<span class="hljs-preprocessor">.app</span><span class="hljs-preprocessor">.NotificationManager</span><span class="hljs-comment">;</span>
import android<span class="hljs-preprocessor">.app</span><span class="hljs-preprocessor">.PendingIntent</span><span class="hljs-comment">;</span>
import android<span class="hljs-preprocessor">.content</span><span class="hljs-preprocessor">.Context</span><span class="hljs-comment">;</span>
import android<span class="hljs-preprocessor">.content</span><span class="hljs-preprocessor">.Intent</span><span class="hljs-comment">;</span>
import android<span class="hljs-preprocessor">.graphics</span><span class="hljs-preprocessor">.Bitmap</span><span class="hljs-comment">;</span>
import android<span class="hljs-preprocessor">.graphics</span><span class="hljs-preprocessor">.drawable</span><span class="hljs-preprocessor">.BitmapDrawable</span><span class="hljs-comment">;</span>
import android<span class="hljs-preprocessor">.net</span><span class="hljs-preprocessor">.Uri</span><span class="hljs-comment">;</span>
import android<span class="hljs-preprocessor">.support</span><span class="hljs-preprocessor">.v</span>4<span class="hljs-preprocessor">.app</span><span class="hljs-preprocessor">.NotificationCompat</span><span class="hljs-comment">;</span>
import android<span class="hljs-preprocessor">.support</span><span class="hljs-preprocessor">.v</span>7<span class="hljs-preprocessor">.app</span><span class="hljs-preprocessor">.AppCompatActivity</span><span class="hljs-comment">;</span>
import android<span class="hljs-preprocessor">.os</span><span class="hljs-preprocessor">.Bundle</span><span class="hljs-comment">;</span>
import android<span class="hljs-preprocessor">.view</span><span class="hljs-preprocessor">.View</span><span class="hljs-comment">;</span>
import android<span class="hljs-preprocessor">.widget</span><span class="hljs-preprocessor">.Button</span><span class="hljs-comment">;</span>
import <span class="hljs-keyword">com</span><span class="hljs-preprocessor">.example</span><span class="hljs-preprocessor">.cmm</span><span class="hljs-preprocessor">.helloworld</span><span class="hljs-preprocessor">.R</span><span class="hljs-comment">;</span>
public class NotificationActivityDemo extends AppCompatActivity {
public final static int NOTIFICATION_ID = <span class="hljs-string">"NotificationActivityDemo"</span><span class="hljs-preprocessor">.hashCode</span>()<span class="hljs-comment">;</span>
@Override
protected void onCreate(Bundle savedInstanceState) {
super<span class="hljs-preprocessor">.onCreate</span>(savedInstanceState)<span class="hljs-comment">;</span>
setContentView(R<span class="hljs-preprocessor">.layout</span><span class="hljs-preprocessor">.activity</span>_notification_activity_demo)<span class="hljs-comment">;</span>
final NotificationManager nm = (NotificationManager) getSystemService(Context<span class="hljs-preprocessor">.NOTIFICATION</span>_SERVICE)<span class="hljs-comment">;</span>
NotificationCompat<span class="hljs-preprocessor">.Builder</span> builder = new NotificationCompat<span class="hljs-preprocessor">.Builder</span>(this)<span class="hljs-comment">;</span>
// params
int smallIconId = R<span class="hljs-preprocessor">.drawable</span><span class="hljs-preprocessor">.small</span>_icon<span class="hljs-comment">;</span>
Bitmap largeIcon = ((BitmapDrawable) getResources()<span class="hljs-preprocessor">.getDrawable</span>(R<span class="hljs-preprocessor">.drawable</span><span class="hljs-preprocessor">.large</span>_icon))<span class="hljs-preprocessor">.getBitmap</span>()<span class="hljs-comment">;</span>
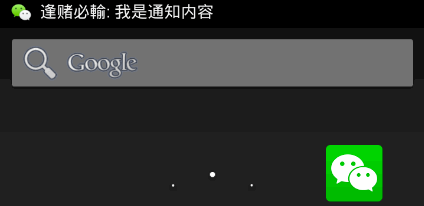
String info = <span class="hljs-string">"逢赌必输:我是通知内容"</span><span class="hljs-comment">;</span>
// action when clicked
Intent intent = new Intent()<span class="hljs-comment">;</span>
intent<span class="hljs-preprocessor">.setAction</span>(Intent<span class="hljs-preprocessor">.ACTION</span>_VIEW)<span class="hljs-comment">;</span>
intent<span class="hljs-preprocessor">.setData</span>(Uri<span class="hljs-preprocessor">.parse</span>(<span class="hljs-string">"host://anotheractivity"</span>))<span class="hljs-comment">;</span>
builder<span class="hljs-preprocessor">.setLargeIcon</span>(largeIcon)
<span class="hljs-preprocessor">.setSmallIcon</span>(smallIconId)
<span class="hljs-preprocessor">.setContentTitle</span>(<span class="hljs-string">"逢赌必输"</span>)
<span class="hljs-preprocessor">.setContentText</span>(info)
<span class="hljs-preprocessor">.setTicker</span>(info)
<span class="hljs-preprocessor">.setContentIntent</span>(PendingIntent<span class="hljs-preprocessor">.getActivity</span>(this, <span class="hljs-number">0</span>, intent, <span class="hljs-number">0</span>))<span class="hljs-comment">;</span>
final Notification n = builder<span class="hljs-preprocessor">.getNotification</span>()<span class="hljs-comment">;</span>
Button btn = (Button) findViewById(R<span class="hljs-preprocessor">.id</span><span class="hljs-preprocessor">.btn</span>)<span class="hljs-comment">;</span>
btn<span class="hljs-preprocessor">.setOnClickListener</span>(new View<span class="hljs-preprocessor">.OnClickListener</span>() {
@Override
public void onClick(View v) {
nm<span class="hljs-preprocessor">.notify</span>(NOTIFICATION_ID, n)<span class="hljs-comment">;</span>
}
})<span class="hljs-comment">;</span>
}
}</code><ul style="" class="pre-numbering"><li>1</li><li>2</li><li>3</li><li>4</li><li>5</li><li>6</li><li>7</li><li>8</li><li>9</li><li>10</li><li>11</li><li>12</li><li>13</li><li>14</li><li>15</li><li>16</li><li>17</li><li>18</li><li>19</li><li>20</li><li>21</li><li>22</li><li>23</li><li>24</li><li>25</li><li>26</li><li>27</li><li>28</li><li>29</li><li>30</li><li>31</li><li>32</li><li>33</li><li>34</li><li>35</li><li>36</li><li>37</li><li>38</li><li>39</li><li>40</li><li>41</li><li>42</li><li>43</li><li>44</li><li>45</li><li>46</li><li>47</li><li>48</li><li>49</li><li>50</li><li>51</li><li>52</li><li>53</li><li>54</li><li>55</li><li>56</li><li>57</li><li>58</li></ul><ul style="" class="pre-numbering"><li>1</li><li>2</li><li>3</li><li>4</li><li>5</li><li>6</li><li>7</li><li>8</li><li>9</li><li>10</li><li>11</li><li>12</li><li>13</li><li>14</li><li>15</li><li>16</li><li>17</li><li>18</li><li>19</li><li>20</li><li>21</li><li>22</li><li>23</li><li>24</li><li>25</li><li>26</li><li>27</li><li>28</li><li>29</li><li>30</li><li>31</li><li>32</li><li>33</li><li>34</li><li>35</li><li>36</li><li>37</li><li>38</li><li>39</li><li>40</li><li>41</li><li>42</li><li>43</li><li>44</li><li>45</li><li>46</li><li>47</li><li>48</li><li>49</li><li>50</li><li>51</li><li>52</li><li>53</li><li>54</li><li>55</li><li>56</li><li>57</li><li>58</li></ul>
3. 5.0 后的变化
以上部分的内容是基于 4.4 及以下版本的 SDK。
5.0 及以上版本的 Notification 样式发生了改变,我们先来看个例子,直观感受一下。
下图为 24px x 24px 大小的 SmallIcon,我们可以看到其颜色艳丽精细,明显有悖 SmallIcon 简洁明了的精神:

在 4.1 和 5.0 的 Genymotion 模拟器上的效果图对比如下(很明显 5.0 上 SmallIcon 白成一坨了,完全无法辨别):
| 4.1 系统运行效果 | 5.0 系统运行效果 |
|---|---|
 |  |
Notification 在 5.0及以上版本上的样式发生了变化,包括但不仅限于以下各项:
- 背景色,由黑色变为白色;
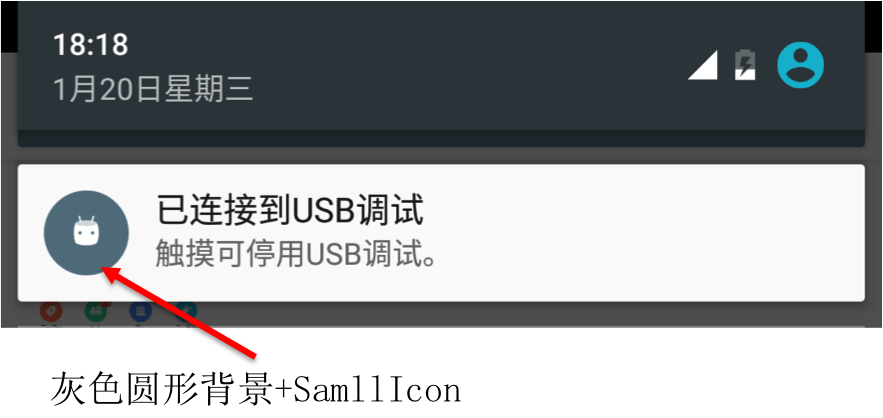
- smallIcon 的显示位置,由布局的右下角变为 largeIcon 的右下角,不过不设置 largeIcon,则系统会使用圆形灰色背景+SmallIcon构成largeIcon,且其右下角没有 SmallIcon,具体效果见下图;
- smallIcon 的显示方式,不再按原图显示,而只显示白色和透明色,且不再显示 ticker(提示文本);
- 如果不设置 largeIcon,则用 smallIcon 代替之,而且大图用灰色的圆包围 smallIcon 构成;
5.0 及以上的系统,Google 推荐 SmallIcon 仅使用白色和透明色两种颜色,而且尽量简单。如果使用其他颜色,系统会进行处理,仅仅显示上述两种颜色,从而导致图标变为白色的一坨,而无法辨别。
安卓 5.0(>= 4.0 同样适用) 及以上版本系统对通知图标的规则:
| 尺寸 | 颜色 | |
|---|---|---|
| SmallIcon | LargeIcon | 小图标和操作图标应该避免过于精细、难以辨认,应该是纯白透明背景图像;禁止对小图标设置任何附加的阿尔法通道属性(变暗或变淡);这些图标会有抗锯齿边缘,但是由于 Android 使用这些图标作为蒙板(即仅使用阿尔法通道),因此通常应以完全不透明的方式绘制图像 |
24dp x 24dp,上下左右各有 2dp 的留白:
| 64dp x 64dp:
| |
在5.0及以上系统,微信、大众点评、淘宝的 SmallIcon 如下图所示:

所以,我们要对 5.0 及以上版本做兼容性处理,代码类似:
<code class="hljs avrasm has-numbering">// more code

boolean isAboveLollipop = Build<span class="hljs-preprocessor">.VERSION</span><span class="hljs-preprocessor">.SDK</span>_INT >= Build<span class="hljs-preprocessor">.VERSION</span>_CODES<span class="hljs-preprocessor">.LOLLIPOP</span><span class="hljs-comment">;</span>

builder<span class="hljs-preprocessor">.setSmallIcon</span>(isAboveLollipop ? R<span class="hljs-preprocessor">.drawable</span><span class="hljs-preprocessor">.small</span>_icon : R<span class="hljs-preprocessor">.drawable</span><span class="hljs-preprocessor">.white</span>_small_icon)<span class="hljs-comment">;</span>

// more code
</code><ul style="" class="pre-numbering"><li>1</li><li>2</li><li>3</li><li>4</li><li>5</li><li>6</li><li>7</li><li>8</li></ul><ul style="" class="pre-numbering"><li>1</li><li>2</li><li>3</li><li>4</li><li>5</li><li>6</li><li>7</li><li>8</li></ul>
4. 结束语
本文简单介绍了 Notification 常用的 API 及在 5.0 及以上版本的变化。在实际开发中,我们要对 5.0 及以上系统做兼容性处理,也就是制作两套 SmallIcon。


 116
116

 被折叠的 条评论
为什么被折叠?
被折叠的 条评论
为什么被折叠?
 到【灌水乐园】发言


