


 本文介绍了一种在Android应用中实现自动检测新版本并提供更新功能的方法,包括获取应用版本信息、与服务器交互获取最新版本信息、以及实现下载、安装新版本的流程。
前言:在软件开发的尾声应该都会遇到这个问题,还好网上资料很多,所以基本不费什么力气就搞定了,现记录于下。这里用的PHP服务器。
效果图:(PHP服务器)
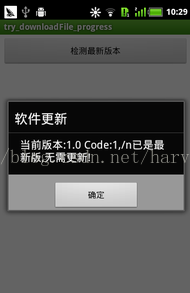
初始界面 检测后,如果已是最新版

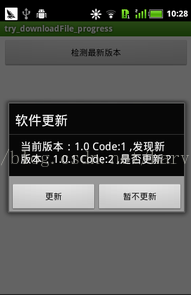
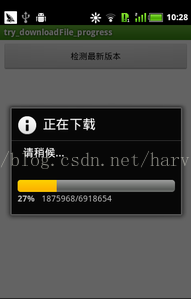
如果不是最新版,提示更新 正在下载 安装新程序
一、准备知识
在AndroidManifest.xml里定义了每个Android apk的版本标识:
<manifest xmlns:android="http://schemas.android.com/apk/res/android"
    package="com.example.try_downloadfile_progress"
    android:versionCode="1"
    android:versionName="1.0" >
其中,android:versionCode和android:versionName两个字段分别表示版本代码,版本名称。versionCode是整型数字,versionName是字符串。由于version是给用户看的,不太容易比较大小,升级检查时,可以以检查versionCode为主,方便比较出版本的前后大小。
那么,在应用中如何读取AndroidManifest.xml中的versionCode和versionName呢?可以使用PackageManager的API,参考以下代码:
	/**
	 * 获取软件版本号
	 * @param context
	 * @return
	 */
	public static int getVerCode(Context context) {
        int verCode = -1;
        try {
        	//注意:"com.example.try_downloadfile_progress"对应AndroidManifest.xml里的package="……"部分
            verCode = context.getPackageManager().getPackageInfo(
                    "com.example.try_downloadfile_progress", 0).versionCode;
        } catch (NameNotFoundException e) {
        	Log.e("msg",e.getMessage());
        }
        return verCode;
    }
   /**
    * 获取版本名称
    * @param context
    * @return
    */
    public static String getVerName(Context context) {
        String verName = "";
        try {
            verName = context.getPackageManager().getPackageInfo(
                    "com.example.try_downloadfile_progress", 0).versionName;
        } catch (NameNotFoundException e) {
        	Log.e("msg",e.getMessage());
        }
        return verName;
}
这里要注意一个地方:代码里的“com.example.try_downloadfile_progress”对应AndroidManifest.xml里的package="……"部分
二、XML代码
XML代码非常简单,就是如初始化界面那样,在里面加一个BUTTON而已。代码如下:
<RelativeLayout xmlns:android="http://schemas.android.com/apk/res/android"
    xmlns:tools="http://schemas.android.com/tools"
    android:layout_width="fill_parent"
    android:layout_height="fill_parent"
    tools:context=".MainActivity" >

    <Button
        android:id="@+id/chek_newest_version"
        android:layout_width="fill_parent"
        android:layout_height="wrap_content"
        android:layout_margin="5dip"
        android:text="检测最新版本"/>

</RelativeLayout>
三、辅助类构建(Common)
这里为了开发方便,将一些公共的函数,单独放在Common类中实现,代码如下:
package com.example.try_downloadfile_progress;
/**
 * @author harvic
 * @date 2014-5-7
 * @address http://blog.csdn.net/harvic880925
 */
import java.io.BufferedReader;
import java.io.InputStreamReader;
import java.util.List;

import org.apache.http.HttpResponse;
import org.apache.http.NameValuePair;
import org.apache.http.client.entity.UrlEncodedFormEntity;
import org.apache.http.client.methods.HttpPost;
import org.apache.http.impl.client.DefaultHttpClient;
import org.apache.http.protocol.HTTP;

import android.content.Context;
import android.content.pm.PackageManager.NameNotFoundException;
import android.util.Log;

public class Common {
	public static final String SERVER_IP="http://192.168.1.105/";
	public static final String SERVER_ADDRESS=SERVER_IP+"try_downloadFile_progress_server/index.php";//软件更新包地址
	public static final String UPDATESOFTADDRESS=SERVER_IP+"try_downloadFile_progress_server/update_pakage/baidu.apk";//软件更新包地址

	/**
	 * 向服务器发送查询请求,返回查到的StringBuilder类型数据
	 *
	 * @param ArrayList
	 *            <NameValuePair> vps POST进来的参值对
	 * @return StringBuilder builder 返回查到的结果
	 * @throws Exception
	 */
	public static StringBuilder post_to_server(List<NameValuePair> vps) {
		DefaultHttpClient httpclient = new DefaultHttpClient();
		try {
			HttpResponse response = null;
			// 创建httpost.访问本地服务器网址
			HttpPost httpost = new HttpPost(SERVER_ADDRESS);
			StringBuilder builder = new StringBuilder();

			httpost.setEntity(new UrlEncodedFormEntity(vps, HTTP.UTF_8));
			response = httpclient.execute(httpost); // 执行

			if (response.getEntity() != null) {
				// 如果服务器端JSON没写对,这句是会出异常,是执行不过去的
				BufferedReader reader = new BufferedReader(
						new InputStreamReader(response.getEntity().getContent()));
				String s = reader.readLine();
				for (; s != null; s = reader.readLine()) {
					builder.append(s);
				}
			}
			return builder;

		} catch (Exception e) {
			// TODO: handle exception
			Log.e("msg",e.getMessage());
			return null;
		} finally {
			try {
				httpclient.getConnectionManager().shutdown();// 关闭连接
				// 这两种释放连接的方法都可以
			} catch (Exception e) {
				// TODO Auto-generated catch block
				Log.e("msg",e.getMessage());
			}
		}
	}

	/**
	 * 获取软件版本号
	 * @param context
	 * @return
	 */
	public static int getVerCode(Context context) {
        int verCode = -1;
        try {
        	//注意:"com.example.try_downloadfile_progress"对应AndroidManifest.xml里的package="……"部分
            verCode = context.getPackageManager().getPackageInfo(
                    "com.example.try_downloadfile_progress", 0).versionCode;
        } catch (NameNotFoundException e) {
        	Log.e("msg",e.getMessage());
        }
        return verCode;
    }
   /**
    * 获取版本名称
    * @param context
    * @return
    */
    public static String getVerName(Context context) {
        String verName = "";
        try {
            verName = context.getPackageManager().getPackageInfo(
                    "com.example.try_downloadfile_progress", 0).versionName;
        } catch (NameNotFoundException e) {
        	Log.e("msg",e.getMessage());
        }
        return verName;
}

}
这里除了上面我们提到的两个函数getVerCode和getVerName外,还有几个常量和一个函数定义,含义分别如下:
SERVER_IP:服务器IP地址(大家在拿到试验的时候,要改成自己服务器IP地址)
SERVER_ADDRESS:android程序要将请求发送到的页面地址,无须更改。
UPDATESOFTADDRESS:更新安装包存放的位置,无须更改。
函数StringBuilder post_to_server(List<NameValuePair> vps)是访问服务器并返回结果的功能封装。传进去名值对,返回StringBuilder对象
四、主页面代码构建
1、首先设置AndroidManifest.xml,使其能访问网络和SD卡
在</manifest>标签上面,加入:
<uses-permission android:name="android.permission.INTERNET" >
</uses-permission>
<uses-permission android:name="android.permission.MOUNT_UNMOUNT_FILESYSTEMS" >
</uses-permission>
<uses-permission android:name="android.permission.WRITE_EXTERNAL_STORAGE" >
</uses-permission>
2、主页代码:
先贴出全部代码,然后逐步讲解,全部代码如下:package com.example.try_downloadfile_progress;
/**
* @author harvic
* @date 2014-5-7
* @address http://blog.csdn.net/harvic880925
*/
import java.io.File;
import java.io.FileOutputStream;
import java.io.IOException;
import java.io.InputStream;
import java.util.ArrayList;
import java.util.List;
import org.apache.http.HttpEntity;
import org.apache.http.HttpResponse;
import org.apache.http.NameValuePair;
import org.apache.http.client.ClientProtocolException;
import org.apache.http.client.HttpClient;
import org.apache.http.client.methods.HttpGet;
import org.apache.http.impl.client.DefaultHttpClient;
import org.apache.http.message.BasicNameValuePair;
import org.json.JSONArray;
import android.net.Uri;
import android.os.AsyncTask;
import android.os.Bundle;
import android.os.Environment;
import android.os.Handler;
import android.app.Activity;
import android.app.AlertDialog;
import android.app.Dialog;
import android.app.ProgressDialog;
import android.content.DialogInterface;
import android.content.Intent;
import android.util.Log;
import android.view.View;
import android.view.View.OnClickListener;
import android.widget.Button;
public class MainActivity extends Activity {
Button m_btnCheckNewestVersion;
long m_newVerCode; //最新版的版本号
String m_newVerName; //最新版的版本名
String m_appNameStr; //下载到本地要给这个APP命的名字
Handler m_mainHandler;
ProgressDialog m_progressDlg;
@Override
protected void onCreate(Bundle savedInstanceState) {
super.onCreate(savedInstanceState);
setContentView(R.layout.activity_main);
//初始化相关变量
initVariable();
m_btnCheckNewestVersion.setOnClickListener(btnClickListener);
}
private void initVariable()
{
m_btnCheckNewestVersion = (Button)findViewById(R.id.chek_newest_version);
m_mainHandler = new Handler();
m_progressDlg = new ProgressDialog(this);
m_progressDlg.setProgressStyle(ProgressDialog.STYLE_HORIZONTAL);
// 设置ProgressDialog 的进度条是否不明确 false 就是不设置为不明确
m_progressDlg.setIndeterminate(false);
m_appNameStr = "haha.apk";
}
OnClickListener btnClickListener = new View.OnClickListener() {
@Override
public void onClick(View v) {
// TODO Auto-generated method stub
new checkNewestVersionAsyncTask().execute();
}
};
class checkNewestVersionAsyncTask extends AsyncTask<Void, Void, Boolean>
{

	@Override
	protected Boolean doInBackground(Void... params) {
		// TODO Auto-generated method stub
		if(postCheckNewestVersionCommand2Server())
		{
			int vercode = Common.getVerCode(getApplicationContext()); // 用到前面第一节写的方法
	         if (m_newVerCode > vercode) {
	             return true;
	         } else {
	             return false;
	         }
		}
		return false;
	}

	@Override
	protected void onPostExecute(Boolean result) {
		// TODO Auto-generated method stub
		if (result) {//如果有最新版本
			doNewVersionUpdate(); // 更新新版本
		}else {
			notNewVersionDlgShow(); // 提示当前为最新版本
		}
		super.onPostExecute(result);
	}

	@Override
	protected void onPreExecute() {
		// TODO Auto-generated method stub
		super.onPreExecute();
	}
}
/**
* 从服务器获取当前最新版本号,如果成功返回TURE,如果失败,返回FALSE
* @return
*/
private Boolean postCheckNewestVersionCommand2Server()
{
	StringBuilder builder = new StringBuilder();
	JSONArray jsonArray = null;
	try {
		// 构造POST方法的{name:value} 参数对
		List<NameValuePair> vps = new ArrayList<NameValuePair>();
		// 将参数传入post方法中
		vps.add(new BasicNameValuePair("action", "checkNewestVersion"));
		builder = Common.post_to_server(vps);
		jsonArray = new JSONArray(builder.toString());
		if (jsonArray.length()>0) {
			if (jsonArray.getJSONObject(0).getInt("id") == 1) {
				m_newVerName = jsonArray.getJSONObject(0).getString("verName");
				m_newVerCode = jsonArray.getJSONObject(0).getLong("verCode");

				return true;
			}
		}

		return false;
	} catch (Exception e) {
		Log.e("msg",e.getMessage());
		m_newVerName="";
		m_newVerCode=-1;
		return false;
	}
}
/**
* 提示更新新版本
*/
private void doNewVersionUpdate() {
	int verCode = Common.getVerCode(getApplicationContext());
    String verName = Common.getVerName(getApplicationContext());

    String str= "当前版本:"+verName+" Code:"+verCode+" ,发现新版本:"+m_newVerName+
    		" Code:"+m_newVerCode+" ,是否更新?";
    Dialog dialog = new AlertDialog.Builder(this).setTitle("软件更新").setMessage(str)
            // 设置内容
            .setPositiveButton("更新",// 设置确定按钮
                    new DialogInterface.OnClickListener() {
                        @Override
                        public void onClick(DialogInterface dialog,
                                int which) {
                            m_progressDlg.setTitle("正在下载");
                            m_progressDlg.setMessage("请稍候...");
                            downFile(Common.UPDATESOFTADDRESS);  //开始下载
                        }
                    })
            .setNegativeButton("暂不更新",
                    new DialogInterface.OnClickListener() {
                        public void onClick(DialogInterface dialog,
                                int whichButton) {
                            // 点击"取消"按钮之后退出程序
                            finish();
                        }
                    }).create();// 创建
    // 显示对话框
    dialog.show();
}
/**
* 提示当前为最新版本
*/
private void notNewVersionDlgShow()
{
int verCode = Common.getVerCode(this);
String verName = Common.getVerName(this);
String str="当前版本:"+verName+" Code:"+verCode+",/n已是最新版,无需更新!";
Dialog dialog = new AlertDialog.Builder(this).setTitle("软件更新")
.setMessage(str)// 设置内容
.setPositiveButton("确定",// 设置确定按钮
new DialogInterface.OnClickListener() {
@Override
public void onClick(DialogInterface dialog,
int which) {
finish();
}
}).create();// 创建
// 显示对话框
dialog.show();
}
private void downFile(final String url)
{
m_progressDlg.show();
new Thread() {
public void run() {
HttpClient client = new DefaultHttpClient();
HttpGet get = new HttpGet(url);
HttpResponse response;
try {
response = client.execute(get);
HttpEntity entity = response.getEntity();
long length = entity.getContentLength();
m_progressDlg.setMax((int)length);//设置进度条的最大值
InputStream is = entity.getContent();
FileOutputStream fileOutputStream = null;
if (is != null) {
File file = new File(
Environment.getExternalStorageDirectory(),
m_appNameStr);
fileOutputStream = new FileOutputStream(file);
byte[] buf = new byte[1024];
int ch = -1;
int count = 0;
while ((ch = is.read(buf)) != -1) {
fileOutputStream.write(buf, 0, ch);
count += ch;
if (length > 0) {
m_progressDlg.setProgress(count);
}
}
}
fileOutputStream.flush();
if (fileOutputStream != null) {
fileOutputStream.close();
}
down();
} catch (ClientProtocolException e) {
e.printStackTrace();
} catch (IOException e) {
e.printStackTrace();
}
}
}.start();
}
private void down() {
m_mainHandler.post(new Runnable() {
public void run() {
m_progressDlg.cancel();
update();
}
});
}
void update() {
Intent intent = new Intent(Intent.ACTION_VIEW);
intent.setDataAndType(Uri.fromFile(new File(Environment
.getExternalStorageDirectory(), m_appNameStr)),
"application/vnd.android.package-archive");
startActivity(intent);
}
}
1、OnCreate函数:
先从主函数开始讲,OnCreate函数中只有两部分,一个是initVariable()初始化变量,这个不多说,难度不大;第二个是为版本检测按钮设置监听函数——btnClickListener,而在btnClickListener函数中可以明显的看到,其中也只有一个类checkNewestVersionAsyncTask,这里采用异步方式处理更新问题。下面看checkNewestVersionAsyncTask函数
2、checkNewestVersionAsyncTask函数
class checkNewestVersionAsyncTask extends AsyncTask<Void, Void, Boolean>
{
@Override
protected Boolean doInBackground(Void... params) {
// TODO Auto-generated method stub
if(postCheckNewestVersionCommand2Server())
{
int vercode = Common.getVerCode(getApplicationContext()); // 用到前面第一节写的方法
if (m_newVerCode > vercode) {
return true;
} else {
return false;
}
}
return false;
}
@Override
protected void onPostExecute(Boolean result) {
// TODO Auto-generated method stub
if (result) {//如果有最新版本
doNewVersionUpdate(); // 更新新版本
}else {
notNewVersionDlgShow(); // 提示当前为最新版本
}
super.onPostExecute(result);
}
@Override
protected void onPreExecute() {
// TODO Auto-generated method stub
super.onPreExecute();
}
}(1)首先看后台操作doInBackground
首先利用postCheckNewestVersionCommand2Server()函数将请求发送到服务器,该函数根据是否请求成功返回TRUE或FALSE,然后将从服务器上获取的版本代码与本地的版本代码进行比较,如果要更新返回TRUE,如果不要更新返回FASLE。
下面看看postCheckNewestVersionCommand2Server()的代码:
private Boolean postCheckNewestVersionCommand2Server()
{
StringBuilder builder = new StringBuilder();
JSONArray jsonArray = null;
try {
// 构造POST方法的{name:value} 参数对
List<NameValuePair> vps = new ArrayList<NameValuePair>();
// 将参数传入post方法中
vps.add(new BasicNameValuePair("action", "checkNewestVersion"));
builder = Common.post_to_server(vps);
jsonArray = new JSONArray(builder.toString());
if (jsonArray.length()>0) {
if (jsonArray.getJSONObject(0).getInt("id") == 1) {
m_newVerName = jsonArray.getJSONObject(0).getString("verName");
m_newVerCode = jsonArray.getJSONObject(0).getLong("verCode");
return true;
}
}
return false;
} catch (Exception e) {
Log.e("msg",e.getMessage());
m_newVerName="";
m_newVerCode=-1;
return false;
}
}这里就是构建名值对,然后发向服务器,如果获取到了值就返回TURE,如果没获取到值,就返回FALSE。服务器返回的JSON值为:
[{"id":"1","verName":"1.0.1","verCode":"2"}]对于服务器代码,由于是用PHP写的,这里就不再列出了,在源码里有。
(2)onPostExecute()
继续第一部分,在doInBackground操作完成后,如果需要更新doInBackground返回TRUE,否则返回FASLE,所以在onPostExecute中根据result不同调用不同的函数,利用doNewVersionUpdate(); 提示用户更新最新版本。利用notNewVersionDlgShow(); /提示用户当前即为最新版本,无需更新。
对于notNewVersionDlgShow()函数仅仅是创建了个对话框,没什么实体内容,就不再具体讲解。下面具体讲述doNewVersionUpdate()下载,更新与安装程序的过程。
3、doNewVersionUpdate()提示版本更新
具体代码如下:
private void doNewVersionUpdate() {
int verCode = Common.getVerCode(getApplicationContext());
String verName = Common.getVerName(getApplicationContext());
String str= "当前版本:"+verName+" Code:"+verCode+" ,发现新版本:"+m_newVerName+
" Code:"+m_newVerCode+" ,是否更新?";
Dialog dialog = new AlertDialog.Builder(this).setTitle("软件更新").setMessage(str)
// 设置内容
.setPositiveButton("更新",// 设置确定按钮
new DialogInterface.OnClickListener() {
@Override
public void onClick(DialogInterface dialog,
int which) {
m_progressDlg.setTitle("正在下载");
m_progressDlg.setMessage("请稍候...");
downFile(Common.UPDATESOFTADDRESS); //开始下载
}
})
.setNegativeButton("暂不更新",
new DialogInterface.OnClickListener() {
public void onClick(DialogInterface dialog,
int whichButton) {
// 点击"取消"按钮之后退出程序
finish();
}
}).create();// 创建
// 显示对话框
dialog.show();
}这里创建一个具有确定按钮和取消按钮功能的对话框,如果用户点击取消按钮,会利用finish()结束掉程序运行;如果点击确定按钮,则利用 downFile(Common.UPDATESOFTADDRESS); 函数开始程序下载,其中downFile()函数传进去的参数是APP所在的服务器地址。注意这里的地址要具体到下载文件,比如这里是http://192.168.1.105/server/XXX.apk
4、downFile(final String url)下载并显示进度
具体代码如下:
private void downFile(final String url)
{
	m_progressDlg.show();
    new Thread() {
        public void run() {
            HttpClient client = new DefaultHttpClient();
            HttpGet get = new HttpGet(url);
            HttpResponse response;
            try {
                response = client.execute(get);
                HttpEntity entity = response.getEntity();
                long length = entity.getContentLength();

                m_progressDlg.setMax((int)length);//设置进度条的最大值

                InputStream is = entity.getContent();
                FileOutputStream fileOutputStream = null;
                if (is != null) {
                    File file = new File(
                            Environment.getExternalStorageDirectory(),
                            m_appNameStr);
                    fileOutputStream = new FileOutputStream(file);
                    byte[] buf = new byte[1024];
                    int ch = -1;
                    int count = 0;
                    while ((ch = is.read(buf)) != -1) {
                        fileOutputStream.write(buf, 0, ch);
                        count += ch;
                        if (length > 0) {
                        	 m_progressDlg.setProgress(count);//设置当前进度
                        }
                    }
                }
                fileOutputStream.flush();
                if (fileOutputStream != null) {
                    fileOutputStream.close();
                }
                down();  //告诉HANDER已经下载完成了,可以安装了
            } catch (ClientProtocolException e) {
                e.printStackTrace();
            } catch (IOException e) {
                e.printStackTrace();
            }
        }
    }.start();
}
通过利用httpClient的get方法,获取指定URL的内容,然后写到本地SD卡中,对于进度条,首先利用m_progressDlg.setMax((int)length);设置进度条的最大值,然后在读取返回结果并写到本地时,利用 m_progressDlg.setProgress(count);设置当前进度。在全部写完以后,调用down()函数,通知HANDER安装程序。
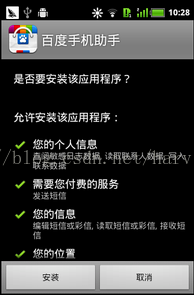
5、安装程序
安装程序主要利用下面两个函数:
/**
 * 告诉HANDER已经下载完成了,可以安装了
 */
private void down() {
        m_mainHandler.post(new Runnable() {
            public void run() {
                m_progressDlg.cancel();
                update();
            }
        });
}
/**
 * 安装程序
 */
void update() {
    Intent intent = new Intent(Intent.ACTION_VIEW);
    intent.setDataAndType(Uri.fromFile(new File(Environment
            .getExternalStorageDirectory(), m_appNameStr)),
            "application/vnd.android.package-archive");
    startActivity(intent);
}由于在android程序中必须依循单线程操作UI,所以在非主线程中不能操作UI,否则程序会崩掉,具体参见:《AsnyncTask与handler(一)——AsyncTask异步处理》与《AsnyncTask与handler(二)——handler消息机制》。所以这里作用handler的方式更新UI。
好了,到这就全部讲完了,下面给出客户端与服务器端源码,懂PHP的童鞋赚到了有木有……
源码地址:http://download.csdn.net/detail/harvic880925/7309013 不要分,仅供分享。
请大家尊重作者原创版权,转载请标明出处:http://blog.csdn.net/harvic880925/article/details/25191159 不胜感激。


 被折叠的 条评论
为什么被折叠?
被折叠的 条评论
为什么被折叠?
 到【灌水乐园】发言


