


About Portlet Bridges
Portals have long been a thorn in the side of many developers who want to stay cutting edge—but must focus on the needs of the enterprise. And 99% of the time, a portal is the only answer for aggregating many applications into one UI.
A port let bridge allows you to run application frameworks like JSF in a portal environment without worrying about the underlying portlet API or portlet concepts.
The JSR-301/329 port let bridge boasts ease of transition, ease of initiation, and seamless mappings from JSF to the portal environment. Overall, a port let bridge is a must-have mediator when working with portals, and it allows developers to learn a new technology painlessly.
About the JBoss Portlet Bridge
This ref card shows specific configurations for the JBoss Portlet Bridge. The JBoss Portlet Bridge is a non-final draft implementation of the JSR-329 specification which supports the JSF 1.2 and 2.0 runtime within a JSR 168 or 286 port let and with added enhancements to support other web frameworks (such as Seam and RichFaces).
The project follows the spec from JSR-301 to JSR-329 and now maintains an alpha version (3.0) compatible with JSF 2.0 and RichFaces 4.0.
Versions
Since this port let bridge spans four different JSRs and supports two additional JSF frameworks, understanding versions can be a little daunting. i.e. Just because the port let bridge is versioned at 2.0 does not mean it covers the JSF 2.0 specification.
| JBoss Portlet Bridge Latest Versions | Compatible Frameworks |
| 2.1.0.FINAL | JSR-286 Portlets, JSF 1.2, RichFaces 3.3.3.FINAL,Seam 2.2.1.CR2 |
| 3.0.0.ALPHA | SR-286 Portlets, JSF 2.0, RichFaces 4.0 |
In the Beginning, There Were Portlets
It would only be fair (and cruel in some states) if I gave you a brief primer on portal anport letet technologies. There will come a day when you will need to understand what an ActionRequest is and what you can pull from your FacesContext.ExternalContext() while running as a JSport letet.
Portal Terminology
Portal
Hosts the presentation layer for personalization, single sign on and content aggregation.
Portlet Container
A portal can host multiple port let containers, and each port let container has its own runtime environment.
Portal Page: Aggregation of port lets, organized and displayed on a single page.
Portlet: A port let is a Java technology-based web component, managed by a port let container, that processes requests and generates dynamic content.
Portlet Instance: A port let instance can be placed on multiple pages and will show the same state in regards to the current mode.
Portlets vs. Servlets
Most rookie portlet developers have their roots in the servlet world. So it’s important to know the key differences in what you’re about to dive into from what you’ve been dealing with. Portlets generate a portion or “fragment” of the HTML page they’re being displayed upon. This is the first big bullet point in understanding differences between servlets port letslets. UI wise, they cannot make use of the same html (for instance the standard <html> <head> <title> and <body> are forbidden in port lettlet markup). The job of writing these tags belongs to the Portal Page and not you, the developer.
Points To Remember
- Portlet URLs, which are used as links to other pages within your Portlet window, are dynamically pre-generated by the Portlet code and passed into the markup.
- Although servlets port letslets are in some respects similar, their containers life cyclescles differ.
- On the front eport letslets are HTML fragments that compose a larger page which they are unaware of. Servlets provide the entire page.
- Portlets cannot be accessed by use of a single URL, the way in which servlets are accessed. Instead, the URL points to the page where many port lets may be contained.
- The portal request paradigm is completely different. There are two requests instead of one. This is talked about in the next section.
- You now have mode and state buttons that allow you to “minimize” or “maximport lete portlet window or enter “help” mode.
- Portlets support two scopes within the session (PORTLET_SCOPE and APPLICATION_SCOPE). This allows for cases like sharing data port lete portlet to another.
- Portlets are not allowed to set character encoding on the response, set HTTP headers, or manipulate the URL of the client request to the portal.
Portlet Lifecycle
Once you wrap your head around the fact that there are two requests and the Portal sends them for you, the rest is a piece of cake. What I’m about to explain makes total sense, but it’s a huge change from the way things are done in a Servlet-based web app. In the Servlet world, a Servlet owns the process of receiving an entire web request and rendering output at the same time in one big response. In the Portlet world, the Portal receives the web request then makes separate calls to indport lets portlets. This separation allows for a different lifecycle method to be introduced in Portlets. The two requests are called Action and Render, and each have their own request and response. You must first keep in mind that when you click a link or submit button in the port let window, it has been generated by the portal API. Thus, the portal needs to control/remember things like which window is sending the request, modes, parameters, window states, etc. So when an Action link is clicked, the portal will get this information and run processAction() along with a few other methods in your port let. You are guaranteed that this action will be complete before the rendering phase starts. Once this is done, the portal now needs to re-render the page along with all the other port lets on that page. The best thing to keep in mind is port lets may be asked to render, even when the user is not interacting with them. Conceptually, this makes sense to have the two requests. However, developers have been naturally forced to do both of these things at the same time in the servlet world.
In most cases, when converting an existing servlet based application to a port let, you must use a port let bridge so that URLs are generated for the port let world—along with other framework functionality.
Giving Portlets a Second Chance
If You Skipped The First Page...
It’s okay because the port let bridge is created to mask all of those hairy details from the developer so you only have to worry about your web application. You can now take your existing JSF-based application and plug it into a portal painlessly.
Getting Started
Use the following maven archetype command:

Choose from the available projects and you will have everything you need to start develport let new portlet. If you are moving an existing appliport letto a port let, this will serve as a reference point for configuration.
Archetype Options
You will also see other configuration options like “makeremotable” and “richfaces-javascript-namespace” in the archetype generate phase.
| Option | Purpose |
| make-remotable | Boolean property that will create the configuration for running this port let remotely over WSRP |
| richfaces-javascriptnamespace | Boolean property that allows for namespacing dynamically generated RichFaces javascript. |
Configuration
The portlet bridge is a mediator between your web application and the portal worlds. It is not a portlet. So here we will review the changes you must make to convert your current JSF application into a portlet.
Core JSF Portlet Setup
portlet.xml
The following config is the backbone of your port let. It shows where the supplied GenericFacesPortlet is and which JSF pages to render when clicking on the mode buttons (i.e. help, edit, etc...).
When preserveActionParams is set to TRUE, the bridge must maintain any request parameters assigned during the port let’s action request. You should set this as true if your application is not receiving request parameters that were set when a button or link was clicked.
faces-config.xml
The PortletViewHandler ensures that each JSF port let instance is properly namespaces. Your application will use a combined portal and JSF namespace.
web.xml
The following setting tells your port let to use the FaceletPortletViewHandler when using RichFaces.
ALWAYS_DELEGATE Indicates the bridge should not render the view itself but rather always delegate the rendering. This is the default setting for Facelets. If strictly using .jsp, then set the following to NEVER_DELEGATE.
RichFaces Portlet Configuration
web.xml
RichFaces maintains dynamic scripts and styles that are injected in the page at render. The recommended settings for a portal environment are:
RichFaces does not account for multiple components on the same portal page by default. This following parameter renders all RichFaces component javascript to be portal friendly.
Seam automatically configures your Ajax4JSF/RichFaces Filter, so if you are running a Seam port let, you do not need the following Filter config.
Seam Portlet Configuration

The SeamExceptionHandler is used to clean Seam contexts and transactions after errors.
Using Portlet 2.0 Coordination with JSF
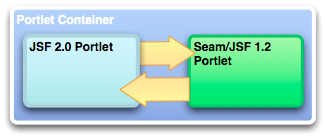
Portlet 2.0 coordination gives us two ways to communicate between port lets (events and public render parameters). This means you can deploy a JSF 2 war and another JSF 1.2/Seam 2 ear and they can send events and messages to each other.
One very important thing to note before using either of the following mechanisms is that you must have the proper 2.0 schema and xsd definition at the top of your portlet.xml.

Sending and Receiving Events
The bridge is designed by default to defer to normal port let processing when sending events. You should set the following parameters allowing port let events to be sent directly to the bridge (autoDispatchEvents) and which class should process received port let events (bridgeEventHandler).
For now, you must dispatch the event in the JSF or Seam backing bean. Future versions of the bridge should automate the dispatching and consuming of events.
Then you must also create the event handler class by implementing the BridgeEventHandler interface to process the event payload.
Public Render Parameters
Public Render Parameters (or PRPs) are one of the most powerful and simple Portlet 2.0 features. Several port lets (JSF or not) can share the same render parameters. This feature can be used to present a cohesive UI to the user across all port lets on the page (i.e., using an employee ID to display relative data).
The bridge maps a render parameter to a backing bean using settings in your faces-config.xml and portlet.xml. A clear and working example can be found below.
You must define the following init params in your portlet.xml.
Create a managed bean and public-parameter-mapping in your faces-config.xml. This should be a simple bean that you can bind the passed parameter to a string with getter and setter.

You can set the public render parameter in the JSF or Seam backing bean as follows:
And finally, in the receiving port let, you must also implement the BridgePublicRenderParameterHandler interface to process any updates from the received parameter.

Serving JSF Resources, the Portlet Way
The below example shows how to create a simple bean that uses the port let resource serving mechanism within a JSF port let.
By creating a simple class (and defining it in your faces-config.xml) that implements the java.util.Map interface, you can create a “ResourceBean” that will make life much easier on the UI.
From here, you can serve images and other resources based in your web application by using:
The source for this example can be found here: http://bit.ly/resourcebean
Developer Tips & Tricks
Excluding Attributes from the Bridge Request Scope
When your application uses request attributes on a per request basis and you do not want that particular attribute to be managed in the extended bridge request scope, you must use the following configuration in your faces-config.xml. Below you will see that any attribute namespaces as foo.bar or any attribute beginning with foo.baz(wildcard) will be excluded from the bridge request scope and only be used per that application’s request.

Supporting PortletMode Changes
A PortletMode represents a distinct render path within an application. There are three standard modes: view, edit and help. The bridge’s ExternalContext.encodeActionURL recognizes the query string parameter javax.portlet.faces.PortletMode and uses this parameter’s value to set the port let mode on the underlying port let actionURL or response. Once processed, it then removes this parameter from the query string. This means the following navigation rule causes one to render the \edit.jspx viewId in the port let edit mode:

Navigating to a Mode’s Last ViewId
By default a mode change will start in the mode’s default view without any (prior) existing state. One common port let pattern when returning to the mode one left after entering another mode (e.g.. view -> edit -> view) is to return to the last view (and state) of this origin mode. The bridge will explicitly encode the necessary information so that when returning to a prior mode it can target the appropriate view and restore the appropriate state. The session attributes maintained by the bridge are intended to be used by developers to navigate back from a mode to the last location and state of a prior mode. As such, a developer needs to describe a dynamic navigation: “from view X return to the last view of mode y”. This is most easily expressed via an EL expression. E.g.

Clearing The View History When Changing Portlet Modes
By default, the bridge remembers the view history when you switch to a different port let mode (like “Help” or “Edit”). You can use the following parameter in your portlet.xml to use the default viewId each time you switch modes.
General Error Handling

The following configuration may be used to handle exceptions. This is also useful for handling session timeout and ViewExpiredExceptions. Pay attention to the location element. It must contain the /faces/ mapping to work properly.
Custom Ajax Error Handling
By default, error handling is sent to a standard servlet page for Ajax requests. To handle the error inside the port let, use the following javascript:
Also, add the following to web.xml.

Communication Between Your Portlets
There are roughly 4 different ways to send messages, events, and parameters between port lets which are contained in different ears/wars or contained in the same war. The Portlet Container does not care if you have 2 port lets in the same war or if they are separated, because each port let has a different HttpSession.
Of course, with the Portlet 2.0 spec, the recommended way to share a parameter or event payload between 2 or more port lets are the Section 3.4.2, “Public Render Parameters” and Section 3.4.1, “Sending and Receiving Events” mechanisms. This allows you to decouple your application from surgically managing objects in the PortletSession.APPLICATION_SCOPE.
But, if these do not meet your use case or you have a different strategy, you can use one of the following methods.
Storing Components in PortletSession.APPLICATION_SCOPE
Sometimes, it makes sense to store your Seam components in the port let APPLICATION_SCOPE. By default, these objects are stored in the PORTLET_SCOPE; but with the annotation below, you can fish this class out of the PortletSession and use its values in other port lets across different Seam applications.
Then you would pull the state full object from the session:
Using the PortletSession
If you need to access the PortletSession to simply share a parameter/value across multiple port lets, you can use the following to do so.
Linking to Portlet/JSF Pages Using h:outputink
For linking to any JSF/Facelets page within your port let web application, you may use the following.
Redirecting to an External Page or Resource
To link to a non JSF view (i.e. jboss.org), you can use the following parameter.
Then in your backing bean, you must call a redirect().
Using Provided EL Variables
All EL variables found in the JSR-329 (Portlet 2.0) specification are available in the JBoss Portlet Bridge. For example, you can use the following to edit the port let preferences on the UI.
Then in your backing bean, you must call the PortletPreferences.store() method.
Remote Portlet Navigation Using Portlet Events
When you send events, you can also leverage the EventNavigationResult and return a JSF navigation rule. For example, by returning:
The fromAction can be a wildcard “/*” or a nav rule defined in your faces-config.xml and outcome can be the from-outcome node defined in the faces-config.xml navigation rule.
Conclusion
With all the bitter sweetness that JSF and portal technologies offer, the port let bridge does a good job of keeping everything in check. It also gives you possibilities that may not have been thought of when your JSF app was first created. Some examples are integration of legacy applications to leverage existing investments and the ability to develop newer frameworks and technologies without regression.


 1万+
1万+


 被折叠的 条评论
为什么被折叠?
被折叠的 条评论
为什么被折叠?
 到【灌水乐园】发言


