


转载地址:
http://blog.csdn.net/yanzi1225627/article/details/24882569
前面相继介绍了Android网络编程里的Socket传输图片、HttpURLConnection,今天看HttpClient.
第一部分:JavaEE版的Eclipse配置Tomcat
【备注:开发后台服务器用Eclipse的JavaEE版最好的,但单就Tomcat来说(不写jsp之类的),本文下面的服务器方面操作在普通版的Eclipse也是可以的。我这里为了和ADT-bundle分开,特意重新安个JavaEE版的Eclipse。】
1、下载Eclipse的Tomcat插件:http://www.eclipsetotale.com/tomcatPlugin.html 将其解压得到com.sysdeo.eclipse.tomcat_3.3.0文件夹。将它复制到eclipse的plugins文件夹下。 重启Eclipse会看到上面有三个小猫,哈哈

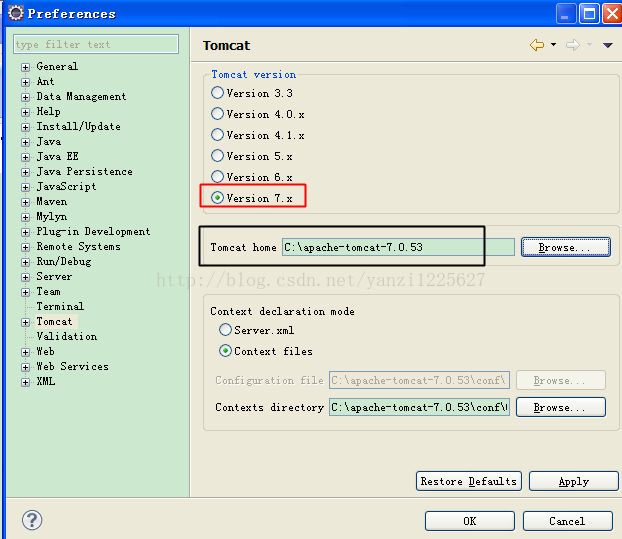
2、下载apache-tomcat-7.0.53-windows-x86 最新到8.0了,但Eclipse支持貌似最高7.0,所以还是用7.0。解压apache-tomcat-7.0.53-windows-x86至C盘根目录,配置环境变量,新增CATALINA_HOME 路径为:C:\apache-tomcat-7.0.53 或者直接将这个变量配置到Path里都ok。 然后双击bin目录下的startup脚本,浏览器输入:http://localhost:8080/ 看到小猫表示windows上的tomcat配好了。
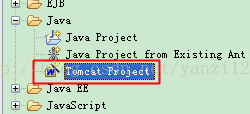
3、新建一个java工程,在里面选择Tomcat Project工程如图所示:
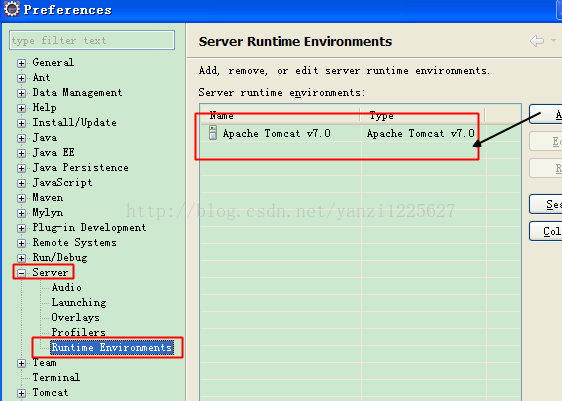
配置Tomcat和Server选项:
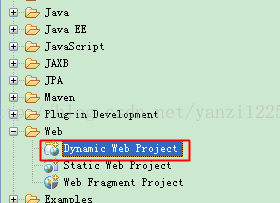
备注:新建工程这块也可以在Web里选择新建Dynamic Web Project,这是标准的使用Servlet、JSP等技术开发动态网站的项目,需要JavaEE版的Eclipse。
第二部分:联通浏览器和Tomcat
即在浏览器输入一个网址,tomcat里返回一句话,浏览器收到并显示。之所以弄这一步一是为了测试,二是后来会发现,Android里的HttpClient就跟这个浏览器一样。
1.在WEB-INF/src文件夹下新建包名org.yanzi.testtomcat,在里面新建一个类TestTomcat继承自HttpServlet.并重写里面的doGet方法。
@Override
protected void doGet(HttpServletRequest req, HttpServletResponse resp)
throws ServletException, IOException {
// TODO Auto-generated method stub
resp.setContentType("text/html;charset=utf-8");
req.setCharacterEncoding("utf-8");
resp.setCharacterEncoding("utf-8");
PrintWriter out = resp.getWriter();
// //用HTML格式给浏览器返回数据
// out.println("<html>");
// out.println("<head>");
// out.println("<title>Hello,Servlet!</title>");
// out.println("</head>");
// out.println("<body>");
// out.println("Hello,First Servlet!");
// out.println("</body>");
// out.println("</html>");
out.println("Hello,第一个Tomcat!!!");
out.close();
}
2.在WEB-INF文件夹下新建文件wem.xml,内容如下:
<?xml version="1.0" encoding="utf-8"?>
<!DOCTYPE web-app PUBLIC "-//Sun Microsystems, Inc.//DTD Web Application 2.3//EN" "http://java.sun.com/dtd/web-app_2_3.dtd">
<web-app >
<servlet>
<servlet-name>test_yan</servlet-name>
<!-- 名字随便 -->
<servlet-class>org.yanzi.testtomcat.TestTomcat</servlet-class>
<!-- servlet类名 -->
</servlet>
<servlet-mapping>
<servlet-name>test_yan</servlet-name>
<url-pattern>/login</url-pattern>
<!-- url访问虚拟路径,最后我们就是通过工程名/login进行访问的,像这样http://127.0.0.1:8000/LoginAction/login -->
</servlet-mapping>
</web-app>
关于上面的配置注意:a. servlet-name是servlet的名字,这个名字可以随便起。只要servlet-name标签里名字一样就可以了。b. servlet-class里写包名+类名。c. url-pattern这里也是随便写的,是输入浏览器里的地址。本博文中浏览器的地址是:
http://localhost:8080/TestTomcat/login 这里的8080是端口,是在tomcat安装文件里的conf里的server.xml配置好的,用默认的就ok。除非此端口已被其他占用。 TestTomcat这里指的是工程的名字,而非类的名字。最后的“/login”跟web.xml里对应,注意后面不要再多加一个斜杠成这样"/login/", 这是解析不了的。
3. 修改conf文件夹下的tomcat-users.xml文件,在里面添加一个用户:
<role rolename="manager"/>
<user username="admin" password="admin" roles="manager"/>
默认的都是全被注释掉的。
然后就可以点击eclipse上的小猫头像,开启这个servlet服务了。浏览器输入http://localhost:8080/TestTomcat/login 可以看到:

在doGet()函数里用html格式输出,即:
@Override
protected void doGet(HttpServletRequest req, HttpServletResponse resp)
throws ServletException, IOException {
// TODO Auto-generated method stub
resp.setContentType("text/html;charset=utf-8");
req.setCharacterEncoding("utf-8");
resp.setCharacterEncoding("utf-8");
PrintWriter out = resp.getWriter();
//用HTML格式给浏览器返回数据
out.println("<html>");
out.println("<head>");
out.println("<title>Tomcat Servlet测试</title>");
out.println("</head>");
out.println("<body>");
out.println("Hello,First Servlet!");
out.println("</body>");
out.println("</html>");
out.println("Hello,第一个Tomcat!!!");
out.close();
}
看到效果:
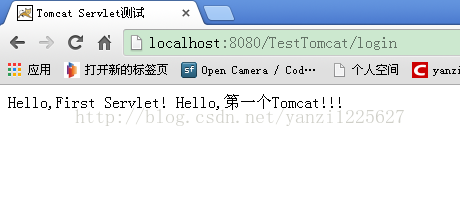
这是因为用html格式给它设置了标题名字,并打印了一句话。这里真想吐槽一下,最初我用百度浏览器倒置了两个小时都没有出来,后来在google浏览器里一输入就ok了。真心坑爹啊。另外,如果浏览器在看视频,貌似也是出不来的。大爷的,此点么深究!!
第三部分:重写TestTomcat里的doPost()和doGet()方法。
因为我准备再手机上用doPost跟Tomcat通信,传递一个用户名和密码。Tomcat判断后再返回结果。改好后的TestTomcat.java的完整文件如下:
- package org.yanzi.testtomcat;
- import java.io.IOException;
- import java.io.PrintWriter;
- import javax.servlet.ServletException;
- import javax.servlet.http.HttpServlet;
- import javax.servlet.http.HttpServletRequest;
- import javax.servlet.http.HttpServletResponse;
- public class TestTomcat extends HttpServlet {
- private static final long serialVersionUID = 1L;
- private static final int NAME_CODE_RIGHT = 0; //
- private static final int CODE_WRONG = 1; //
- private static final int NAME_WRONG = 2; //
- public TestTomcat(){
- }
- @Override
- protected void doGet(HttpServletRequest req, HttpServletResponse resp)
- throws ServletException, IOException {
- // TODO Auto-generated method stub
- if(req == null){
- return;
- }
- resp.setContentType("text/html;charset=utf-8");
- req.setCharacterEncoding("utf-8");
- resp.setCharacterEncoding("utf-8");
- PrintWriter out = resp.getWriter();
- String name = req.getParameter("NAME");
- String code = req.getParameter("CODE");
- /* //浏览器访问,没传递任何参数。用HTML格式给浏览器返回数据
- out.println("<html>");
- out.println("<head>");
- out.println("<title>Tomcat Servlet测试</title>");
- out.println("</head>");
- out.println("<body>");
- out.println("Hello,哥知道你是浏览器访问的.");
- out.println("</body>");
- out.println("</html>");
- out.println("Hello,第一个Tomcat!!!");
- out.close();*/
- //手机客户端访问
- int ret = checkSubmit(name, code);
- out.print(ret);
- out.flush();
- out.close();
- }
- @Override
- protected void doPost(HttpServletRequest req, HttpServletResponse resp)
- throws ServletException, IOException {
- // TODO Auto-generated method stub
- if(req == null){
- return;
- }
- resp.setContentType("text/html;charset=utf-8");
- req.setCharacterEncoding("utf-8");
- resp.setCharacterEncoding("utf-8");
- PrintWriter out = resp.getWriter();
- String name = req.getParameter("NAME");
- String code = req.getParameter("CODE");
- int ret = checkSubmit(name, code);
- out.print(ret);
- out.flush();
- out.close();
- }
- /**
- * 判断登录名和密码
- * @param name
- * @param code
- * @return
- */
- private int checkSubmit(String name, String code){
- int ret = -2;
- if(name.equals("admin")){
- if(code.equals("123")){
- ret = NAME_CODE_RIGHT;
- }else{
- ret = CODE_WRONG;
- }
- }else{
- ret = NAME_WRONG;
- }
- return ret;
- }
- }
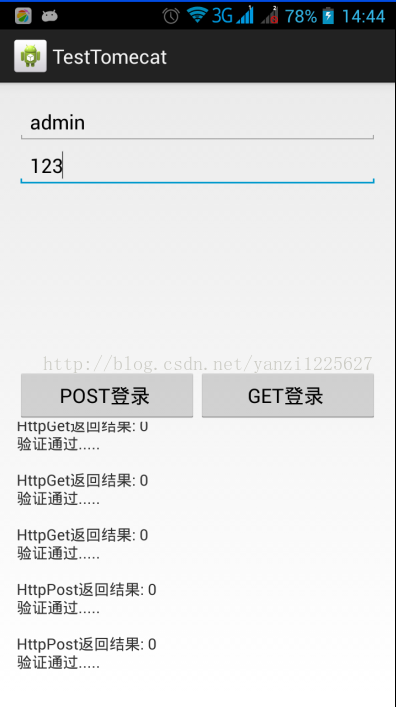
第四步: Android客户端的开发,这里我弄两个按钮分别对应HttpPost和HttpGet两种方式跟服务器通讯。下面是个ScrollView显示服务器回传结果.效果如下所示:
AndroidManifest.xml里加权限: <uses-permission android:name="android.permission.INTERNET"/>
activity_main.xml的内容:
- <RelativeLayout xmlns:android="http://schemas.android.com/apk/res/android"
- xmlns:tools="http://schemas.android.com/tools"
- android:layout_width="match_parent"
- android:layout_height="match_parent"
- android:paddingBottom="@dimen/activity_vertical_margin"
- android:paddingLeft="@dimen/activity_horizontal_margin"
- android:paddingRight="@dimen/activity_horizontal_margin"
- android:paddingTop="@dimen/activity_vertical_margin"
- tools:context=".MainActivity" >
- <EditText
- android:id="@+id/edit_name"
- android:layout_width="match_parent"
- android:layout_height="wrap_content"
- android:hint="输入用户名" />
- <EditText
- android:id="@+id/edit_code"
- android:layout_width="match_parent"
- android:layout_height="wrap_content"
- android:layout_below="@id/edit_name"
- android:hint="输入密码" />
- <LinearLayout
- android:id="@+id/layout_btn"
- android:layout_width="match_parent"
- android:layout_height="wrap_content"
- android:layout_centerInParent="true"
- android:orientation="horizontal" >
- <Button
- android:id="@+id/btn_submit_post"
- android:layout_width="0dip"
- android:layout_height="wrap_content"
- android:layout_weight="1"
- android:gravity="center"
- android:text="POST登录 " />
- <Button
- android:id="@+id/btn_submit_get"
- android:layout_width="0dip"
- android:layout_height="wrap_content"
- android:layout_weight="1"
- android:gravity="center"
- android:text="GET登录 " />
- </LinearLayout>
- <ScrollView
- android:id="@+id/info_scroll_view"
- android:layout_width="match_parent"
- android:layout_height="wrap_content"
- android:layout_below="@id/layout_btn" >
- <TextView
- android:id="@+id/tv_info"
- android:layout_width="wrap_content"
- android:layout_height="wrap_content"
- android:text="结果显示........." />
- </ScrollView>
- </RelativeLayout>
MainActivity.java里的内容:
- package org.yanzi.testtomecat;
- import java.io.IOException;
- import java.io.UnsupportedEncodingException;
- import java.util.ArrayList;
- import java.util.List;
- import org.apache.http.HttpResponse;
- import org.apache.http.HttpStatus;
- import org.apache.http.client.ClientProtocolException;
- import org.apache.http.client.HttpClient;
- import org.apache.http.client.entity.UrlEncodedFormEntity;
- import org.apache.http.client.methods.HttpGet;
- import org.apache.http.client.methods.HttpPost;
- import org.apache.http.conn.params.ConnManagerParams;
- import org.apache.http.impl.client.DefaultHttpClient;
- import org.apache.http.impl.conn.DefaultClientConnection;
- import org.apache.http.message.BasicNameValuePair;
- import org.apache.http.params.BasicHttpParams;
- import org.apache.http.params.HttpConnectionParams;
- import org.apache.http.params.HttpParams;
- import org.apache.http.protocol.HTTP;
- import org.apache.http.util.EntityUtils;
- import android.app.Activity;
- import android.os.AsyncTask;
- import android.os.Bundle;
- import android.view.Menu;
- import android.view.View;
- import android.view.View.OnClickListener;
- import android.widget.Button;
- import android.widget.EditText;
- import android.widget.ScrollView;
- import android.widget.TextView;
- public class MainActivity extends Activity {
- public static final String URL = "http://192.168.16.8:8080/TestTomcat/login";
- Button submitBtnPost = null;
- Button submitBtnGet = null;
- TextView infoTextView = null;
- EditText nameEdit = null;
- EditText codeEdit = null;
- ScrollView scrollView = null;
- boolean isPost = true; //默认采取post登录方式
- @Override
- protected void onCreate(Bundle savedInstanceState) {
- super.onCreate(savedInstanceState);
- setContentView(R.layout.activity_main);
- scrollView = (ScrollView)findViewById(R.id.info_scroll_view);
- submitBtnPost = (Button)findViewById(R.id.btn_submit_post);
- submitBtnGet = (Button)findViewById(R.id.btn_submit_get);
- infoTextView = (TextView)findViewById(R.id.tv_info);
- nameEdit = (EditText)findViewById(R.id.edit_name);
- codeEdit = (EditText)findViewById(R.id.edit_code);
- submitBtnPost.setOnClickListener(new View.OnClickListener() {
- @Override
- public void onClick(View v) {
- // TODO Auto-generated method stub
- isPost = true;
- new SubmitAsyncTask().execute(URL);
- }
- });
- submitBtnGet.setOnClickListener(new View.OnClickListener() {
- @Override
- public void onClick(View v) {
- // TODO Auto-generated method stub
- isPost = false;
- new SubmitAsyncTask().execute(URL);
- }
- });
- }
- @Override
- public boolean onCreateOptionsMenu(Menu menu) {
- // Inflate the menu; this adds items to the action bar if it is present.
- getMenuInflater().inflate(R.menu.main, menu);
- return true;
- }
- public class SubmitAsyncTask extends AsyncTask<String, Void, String>{
- String info = "";
- @Override
- protected String doInBackground(String... params) {
- // TODO Auto-generated method stub
- String url = params[0];
- String reps = "";
- if(isPost){
- info = "HttpPost返回结果: ";
- reps = doPost(url);
- }else{
- info = "HttpGet返回结果: ";
- reps = doGet(url);
- }
- return reps;
- }
- @Override
- protected void onPostExecute(String result) {
- // TODO Auto-generated method stub
- infoTextView.append("\n" + info + result +"\n");
- String res = result.trim();
- if(res.equals("0")){
- info = "验证通过.....";
- }else if(res.equals("1")){
- info = "密码错误.....";
- }else if(res.equals("2")){
- info = "用户名错误.....";
- }else if(res.equals("-1")){
- info = "返回结果异常!";
- }
- infoTextView.append(info + "\n");
- scrollView.fullScroll(ScrollView.FOCUS_DOWN);
- super.onPostExecute(result);
- }
- }
- private String doGet(String url){
- String responseStr = "";
- try {
- String name = nameEdit.getText().toString().trim();
- String code = codeEdit.getText().toString().trim();
- String getUrl = URL + "?NAME=" + name+"&"+"CODE=" + code;
- HttpGet httpRequest = new HttpGet(getUrl);
- HttpParams params = new BasicHttpParams();
- ConnManagerParams.setTimeout(params, 1000);
- HttpConnectionParams.setConnectionTimeout(params, 3000);
- HttpConnectionParams.setSoTimeout(params, 5000);
- httpRequest.setParams(params);
- HttpResponse httpResponse = new DefaultHttpClient().execute(httpRequest);
- final int ret = httpResponse.getStatusLine().getStatusCode();
- if(ret == HttpStatus.SC_OK){
- responseStr = EntityUtils.toString(httpResponse.getEntity(), HTTP.UTF_8);
- }else{
- responseStr = "-1";
- }
- } catch (ClientProtocolException e) {
- // TODO Auto-generated catch block
- e.printStackTrace();
- } catch (IOException e) {
- // TODO Auto-generated catch block
- e.printStackTrace();
- }
- return responseStr;
- }
- /**
- * 用Post方式跟服务器传递数据
- * @param url
- * @return
- */
- private String doPost(String url){
- String responseStr = "";
- try {
- HttpPost httpRequest = new HttpPost(url);
- HttpParams params = new BasicHttpParams();
- ConnManagerParams.setTimeout(params, 1000); //从连接池中获取连接的超时时间
- HttpConnectionParams.setConnectionTimeout(params, 3000);//通过网络与服务器建立连接的超时时间
- HttpConnectionParams.setSoTimeout(params, 5000);//读响应数据的超时时间
- httpRequest.setParams(params);
- //下面开始跟服务器传递数据,使用BasicNameValuePair
- List<BasicNameValuePair> paramsList = new ArrayList<BasicNameValuePair>();
- String name = nameEdit.getText().toString().trim();
- String code = codeEdit.getText().toString().trim();
- paramsList.add(new BasicNameValuePair("NAME", name));
- paramsList.add(new BasicNameValuePair("CODE", code));
- UrlEncodedFormEntity mUrlEncodeFormEntity = new UrlEncodedFormEntity(paramsList, HTTP.UTF_8);
- httpRequest.setEntity(mUrlEncodeFormEntity);
- HttpClient httpClient = new DefaultHttpClient();
- HttpResponse httpResponse = httpClient.execute(httpRequest);
- final int ret = httpResponse.getStatusLine().getStatusCode();
- if(ret == HttpStatus.SC_OK){
- responseStr = EntityUtils.toString(httpResponse.getEntity(), HTTP.UTF_8);
- }else{
- responseStr = "-1";
- }
- } catch (UnsupportedEncodingException e) {
- // TODO Auto-generated catch block
- e.printStackTrace();
- } catch (ClientProtocolException e) {
- // TODO Auto-generated catch block
- e.printStackTrace();
- } catch (IOException e) {
- // TODO Auto-generated catch block
- e.printStackTrace();
- }
- return responseStr;
- }
- }
要点注释:
1、核心在doGet()和doPost()两个函数里,可以看到用get方式比用post传递参数更方便,可以直接写到url里。使用get方式时传递数据在url里写的:
String name = nameEdit.getText().toString().trim();
String code = codeEdit.getText().toString().trim();
String getUrl = URL + "?NAME=" + name+"&"+"CODE=" + code;
post方式时是用BasicNameValuePair来弄的。其他流程都差不多。首先new一个HttpGet或HttpPost,然后设参数,共设三个,作用注释里有。然后设参数,传数据,通过HttpResponse httpResponse = httpClient.execute(httpRequest);得到返回结果。
2、如果在Tomcat里使用的是out.println(),则再解析数据时需要再得到的String上trim()一下,否则会错。
3、Android客户端URL地址为:
public static final String URL = "http://192.168.16.8:8080/TestTomcat/login";
这里的IP就是电脑的IP加端口号就ok。
当然这仅是个最基本的示例,遗留问题:
1.JSON传递数据
2.每次链接都开一个DefaultHttpClient很不科学。
参考:
http://blog.chinaunix.net/uid-25799257-id-3774015.html
http://blog.chinaunix.net/uid-25799257-id-3774047.html


 3万+
3万+


 被折叠的 条评论
为什么被折叠?
被折叠的 条评论
为什么被折叠?
 到【灌水乐园】发言


