


在基于Binder通信的C/S架构体系中,除了C/S架构所包括的Client端和Server端外,Android还有一个全局的ServiceManager端,它的作用是管理系统中的各种服务。Client、Server、ServiceManager这三者之间的关系如下如所示:
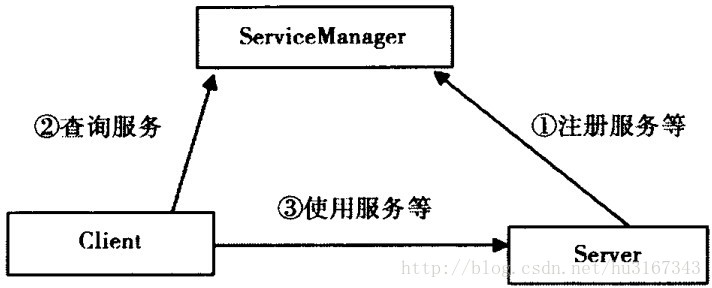
根据上图的显示,我们可以得到如下结论:
1. Server进程要先注册一些Service到ServiceManager中,所以Server是ServiceManager的客户端,而ServiceManager是服务端。
2. 如果某个Client进程要使用某个Service,必须先到ServiceManager中获取该Service的相关信息,所以Client是ServiceManager的客户端。
3. Client根据得到的Service信息与Service所在的Server进程建立通信链路,然后就可以直接和Service交互了,所以Client也是Server的客户端。
4. 三者之间的交互都是基于Binder通信的。
前面的文章我们已经分析了下ServiceManager的实现,那么我们今天主要借助MediaServer来分析下Server是怎么向ServiceManager注册服务并实现两者之间的通信的。
MediaServer的启动
和ServiceManager一样,MediaServer也是由init进程在初始化时根据init.rc配置文件来启动的。
service media /system/bin/mediaserver
    class main
    user media
    group audio camera inet net_bt net_bt_admin net_bw_acct drmrpc mediadrm
ioprio rt 4
MediaServer的使命
Mediaserver的代码主要在frameworks\av\media\mediaserver\main_mediaserver.cpp中实现:
int main(int argc, char** argv)
{

    ……
sp<ProcessState> proc(ProcessState::self());
// 获得ServiceManager的实例
    sp<IServiceManager> sm = defaultServiceManager();

// Mediaserver进程承载了好几个服务
AudioFlinger::instantiate();
    MediaPlayerService::instantiate();
    CameraService::instantiate();
    AudioPolicyService::instantiate();
registerExtensions();

// 开始循环接收消息
    ProcessState::self()->startThreadPool();
    IPCThreadState::self()->joinThreadPool();}
上面的代码看似还挺简单的,但是其中蕴含了很多的知识点,我们一个个来逐一击破。
独一无二的ProcessState
单例ProcessState
首先我们来看下sp<ProcessState> proc(ProcessState::self());这行代码。
sp<ProcessState> ProcessState::self()
{
    Mutex::Autolock _l(gProcessMutex);
    if (gProcess != NULL) {
        return gProcess;
    }
    gProcess = new ProcessState;
    return gProcess;
}
如上所示,Self函数采用了单例模式,每个进程只有一个ProcessState对象。
ProcessState的构造
Self函数最后new了一个ProcessState对象出来,那么我们再来看看其构造函数:
ProcessState::ProcessState()
    : mDriverFD(open_driver())	// open_driver打开binder驱动
    , mVMStart(MAP_FAILED)
    , mManagesContexts(false)
    , mBinderContextCheckFunc(NULL)
    , mBinderContextUserData(NULL)
    , mThreadPoolStarted(false)
    , mThreadPoolSeq(1)
{
    if (mDriverFD >= 0) {
        // XXX Ideally, there should be a specific define for whether we
        // have mmap (or whether we could possibly have the kernel module
        // availabla).
#if !defined(HAVE_WIN32_IPC)
        // mmap the binder, providing a chunk of virtual address space to receive transactions.
        mVMStart = mmap(0, BINDER_VM_SIZE, PROT_READ, MAP_PRIVATE | MAP_NORESERVE, mDriverFD, 0);
        if (mVMStart == MAP_FAILED) {
            // *sigh*
            ALOGE("Using /dev/binder failed: unable to mmap transaction memory.\n");
            close(mDriverFD);
            mDriverFD = -1;
        }
#else
        mDriverFD = -1;
#endif
    }

    LOG_ALWAYS_FATAL_IF(mDriverFD < 0, "Binder driver could not be opened.  Terminating.");
}
ProcessState的构造函数其实很简单,主要是调用open_driver函数来打开binder驱动,并调用mmap来映射一块内存出来接收数据。
open_driver打开binder驱动
static int open_driver()
{
	// 打开/dev/binder设备
    int fd = open("/dev/binder", O_RDWR);
    if (fd >= 0) {
        fcntl(fd, F_SETFD, FD_CLOEXEC);
        int vers;
		// 获取binder驱动的版本
        status_t result = ioctl(fd, BINDER_VERSION, &vers);
        if (result == -1) {
            ALOGE("Binder ioctl to obtain version failed: %s", strerror(errno));
            close(fd);
            fd = -1;
        }

		// #define BINDER_CURRENT_PROTOCOL_VERSION 7
		// 如果binder驱动版本不等于7,那么就返回失败
        if (result != 0 || vers != BINDER_CURRENT_PROTOCOL_VERSION) {
            ALOGE("Binder driver protocol does not match user space protocol!");
            close(fd);
            fd = -1;
        }

		// 设置binder的最大支持线程数为15
        size_t maxThreads = 15;
        result = ioctl(fd, BINDER_SET_MAX_THREADS, &maxThreads);
        if (result == -1) {
            ALOGE("Binder ioctl to set max threads failed: %s", strerror(errno));
        }
    } else {
        ALOGW("Opening '/dev/binder' failed: %s\n", strerror(errno));
    }
    return fd;
}
ProcessState::self总结
至此,ProcessState::self()函数分析完了,它主要干的事情如下:
1. 打开/dev/binder设备,这就相当于与内核的binder驱动建立了交互的通道。
2. 对于返回的fd使用mmap,这样binder驱动就会分配一块内存用来传递数据。
3. 由于ProcessState具有唯一性,因此一个进程只能打开设备一次。
与ServiceManager建立连接
defaultServiceManager函数返回一个IserviceManager的对象。通过这个对象,我们就能和远程的ServiceManager进程建立交互连接了。
sp<IServiceManager> defaultServiceManager()
{
    if (gDefaultServiceManager != NULL) return gDefaultServiceManager;

    {
        AutoMutex _l(gDefaultServiceManagerLock);
        while (gDefaultServiceManager == NULL) {
            gDefaultServiceManager = interface_cast<IServiceManager>(
                ProcessState::self()->getContextObject(NULL));
            if (gDefaultServiceManager == NULL)
                sleep(1);
        }
    }

    return gDefaultServiceManager;
}
感情这个对象也是个单例啊。首先来看看ProcessState::self()->getContextObject的实现:
sp<IBinder> ProcessState::getContextObject(const sp<IBinder>& caller)
{
	// 这个调用返回的是Ibinder对象,注意此处参数为0
    return getStrongProxyForHandle(0);
}
sp<IBinder> ProcessState::getStrongProxyForHandle(int32_t handle)
{
    sp<IBinder> result;

    AutoMutex _l(mLock);

	/*
		ProcessState类内部维护了一个vector,名为mHandleToObject,
		主要用来记录该进程中的proxy服务。
		lookupHandleLocked就是根据handle索引值来找到这个proxy服务。
		如果没有该服务,那么就新插入一个。
		注意,此处handle值为0,还记得ServiceManager有一个magic object的
		值也为0,其实此处是和ServiceManager对应的。
	*/
    handle_entry* e = lookupHandleLocked(handle);

    if (e != NULL) {
        // 第一次进来,刚插入的项e->binder为NULL
        IBinder* b = e->binder;
        if (b == NULL || !e->refs->attemptIncWeak(this)) {
            if (handle == 0) {
				/*
					像MediaPlayerService这样的服务,本身会有ServiceManager
					来管理其死活。
					但是如果handle为0,即要和ServiceManager建立连接,那么
					我们只能先ping一下ServiceManager,看看sm是否有回应。
				*/
                Parcel data;
                status_t status = IPCThreadState::self()->transact(
                        0, IBinder::PING_TRANSACTION, data, NULL, 0);
                if (status == DEAD_OBJECT)
                   return NULL;
            }

// new了一个BpBinder
            b = new BpBinder(handle);
            e->binder = b;
            if (b) e->refs = b->getWeakRefs();
            result = b;
        } else {
            result.force_set(b);
            e->refs->decWeak(this);
        }
    }

    return result;
}
BpBinder的构造
在上述代码中,我们看到new了一个BpBinder对象,那么它到底是干什么的呢?在介绍BpBinder之前,我们有必要先来介绍它的孪生兄弟BBinder。
BpBinder和BBinder都是Android中和Binder通信相关的代表,他们都是从IBinder类中派生而来,如下图所示:
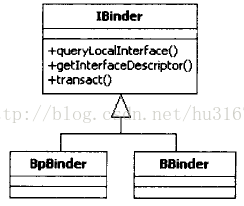
由上图可知:
1. BpBinder是客户端用来与Server交互的代理类,p即proxy的意思。
2. BBinder则是与proxy相对的一端,它是proxy交互的目的端。如果说proxy代表客户端,那么BBinder则代表服务端。这里的BpBinder和BBinder是一一对应的关系。
再来看看BpBinder的构造函数:
BpBinder::BpBinder(int32_t handle)
    : mHandle(handle)
    , mAlive(1)
    , mObitsSent(0)
    , mObituaries(NULL)
{
    extendObjectLifetime(OBJECT_LIFETIME_WEAK);
    IPCThreadState::self()->incWeakHandle(handle);
}
从上面的代码中可以看到BpBinder的构造很简单,既然BpBinder和BBinder是binder通信中的重要组件,这里却没有看到操作ProcessState打开的那个/dev/binder设备,换言之,这两个Binder类并没有和binder设备直接交互。
我们再来回顾下前面的调用:
gDefaultServiceManager = interface_cast<IServiceManager>(ProcessState::self()->getContextObject(NULL));现在这个调用可以被简化成如下语句:
gDefaultServiceManager = interface_cast<IServiceManager>(new BpBinder(0));注意:我们给BpBinder构造函数传的参数handle的值为0。这个0在整个Binder系统中有重要含义,因为0代表的就是ServiceManager所对应的BBinder。
interface_cast的实现
那么又是如何将BpBinder*类型强制转化成IServiceManager*类型的呢?答案就在interface_cast的实现中。
template<typename INTERFACE>
inline sp<INTERFACE> interface_cast(const sp<IBinder>& obj)
{
    return INTERFACE::asInterface(obj);
}
看来这个interface_cast仅仅是个模板函数,所以interface_cast<IServiceManager>等价于:
inline sp< IServiceManager > interface_cast(const sp<IBinder>& obj)
{
    return IServiceManager::asInterface(obj);
}
IServiceManager的构造
前面我们说到,BpBinder和BBinder是与通信业务相关的,但是又没看到BpBinder与底层设备直接的通信。秘密都在IServiceManager中,让我们来看看IServiceManager的定义。
class IServiceManager : public IInterface
{
public:
    DECLARE_META_INTERFACE(ServiceManager);

    /**
     * Retrieve an existing service, blocking for a few seconds
     * if it doesn't yet exist.
     */
    virtual sp<IBinder>         getService( const String16& name) const = 0;

    /**
     * Retrieve an existing service, non-blocking.
     */
    virtual sp<IBinder>         checkService( const String16& name) const = 0;

    /**
     * Register a service.
     */
    virtual status_t            addService( const String16& name,
                                            const sp<IBinder>& service,
                                            bool allowIsolated = false) = 0;

    /**
     * Return list of all existing services.
     */
    virtual Vector<String16>    listServices() = 0;

    enum {
        GET_SERVICE_TRANSACTION = IBinder::FIRST_CALL_TRANSACTION,
        CHECK_SERVICE_TRANSACTION,
        ADD_SERVICE_TRANSACTION,
        LIST_SERVICES_TRANSACTION,
    };
};
如上所述,IServiceManager类定义了ServiceManager所提供的服务。例如,获取服务、添加服务等等。
继续来看DECLARE_META_INTERFACE宏的实现
#define DECLARE_META_INTERFACE(INTERFACE)                               \
    static const android::String16 descriptor;                          \
    static android::sp<I##INTERFACE> asInterface(                       \
            const android::sp<android::IBinder>& obj);                  \
    virtual const android::String16& getInterfaceDescriptor() const;    \
    I##INTERFACE();                                                     \
virtual ~I##INTERFACE();                                            \
DECLARE_META_INTERFACE(ServiceManager);展开之后如下:
// 定义了descriptor字符串
static const android::String16 descriptor;

// 定义函数asInterface
static android::sp<IServiceManager > asInterface(const android::sp<android::IBinder>& obj);

//定义getInterfaceDescriptor函数,应该是返回上述descriptor字符串
virtual const android::String16& getInterfaceDescriptor() const;

// 定义构造函数和析构函数
IServiceManager ();
virtual ~IServiceManager ();
由上可知,DECLARE宏主要用来定义类的一些函数,变量等。那么与其对应的IMPLEMENT宏主要用来实现上述的定义。
IServiceManager中,IMPLEMENT宏的使用如下:
IMPLEMENT_META_INTERFACE(ServiceManager, "android.os.IServiceManager");再来看看IMPLEMENT_META_INTERFACE宏的实现:
#define IMPLEMENT_META_INTERFACE(INTERFACE, NAME)                       \
    const android::String16 I##INTERFACE::descriptor(NAME);             \
    const android::String16&                                            \
            I##INTERFACE::getInterfaceDescriptor() const {              \
        return I##INTERFACE::descriptor;                                \
    }                                                                   \
    android::sp<I##INTERFACE> I##INTERFACE::asInterface(                \
            const android::sp<android::IBinder>& obj)                   \
    {                                                                   \
        android::sp<I##INTERFACE> intr;                                 \
        if (obj != NULL) {                                              \
            intr = static_cast<I##INTERFACE*>(                          \
                obj->queryLocalInterface(                               \
                        I##INTERFACE::descriptor).get());               \
            if (intr == NULL) {                                         \
                intr = new Bp##INTERFACE(obj);                          \
            }                                                           \
        }                                                               \
        return intr;                                                    \
    }                                                                   \
    I##INTERFACE::I##INTERFACE() { }                                    \
I##INTERFACE::~I##INTERFACE() { }                                   \
展开如下:
// 赋值字符串descriptor为android.os.IServiceManager
const android::String16 IServiceManager::descriptor(“android.os.IServiceManager”);

// getInterfaceDescriptor的实现
const android::String16&
            IServiceManager::getInterfaceDescriptor() const {
        return IServiceManager::descriptor;
}

// asInterface函数的实现
android::sp< IServiceManager> IServiceManager::asInterface(
            const android::sp<android::IBinder>& obj)
    {
        android::sp< IServiceManager > intr;
        if (obj != NULL) {
            intr = static_cast< IServiceManager *>(
                obj->queryLocalInterface(
                        IServiceManager::descriptor).get());
            if (intr == NULL) {
                intr = new BpServiceManager (obj);
            }
        }
        return intr;
    }

// 构造和析构函数的实现
IServiceManager:: IServiceManager () { }
IServiceManager::~ IServiceManager(){ }
分析到这里,我们明白了interface_cast是如何把一个BpBinder对象转换成一个IServiceManager指针的。主要实现在asInterface函数中,关键代码为如下一句:
intr = new BpServiceManager (obj);
在这里,利用BpBinder对象作为参数又新建了一个BpServiceManager对象。
来看看IServiceManager类的家族图谱:
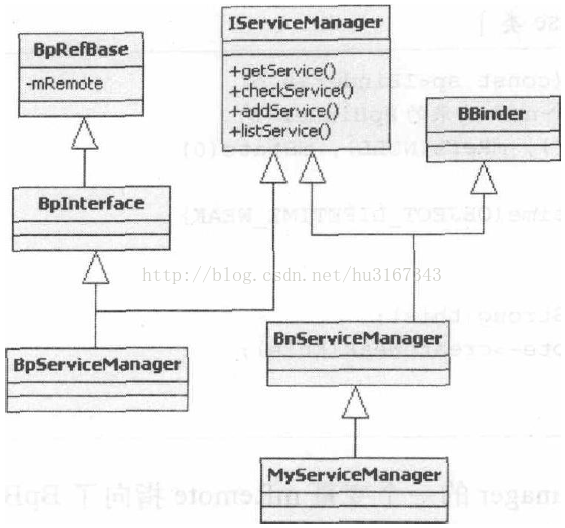
由上图可知:
1. IServiceManager、BpServiceManager、BnServiceManager都与业务逻辑相关。
2. BnServiceManager同时从IServiceManager和BBinder派生,表明它可以直接参与Binder通信。
3. BpServiceManager虽然从BpInterface类中派生,但是这条分支似乎与BpBinder没有关系。
4. BnServiceManager是一个虚类,它的业务函数最终需要子类来实现,例如图中的MyServiceManager。
BpServiceManager派生自BpInterface和IServiceManager,并没有像它兄弟BnServiceManager一样直接派生自Binder相关的类。那么它是怎么与BpBinder联系的呢?
BpServiceManager(const sp<IBinder>& impl)
        : BpInterface<IServiceManager>(impl)
    {
}
template<typename INTERFACE>
inline BpInterface<INTERFACE>::BpInterface(const sp<IBinder>& remote)
    : BpRefBase(remote)
{
}
BpRefBase::BpRefBase(const sp<IBinder>& o)
    : mRemote(o.get()), mRefs(NULL), mState(0)
{
    extendObjectLifetime(OBJECT_LIFETIME_WEAK);

    if (mRemote) {
        mRemote->incStrong(this);           // Removed on first IncStrong().
        mRefs = mRemote->createWeak(this);  // Held for our entire lifetime.
    }
}
原来是BpServiceManager类中有一个名为mRemote的变量,它指向BpBinder对象。
至此,前面的defaultServiceManager函数执行后,我们得到如下两个关键对象:
1. 有一个BpBinder对象,它的handle值为0。
2. 有一个BpServiceManager对象,它的mRemote值为上述BpBinder对象。
BpServiceManager对象继承自IServiceManager,因此它有IServiceManager的所有业务函数。现在又有BpBinder作为通讯的代表,那么接下来的工作就简单了。我们继续分析MediaPlayerService的工作原理。


 1万+
1万+


 被折叠的 条评论
为什么被折叠?
被折叠的 条评论
为什么被折叠?
 到【灌水乐园】发言


