转载请标明出处:http://blog.csdn.net/hzwailll/article/details/51336871
最近项目需要,需要实现一个特殊的瀑布流形式,普通的瀑布流我们完全可以用RecyclerView轻松实现。先看最终实现效果吧
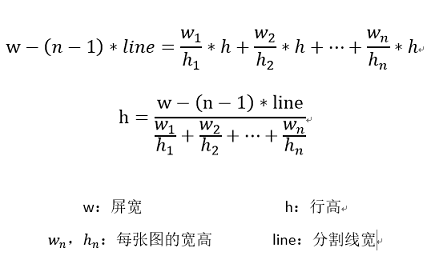
实现原理肯定是自定义ViewGroup,但是这个不是难点,难点是这个效果的算法实现,实现方式想到了两种,下图是其中一种的算法的计算公式
简单说说这个公式:h为我们假设每行的高度,那么每张图在屏幕中占的实际宽我们可以通过每张图的宽高比和这个高度计算得出,当然,在具体每行的图片数量是根据每张图的宽相加之和超过屏宽的计算的。还有另外一种算法实现原理和这个差不多,只不过是计算每张图宽高比之和然后与屏宽与行高比计算的,这种实现方式更好。ps:上面那个计算公式是我在word中敲出来的,累死我了。
好。知道了公式然后就可以愉快的实现了,just do it!
这里只贴一个onLayou方法,文章后面有源码链接可以下载(源码里我注释写的很详细,一方面是为了清晰我的思路,一方面是为了以后看,更重要的是我是个处女座程序员!)
    @Override
    protected void onLayout(boolean changed, int l, int t, int r, int b) {
        //设置子view的位置,这里通过View的margin属性设置View在屏幕上的位置
        int height = parentHeight - updateHeight == 0 ? 0 : //上几行的总高度
                (int) (parentHeight - lineSpaceHeight * (updateTimes - 1) - (updateTimes - 1) *
                        loadMoreHeight - updateHeight) - (updateTimes - 1) * (int) dip2px(2.0f);
        float lineHeight;//每行的实际高度
        int lineWidth = 0;//每行子View的宽度相加的和
        int index = imgWidthList.size() - (isLoadMoreEnable ? updateSize : updateSize - 1);//上一行结束时的view

        //遍历每个子 View 确定 View 的位置
        for (int i = index; i < imgWidthList.size(); i++) {
            //最后一行时,无论怎样都让它的值超出屏宽
            lineWidth = i >= (isLoadMoreEnable ? imgWidthList.size() - 2
                    : imgWidthList.size() - 1) ? getScreenWidth() : lineWidth;
            //还是计算每行的实际高度
            if (lineWidth + imgWidthList.get(i) - lineSpaceWidth >= getScreenWidth()) {
                //每行子View的宽度相加的和大于屏宽时
                float childWH = 0;//初始化宽高比之和
                for (int j = index; j <= i; j++) {//计算该行每张图的宽高比之和
                    childWH += imgWidthList.get(j) / (float) imgHeightList.get(j);
                }
                //计算每行的实际高度
                lineHeight = (getScreenWidth() - (i - index) * lineSpaceWidth) / childWH;
                //获取了每行的高度后设置childView的实际宽高
                for (int j = index; j <= i; j++) {
                    if (getChildAt(j).getVisibility() != GONE) {
                        int childWidth = (int) (imgWidthList.get(j) * lineHeight / imgHeightList.get(j));
                        //设置每个子View的位置
                        if (j > index) {
                            lineWidth += getChildAt(j - 1).getWidth() + lineSpaceWidth;
                        } else {
                            lineWidth = 0;
                        }
                        int left = lineWidth;
                        int top = height;
                        int right = j == i ? getScreenWidth() : left + childWidth;
                        int bottom = height + (int) lineHeight;
                        getChildAt(j).layout(left, top, right, bottom);
                    }
                    if (j == imgWidthList.size() - 1) {
                        break;
                    }
                    final int finalJ = j;
                    getChildAt(j).setOnClickListener(new OnClickListener() {
                        @Override
                        public void onClick(View v) {
                            if (mListener != null && !isFastClick()) {
                                int[] location = new int[2];
                                v.getLocationOnScreen(location);
                                mListener.click(location[0], location[1],
                                        v.getWidth(), v.getHeight(), finalJ);
                            }
                        }
                    });
                }
                //父View的高等于每一行的高度和两行间的分割线高度相加
                height += lineHeight + lineSpaceHeight;
                lineWidth = 0;//重置lineWidth(每行子View的宽度相加的和)
                index = i + 1;//记录上一行结束时的`
            } else {
                lineWidth += imgWidthList.get(i) + lineSpaceWidth;
            }
        }
    }
public class TransBigImageView extends ImageView {
    ......

    public void init(int x, int y, float width, float height) {
        FrameLayout.MarginLayoutParams margin = new FrameLayout.MarginLayoutParams(getLayoutParams());
        margin.width = (int) width;
        margin.height = (int) height;
        margin.setMargins(x, y, x + (int) width, y + (int) height);
        FrameLayout.LayoutParams layoutParams = new FrameLayout.LayoutParams(margin);
        setLayoutParams(layoutParams);

        float imgHeight = getScreenWidth() * height / width;
        tX = (getScreenWidth() - width) / 2.0f - x;
        tY = (getScreenHeight() - height) / 2.0f - getStatusBarHeight() / 2.0f - y;
        sX = getScreenWidth() / width;
        sY = imgHeight / height;
    }


    public void startTrans() {
        if (isFastClick()) {
            return;
        }
        setVisibility(VISIBLE);
        AnimatorSet set = new AnimatorSet();
        ObjectAnimator animator = ObjectAnimator.ofInt(getParent(), "backgroundColor",
                Color.TRANSPARENT, Color.parseColor("#000000"));
        animator.setEvaluator(new ArgbEvaluator());
        set.playTogether(
                ObjectAnimator.ofFloat(this, "translationX", 0, tX),
                ObjectAnimator.ofFloat(this, "translationY", -getStatusBarHeight(), tY),
                ObjectAnimator.ofFloat(this, "scaleX", 1, sX),
                ObjectAnimator.ofFloat(this, "scaleY", 1, sY), animator
        );
        set.setDuration(400);
        set.start();
        set.addListener(new AnimatorListenerAdapter() {
            @Override
            public void onAnimationEnd(Animator animation) {
                super.onAnimationEnd(animation);
                if (mTransEnd != null) {
                    setVisibility(GONE);
                    mTransEnd.end();

                }
            }
        });
    }
接下来就是那这个特殊瀑布流,放大与缩小的动画组合在一起,这里重写RelativeLayout实现组合,部分源码如下:
public class BigImagePreview extends RelativeLayout {

    ......

    private void findView() {
        //获取布局
        View preview = LayoutInflater.from(mContext).inflate(R.layout.gallery_preview, this);
        galleryView = (GalleryView) preview.findViewById(R.id.gallery);
        pager = (ViewPager) preview.findViewById(R.id.preview_viewPager);
        mTransSmallImageView = (TransSmallImageView) preview.findViewById(R.id.transImage);
        previewParent = (FrameLayout) preview.findViewById(R.id.previewParent);
        galleryScroll = (ScrollView) preview.findViewById(R.id.gallery_scroll);
        transBigImageView = (TransBigImageView) preview.findViewById(R.id.transBigImage);
    }

    public void init(final List<?> list, List<Integer> widthList, List<Integer> heightList,
                     int lineWidth, int lineHeight, int loadMoreHeight) {
        this.lineWidth = lineWidth;
        this.lineHeight = lineHeight;
        this.loadMoreHeight = loadMoreHeight;
        //设置Gallery数据
        setGalleryLoadMoreData(list, widthList, heightList);
        mTransSmallImageView.setExitEnd(new TransSmallImageView.ExitEnd() {
            @Override
            public void end() {
                previewParent.setVisibility(GONE);
            }
        });
        galleryView.setItemClickListener(new GalleryView.ItemClickListener() {
            @Override
            public void click(int x, int y, float width, float height, int position) {
                galleryItemClick(x, y, width, height, position);
            }
        });
        pager.addOnPageChangeListener(new ViewPager.OnPageChangeListener() {
            @Override
            public void onPageScrolled(int position, float positionOffset, int positionOffsetPixels) {
            }

            @Override
            public void onPageSelected(int position) {
                List<Float> info = galleryView.getChildInfo(position);
                int w = (int) (info.get(2) / 1);
                int h = (int) (info.get(3) / 1);
                Glide.with(mContext).load(urlList.get(position))
                        .override(w, h).dontAnimate().into(mTransSmallImageView);
                if (isKeepCenter) {
                    galleryScroll.scrollTo(0,
                            galleryView.getChildAt(position).getTop() - (getScreenHeight() - h) / 2);
                }
            }

            @Override
            public void onPageScrollStateChanged(int state) {
            }
        });
        //Gallery加载更多的回调事件
        galleryView.setLoadMoreClick(new GalleryView.LoadMoreClick() {
            @Override
            public void load() {
                if (mLoadMore != null) {
                    mLoadMore.loadMore();
                }
            }
        });

    }

    public void setGalleryLoadMoreData(final List<?> list, List<Integer> widthList, List<Integer> heightList) {
        if (list.size() == 0) {
            galleryView.setLoadMoreEnable(false);
            return;
        }
        //初始化GalleryView
        for (int i = 0; i < list.size(); i++) {
            ImageView imageView = new ImageView(mContext);
            imageView.setScaleType(ImageView.ScaleType.FIT_XY);
            galleryView.addView(imageView);
        }
        galleryView.init(widthList, heightList, lineWidth, lineHeight, loadMoreHeight);
        //当最后一个子View绘制完成后,加载子View的图片
        galleryView.getChildAt(urlList.size() + list.size() - 1).post(new Runnable() {
            @Override
            public void run() {
                urlList.addAll(list);
                for (int i = urlList.size() - list.size(); i < urlList.size(); i++) {
                    //指定Gallery中的加载的图片大小,防止OOM
                    int w = galleryView.getChildAt(i).getWidth();
                    int h = galleryView.getChildAt(i).getHeight();
                    Glide.with(mContext).load(urlList.get(i)).override(w, h)
                            .into((ImageView) galleryView.getChildAt(i));
                }
                //设置ViewPager的适配器
                if (mAdapter == null) {
                    mAdapter = new ViewPagerAdapter(mContext, urlList);
                    pager.setAdapter(mAdapter);
                } else {
                    mAdapter.notifyDataSetChanged();
                }
            }
        });
    }

    private void galleryItemClick(final int x, final int y, final float width, final float height, final int position) {
        previewParent.setVisibility(VISIBLE);
        Glide.with(mContext).load(urlList.get(position)).asBitmap().dontAnimate().into(transBigImageView);
        transBigImageView.init(x, y, width, height);
        transBigImageView.startTrans();
        transBigImageView.setTransEnd(new TransBigImageView.TransEnd() {
            @Override
            public void end() {
                pager.setCurrentItem(position, false);
                pager.setVisibility(View.VISIBLE);
            }
        });
    }
怎么用呢?
final int[] img = new int[]{R.mipmap.xxx0, R.mipmap.xxx1, R.mipmap.xxx2, R.mipmap.xxx3,
                R.mipmap.xxx4, R.mipmap.xxx5, R.mipmap.xxx6, R.mipmap.xxx7, R.mipmap.xxx8,
                R.mipmap.xxx9, R.mipmap.xxx10, R.mipmap.xxx11, R.mipmap.xxx12, R.mipmap.xxx13,
                R.mipmap.xxx14, R.mipmap.xxx15, R.mipmap.xxx16, R.mipmap.xxx17, R.mipmap.xxx18,
                R.mipmap.xxx19, R.mipmap.xxx20, R.mipmap.xxx21, R.mipmap.xxx22, R.mipmap.xxx23,
                R.mipmap.xxx24, R.mipmap.xxx25};

        BitmapFactory.Options opts = new BitmapFactory.Options();
        opts.inJustDecodeBounds = true;
        opts.inSampleSize = 1;
        opts.inJustDecodeBounds = false;
        mUrlList = new ArrayList<>();
        for (int i = 0; i < img.length; i++) {
            BitmapFactory.decodeResource(getResources(), img[i], opts);
            int width = opts.outWidth;
            int height = opts.outHeight;
            mImgWidthList.add(width / 3);
            mImgHeightList.add(height / 3);
            mUrlList.add(img[i]);
        }
        mPreview.init(mUrlList, mImgWidthList, mImgHeightList,
                (int) dip2px(4), (int) dip2px(4), (int) dip2px(60));
加载图片我用的是Glide,另外由于图片较多,在加载图片时我指定了加载大小,防止OOM,很多地方写的不是很好,还有待优化!
更新:Google也有个这样的库,功能更多更强大,推荐使用这个库:https://github.com/google/flexbox-layout
最后附上源码链接:https://github.com/HzwSunshine/ImageGallery


 262
262

 被折叠的 条评论
为什么被折叠?


