


This series of articles are the study notes of "An Arduino platform and C Programming", by Prof. Harris, Department of Computer Science, University of California, Irvine. This article is the notes of week 1, lessen 2.
2.Lesson 2
2.1 Lecture2-1: ArduinoSchematics.mp4
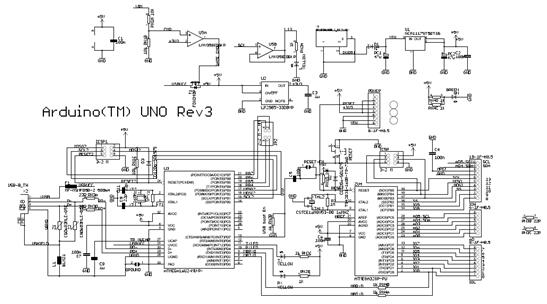
So this lecture will talk about the Arduino schematics. The schematics of the actual Arduino board. This is definitely, somewhat advanced.
2.1.1 Arduino UNO Schematic
Schematic is a diagram of what the components are on the device and how they're wired together. Understanding schematics, being able to read them, is a very useful skill. Whenever I make any new design the first thing I do is look for people who have already made similar designs, right. So I go on the internet and look around, and has anybody ever done anything like this. And you find DIY projects, do it yourself projects that are up there online. And the traditional way to convey a hardware design is to draw you a schematic.
- Arduino designs are open source
- Design is available
- You can build your own
2.1.2 Microcontrollers and I/O
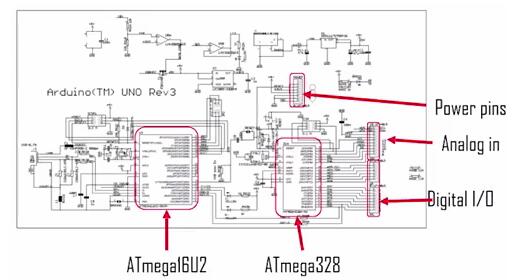
There are two microcontrollers on this device. There's the ATmega328, which is the main one that you're going to be programming. And then there's the ATmega16U2 that deals with the USB connection. So you can see both of those are highlighted in the picture.
2.1.3 USB, Power, ICSP
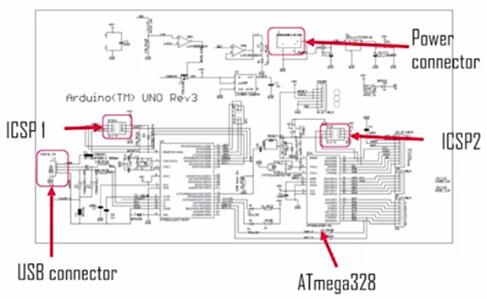
You can see power connector, so remember we saw the power connector on the board, there it is highlighted. The ICSP headers, ICSP1 ICSP2 those two headers that are used for programming the firmware on the two processors, those are highlighted there. The USB connector you can see that.
2.2 Lecture2-2: Arduino IDE
In this lecture, we'll continue a little bit about the board and the microcontroller and its properties. But then we'll start talking about the IDE itself. So that's the software environment that you use to actually do the coding, and compile the code and upload the code.
2.2.1 Atmage328 microcontroller
(1) Operating Voltage: 5V
ATmega328, it's an 8-bit microcontroller, operating voltage is at 5V, so its pins are going from 0 to 5V, the input voltage recommended and the input voltage limits.
(2) Input Voltage: 7-12V
If you're driving it with external power, you want to give it 7 to 12V that is preferred. And what it does is operating voltage at 5 volts it'll step that down, but you want to get it in the range of 7 to 12 V if you're going to do that. Not through the USB but through external input.
(3) Input Voltage (limits): 6-20V
(4) Digital I/O Pins: 14
It got 14 digital I/O pins, numbers zero through 13. Analog input pins, it's got 6 analog input pins at A0 through A5.
(5) Analog I/O Pins: 6
(6) DC Current per I/O pin: 40mA
DC current per pin and DC current on the 3.3V pin. So DC current, why that matters basically what that says is how much current can be supplied out of that pin? So the Arduino can only drive a certain a mountof current out of a pin because it's a small device and only can push a certain amount of current. So say the DC current for an I/O pin is typically 40, the maxis 40mA. That's not a lot. And that's important to know. Because that tell you the limits what you can drive. So, for instance, if you're turning on an LED, 40mA is fine. In fact, you can only push maybe 20mA through an LED before you fry the thing. But if you want to drive a motor or something like that, 40mA is not.
(7) DC Current for 3.3V Pin: 50mA
(8) Flash Memory: 32KB of which 0.5KB used by bootloader
Flash memory is notin volatile memory, and the ATmega328 actually has someflash memory. All processors have some kind of flash memory, and that'swhere you store the programs that you run. Nonvolatile memory means that it stores and holds data,even if it loses power.
So that's what you want for your program, soyour program's going to flash memory, and it's only got 32 KB of flash memory,which is not much at all. But it's enough for what we're doing.
(9) SRAM: 2KB
SRAM is just, that stands for staticread-only memory. SRAM stands for static randomaccess memory. And that is a, it's just regular memory but it's volatile memory. So, what that means is when you turn off the power anything in SRAM disappears.And so, when you power it on, again, you have to reload SRAM. So SRAMis a memory that uses at runtime, and 2KB, whichis not much.
(10) EEPROM: 1KB
EEPROM is like flash but different. It's controllable in individual bytes rather than whole blocks.
(11) Clock Speed: 16MHz
The clock speedis 16 MHz, so it can do, say,roughly 16 million cycles a second, so 16 million operations in a second. And so that's slow compared to a desktop, which might be 3, 4GHz. But, it's plenty fast for the type of things we want to do.
2.2.2 Arduino IDE
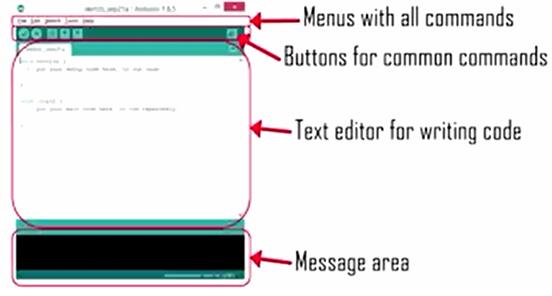
Arduino Integrated Development Environment. So an IDE is a software tool that you use for programming. So the main thing inhere, actually if you look at the IDE, the main window right there is a texteditor for writing code. So you put your code right in that text editor and you can type it in there.
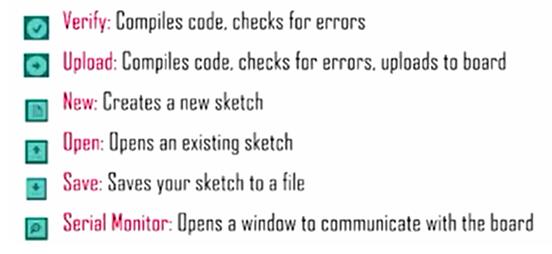
(1) Verify
Compiles code, checks for errors.
(2) Upload
Compiles code, check for errors, upload to board.
(3) New
Creates a new sketch.
(4) Open
Opens an existing sketch
(5) Save
Saves your sketch to a file
(6) Serial Monitor
2.3 Lecture2-3: Compiling Code
IIn this lecture, we'll talk about how you compile and upload using IDE.
2.3.1 Compiling Code
If you want to compile a code,cross-compile technically, you can either verify or upload. So those are both buttons, verify and upload. Also, you can get those from the pull-down menus.So verify and upload both compile the code. Upload additionally copies a code, the executable, final executable to the Arduino.
(1) You can compiling through 2 bottoms
Now, what happens is when you do it, there's a message window at the bottom. And the message window is there to show you the status of the compile. After it's done compiling, it'll either show you some completion message, to say, compile complete, or done uploading if you're uploading, or it'll show you an error, one or more errors. Error messages will show the line numbers, too. It helps you to find the errors.
(2) How to find the Error
And it tells you the line number that it's on. So you can go back to the code and figure out which line number it's on.Also, you can see in the main text editor that it's highlighted pink the line with the error on it, with the first error. So that's also helpful. You can look straight at that line.
And the highlight indicates your first error. So it's helping you to zero-in on where the errors are. And then you examine the line and try to find it.
(3) Sometimes it will give the next line to the error
Just a warning about these errors, you'll notice that it gives you an error on that line. It also gives you an error on the next line. This happens in C a lot. Because with C you get these semicolons at the end of your statements. And what happens is that the compiler thinks, look, anything between two semicolons is one line. So it thinks the XX is actually the beginning of the next line. And that's why it gives us an erroron the next line as well, because an XX shouldn't be at the beginning of the next line. So just be wary of that.
2.3.2 Serial Monitor

- Displayserial data sent from the Arduino
- Allowsserial data to be sent to the Arduino from the keyboard
- Libraryfunction in the serial library
(1) Arduino to Computer
The serial monitor is basically a pop-up window. You pop it up and it looks like this. It's got a main window, and then it's got, up near the top it's got a row where you can type in text. Sothis is an interface to the Arduino. The main window is where messages will pop up. You can write, there are libraryfunctions that allow you to write in your code to print some messages to this serial monitor. So if you have a serial monitor open and you write serial print, serial.print in your code, itwill print text to the serial monitor. So you can see the results of your computation.
(2) Computer to Arduino
Now, also, serial monitor can work in the other direction. So somebody can type into the serial monitor. So if you look at that top row up there on the serial monitor, you can type in there and click that send button. It will send that data to the Arduino, and the Arduino will receive it. And you can write code that does something with that data that interprets it in some way. So the serial monitor is like a, sort of a keyboard and screen interface for the Arduino.


 467
467


 被折叠的 条评论
为什么被折叠?
被折叠的 条评论
为什么被折叠?
 到【灌水乐园】发言


