


AndroidManifest.xml
<!-- 在百度开发者中心查询应用的API Key -->
<meta-data
android:name="api_key"
android:value="6XpC1yqmAphaVRScnwSz7tr6" />
添加权限和声明信息(请勿修改):
<!-- Push service 运行需要的权限 -->
<uses-permission android:name="android.permission.INTERNET" />
<uses-permission android:name="android.permission.READ_PHONE_STATE" />
<uses-permission android:name="android.permission.ACCESS_NETWORK_STATE" />
<uses-permission android:name="android.permission.RECEIVE_BOOT_COMPLETED" />
<uses-permission android:name="android.permission.WRITE_SETTINGS" />
<uses-permission android:name="android.permission.VIBRATE" />
<uses-permission android:name="android.permission.WRITE_EXTERNAL_STORAGE" />
<uses-permission android:name="android.permission.ACCESS_DOWNLOAD_MANAGER"/>
<uses-permission android:name="android.permission.DOWNLOAD_WITHOUT_NOTIFICATION" />
<uses-permission android:name="android.permission.DISABLE_KEYGUARD" />
<uses-permission android:name="android.permission.ACCESS_COARSE_LOCATION" />
<uses-permission android:name="android.permission.ACCESS_WIFI_STATE" />

<!-- push service start -->
<!-- 用于接收系统消息以保证PushService正常运行 -->
<receiver android:name="com.baidu.android.pushservice.PushServiceReceiver"
    android:process=":bdservice_v1" >
    <intent-filter>
        <action android:name="android.intent.action.BOOT_COMPLETED" />
        <action android:name="android.net.conn.CONNECTIVITY_CHANGE" />
        <action android:name="com.baidu.android.pushservice.action.notification.SHOW" />
        <action android:name="com.baidu.android.pushservice.action.media.CLICK" />
        <!-- 以下四项为可选的action声明,可大大提高service存活率和消息到达速度 -->
        <action android:name="android.intent.action.MEDIA_MOUNTED" />
        <action android:name="android.intent.action.USER_PRESENT" />
        <action android:name="android.intent.action.ACTION_POWER_CONNECTED" />
        <action android:name="android.intent.action.ACTION_POWER_DISCONNECTED" />
    </intent-filter>
</receiver>
<!-- Push服务接收客户端发送的各种请求-->
<receiver android:name="com.baidu.android.pushservice.RegistrationReceiver"
    android:process=":bdservice_v1" >
    <intent-filter>
        <action android:name="com.baidu.android.pushservice.action.METHOD" />
        <action android:name="com.baidu.android.pushservice.action.BIND_SYNC" />
    </intent-filter>
    <intent-filter>
        <action android:name="android.intent.action.PACKAGE_REMOVED" />
        <data android:scheme="package" />
    </intent-filter>
</receiver>
<service android:name="com.baidu.android.pushservice.PushService" android:exported="true"
    android:process=":bdservice_v1" >
    <intent-filter >
            <action android:name="com.baidu.android.pushservice.action.PUSH_SERVICE" />
    </intent-filter>
</service>
<!-- 4.4版本新增的CommandService声明,提升小米和魅族手机上的实际推送到达率 -->
<service android:name="com.baidu.android.pushservice.CommandService"
    android:exported="true" />
<!-- push结束 -->
启动云推送
PushManager.startWork(getApplicationContext(),PushConstants.LOGIN_TYPE_API_KEY,"api_key")/**
* Push: 以apikey的方式登录,一般放在主Activity的onCreate中。
* 这里把apikey存放于manifest文件中,只是一种存放方式,
* 您可以用自定义常量等其它方式实现,来替换参数中的Utils.getMetaValue(PushDemoActivity.this,"api_key")
* */
PushManager.startWork(getApplicationContext(),PushConstants.LOGIN_TYPE_API_KEY,
Utils.getMetaValue(PushDemoActivity.this, "api_key"));
自定义回调类
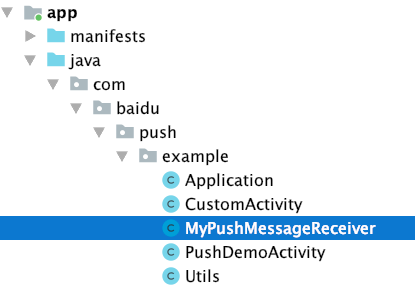
在当前工程中新建一个类,右键点击选择new --> Class,填写接收云推送回调信息和推送到达信息的类的类名,并点击Finish创建该类文件(本例中使用PushTestReceiver)。
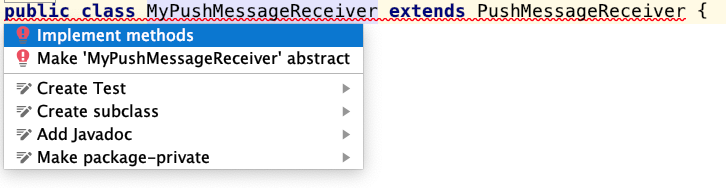
打开新创建的类,继承PushMessageReceiver,此时类名飘红,移动到类名上,点击 Add unimplemented methods,重载所有的回调函数,并打印对应信息,如图所示:
在当前工程的AndroidManifest.xml文件中,添加自定义Receiver信息如下:
<!-- 此处Receiver名字修改为当前包名路径 -->
<receiver android:name="com.*.*.PushTestReceiver">
    <intent-filter>
        <!-- 接收push消息 -->
        <action android:name="com.baidu.android.pushservice.action.MESSAGE" />
        <!-- 接收bind、setTags等method的返回结果-->
        <action android:name="com.baidu.android.pushservice.action.RECEIVE" />
        <!-- 接收通知点击事件,和通知自定义内容 -->
        <action android:name="com.baidu.android.pushservice.action.notification.CLICK" />
    </intent-filter>
</receiver>
运行App
右键点击当前工程,选择Run As --> Android Application,选中已连接的设备或Android虚拟机,运行该程序。如果在logcat中的回调函数中的errorCode为0,说明已经绑定成功,并返回userid和channelid,我们就可以在云控制台推送通知和透传消息到该app了。

处理推送消息
推送
在集成SDK后,可以通过以下两种方式推送消息。
接收通知消息
当设备接收到通知消息后,查看手机的通知栏,可以看到通知栏内的新通知展示。如图:
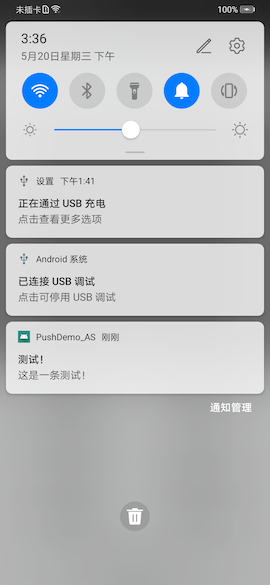
通知到达时,当通知被用户点击时,会回调onNotificationClicked函数。
推送透传消息
当设备接收到透传消息时,消息不会在通知栏展示,只是静默回调开发者自定义Receiver中的onMessage函数。手机收到消息后不会有任何现象,因为透传消息对用户完全透明,用户无法感知,便于开发者在不影响用户的情况下对app进行操作。开发者可以通过log内容和自定义的回调函数onMessage中打印该内容,确认消息到达,并执行开发者指定操作。
混淆说明
如果需要混淆app,请在混淆文件(一般默认为Android工程下proguard-project.txt或者proguard.cfg)中添加以下说明(pushservice-VERSION.jar为集成的jar包名字,VERSION为版本名称),防止SDK内容被二次混淆,无法收到消息。
     -libraryjars libs/pushservice-VERSION.jar
     -dontwarn com.baidu.**
     -keep class com.baidu.**{*; }
API
类
本SDK中有四个重要的开放类,分别为:PushManager、PushSettings、BasicPushNotificationBuilder和CustomPushNotificationBuilder,另外还有常量类PushConstants和回调接收类PushMessageReceiver。| 类 | 描述 |
|---|---|
| PushManager | 提供了所有使用Push服务的静态方法 |
| PushSettings | 提供了端上Push服务的配置静态方法 |
| BasicPushNotificationBuilder | 用于定制 Android Notification 里的基础样式和行为 |
| CustomPushNotificationBuilder | 用于定制 Android Notification 里的 sound / flags / icon,以及通知栏的layout、图标 和状态栏图标 |
| PushConsants | SDK对外的常量定义 |
| PushMessageReceiver | 自定义接收push消息和通知实现的直接父类 |
接口与方法
Push Android SDK目前支持以下接口:
| 分类 | 功能 | API函数原型 |
|---|---|---|
| Push服务接口 | 提供Push服务 | startWork, stopWork, resumeWork |
| Tag管理接口 | Tag的创建与删除 | setTags, delTags, onListTags |
| 通知管理接口 | 自定义通知样式 | CustomPushNotificationBuilder, BasicPushNotificationBuilder, setNotificationFlags, setNotificationDefaults, setStatusbarIcon, setLayoutDrawable, setNotificationSound, setNotificationBuilder |
| 推送效果反馈 | 反馈推送通知的效果 | activityStarted, activityStoped |
| 设置接口 | Push服务设置 | enableDebugMode |
| LBS推送接口 | 打开或关闭精确LBS推送 | enableLbs, disableLbs |
| 异步消息处理接口 | Push消息处理receiver | onBind, onMessage, onNotificationClicked, onNotificationArrived, onSetTags, onDelTags, onListTags, onUnbind |
| 统计渠道号设置 | 在统计中查看渠道分布 | 在AndroidManifest.xml中添加meta:BaiduPush_CHANNEL |
Push服务初始化及绑定-- startWork
函数原型
public static void startWork(Context context, int loginType, String loginValue);功能
PushManager类定义的静态方法,完成Push服务的初始化,并且自动完成bind工作。
参数
- context:当前执行Context
- loginType:绑定认证方式(无账号认证方式用
PushConstants.LOGIN_TYPE_API_KEY,百度Auth2.0认证方式用PushConstants.LOGIN_TYPE_ACCESS_TOKEN) - loginValue:和loginType对应,分别是应用的API Key,或者百度Auth2.0 Access
返回结果
通过com.baidu.android.pushservice.action.RECEIVE Intent发送给客户端receiver,Intent extra PushConstants.EXTRA_CONTENT 包含返回字符串,为json格式,如:
{
    "request_id":12394838223,
    "response_params":
    {
        "appid": "0696110321",
        "user_id":"123456789012345678",
        "channel_id":"4923859573096872165"
    }
}
参数说明
- user_id 系统返回的绑定Baidu Channel的用户标识
- appid 系统返回的应用标识
- channel_id 系统返回的设备连接的通道标识
如果您通过服务端接口(REST或SDK)向百度Push服务推送消息,bind成功后需要channel_id和access token(或者appid + user_id)传给应用的服务器,以便您的服务器向百度Push服务推送消息。如果只使用管理控制台来发送消息,可以不用关心这些返回信息。
注意:不要在Application的onCreate里去做startWork的操作。
停止和恢复Push服务-- stopWork(解绑)、resumeWork
函数原型
public static void stopWork(Context context);功能
PushManager类定义的静态方法,停止本应用Push服务进程,并且完成unbind工作。startWork和resumeWork都会重新开启本应用Push功能。
参数
- context:当前执行Context
返回结果
无
函数原型
public static void resumeWork(Context context);功能
PushManager类定义的静态方法,恢复本应用Push服务,并且再次完成bind工作。
参数
- context:当前执行Context
返回结果
无
查询push是否被停止的接口-- isPushEnabled
函数原型
public static boolean isPushEnabled(Context context);功能
PushManager类定义的静态方法,查询push是否已经被停止。
参数
- context:当前执行Context
返回结果
无
设置Tag-- setTags
函数原型
public static void setTags(Context context, List tags);功能
PushManager类定义的静态方法,用于设置标签;成功设置后,可以从管理控制台或您的服务后台,向指定的设置了该tag的一群用户进行推送。
注意:tag设置的前提是已绑定的端,也就是应用有运行过startWork或bind,且在onBind回调中返回成功。
参数
- tags :包含多个标签字符串的List
返回结果
通过com.baidu.android.pushservice.action.RECEIVE Intent发送给客户端receiver,Intent extra PushConstants.EXTRA_CONTENT 包含返回字符串,json格式:
{
    "request_id":12394838223,
    "response_params":
    {
        success_amount:1,
        details:
        {
            "tag":"abc",
            "result":0  //成功
        }
        {
            "tag":"def",
            "result":1  //失败
        }
    }
}
删除Tag-- delTags
函数原型
public static void delTags(Context context, List tags);功能
PushManager类定义的静态方法,用于删除标签。
参数
- tags :包含多个标签字符串的List
返回结果
通过com.baidu.android.pushservice.action.RECEIVE Intent发送给客户端receiver,Intent extra PushConstants.EXTRA_CONTENT 包含返回字符串,json格式:
{
    "request_id":12394838223,
    "response_params":
    {
        success_amount:1,
        details:
        {
            "tag":"abc",
            "result":0//成功
        }
        {
            "tag":"def",
            "result":1//失败
        }
    }
}
统计activity onStart-- activityStarted
函数原型
public static void activityStarted(Activity activity);功能
PushManager类定义的静态方法,在您的Activity的onStart方法里面加上PushManager.onStart()方法,会统计应用程序的包名、时间戳、用户是直接打开应用还是通过我们推送打开的应用、messageId和Activity的hash code。
统计activity onStop-- activityStoped
函数原型
public static void activityStoped(Activity activity);功能
PushManager类定义的静态方法,在您的Activity的onStop方法里面加上PushManager.onStop()方法,会统计应用程序的包名、时间戳和Activity的hash code。
设置通知的Builder -- setNotificationBuilder
函数原型
public static void setNotificationBuilder(Context context, int id, PushNotificationBuilder notificationBuilder);功能
PushManager类定义的静态方法,设置通知栏样式,并为样式指定编号。在管理控制台或您的服务后台中,您可以指定相应的编号,让客户端显示预先设定好的样式。
参数
- context :android app运行上下文
- id :notificationBuilder编号,开发者自己维护
- notificationBuilder :通知栏构建类
/**
* Push: 如果想基于地理位置推送,可以打开支持地理位置的推送的开关
* PushManager.enableLbs(getApplicationContext());
* Push: 设置自定义的通知样式,具体API介绍见用户手册,如果想使用系统默认的可以不加这段代码
* 请在通知推送界面中,高级设置->通知栏样式->自定义样式,选中并且填写值:1,
* 与下方代码中 PushManager.setNotificationBuilder(this, 1, cBuilder)中的第二个参数对应
* */
// 推送高级设置,通知栏样式设置为下面的ID
PushManager.setNotificationBuilder(this, 1, cBuilder);
设置默认的通知Builder-- setDefaultNotificationBuilder
函数原型
public static void setDefaultNotificationBuilder(Context context, PushNotificationBuilder notificationBuilder);功能
PushManager类定义的静态方法,设置默认的通知栏样式;如果推送通知时不指定id的样式,都将显示该默认样式。
参数
- Context :android app运行上下文
- notificationBuilder :通知栏构建类
设置富媒体通知的Builder-- setMediaNotificationBuilder
函数原型
public static void setMediaNotificationBuilder(Context context, PushNotificationBuilder notificationBuilder);功能
PushManager类定义的静态方法,为富媒体通知设置样式;用法和自定义通知样式相似。
--------------------------------------------------------------------------------------------------------------------------<!-- push富媒体,不使用富媒体推送不需要 -->
<activity
android:name="com.baidu.android.pushservice.richmedia.MediaViewActivity"
android:configChanges="orientation|keyboardHidden"
android:label="MediaViewActivity" >
</activity>
<activity
android:name="com.baidu.android.pushservice.richmedia.MediaListActivity"
android:configChanges="orientation|keyboardHidden"
android:label="MediaListActivity"
android:launchMode="singleTask" >
</activity>
<!-- push富媒体结束 -->
// Push: 打开富媒体消息列表
Intent sendIntent = new Intent();
sendIntent.setClassName(getBaseContext(),"com.baidu.android.pushservice.richmedia.MediaListActivity");
sendIntent.addFlags(Intent.FLAG_ACTIVITY_NEW_TASK);
PushDemoActivity.this.startActivity(sendIntent);
自定义通知Builder-- BasicPushNotificationBuilder
函数原型
BasicPushNotificationBuilder();功能
自定义通知状态栏构建类构造函数(定制通知栏基础样式) 。
自定义通知Builder-- CustomPushNotificationBuilder
函数原型
CustomPushNotificationBuilder(layoutId, layoutIconId, layoutTitleId, layoutTextId);功能
自定义通知状态栏构建类构造函数(定制通知栏基础样式及layout)。
参数
- layoutId :自定义layout资源id
- layoutIconId :自定义layout中显示icon 的id
- layoutTitleId :自定义layout中显示标题的id
- layoutTextId :自定义layout中显示内容的id
/**
* CustomPushNotificationBuilder(layoutId, layoutIconId, layoutTitleId, layoutTextId)
* 自定义通知状态栏构建类构造函数(定制通知栏基础样式及layout)
* layoutId :自定义layout资源id
* layoutIconId :自定义layout中显示icon 的id
* layoutTitleId :自定义layout中显示标题的id
* layoutTextId :自定义layout中显示内容的id
* */
CustomPushNotificationBuilder cBuilder = new CustomPushNotificationBuilder(
resource.getIdentifier("notification_custom_builder", "layout", pkgName),
resource.getIdentifier("notification_icon", "id", pkgName),
resource.getIdentifier("notification_title", "id", pkgName),
resource.getIdentifier("notification_text", "id", pkgName));
设置通知flags-- setNotificationFlags
函数原型
public void setNotificationFlags (int flags);功能
基类PushNotificationBuilder定义的方法,定制 Android Notification 里的flags。
参数
- flags :Android Notification flags
/**
* public void setNotificationFlags (int flags)
* 基类PushNotificationBuilder定义的方法,定制 Android Notification 里的flags
*
* */
cBuilder.setNotificationFlags(Notification.FLAG_AUTO_CANCEL);
设置通知defaults-- setNotificationDefaults
函数原型
public void setNotificationDefaults (int defaults);功能
基类PushNotificationBuilder定义的方法,定制 Android Notification 里的defaults。
参数
- defaults :Android Notification defaults
/** * public void setNotificationDefaults (int defaults)
* 基类PushNotificationBuilder定义的方法,定制 Android Notification 里的defaults
* */
cBuilder.setNotificationDefaults(Notification.DEFAULT_VIBRATE);
设置通知状态栏icon-- setStatusbarIcon
函数原型
public void setStatusbarIcon (int icon);功能
基类PushNotificationBuilder类定义的方法,定制 Android Notification通知状态栏的icon图标。
参数
- icon :图标资源id
/**
* public void setStatusbarIcon (int icon)
* 基类PushNotificationBuilder类定义的方法,定制 Android Notification通知状态栏的icon图标
* icon :图标资源id
* */
cBuilder.setStatusbarIcon(this.getApplicationInfo().icon);
设置通知样式图片-- setLayoutDrawable
函数原型
public void setLayoutDrawable(int drawableId);功能
CustomPushNotificationBuilder类定义的方法,定制自定义layout中显示的图片。
参数
drawableId :图标资源id
/**
* public void setLayoutDrawable(int drawableId)
* CustomPushNotificationBuilder类定义的方法,定制自定义layout中显示的图片
* drawableId :图标资源id
* */
cBuilder.setLayoutDrawable(resource.getIdentifier("simple_notification_icon", "drawable", pkgName));
设置通知样式声音-- setNotificationSound
函数原型
public void setNotificationSound(String soundId);功能
CustomPushNotificationBuilder类定义的方法,自定义推送的声音。
参数
soundId :声音资源路径
/*** public void setNotificationSound(String soundId)
* CustomPushNotificationBuilder类定义的方法,自定义推送的声音
* soundId :声音资源路径
*/
cBuilder.setNotificationSound(Uri.withAppendedPath(Audio.Media.INTERNAL_CONTENT_URI, "6").toString());
开启调试模式-- enableDebugMode
函数原型
public static void enableDebugMode(boolean debugEnabled);功能
PushSettings类定义的方法,开启调试模式,会输出调试Log。
注意:发布应用时,请不要开启调试模式,否则会降低Push性能。
参数
- debugEnabled :true打开调试模式,false关闭调试模式。
开启精确LBS推送模式-- enableLbs
函数原型
public static void enableLbs(Context context);功能
PushManager类定义的方法,开启精确LBS推送模式,覆盖最近半小时内在指定区域出现过的终端。
参数
- Context :android app运行上下文
关闭精确LBS推送模式-- disableLbs
函数原型
public static void disableLbs(Context context);功能
PushManager类定义的方法,关闭精确LBS推送模式,关闭后,服务端将无法有效发送基于地理位置的定向推送。
参数
- Context :android app运行上下文
================================================================================================
/*
* Push消息处理receiver。请编写您需要的回调函数, 一般来说:
*onBind是必须的,用来处理startWork返回值;
*onMessage用来接收透传消息;
*onSetTags、onDelTags、onListTags是tag相关操作的回调;
*onNotificationClicked在通知被点击时回调;
*onUnbind是stopWork接口的返回值回调
* 返回值中的errorCode,解释如下:
*0 - Success
*10001 - Network Problem
*10101 Integrate Check Error
*30600 - Internal Server Error
*30601 - Method Not Allowed
*30602 - Request Params Not Valid
*30603 - Authentication Failed
*30604 - Quota Use Up Payment Required
*30605 -Data Required Not Found
*30606 - Request Time Expires Timeout
*30607 - Channel Token Timeout
*30608 - Bind Relation Not Found
*30609 - Bind Number Too Many
*
*/
获取绑定请求的结果-- onBind
函数原型
public void onBind(Context context, int errorCode, String appid, String userId, String channelId, String requestId);功能
PushMessageReceiver的抽象方法,把receiver类继承PushMessageReceiver可以使用。调用PushManager.startWork后,sdk将对push server发起绑定请求,这个过程是异步的。绑定请求的结果通过onBind返回。如果您需要用单播推送,需要把这里获取的channel id和user id上传到应用server中,再调用server接口用channel id和user id给单个手机或者用户推送。
参数
- context BroadcastReceiver的执行Context
- errorCode 绑定接口返回值,0 - 成功
- appid 应用id,errorCode非0时为null
- userId 应用user id,errorCode非0时为null
- channelId 应用channel id,errorCode非0时为null
- requestId 向服务端发起的请求id,在追查问题时有用
接收透传消息的函数-- onMessage
函数原型
public void onMessage(Context context, String message, String customContentString);功能
PushMessageReceiver的抽象方法,把receiver类继承PushMessageReceiver可以使用。接收透传消息。
参数
- context 上下文
- message 推送的消息
- customContentString 自定义内容,为空或者json字符串
接收通知点击的函数-- onNotificationClicked
函数原型
public void onNotificationClicked(Context context, String title, String description, String customContentString)功能
PushMessageReceiver的抽象方法,把receiver类继承PushMessageReceiver可以使用。接收通知点击的函数。
参数
- context 上下文
- title 推送的通知的标题
- description 推送的通知的描述
- customContentString 自定义内容,为空或者json字符串
接收通知到达的函数-- onNotificationArrived
函数原型
public void onNotificationArrived(Context context, String title, String description, String customContentString)功能
PushMessageReceiver的抽象方法,把receiver类继承PushMessageReceiver可以使用。接收通知到达的函数。
参数
- context 上下文
- title 推送的通知的标题
- description 推送的通知的描述
- customContentString 自定义内容,为空或者json字符串
setTags的回调函数-- onSetTags
函数原型
public void onSetTags(Context context, int errorCode, List sucessTags, List failTags, String requestId);功能
PushMessageReceiver的抽象方法,把receiver类继承PushMessageReceiver可以使用。setTags() 的回调函数。
参数
- context 上下文
- errorCode 错误码,0表示某些tag已经设置成功,非0表示所有tag的设置均失败
- successTags 设置成功的tag
- failTags 设置失败的tag
- requestId 分配给对云推送的请求的id
delTags的回调函数-- onDelTags
函数原型
public void onDelTags(Context context, int errorCode, List sucessTags, List failTags, String requestId)功能
PushMessageReceiver的抽象方法,把receiver类继承PushMessageReceiver可以使用。delTags() 的回调函数。
参数
- context 上下文
- errorCode 错误码。0表示某些tag已经删除成功;非0表示所有tag均删除失败
- successTags 成功删除的tag
- failTags 删除失败的tag
- requestId 分配给对云推送的请求的id
listTags的回调函数-- onListTags
函数原型
public void onListTags(Context context, int errorCode, List tags, String requestId);功能
PushMessageReceiver的抽象方法,把receiver类继承PushMessageReceiver可以使用。listTags() 的回调函数。
参数
- context 上下文
- errorCode 错误码。0表示列举tag成功;非0表示失败
- tags 当前应用设置的所有tag
- requestId 分配给对云推送的请求的id
stopWork的回调函数-- onUnbind
函数原型
public void onUnbind(Context context, int errorCode, String requestId);功能
PushMessageReceiver的抽象方法,把receiver类继承PushMessageReceiver可以使用。PushManager.stopWork() 的回调函数。
参数
- context 上下文
- errorCode 错误码,0表示从云推送解绑定成功,非0表示失败
- requestId 分配给对云推送的请求的id
渠道号设置
通过AndroidManifest.xml中静态设置渠道号,如:
<meta-data android:name="BaiduPush_CHANNEL" android:value="91 " />常量说明
Android SDK的常量定义都在PushConstants类中。
如:Push发送给应用的Action的常量,都是String类型
ACTION_MESSAGE
接收消息时使用。
ACTION_RECEIVE
获取方法调用的返回值,包括绑定、设置Tag、删除Tag等方法。
ACTION_RECEIVER_NOTIFICATION_CLICK
通知点击事件的截获。
注意:通知发出时,应用从Intent中获取Extra的常量,均为String类型
EXTRA_PUSH_MESSAGE_STRING
消息内容,在ACTION_MESSAGE中使用。Extra获取方法
intent.getStringExtra(PushConstants.EXTRA_PUSH_MESSAGE_STRING)EXTRA_METHOD
方法名,在ACTION_RECEIVE中使用。Extra获取方法
intent.getStringExtra(PushConstants.EXTRA_METHOD)EXTRA_ERROR_CODE
方法错误码,在ACTION_RECEIVE中使用。Extra获取方法
intent.getIntExtra(PushConstants.EXTRA_ERROR_CODE)EXTRA_CONTENT
方法返回内容,在ACTION_RECEIVE中使用。Extra获取方法
intent.getByteArrayExtra(PushConstants.EXTRA_CONTENT)EXTRA_NOTIFICATION_TITLE
通知标题,在ACTION_RECEIVER_NOTIFICATION_CLICK中使用。Extra获取方法
intent.getStringExtra(PushConstants.EXTRA_NOTIFICATION_TITLE)EXTRA_NOTIFICATION_CONTENT
通知内容,在ACTION_RECEIVER_NOTIFICATION_CLICK中使用。Extra获取方法
intent.getStringExtra(PushConstants.ACTION_RECEIVER_NOTIFICATION_CLICK)方法名常量,都是String类型
METHOD_BIND, METHOD_SET_TAGS, METHOD_DEL_TAGS
绑定方法名,在EXTRA_METHOD中取得的值是这三者之一。


 220
220


 被折叠的 条评论
为什么被折叠?
被折叠的 条评论
为什么被折叠?
 到【灌水乐园】发言


