Android Design Support Library(一)用TabLayout实现类似网易选项卡动态滑动效果

本文介绍了如何使用Android Design Support Library中的TabLayout实现类似网易选项卡的动态滑动效果。通过配置build.gradle引入库,设置AppBarLayout和TabLayout,以及编写对应的Java代码来创建和关联TabLayout与ViewPager,展示了在多个Tab和少数Tab情况下的实现方法。文章还提供了源码下载和后续控件讲解的预告。
摘要由CSDN通过智能技术生成

相关文章
Android Design Support Library(一)用TabLayout实现类似网易选项卡动态滑动效果
Android Design Support Library(二)用NavigationView实现抽屉菜单界面
Android Design Support Library(三)用CoordinatorLayout实现Toolbar隐藏和折叠

前言
此前我们用HorizontalScrollView也实现了类似网易选项卡动态滑动效果,详见 Android选项卡动态滑动效果这篇文章
这里我们用TabLayout来实现这一效果。TabLayout是Android Design Support Library库中的控件。
Google在2015的IO大会上,给我们带来了更加详细的Material Design设计规范,同时,也给我们带来了全新的Android Design Support Library,在这个support库里面,Google给我们提供了更加规范的MD设计风格的控件。最重要的是,Android Design Support Library的兼容性更广,直接可以向下兼容到Android 2.2。

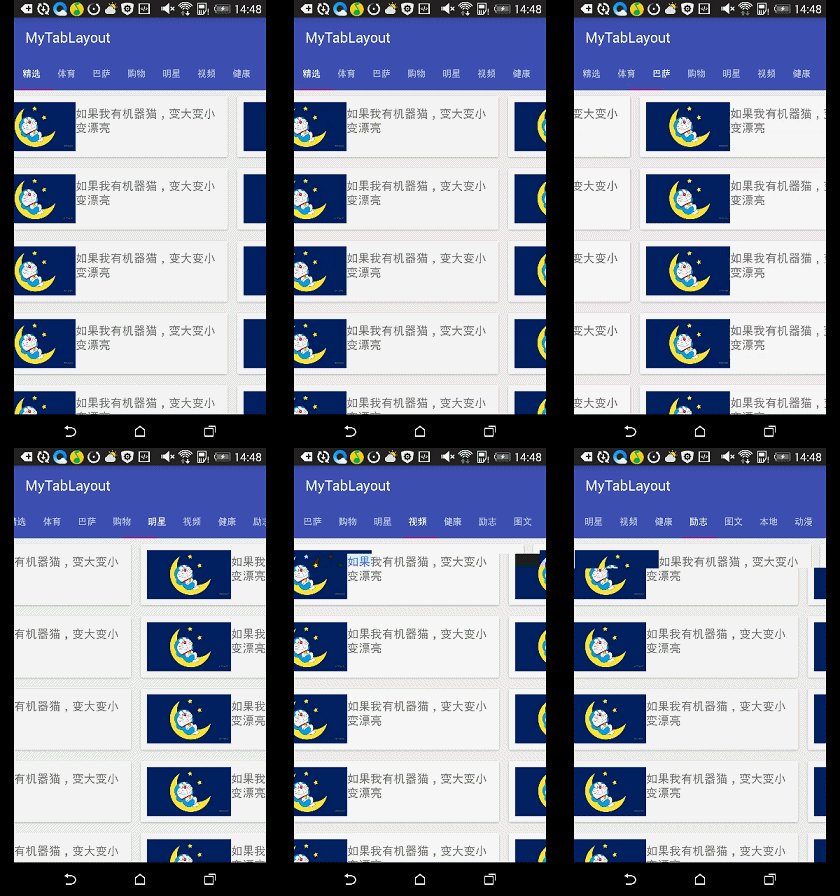
首先我们先来看看效果:
这里写图片描述

接下来开始实现

1. 配置build.gradle

在build.gradle加入如下代码

dependencies {
    compile fileTree(dir: 'libs', include: ['*.jar'])
    compile 'com.android.support:appcompat-v7:22.2.0'
    compile 'com.android.support:design:22.2.0'
    compile 'com.android.support:recyclerview-v7:22.2.0'
    compile 'com.android.support:cardview-v7:22.2.0'
}

com.android.support:design:22.2.0就是我们需要引入的Android Design Support Library,其次我们还引入了Recyclerview和Cardview,还不了解这两个控件的同学可以看下面这两篇文章:

Android5.x RecyclerView 应用解析Android5.x CardView 应用解析

2.AppBarLayout,Toolbar与TabLayout
先看看主界面的布局 (activity_tab_layout.xml)

<?xml version="1.0" encoding="utf-8"?>
<LinearLayout xmlns:android="http://schemas.android.com/apk/res/android"
    xmlns:tools="http://schemas.android.com/tools"
    xmlns:app="http://schemas.android.com/apk/res-auto"
    android:layout_width="match_parent"
    android:layout_height="match_parent"
    tools:context=".TabLayoutActivity"
    android:orientation="vertical">
    <android.support.design.widget.AppBarLayout
        android:id="@+id/appbar"
        android:layout_width="match_parent"
        android:layout_height="wrap_content"
        android:theme="@style/ThemeOverlay.AppCompat.Dark.ActionBar">
        <android.support.v7.widget.Toolbar
            android:id="@+id/toolbar"
            android:layout_width="match_parent"
            android:layout_height="?attr/actionBarSize"
            app:layout_scrollFlags="scroll|enterAlways"
            app:popupTheme="@style/ThemeOverlay.AppCompat.Light"/>

        <android.support.design.widget.TabLayout
            android:id=
  • 13
    点赞
  • 63
    收藏
    觉得还不错? 一键收藏
  • 17
    评论
好的,下面是使用ViewPager和TabLayout实现滑动效果的步骤: 1.在布局文件中添加ViewPager和TabLayout组件 ```xml <android.support.design.widget.TabLayout android:id="@+id/tabLayout" android:layout_width="match_parent" android:layout_height="wrap_content" android:background="@color/colorPrimary" app:tabMode="scrollable" app:tabTextColor="@android:color/white" app:tabSelectedTextColor="@android:color/white" app:tabIndicatorColor="@android:color/white" app:tabIndicatorHeight="3dp" /> <android.support.v4.view.ViewPager android:id="@+id/viewPager" android:layout_width="match_parent" android:layout_height="match_parent" /> ``` 2.在Java代码中初始化ViewPager和TabLayout组件 ```java ViewPager viewPager = findViewById(R.id.viewPager); TabLayout tabLayout = findViewById(R.id.tabLayout); MyFragmentPagerAdapter adapter = new MyFragmentPagerAdapter(getSupportFragmentManager()); viewPager.setAdapter(adapter); tabLayout.setupWithViewPager(viewPager); ``` 3.实现FragmentPagerAdapter类,用于管理ViewPager中的Fragment ```java public class MyFragmentPagerAdapter extends FragmentPagerAdapter { private String[] titles = {"Tab 1", "Tab 2", "Tab 3"}; public MyFragmentPagerAdapter(FragmentManager fm) { super(fm); } @Override public Fragment getItem(int position) { switch (position) { case 0: return new Fragment1(); case 1: return new Fragment2(); case 2: return new Fragment3(); default: return null; } } @Override public int getCount() { return titles.length; } @Nullable @Override public CharSequence getPageTitle(int position) { return titles[position]; } } ``` 4.实现三个Fragment类,用于显示在ViewPager中的内容 ```java public class Fragment1 extends Fragment { @Nullable @Override public View onCreateView(LayoutInflater inflater, @Nullable ViewGroup container, @Nullable Bundle savedInstanceState) { View view = inflater.inflate(R.layout.fragment1_layout, container, false); return view; } } public class Fragment2 extends Fragment { @Nullable @Override public View onCreateView(LayoutInflater inflater, @Nullable ViewGroup container, @Nullable Bundle savedInstanceState) { View view = inflater.inflate(R.layout.fragment2_layout, container, false); return view; } } public class Fragment3 extends Fragment { @Nullable @Override public View onCreateView(LayoutInflater inflater, @Nullable ViewGroup container, @Nullable Bundle savedInstanceState) { View view = inflater.inflate(R.layout.fragment3_layout, container, false); return view; } } ``` 5.创建三个布局文件fragment1_layout.xml、fragment2_layout.xml、fragment3_layout.xml,用于显示在ViewPager中的内容 ```xml <LinearLayout xmlns:android="http://schemas.android.com/apk/res/android" android:layout_width="match_parent" android:layout_height="match_parent" android:orientation="vertical"> <TextView android:text="Fragment 1" android:textSize="30sp" android:gravity="center" android:layout_width="match_parent" android:layout_height="match_parent" /> </LinearLayout> ``` ```xml <LinearLayout xmlns:android="http://schemas.android.com/apk/res/android" android:layout_width="match_parent" android:layout_height="match_parent" android:orientation="vertical"> <TextView android:text="Fragment 2" android:textSize="30sp" android:gravity="center" android:layout_width="match_parent" android:layout_height="match_parent" /> </LinearLayout> ``` ```xml <LinearLayout xmlns:android="http://schemas.android.com/apk/res/android" android:layout_width="match_parent" android:layout_height="match_parent" android:orientation="vertical"> <TextView android:text="Fragment 3" android:textSize="30sp" android:gravity="center" android:layout_width="match_parent" android:layout_height="match_parent" /> </LinearLayout> ``` 以上就是使用ViewPager和TabLayout实现滑动效果的步骤,希望对你有帮助。

“相关推荐”对你有帮助么?

  • 非常没帮助
  • 没帮助
  • 一般
  • 有帮助
  • 非常有帮助
提交
评论 17
添加红包

请填写红包祝福语或标题

红包个数最小为10个

红包金额最低5元

当前余额3.43前往充值 >
需支付:10.00
成就一亿技术人!
领取后你会自动成为博主和红包主的粉丝 规则
hope_wisdom
发出的红包
实付
使用余额支付
点击重新获取
扫码支付
钱包余额 0

抵扣说明:

1.余额是钱包充值的虚拟货币,按照1:1的比例进行支付金额的抵扣。
2.余额无法直接购买下载,可以购买VIP、付费专栏及课程。

余额充值