


1、概述
AdminEAP为本人基于AdminLTE改造的后台管理框架,包含了基本的系统管理功能和各种交互demo,项目已经开源到Github,并部署到阿里云。
Github : https://github.com/bill1012/AdminEAP
AdminEAP DEMO: http://www.admineap.com
本文讲解在AdminEAP框架下如何集成github等第三登录,第三方登录是应用开发中的常用功能,通过第三方登录,我们可以更加容易的吸引用户来到我们的应用中。现在,很多网站都提供了第三方登录的功能,在他们的官网中,都提供了如何接入第三方登录的文档。但是,不同的网站文档差别极大,各种第三方文档也是千奇百怪,同时,很多网站提供的SDK用法也是各不相同。对于不了解第三方登录的新手来说,实现一个支持多网站第三方登录的功能可以说是极其痛苦。
在集成过程中使用了oauth2.0的协议,关于oauth2.0协议的讲解,大家可以参考这篇文章OAuth2.0认证和授权机制讲解
为了方便大家理解,贴上两张交互过程图:

oauth2.0交互过程图1
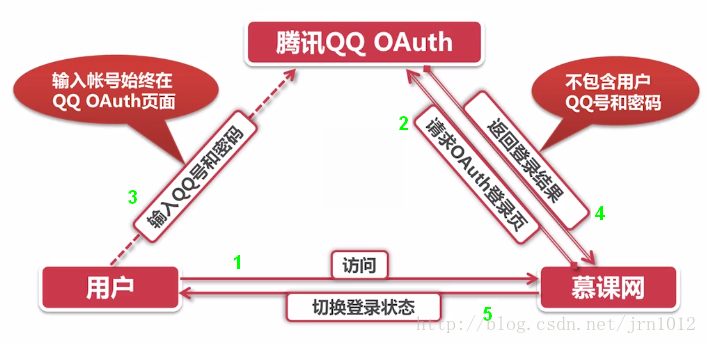
oauth2.0交互过程图2(以qq为例)
本文集成github第三方登录采用了Scribe,Spring配置注解,并抽象成统一的接口,非常方便其他社会化登录入口的接入,比如微博、微信、qq等。
本教程的源码已经在本人Github上AdminEAP项目开源,实现结果。
2、 实现思路
1、使用Scribe提供的接口,Scribe是一个用 Java 开发的 OAuth 开源库,支持 OAuth 1.0a / OAuth 2.0 标准,使用Scribe可节省很多工作量,而且方便扩展。
2、用户进行认证后返回到注册的回调地址http://**/oauth/{type}/callback,其中type为github,(这样方法可以通用)
3、通过返回的oAuthId与用户建立关联,如果本地系统关联表(oAuthUser)中存在这条记录,则直接跳转到主页,否者跳转到注册界面,引导用户注册,并关联第三方账号和注册用户。
(以上为实现实录的核心部分,还需在Github上申请key等,会在下面具体实现里面提到)
3、核心代码具体实现
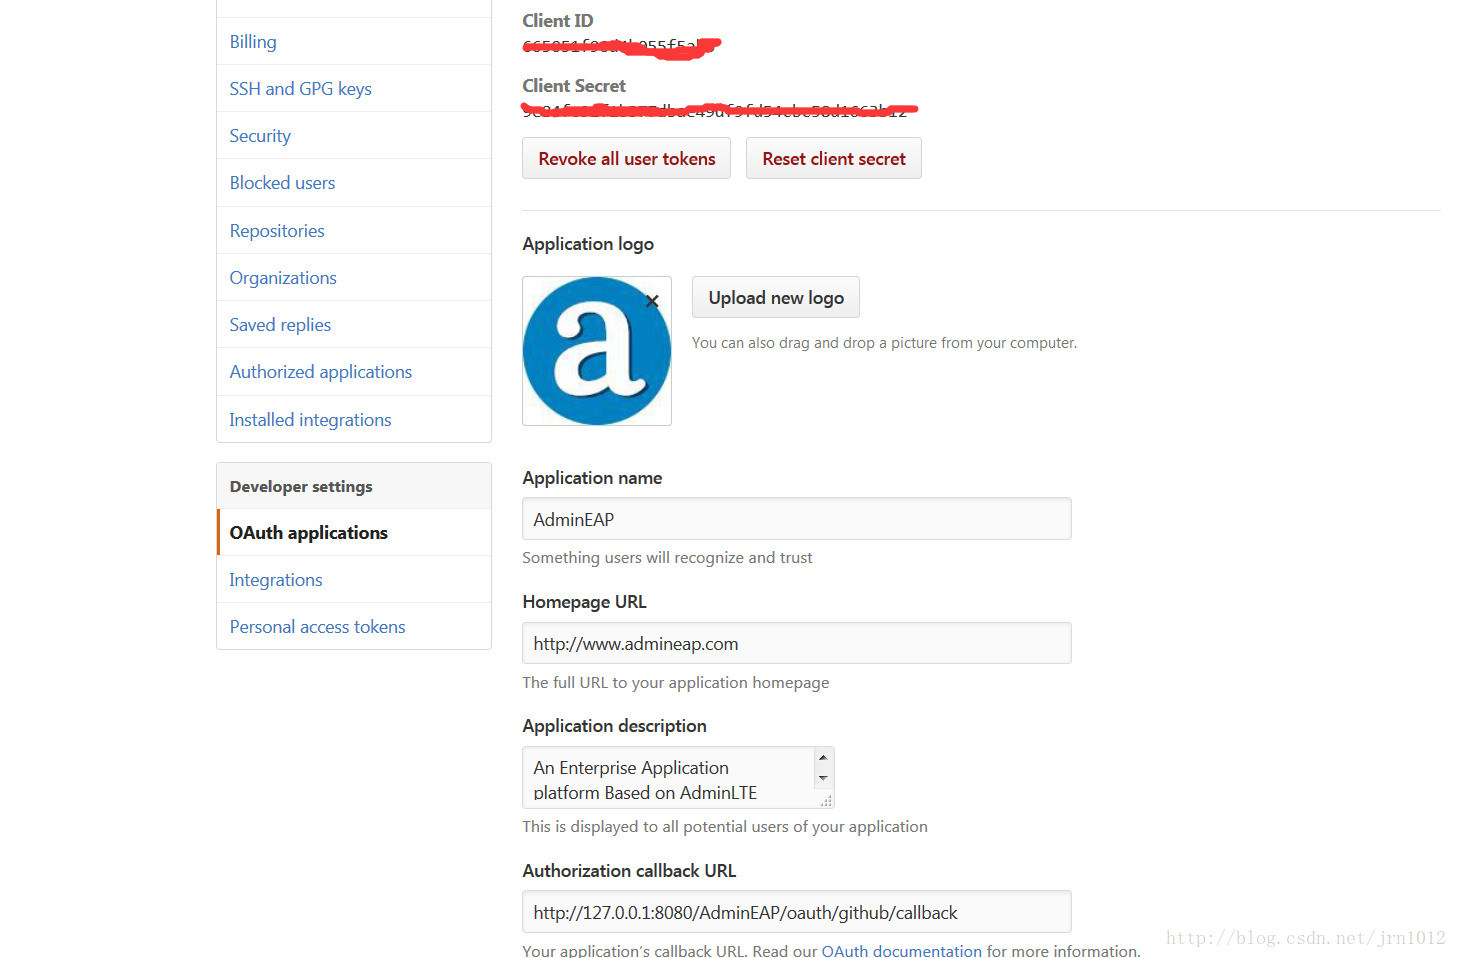
1、在github上填写应用的信息,这样在认证的时候,服务器会和客户端拿着id 和secret 做比对。要注意Authorization callback URL的填写,目前在本地调试的时候,写上本地地址。
2、pom.xml引用Scribe的依赖
          <dependency>
                <groupId>org.scribe</groupId>
                <artifactId>scribe</artifactId>
                <version>1.3.7</version>
           </dependency>
3、核心代码
下面讲述这些代码的关系:
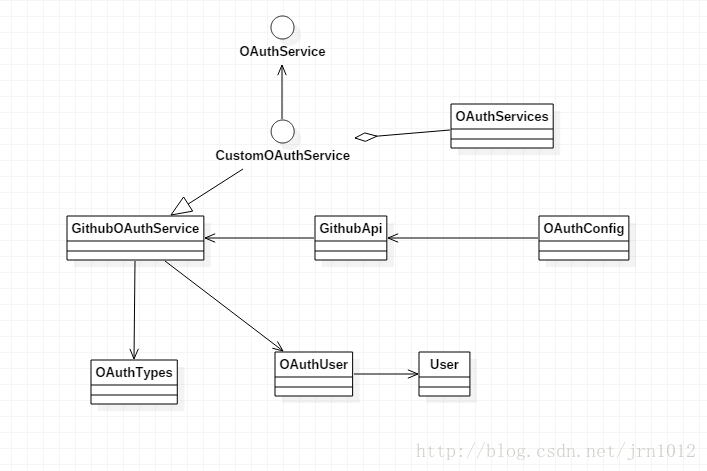
- OAuthConfig: spirng 的配置类,通过注解的方式调用GithubApi的createService方法,从而创建GithubOAuthService实例
- GithubApi: Scribe 没有现成的GithubApi,所以要自己写,通过这个类创建GithubOAuthService实例
- CustomOAuthService:通用接口,继承OAuthService接口,未来所有的其他第三方登录都可以简称这个接口
- oAuthServices: 这个在图中漏掉了,这个是实现所有CustomOAuthService接口的类的接口,这样可以把所有的第三方登录的接口放在一起,前台通过统一的方式调用各种第三方登录。
- OAuthUser :用户第三方账号和本地用户的关联表
- User: 本地用户表
- OAuthTypes: 各种第三方认证的静态变量名称类
下面开始放代码:
4、OAuthConfig.java
通过注解方式配置,并注入相关属性 @Value属性来自于settting.properties文件
package com.cnpc.framework.conf;

import com.cnpc.framework.oauth.common.CustomOAuthService;
import com.cnpc.framework.oauth.common.OAuthTypes;
import com.cnpc.framework.oauth.github.GithubApi;
import com.cnpc.framework.utils.PropertiesUtil;
import org.scribe.builder.ServiceBuilder;
import org.springframework.beans.factory.annotation.Value;
import org.springframework.context.annotation.Bean;
import org.springframework.context.annotation.Configuration;

/**
 * Created by billJiang on 2017/1/15.
 * e-mail:jrn1012@petrochina.com.cn qq:475572229
 */
@Configuration
public class OAuthConfig {
    @Value("${oauth.callback.url}")
    String callback_url;

    /**
     * github配置
     */
    @Value("${oauth.github.key}")
    String github_key;
    @Value("${oauth.github.secret}")
    String github_secret;
    //该state为一串随机码,大家可随便给一个uuid
    @Value("${oauth.github.state}")
    String github_state;

    @Bean
    public GithubApi githubApi(){
        return new GithubApi(github_state);
    }

    @Bean
    public CustomOAuthService getGithubOAuthService(){
        return (CustomOAuthService)new ServiceBuilder()
                .provider(githubApi())
                .apiKey(github_key)
                .apiSecret(github_secret)
                .callback(String.format(callback_url, OAuthTypes.GITHUB))
                .build();
    }
}
以上配置要被spring的配置文件扫描到,还需要在spring.xml配置以下内容
<!--扫描到java config配置-->
<context:annotation-config/>
<context:component-scan base-package="com.cnpc.framework.conf" />

<!-- 引入属性文件 -->
<context:property-placeholder location="classpath:jdbc.properties,classpath:setting.properties" />
5、GithubApi.java
package com.cnpc.framework.oauth.github;

import org.scribe.builder.api.DefaultApi20;
import org.scribe.model.OAuthConfig;
import org.scribe.oauth.OAuthService;
import org.scribe.utils.OAuthEncoder;

/**
 * Created by billJiang on 2017/1/15.
 * e-mail:jrn1012@petrochina.com.cn qq:475572229
 * Github Api for oauth2.0
 */
public class GithubApi extends DefaultApi20 {
    private static final String AUTHORIZE_URL = "https://github.com/login/oauth/authorize?client_id=%s&redirect_uri=%s&state=%s";
    private static final String SCOPED_AUTHORIZE_URL = AUTHORIZE_URL + "&scope=%s";
    private static final String ACCESS_TOKEN_URL = "https://github.com/login/oauth/access_token?state=%s";

    private final String githubState;

    public GithubApi(String state) {
        this.githubState = state;
    }

    @Override
    public String getAuthorizationUrl(OAuthConfig config) {
        if (config.hasScope()) {
            return String.format(SCOPED_AUTHORIZE_URL, config.getApiKey(), OAuthEncoder.encode(config.getCallback()), githubState, OAuthEncoder.encode(config.getScope()));
        } else {
            return String.format(AUTHORIZE_URL, config.getApiKey(), OAuthEncoder.encode(config.getCallback()), githubState);
        }
    }

    @Override
    public String getAccessTokenEndpoint() {
        return String.format(ACCESS_TOKEN_URL,githubState);
    }


    @Override
    public OAuthService createService(OAuthConfig config){
        return new GithubOAuthService(this,config);
    }

}
6、GithubOAuthService.java
package com.cnpc.framework.oauth.github;

import com.alibaba.fastjson.JSON;
import com.alibaba.fastjson.JSONPath;
import com.cnpc.framework.oauth.common.CustomOAuthService;
import com.cnpc.framework.oauth.common.OAuthTypes;
import com.cnpc.framework.oauth.entity.OAuthUser;
import com.cnpc.framework.utils.PropertiesUtil;
import org.scribe.builder.api.DefaultApi20;
import org.scribe.model.*;
import org.scribe.oauth.OAuth20ServiceImpl;

/**
 * Created by billJiang on 2017/1/15.
 * e-mail:jrn1012@petrochina.com.cn qq:475572229
 */
public class GithubOAuthService extends OAuth20ServiceImpl implements CustomOAuthService {
    private static final String PROTECTED_RESOURCE_URL = "https://api.github.com/user";

    private final DefaultApi20 api;
    private final OAuthConfig config;
    private final String authorizationUrl;

    public GithubOAuthService(DefaultApi20 api, OAuthConfig config){
        super(api,config);
        this.api=api;
        this.config=config;
        this.authorizationUrl=getAuthorizationUrl(null);
    }

    @Override
    public String getoAuthType() {
        return OAuthTypes.GITHUB;
    }

    @Override
    public String getBtnClass(){
        return PropertiesUtil.getValue("oauth.github.btnclass");
    }

    @Override
    public String getAuthorizationUrl() {
        return authorizationUrl;
    }

    @Override
    public OAuthUser getOAuthUser(Token accessToken) {
        OAuthRequest request = new OAuthRequest(Verb.GET, PROTECTED_RESOURCE_URL);
        this.signRequest(accessToken, request);
        Response response = request.send();
        OAuthUser oAuthUser = new OAuthUser();
        oAuthUser.setoAuthType(getoAuthType());
        Object result = JSON.parse(response.getBody());
        oAuthUser.setoAuthId(JSONPath.eval(result, "$.id").toString());
        oAuthUser.setUserName(JSONPath.eval(result, "$.login").toString());
        return oAuthUser;
    }

}
7、CustomOAuthService.java 接口,通用接口,方便其他第三方登录扩展
package com.cnpc.framework.oauth.common;

import com.cnpc.framework.oauth.entity.OAuthUser;
import org.scribe.model.Token;
import org.scribe.oauth.OAuthService;

/**
 * Created by billJiang on 2017/1/15.
 * e-mail:jrn1012@petrochina.com.cn qq:475572229
 */
public interface CustomOAuthService extends OAuthService {
    String getoAuthType();
    String getAuthorizationUrl();
    OAuthUser getOAuthUser(Token accessToken);
    String getBtnClass();
}
8、OAuthServices.java 所有继承CustomOAuthService的类的集合类,通过@Autowired注入所有继承CustomOAuthService接口的实例。
package com.cnpc.framework.oauth.service;

import com.cnpc.framework.oauth.common.CustomOAuthService;
import org.springframework.beans.factory.annotation.Autowired;
import org.springframework.stereotype.Service;

import java.util.List;


/**
 * Created by billJiang on 2017/1/15.
 * e-mail:jrn1012@petrochina.com.cn qq:475572229
 */
@Service
public class OAuthServices {


    @Autowired
    private List<CustomOAuthService> customOAuthServices;

    /*public OAuthServices(){
        OAuthConfig config=new OAuthConfig();
        customOAuthServices=new ArrayList<CustomOAuthService>();
        customOAuthServices.add(config.getGithubOAuthService());
    }*/

    public CustomOAuthService getOAuthService(String type) {
        CustomOAuthService oAuthService = null;
        for (CustomOAuthService customOAuthService : customOAuthServices) {
            if (customOAuthService.getoAuthType().equals(type)) {
                oAuthService = customOAuthService;
                break;
            }
        }
        return oAuthService;
    }
    public List<CustomOAuthService> getAllOAuthServices() {
        return customOAuthServices;
    }


}
9、OAuthTypes.java
package com.cnpc.framework.oauth.common;

/**
 * Created by billJiang on 2017/1/15.
 * e-mail:jrn1012@petrochina.com.cn qq:475572229
 */
public class OAuthTypes {

    public static final String GITHUB="github";

    public static final String WEIXIN="weixin";

    public static final String QQ="qq";
}
10、OAuthUser.java 第三方应用ID与本地用户关联
package com.cnpc.framework.oauth.entity;

import com.cnpc.framework.base.entity.BaseEntity;
import com.fasterxml.jackson.annotation.JsonIgnoreProperties;

import javax.persistence.*;

@Entity
@Table(name = "tbl_user_oauth")
@JsonIgnoreProperties(value = { "hibernateLazyInitializer", "handler", "fieldHandler" })
public class OAuthUser extends BaseEntity {

    /**
     *
     */
    private static final long serialVersionUID = 2836972841233228L;

    @Column(name="user_id")
    private String userId;

    @Column(name="user_name")
    private  String userName;

    @Column(name="oauth_type")
    private String oAuthType;

    @Column(name="oauth_id")
    private String oAuthId;

    public String getUserId() {
        return userId;
    }

    public void setUserId(String userId) {
        this.userId = userId;
    }

    public String getUserName() {
        return userName;
    }

    public void setUserName(String userName) {
        this.userName = userName;
    }

    public String getoAuthType() {
        return oAuthType;
    }

    public void setoAuthType(String oAuthType) {
        this.oAuthType = oAuthType;
    }

    public String getoAuthId() {
        return oAuthId;
    }

    public void setoAuthId(String oAuthId) {
        this.oAuthId = oAuthId;
    }
}
4、controller层处理与前端页面
1、LoginController的oauth2.0认证的核心代码,记得在spring-shiro配置文件上加上oauth/**=anon(允许匿名访问)
  //----------------oauth 认证------------------
    @RequestMapping(value = "/oauth/{type}/callback", method = RequestMethod.GET)
    public String callback(@RequestParam(value = "code", required = true) String code, @PathVariable(value = "type") String type,
                           HttpServletRequest request, Model model) {
        model.addAttribute("oAuthServices", oAuthServices.getAllOAuthServices());
        try {
            CustomOAuthService oAuthService = oAuthServices.getOAuthService(type);
            Token accessToken = oAuthService.getAccessToken(null, new Verifier(code));
            //第三方授权返回的用户信息
            OAuthUser oAuthInfo = oAuthService.getOAuthUser(accessToken);
            //查询本地数据库中是否通过该方式登陆过
            OAuthUser oAuthUser = oAuthUserService.findByOAuthTypeAndOAuthId(oAuthInfo.getoAuthType(), oAuthInfo.getoAuthId());
            //未建立关联,转入用户注册界面
            if (oAuthUser == null) {
                model.addAttribute("oAuthInfo", oAuthInfo);
                return REGISTER_PAGE;
            }

            //如果已经过关联,直接登录
            User user = userService.get(User.class, oAuthUser.getUserId());
            return loginByAuth(user);
        }catch (Exception e){
            String msg = "连接"+type+"服务器异常. 错误信息为:"+e.getMessage();
            model.addAttribute("message", new ResultCode("1", msg));
            LOGGER.error(msg);
            return LOGIN_PAGE;
        }

    }

    @RequestMapping(value = "/oauth/register", method = RequestMethod.POST)
    public String register_oauth(User user, @RequestParam(value = "oAuthType", required = false, defaultValue = "") String oAuthType,
                           @RequestParam(value = "oAuthId", required = true, defaultValue = "") String oAuthId,
                           HttpServletRequest request,Model model) {
        model.addAttribute("oAuthServices", oAuthServices.getAllOAuthServices());
        OAuthUser oAuthInfo = new OAuthUser();
        oAuthInfo.setoAuthId(oAuthId);
        oAuthInfo.setoAuthType(oAuthType);
        //保存用户
        user.setPassword(EncryptUtil.getPassword(user.getPassword(),user.getLoginName()));
        String userId=userService.save(user).toString();
        //建立第三方账号关联
        OAuthUser oAuthUser=oAuthUserService.findByOAuthTypeAndOAuthId(oAuthType,oAuthId);
        if(oAuthUser==null&&!oAuthType.equals("-1")){
            oAuthInfo.setUserId(userId);
            oAuthUserService.save(oAuthInfo);
        }
        //关联成功后登陆
        return loginByAuth(user);
    }


    public String loginByAuth(User user){
        UsernamePasswordToken token = new UsernamePasswordToken(user.getLoginName(), user.getPassword());
        token.setRememberMe(true);
        Subject subject = SecurityUtils.getSubject();
        subject.login(token);
        //通过认证
        if (subject.isAuthenticated()) {
            return MAIN_PAGE;
        } else {
            return LOGIN_PAGE;
        }
    }


    /**
     * 校验当前登录名/邮箱的唯一性
     * @param loginName 登录名
     * @param userId 用户ID(用户已经存在,改回原来的名字还是唯一的)
     * @return
     */
    @RequestMapping(value = "/oauth/checkUnique", method = RequestMethod.POST)
    @ResponseBody
    public Map checkExist(String loginName, String userId) {
        Map<String, Boolean> map = new HashMap<String, Boolean>();
        User user = userService.getUserByLoginName(loginName);
        //用户不存在,校验有效
        if (user == null) {
            map.put("valid", true);
        } else {
            if(!StrUtil.isEmpty(userId)&&userId.equals(user.getLoginName())){
                map.put("valid",true);
            }else {
                map.put("valid", false);
            }
        }
        return map;
    }
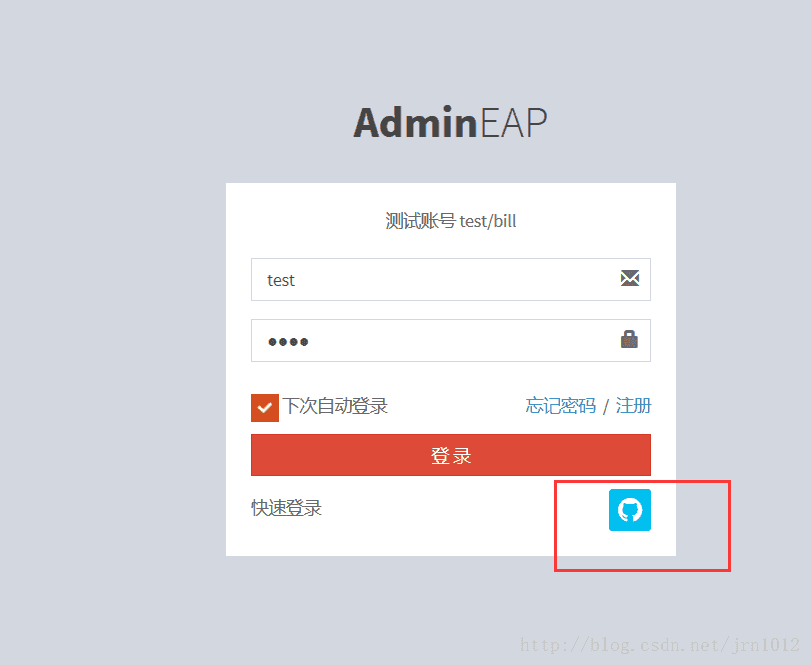
2、 login.html的核心代码
  <div class="social-auth-links" style="margin-bottom: 0px;">
            <div class="row">
                <div class="col-xs-5">
                    <div class="text-left" style="margin-top: 5px;">快速登录</div>
                </div>
                <div class="col-xs-7">
                    <div class="text-right">
                        <!--<a class="btn btn-social-icon btn-primary"><i class="fa fa-qq"></i></a>
                        <a class="btn btn-social-icon btn-success"><i class="fa fa-wechat"></i></a>
                        <a class="btn btn-social-icon btn-warning"><i class="fa fa-weibo"></i></a>
                        <a class="btn btn-social-icon btn-info"><i class="fa fa-github"></i></a>-->
                        <#list oAuthServices as oauth>
                            <a class="btn btn-social-icon ${oauth.btnClass}" href="${oauth.authorizationUrl}"><i class="fa fa-${oauth.oAuthType}"></i></a>
                        </#list>
                    </div>
                </div>
            </div>
3、register.html的核心代码(略,后面会写一篇文章专门讲Bootstrap-validator用于注册页面的校验)详细代码可查看我的github
以上的代码实现了在AdminEAP框架下,以github为例实现了第三方登录认证,这个方式是通用的,越来越多的应用接入社会化登录,通用的方式可以节省很多工作量,希望这篇文章能帮到你。


 206
206


 被折叠的 条评论
为什么被折叠?
被折叠的 条评论
为什么被折叠?
 到【灌水乐园】发言


