


首先请下载源码程序。。。。。。。
(下面内容请再熟悉Android开发以后继续观看)
~~~~~~~~~~~~~~~~~~~~~~~~~~~~~~~~~~~~~~~~~~~~
正式写代码之前,先大概介绍一下Cocos2d
Cocos2d-x 是一个支持多平台的 2D 手机游戏引擎,使用 C++ 开发,基于OpenGL ES,基于Cocos2d-iphone,支持 WOPhone, iOS 4.1, Android 2.1 及更高版本, WindowsXP & Windows7,WindowsPhone 8.
Cocos2d引擎框架如下图:
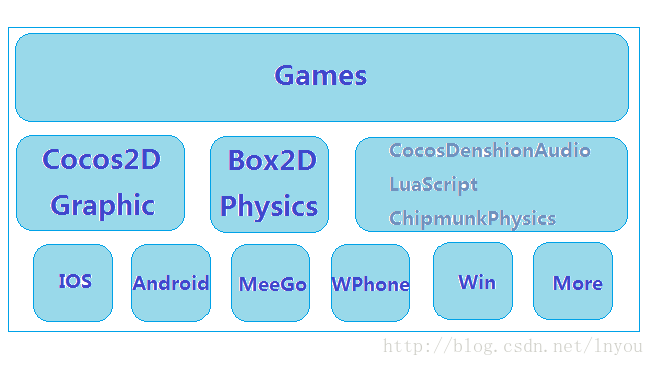
Cocos2d-x 基于Cocos2d-iphone。原则上在IOS上开发完成以后可以通过工具转换为Android版本的APK(具体如何转,在此不做介绍)。
Cocos2d基础理论:

请观看视频 http://edu.51cto.com/lesson/id-13256.html
FlyppyBird游戏在此分四步:
1、添加小鸟
2、添加地板
3、改变小鸟速度
4、添加滑块并设置速度
那么接下来开始写代码:
首先搭建Android工程
这里我们仍然默认LauncherActivity为MainActivity
public class MainActivity extends Activity {

	static{
		System.loadLibrary("gdx");
	}
	CCGLSurfaceView view;
    @Override
    public void onCreate(Bundle savedInstanceState) {
        super.onCreate(savedInstanceState);
        view = new CCGLSurfaceView(this);
        CCDirector director = CCDirector.sharedDirector();
		director.setDeviceOrientation(CCDirector.kCCDeviceOrientationPortrait);//初始化导演类
        director.attachInView(view);
        director.setAnimationInterval(1/30.0);
        director.setDisplayFPS(true);//以上三句设置导演类的属性
        setContentView(view);
        CCScene scene = CCScene.node();//初始化场景类
        FlyppyBirdLayer layer = new FlyppyBirdLayer(this);//布景层
        scene.addChild(layer);
        director.runWithScene(scene);//运行场景
    }
}
1、添加小鸟
	private void addBird() {
		bird = CCSprite.sprite("bird.png");
		CGSize s = bird.getContentSize();
		BodyDef bodyDef = new BodyDef();
		bodyDef.type = BodyType.DynamicBody;
		bodyDef.position.set(300 / PTM_RATIO, 800 / PTM_RATIO);

		// Define another box shape for our dynamic body.
		PolygonShape dynamicBox = new PolygonShape();
		dynamicBox.setAsBox(s.width / 2 / PTM_RATIO, s.height / 2 / PTM_RATIO);
		// These are mid points for our 1m box
		// dynamicBox.density = 1.0f;
		// dynamicBox.friction = 0.3f;

		// Define the dynamic body fixture and set mass so it's dynamic.
		Body body = world.createBody(bodyDef);
		body.setUserData(bird);

		FixtureDef fixtureDef = new FixtureDef();
		fixtureDef.shape = dynamicBox;
		fixtureDef.density = 1.0f;
		fixtureDef.friction = 0.3f;
		body.createFixture(fixtureDef);
		addChild(bird);
	}
2、添加地板
	private void addGround() {
		CCSprite ground = CCSprite.sprite("ground.png");
		CGSize s = ground.getContentSize();
		BodyDef def = new BodyDef();
		def.type = BodyType.StaticBody;
		def.position.set(s.width / 2 / PTM_RATIO, s.height / 2 / PTM_RATIO);
		Body groundBody = world.createBody(def);

		FixtureDef fDef = new FixtureDef();
		PolygonShape pShape = new PolygonShape();
		pShape.setAsBox(s.width / 2 / PTM_RATIO, s.height / 2 / PTM_RATIO);
		fDef.shape = pShape;
		fDef.density = 1.0f;
		fDef.friction = 0.3f;
		groundBody.createFixture(fDef);
		groundBody.setUserData(ground);
		addChild(ground);
	}
3、改变小鸟速度(在这里设置当点击屏幕时小鸟向上移动)
需要首先设置当前场景的物理环境,这里我们使用Box2D
	private void initWorld() {
		Vector2 gravity = new Vector2(0f, -9.8f);
		world = new World(gravity, true);
		world.setContinuousPhysics(true);
		world.setContactListener(this);
	}
设置屏幕接受点击事件
	public FlyppyBirdLayer(Context context) {
		this.mContext = context;
		this.setIsTouchEnabled(true);
		this.setIsAccelerometerEnabled(true);
		screenSize = CCDirector.sharedDirector().winSize();
	}
给屏幕添加点击事件,当点击屏幕时,改变小鸟速度为向上,初始速度为10
	@Override
	public boolean ccTouchesBegan(MotionEvent event) {
		Iterator<Body> it = world.getBodies();
		while (it.hasNext()) {
			Body b = it.next();
			Object userData = b.getUserData();
			if (userData != null && userData instanceof CCSprite
					&& userData == bird) {
				b.setLinearVelocity(0, 10);
			}
		}
		return super.ccTouchesBegan(event);
	}
这里需要注意一点,需要每次重绘小鸟位置,否则小鸟表现为不会运动,我们调用scheduleUpdate()方法,来执行默认的update(float dt)方法(Cocos2d机制)
	private void startGame() {
		score=0;
		addBird();
		addGround();
		scheduleUpdate();
	}
	public void update(float dt) {
		System.out.println(world.getBodyCount());
		world.step(FPS, 8, 1);
		// Iterate over the bodies in the physics world
		Iterator<Body> it = world.getBodies();
		while (it.hasNext()) {
			Body b = it.next();
			Object userData = b.getUserData();
			if (userData != null && userData instanceof CCSprite) {
				// Synchronize the Sprites position and rotation with the
				// corresponding body
				final CCSprite sprite = (CCSprite) userData;
				final Vector2 pos = b.getPosition();
				if(pos.x<0){
					sprite.removeFromParentAndCleanup(true);
					world.destroyBody(b);
					score++;
				}else{
					sprite.setPosition(pos.x * PTM_RATIO, pos.y * PTM_RATIO);
				}
			}
		}
	}
4、添加滑块,并且设置速度,这里我们仍然使用schedule方法,来隔一段时间添加滑块,并且设置从右往左运动。
	public void addBar(float dt) {
		float offset = -(new Random().nextInt(5));
		CCSprite downBar = CCSprite.sprite("downBar.png");
		CGSize downBarSize = downBar.getContentSize();
		BodyDef def = new BodyDef();
		def.type = BodyType.KinematicBody;
		def.position.set(screenSize.width / PTM_RATIO + 2, downBarSize.height
				/ PTM_RATIO + offset);
		def.linearVelocity.set(-5, 0);

		Body downBarBody = world.createBody(def);
		PolygonShape downPolygonShape = new PolygonShape();
		downPolygonShape.setAsBox(downBarSize.width / 2 / PTM_RATIO,
				downBarSize.height / 2 / PTM_RATIO);
		FixtureDef downBarFixtureDef = new FixtureDef();
		downBarFixtureDef.shape = downPolygonShape;
		downBarBody.createFixture(downBarFixtureDef);
		addChild(downBar);
		downBarBody.setUserData(downBar);

		CCSprite upBar = CCSprite.sprite("downBar.png");
		CGSize upBarSize = upBar.getContentSize();
		BodyDef upBardef = new BodyDef();
		upBardef.type = BodyType.KinematicBody;
		upBardef.position.set(screenSize.width / PTM_RATIO + 2,
				upBarSize.height / PTM_RATIO + offset + upBarSize.height * 2
						/ PTM_RATIO);
		upBardef.linearVelocity.set(-5, 0);

		Body upBarBody = world.createBody(upBardef);
		PolygonShape upPolygonShape = new PolygonShape();
		upPolygonShape.setAsBox(upBarSize.width / 2 / PTM_RATIO,
				upBarSize.height / 2 / PTM_RATIO);
		FixtureDef upBarFixtureDef = new FixtureDef();
		upBarFixtureDef.shape = upPolygonShape;
		upBarBody.createFixture(upBarFixtureDef);
		addChild(upBar);
		upBarBody.setUserData(upBar);
	}
这里添加了上下2部分滑块,中间留出空隙,让小鸟可以通过。
最后,我们需要碰撞检测
	@Override
	public void beginContact(Contact contact) {
		if (contact.getFixtureA().getBody().getUserData() == bird
				|| contact.getFixtureB().getBody().getUserData() == bird) {
			stopGame();
			handler.sendEmptyMessage(0);
		}

	}
大概简单的FlyppyBird已经完成。最后上传一下源码,供各位参考!
http://download.csdn.net/download/kay_wyong/7056443


 7504
7504

 被折叠的 条评论
为什么被折叠?
被折叠的 条评论
为什么被折叠?
 到【灌水乐园】发言


