


| 命令 | 含义 | |
|---|---|---|
| 配置 | git config | 配置 |
| git status | 查看状态 | |
| git log | 查看提交日志 | |
| 基础命令 | git init | 初始化仓库 |
| git add | 将工作区修改提交到暂存区(工作区 -> 暂存区) | |
| git commit | 将暂存区修改提交到本地版本库(暂存区 -> 本地版本库) | |
| git checkout – file | 丢弃工作区的修改 | |
| git reset HEAD file | 丢弃暂存区的修改 | |
| git rm | 删除文件,并提交到暂存区 | |
| git mv | 重命名文件,并提交到暂存区 | |
| git blame | git blame 查看文件的每个部分是谁修改的, 只要运行’git blame [filename]’, 你就会得到整个文件的每一行的详细修改信息:包括SHA串,日期和作者 | |
| 分支命令 | git branch | 查看本地分支,查看所有分支: git branch -a,查看远程分支:git branch -r |
| git branch branch-name | 创建分支 | |
| git checkout -b branch-name | 创建并切换到分支 | |
| git checkout branch-name | 切换分支 | |
| git branch -d branch-name | 删除分支,有修改未合并无法删除。强制删除用-D参数:git branch -D branch-name | |
| git merge | 合并分支,Fast-forward/冲突 | |
| git reset –hard HEAD^ | 回退到上一个版本,^^回退前两个版本,以此类推 | |
| git reset –hard HEAD~n | 回退到前n个版本 | |
| git reset –hard commit_id | 回到某个版本 | |
| git reflog | 查看操作日志 | |
| 远程命令 | git push | 将本地代码推送到远程仓库,完整命令:git push origin src:dst |
| git pull | 从远程仓库拉取代码到本地,等价于git fetch + git checkout。git fetch 是从远程版本库到本地版本库。 | |
| git clone | 克隆远程仓库的代码 | |
| git remote show | 本地工程对应的所有远程仓库 | |
| git push origin –delete | 删除远程分支 |
git基础
官方指导:
https://git-scm.com/book/en/v2
学习网站:
1. 概念
Git是一款免费、开源的分布式版本控制系统。
维基百科定义:https://en.wikipedia.org/wiki/Git
2. 安装(mac)
2.1 下载
到官网 https://git-scm.com/ 下载dmg包,我下载的是2.14.1版本
git-2.14.1-intel-universal-mavericks.dmg
2.2 安装
双击安装,按提示下一步就可以,安装完成后在终端输入:
git –version
如果显示出版本号,即安装成功。
➜  ~ git --version
git version 2.14.1
3. 配置
git 配置使用命令 git config
3.1 配置帮助
git config 有很多参数,具体参数可以查看帮助文档,查看方式有如下三种:
- git config –help
- git help config
- man git-config
3.2 配置用户名和邮箱
使用git前一般需要配置用户名和邮箱,配置用户名和邮箱有三个参数,不同的参数作用范围不一样:
三种方式优先级 local > global > system
| 参数 | 作用范围 | 对应修改的文件 |
|---|---|---|
| –system | 针对整个系统,整个电脑的配置文件(不常用) | /etc/gitconfig |
| –global | 针对当前用户配置文件(常用) | ~/.gitconfig |
| –local | 针对特定项目的配置文件(常用) | 项目根目录下 .git/config |
➜  ~ git config --global user.name "懿名"
➜  ~ git config --global user.email "lilongjiu_lntu@163.com"
我们用的是 –global参数,所以查看一下~/.gitconfig文件
➜  ~ cat ~/.gitconfig
[user]
    name = 懿名
    email = lilongjiu_lntu@163.com
➜  ~
用命令查看
➜  ~ git config --global --list

user.name=懿名
user.email=lilongjiu_lntu@163.com
➜  ~
4. 文件的四种位置:
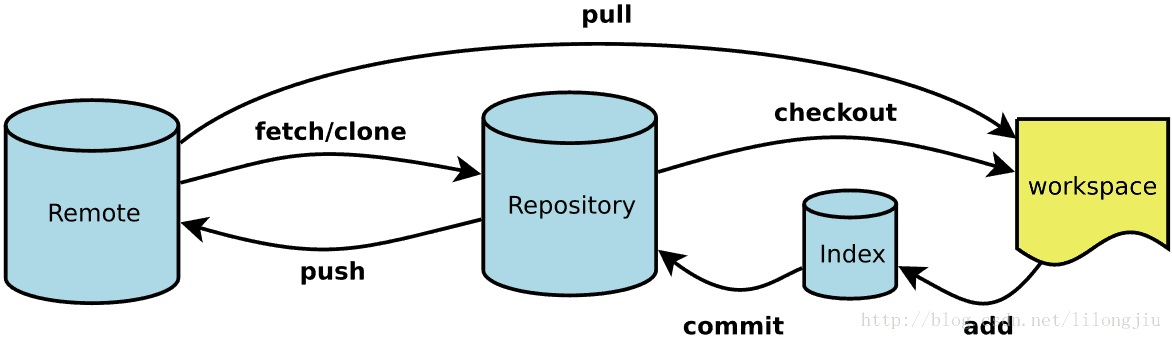
git所管理的文件,有四种位置,分为别:
- 工作区(Workspace)
- 暂存区(Index / Stage)
- 本地版本库(Repository)
- 远程版本库(Remote)
4.1 工作区
就是我们平时创建、修改文件的地方
4.2 暂存区
项目根目录下.git目录下的index文件, 暂存区会记录文件的相关信息(文件名、大小、timestamp…),不保保存实际的文件, 通过id指向每个文件实体。
4.3 本地版本库
记录提交文件的所有版本和日志
4.4 远程版本库
项目团队成员共享的版本库,开发人员从远程版本库拉取(pull)或者提交(push)代码。
5. 基础命令
5.1 基础配置
| 命令 | 含义 |
|---|---|
| git config | 配置 |
| git status | 查看状态 |
| git log | 查看提交日志 |
5.2 基本命令
| 命令 | 含义 |
|---|---|
| git init | 初始化仓库 |
| git add | 将工作区修改提交到暂存区(工作区 -> 暂存区) |
| git commit | 将暂存区修改提交到本地版本库(暂存区 -> 本地版本库) |
| git checkout – file | 丢弃工作区的修改 |
| git reset HEAD file | 丢弃暂存区的修改 |
| git rm | 删除文件,并提交到暂存区 |
| git mv | 重命名文件,并提交到暂存区 |
| git blame | git blame 查看文件的每个部分是谁修改的, 只要运行’git blame [filename]’, 你就会得到整个文件的每一行的详细修改信息:包括SHA串,日期和作者 |
git init
初始化git仓库,git的所有版本信息都存储在 .git目录下,而svn会在每个目录下都有一个 .svn目录。默认情况下创建并进入master分支中,可以看到有一个master提示,这是因为系统安装了oh my zsh
➜  myproject ls -al
total 0
drwxr-xr-x  2 lilongjiu  staff   68 10 10 09:09 .
drwxr-xr-x  5 lilongjiu  staff  170 10 10 09:09 ..
➜  myproject git init
Initialized empty Git repository in /Users/lilongjiu/02workspace/git/myproject/.git/
➜  myproject git:(master)
git status
查看当前版本库的状态,初始化仓库后,项目根目录会创建一个.git目录,这个目录里存储git版本的所有信息。我们在这里创建一个文件test.txt,然后查看状态,“Untracked files”表示文件在工作中区中还未被追中,如果系统安装了oh my zsh 会有个 ✗ 提示
➜  myproject git:(master) ls -al
total 0
drwxr-xr-x   3 lilongjiu  staff  102 10 10 09:10 .
drwxr-xr-x   5 lilongjiu  staff  170 10 10 09:09 ..
drwxr-xr-x  10 lilongjiu  staff  340 10 10 09:10 .git
➜  myproject git:(master) echo "hello git" > test.txt
➜  myproject git:(master) ✗ git status
On branch master

No commits yet

Untracked files:
  (use "git add <file>..." to include in what will be committed)

    test.txt

nothing added to commit but untracked files present (use "git add" to track)
➜  myproject git:(master) ✗
git add
将工作区已修改的文件存储到暂存区中,添加到暂存区后状态为“Changes to be committed”,表示待提交
➜  myproject git:(master) ✗ git add test.txt
➜  myproject git:(master) ✗ git status
On branch master

No commits yet

Changes to be committed:
  (use "git rm --cached <file>..." to unstage)

    new file:   test.txt

➜  myproject git:(master) ✗
git commit
将暂存区的文件提交到版本库,git提交文件,必须输入提交日志,默认情况下会用vi打开,提示你输入提交日志,以 # 号开头的行不会被提交。
➜  myproject git:(master) ✗ git commit test.txt

默认会用vi打开如下信息:
  1
  2 # Please enter the commit message for your changes. Lines starting
  3 # with '#' will be ignored, and an empty message aborts the commit.
  4 #
  5 # On branch master
  6 #
  7 # Initial commit
  8 #
  9 # Changes to be committed:
 10 #   new file:   test.txt
 11 #
一般会在提交时直接输入提交日志,使用 -m 参数,这样就不会打开vi了。
➜  myproject git:(master) ✗ git commit -m "initial commit" test.txt
[master (root-commit) 5a8a23b] initial commit
 1 file changed, 1 insertion(+)
 create mode 100644 test.txt
➜  myproject git:(master)
文件提交后,可以看到 ✗ 已经没有了,表示没有待提交的文件了,可以通过git status证实这一点
➜  myproject git:(master) git status
On branch master
nothing to commit, working tree clean
➜  myproject git:(master)
git checkout – file
丢弃对工作区文件的修改
首先修改一下文件,增加一行,现在文件状态为未暂存”Changes not staged for commit”,也就是工作区的文件修改未提交到暂存区
➜  myproject git:(master) cat test.txt
hello git
➜  myproject git:(master) echo "add a new line" >> test.txt
➜  myproject git:(master) ✗ cat test.txt
hello git
add a new line
➜  myproject git:(master) ✗ git status
On branch master
Changes not staged for commit:
  (use "git add <file>..." to update what will be committed)
  (use "git checkout -- <file>..." to discard changes in working directory)

    modified:   test.txt

no changes added to commit (use "git add" and/or "git commit -a")
➜  myproject git:(master) ✗
使用 git checkout – file 放弃工作区文件的修改(use “git checkout – …” to discard changes in working directory),可以看到新增加的一行被丢弃掉,同时可以看到 ✗ 已经变没了。
➜  myproject git:(master) ✗ git checkout -- test.txt
➜  myproject git:(master) git status
On branch master
nothing to commit, working tree clean
➜  myproject git:(master) cat test.txt
hello git
➜  myproject git:(master)
git reset HEAD file
丢弃暂存区的修改
HEAD 文件是一个指向你当前所在分支的引用标识符,它可以指向任意提交点。一般,你现在哪儿,HEAD 就指向哪儿(记录在.git/HEAD文件中)。
➜  myproject git:(master) cat .git/HEAD
ref: refs/heads/master
➜  myproject git:(master)
首先修改一下文件,增加一行,然后将工作区的修改提交到暂存区,状态为待提交(Changes to be committed)
➜  myproject git:(master) echo "add a new line" >> test.txt
➜  myproject git:(master) ✗ git add test.txt
➜  myproject git:(master) ✗ git status
On branch master
Changes to be committed:
  (use "git reset HEAD <file>..." to unstage)

    modified:   test.txt

➜  myproject git:(master) ✗
使用git reset HEAD丢弃暂存区的修改(use “git reset HEAD …” to unstage),文件状态变为待暂存(Changes not staged for commit)
➜  myproject git:(master) ✗ git reset HEAD test.txt
Unstaged changes after reset:
M   test.txt
➜  myproject git:(master) ✗ git status
On branch master
Changes not staged for commit:
  (use "git add <file>..." to update what will be committed)
  (use "git checkout -- <file>..." to discard changes in working directory)

    modified:   test.txt

no changes added to commit (use "git add" and/or "git commit -a")
➜  myproject git:(master) ✗
git rm
首先创建一个测试文件test2.txt,然后暂存,提交。git commit 提交到版本库会打开vi编辑器,让用户输入提交日志,可以使用 -m 参数,直接输入提交日志,而不必打开vi编辑器。
➜  myproject git:(master) ll
total 8
-rw-r--r--  1 lilongjiu  staff    10B 10 10 10:11 test.txt
➜  myproject git:(master) echo "test difference between git rm and rm" > test2.txt
➜  myproject git:(master) ✗ git add test2.txt
➜  myproject git:(master) ✗ git commit -m "add a new file test2.txt" test2.txt

[master ebf7ed3] add a new file test2.txt
 1 file changed, 1 insertion(+)
 create mode 100644 test2.txt
➜  myproject git:(master) ll
total 16
-rw-r--r--  1 lilongjiu  staff    10B 10 10 10:11 test.txt
-rw-r--r--  1 lilongjiu  staff    38B 10 10 10:12 test2.txt
➜  myproject git:(master)
使用 git rm 删除 test2.txt,可以看到工作区文件test2.txt被删除,并且文件状态为待提交,也就是文件删除已经被纳入到暂存区
➜  myproject git:(master) git rm test2.txt
rm 'test2.txt'
➜  myproject git:(master) ✗ ll
total 8
-rw-r--r--  1 lilongjiu  staff    10B 10 10 10:11 test.txt
➜  myproject git:(master) ✗ git status
On branch master
Changes to be committed:
  (use "git reset HEAD <file>..." to unstage)

    deleted:    test2.txt

➜  myproject git:(master) ✗
假如是误删除,可以通过两步恢复,丢弃暂存区的修改,丢弃工作区的修改
➜  myproject git:(master) ✗ git reset HEAD test2.txt
Unstaged changes after reset:
D   test2.txt
➜  myproject git:(master) ✗ git checkout -- test2.txt
➜  myproject git:(master) git status
On branch master
nothing to commit, working tree clean
➜  myproject git:(master) ll
total 16
-rw-r--r--  1 lilongjiu  staff    10B 10 10 10:11 test.txt
-rw-r--r--  1 lilongjiu  staff    38B 10 10 10:15 test2.txt
➜  myproject git:(master)
也可以使用操作系统 rm 删除命令删除test2.txt,可以看到工作区文件test2.txt被删除,然而文件并未被暂存,也就是只有工作区有修改
➜  myproject git:(master) rm test2.txt
➜  myproject git:(master) ✗ ll
total 8
-rw-r--r--  1 lilongjiu  staff    10B 10 10 10:11 test.txt
➜  myproject git:(master) ✗ git status
On branch master
Changes not staged for commit:
  (use "git add/rm <file>..." to update what will be committed)
  (use "git checkout -- <file>..." to discard changes in working directory)

    deleted:    test2.txt

no changes added to commit (use "git add" and/or "git commit -a")
➜  myproject git:(master) ✗
如果要恢复删除,通过一步就可以
➜  myproject git:(master) ✗ git checkout -- test2.txt
➜  myproject git:(master) ll
total 16
-rw-r--r--  1 lilongjiu  staff    10B 10 10 10:11 test.txt
-rw-r--r--  1 lilongjiu  staff    38B 10 10 10:16 test2.txt
➜  myproject git:(master) git status
On branch master
nothing to commit, working tree clean
➜  myproject git:(master)
综合以上对比,可以看到 git rm 与 rm 的区别 :
- git rm: 两步动作,删除工作区文件,将删除动作提交到暂存区
- rm: 一步动作,仅仅删除工作区的文件
git mv
重命名文件
git mv 与 mv 和 git rm 和 rm 原理一样
- git mv: 两步动作,重命名工作区文件,将重命名动作提交到暂存区
- mv: 一步动作,仅仅重命名工作区的文件
git commit –amend
修正上一次提交日志
git commit –amend -m “modify commit log”
➜  myproject git:(master) git commit --amend -m "modify commit log"
[master 1ab72ee] modify commit log
 Date: Tue Oct 10 10:13:14 2017 +0800
 1 file changed, 1 insertion(+)
 create mode 100644 test2.txt
➜  myproject git:(master)
git log
查看提交日志
➜  myproject git:(master) git log

commit 1ab72ee6e5c936b2a9b3723eeef79d8877b9984e (HEAD -> master)
Author: 懿名 <lilongjiu_lntu@163.com>
Date:   Tue Oct 10 10:13:14 2017 +0800

    modify commit log

commit ffc9cd2c42489a2c928648ae3432434406ffa119
Author: 懿名 <lilongjiu_lntu@163.com>
Date:   Tue Oct 10 10:12:01 2017 +0800

    delete test2.txt

commit 9bec42be1ef56f3ded52cc9dcb8ac62bf8e4b7bc
Author: 懿名 <lilongjiu_lntu@163.com>
Date:   Tue Oct 10 09:56:56 2017 +0800

    add a new file test2.txt

commit 5a8a23b89c003461364b5360ae86398a655b706b
Author: 懿名 <lilongjiu_lntu@163.com>
Date:   Tue Oct 10 09:21:33 2017 +0800

    initial commit
git log -n
查看最新的n条提交日志
➜  myproject git:(master) git log -1

commit 1ab72ee6e5c936b2a9b3723eeef79d8877b9984e (HEAD -> master)
Author: 懿名 <lilongjiu_lntu@163.com>
Date:   Tue Oct 10 10:13:14 2017 +0800

    modify commit log
(END)
git log –pretty=oneline
以一行的形式显示日志
➜  myproject git:(master) git log --pretty=oneline

1ab72ee6e5c936b2a9b3723eeef79d8877b9984e (HEAD -> master) modify commit log
ffc9cd2c42489a2c928648ae3432434406ffa119 delete test2.txt
9bec42be1ef56f3ded52cc9dcb8ac62bf8e4b7bc add a new file test2.txt
5a8a23b89c003461364b5360ae86398a655b706b initial commit
git log –graph
以图形化的方式显示log
git blame
查看文件的每个部分是谁修改的,包括文件的每一行的详细修改信息:包括SHA串,日期和作者
➜  myproject git:(master) git blame test.txt

^5a8a23b (懿名 2017-10-10 09:21:33 +0800 1) hello git
git blame 还可以使用 -L参数指定开始行和结束行
➜  myproject git:(master) git blame -L 2,+2 test.txt

^5a8a23b (懿名 2017-10-10 09:21:33 +0800 1) hello git
6. .gitignore
并不是所有的项目文件都需要提交到版本库,比如说java的class文件或者ide生成的一些与项目代码无关的文件,是不需要提交到版本库中的。
首先创建一个文件test3.txt,新建文件状态为未追中
➜  myproject git:(master) echo "hello world" > test3.txt
➜  myproject git:(master) ✗ git status
On branch master
Untracked files:
  (use "git add <file>..." to include in what will be committed)

    test3.txt

nothing added to commit but untracked files present (use "git add" to track)
➜  myproject git:(master) ✗
创建一个.gitignore文件,内容为test3.txt,然后提交到版本库
➜  myproject git:(master) ✗ echo "test3.txt" > .gitignore
➜  myproject git:(master) ✗ git add .gitignore
➜  myproject git:(master) ✗ git commit -m "add .gitignore file" .gitignore
[master a13927e] add .gitignore file
 1 file changed, 1 insertion(+)
 create mode 100644 .gitignore
➜  myproject git:(master)
可以看到我们没有把test3提交到版本库,但是git仓库是干净的,没有待提交的文件。
➜  myproject git:(master) git status
On branch master
nothing to commit, working tree clean
➜  myproject git:(master)
.gitignore 支持通配符,具体可以查看帮助文档:
➜ myproject git:(master) git help gitignore7. git分支
git init 会创建一个master分支
| 命令 | 含义 |
|---|---|
| git branch | 查看本地分支,查看所有分支: git branch -a,查看远程分支:git branch -r |
| git branch branch-name | 创建分支 |
| git checkout -b branch-name | 创建并切换到分支 |
| git checkout branch-name | 切换分支 |
| git branch -d branch-name | 删除分支,有修改未合并无法删除。强制删除用-D参数:git branch -D branch-name |
| git merge | 合并分支,Fast-forward/冲突 |
| git reset –hard HEAD^ | 回退到上一个版本,^^回退前两个版本,以此类推 |
| git reset –hard HEAD~n | 回退到前n个版本 |
| git reset –hard commit_id | 回到某个版本 |
| git reflog | 查看操作日志 |
git branch
查看所有本地分支,当前只有master分支
➜  myproject git:(master) git branch
* master
➜  myproject git:(master)
git branch branch-name
创建新的分支develop
➜  myproject git:(master) git branch develop
➜  myproject git:(master) git branch
  develop
* master
➜  myproject git:(master)
git checkout branch-name
切换分支,从master切换到develop
➜  myproject git:(master) git checkout develop
Switched to branch 'develop'
➜  myproject git:(develop) git branch
* develop
  master
➜  myproject git:(develop)
git checkout -b branch-name
创建并切换到分支,创建分支bugfix,然后切换到bugfix,一步到位
➜  myproject git:(develop) git checkout -b bugfix
Switched to a new branch 'bugfix'
➜  myproject git:(bugfix) git branch
* bugfix
  develop
  master
➜  myproject git:(bugfix)
git branch -d branch-name
删除分支,第一次删不掉是因为,当前就在bugfix上,所以先切换到master,然后在删除bugfix分支
➜  myproject git:(bugfix) git branch -d bugfix
error: Cannot delete branch 'bugfix' checked out at '/Users/workspace/git/myproject'
➜  myproject git:(bugfix) git checkout master
Switched to branch 'master'
➜  myproject git:(master) git branch -d bugfix
Deleted branch bugfix (was a13927e).
➜  myproject git:(master)
git merge branch-name
合并分支
- 直接合并
develop分支是从master分支创建来的,内容是一模一样的。现在develop分支test.txt增加一行。
➜  myproject git:(master) git checkout develop
Switched to branch 'develop'
➜  myproject git:(develop) echo "add a new line in test.txt on branch develop" > test.txt
➜  myproject git:(develop) ✗ git commit -m "add a new line in test.txt on branch develop" test.txt
[develop e87fcd3] add a new line in test.txt on branch develop
 1 file changed, 1 insertion(+), 1 deletion(-)
➜  myproject git:(develop)
由于develop分支是在master分支上增加了一行,所以可以直接把develop分支合并到master分支上,这种方式叫做 Fast-forward
➜  myproject git:(develop) git checkout master
Switched to branch 'master'
➜  myproject git:(master) git merge develop
Updating a13927e..e87fcd3
Fast-forward
 test.txt | 2 +-
 1 file changed, 1 insertion(+), 1 deletion(-)
➜ myproject git:(master) - 冲突合并
现在分别修改master和develop的test.txt
➜  myproject git:(master) echo "modify master" > test.txt
➜  myproject git:(master) ✗ git commit -m "modify master" test.txt
[master 5273ae4] modify master
 1 file changed, 1 insertion(+), 1 deletion(-)

➜  myproject git:(master) git checkout develop
Switched to branch 'develop'

➜  myproject git:(develop) echo "modify develop" > test.txt
➜  myproject git:(develop) ✗ git commit -m "modify develop" test.txt
[develop 2bbdd7e] modify develop
 1 file changed, 1 insertion(+), 1 deletion(-)
➜  myproject git:(develop)
由于master和develop分支都做过修改,所以合并会产生冲突,这就需要人工进行冲突合并
➜  myproject git:(develop) git checkout master
Switched to branch 'master'
➜  myproject git:(master) git merge develop
Auto-merging test.txt
CONFLICT (content): Merge conflict in test.txt
Automatic merge failed; fix conflicts and then commit the result.
➜  myproject git:(master) ✗
用vi打开test.txt
 1 <<<<<<< HEAD
 2 modify master
 3 =======
 4 modify develop
 5 >>>>>>> develop
然后保留需要的修改,保存如下:
➜  myproject git:(master) ✗ cat test.txt
modify develop
➜  myproject git:(master) ✗
最后提交结果,这里的git add 表示的是标记冲突解决(mark resolution)
➜  myproject git:(master) ✗ git add test.txt
➜  myproject git:(master) ✗ git commit -m "fix conflict"
[master f20b818] fix conflict
➜  myproject git:(master)
git reset
版本回退
当前日志如下:
➜ myproject git:(master) git log --pretty=onelinef20b818a309c09da4010f94944fc3d7af5bc3d79 (HEAD -> master) fix conflict
2bbdd7eaf94b16dde38b24ce27fb789df279b1df (develop) modify develop
5273ae468af097e39d2d10f2ce589e89f00de3fa modify master
e87fcd3c76c999aedc5f6b8418ecc7fa1b6f76be add a new line in test.txt on branch develop
a13927ee159a401ff834692fc04af17d261343db add .gitignore file
1ab72ee6e5c936b2a9b3723eeef79d8877b9984e modify commit log
ffc9cd2c42489a2c928648ae3432434406ffa119 delete test2.txt
9bec42be1ef56f3ded52cc9dcb8ac62bf8e4b7bc add a new file test2.txt
5a8a23b89c003461364b5360ae86398a655b706b initial commit
(END)- git reset –hard HEAD^
回退到上个版本,如果回退两个版本就用两个^^
➜  myproject git:(master) git reset --hard HEAD^
HEAD is now at 5273ae4 modify master
➜  myproject git:(master)
➜ myproject git:(master) git log --pretty=oneline
5273ae468af097e39d2d10f2ce589e89f00de3fa (HEAD -> master) modify master
e87fcd3c76c999aedc5f6b8418ecc7fa1b6f76be add a new line in test.txt on branch develop
a13927ee159a401ff834692fc04af17d261343db add .gitignore file
1ab72ee6e5c936b2a9b3723eeef79d8877b9984e modify commit log
ffc9cd2c42489a2c928648ae3432434406ffa119 delete test2.txt
9bec42be1ef56f3ded52cc9dcb8ac62bf8e4b7bc add a new file test2.txt
5a8a23b89c003461364b5360ae86398a655b706b initial commit
(END)
- git reset –hard HEAD~n
除了用^还可以用~n的方式,如果回退2个版本,就用git reset –hard HEAD~2
➜  myproject git:(master) git reset --hard HEAD~2
HEAD is now at a13927e add .gitignore file
➜  myproject git:(master)
➜ myproject git:(master) git log --pretty=oneline
a13927ee159a401ff834692fc04af17d261343db (HEAD -> master) add .gitignore file
1ab72ee6e5c936b2a9b3723eeef79d8877b9984e modify commit log
ffc9cd2c42489a2c928648ae3432434406ffa119 delete test2.txt
9bec42be1ef56f3ded52cc9dcb8ac62bf8e4b7bc add a new file test2.txt
5a8a23b89c003461364b5360ae86398a655b706b initial commit
(END)- git reset –hard commit_id
回退到任意一次提交id, commit_id 不需要全部写出,写前几位就够了,只要git能够区分出不同的提交id就可以。比如我们回退到初始提交(initial commit)版本5a8a23b89c003461364b5360ae86398a655b706b
➜  myproject git:(master) git reset --hard 5a8a2
HEAD is now at 5a8a23b initial commit
➜  myproject git:(master) ✗
➜ myproject git:(master) ✗ git log --pretty=oneline
5a8a23b89c003461364b5360ae86398a655b706b (HEAD -> master) initial commit
(END)回退到初始提交状态后出现了个 ✗ 是因为有文件未添加到版本库,之前没有出现是因为有.gitignore 文件,这次回退把.gitignore也回退了
- git reflog
从最新的提交,回到历史版本,我们可以通过git log查看到历史的commit_id。但是如果从历史版本回到最新状态,我们是看不到最新的commit_id,git提供了另外一个命令git reflog,查询操作日志,当然也就可以查看所有的commit_id
➜  myproject git:(master) ✗ git reflog

5a8a23b (HEAD -> master) HEAD@{0}: reset: moving to 5a8a2
a13927e HEAD@{1}: reset: moving to HEAD~2
5273ae4 HEAD@{2}: reset: moving to HEAD^
f20b818 HEAD@{3}: commit (merge): fix conflict
5273ae4 HEAD@{4}: checkout: moving from develop to master
2bbdd7e (develop) HEAD@{5}: commit: modify develop
e87fcd3 HEAD@{6}: checkout: moving from master to develop
5273ae4 HEAD@{7}: commit: modify master
e87fcd3 HEAD@{8}: merge develop: Fast-forward
a13927e HEAD@{9}: checkout: moving from develop to master
e87fcd3 HEAD@{10}: commit: add a new line in test.txt on branch develop
a13927e HEAD@{11}: checkout: moving from master to develop
a13927e HEAD@{12}: checkout: moving from bugfix to master
a13927e HEAD@{13}: checkout: moving from develop to bugfix
a13927e HEAD@{14}: checkout: moving from master to develop
a13927e HEAD@{15}: commit: add .gitignore file
1ab72ee HEAD@{16}: commit (amend): modify commit log
669b5cb HEAD@{17}: commit (amend): add a new file test2.txt
ebf7ed3 HEAD@{18}: commit: add a new file test2.txt
ffc9cd2 HEAD@{19}: commit: delete test2.txt
9bec42b HEAD@{20}: commit: add a new file test2.txt
5a8a23b (HEAD -> master) HEAD@{21}: commit (initial): initial commit
(END)
8. git 远程操作
| 命令 | 含义 |
|---|---|
| git push | 将本地代码推送到远程仓库,完整命令:git push origin src:dst |
| git pull | 从远程仓库拉取代码到本地,等价于git fetch + git checkout。git fetch 是从远程版本库到本地版本库。 |
| git clone | 克隆远程仓库的代码 |
| git remote show | 本地工程对应的所有远程仓库 |
| git push origin –delete | 删除远程分支 |
有时间补充。。。
9. 标签
git tag tag-name
创建标签
➜  myproject git:(master) git tag v1.0
➜  myproject git:(master)
创建标签并附加备注
➜  myproject git:(master) git tag -a v2.0 -m "version2.0 released"
➜  myproject git:(master)
git tag
查看标签
➜  myproject git:(master) git tag
v1.0
v2.0
➜  myproject git:(master)
git tag -l
查找标签
➜  myproject git:(master) git tag -l 'v1*'
v1.0
➜  myproject git:(master)
git tag -d
删除标签
➜  myproject git:(master) git tag -d v2.0
Deleted tag 'v2.0' (was 5ebd0e6)
➜  myproject git:(master) git tag
v1.0
➜  myproject git:(master)
10. 日志
git的提交日志是一个类似链表形式,根据下一次提交可以找到上一次提交
现在,初始化一个仓库,然后创建一个test.txt文件
➜  myproject git:(master) touch test.txt
➜  myproject git:(master) ✗ git add test.txt
➜  myproject git:(master) ✗ git commit -m "initial commit" test.txt
[master (root-commit) 20ad634] initial commit
 1 file changed, 0 insertions(+), 0 deletions(-)
 create mode 100644 test.txt
➜  myproject git:(master)
进行四次提交:
//第一次提交
➜  myproject git:(master) echo "first line" >> test.txt
➜  myproject git:(master) ✗ git commit -am "first commit"
[master 4d735b0] first commit
 1 file changed, 1 insertion(+)
➜  myproject git:(master)

//第二次提交
➜  myproject git:(master) echo "second line" >> test.txt
➜  myproject git:(master) ✗ git commit -am "second commit"
[master 7cf1e4b] second commit
 1 file changed, 1 insertion(+)
➜  myproject git:(master)

//第三次提交
➜  myproject git:(master) echo "third line" >> test.txt
➜  myproject git:(master) ✗
➜  myproject git:(master) ✗ git commit -am "third commit"
[master cbfab80] third commit
 1 file changed, 1 insertion(+)
➜  myproject git:(master)

//第四次提交
➜  myproject git:(master) echo "fourth line" >> test.txt
➜  myproject git:(master) ✗ git commit -am "fourth commit"
[master 86e7fa4] fourth commit
 1 file changed, 1 insertion(+)
➜  myproject git:(master)
现在test.txt内容和日志如下:
➜  myproject git:(master) cat test.txt
first line
second line
third line
fourth line
➜  myproject git:(master)
➜ myproject git:(master) git log
commit 86e7fa413ea7fa8a527daeaae3cdbf9309dd3d5d (HEAD -> master)
Author: 懿名 <lilongjiu_lntu@163.com>
Date: Wed Oct 11 21:18:13 2017 +0800
fourth commit
commit cbfab806941c47298c43ec1b86b6491e916a04f8
Author: 懿名 <lilongjiu_lntu@163.com>
Date: Wed Oct 11 21:17:58 2017 +0800
third commit
commit 7cf1e4b7ac9b36724bcd5d906e48ac4abaca4c51
Author: 懿名 <lilongjiu_lntu@163.com>
Date: Wed Oct 11 21:17:45 2017 +0800
second commit
commit 4d735b09358b4e4d61124336789edfdf3802050b
Author: 懿名 <lilongjiu_lntu@163.com>
Date: Wed Oct 11 21:17:31 2017 +0800
first commit
commit 20ad634e11a6a49e47abad0a257f99ce73797bc7
Author: 懿名 <lilongjiu_lntu@163.com>
Date: Wed Oct 11 21:17:04 2017 +0800
initial commit在.git/logs/refs/heads目录下存储着各个分支的日志信息
➜  myproject git:(master) ll .git/logs/refs/heads
total 16
-rw-r--r--  1 lilongjiu  staff   774B 10 11 21:18 master
➜  myproject git:(master)
在master分支下,可以看到每次提交的日志,并且每一次提交都记录了上一次提交的id。
➜ myproject git:(master) cat .git/logs/refs/heads/master
0000000000000000000000000000000000000000 20ad634e11a6a49e47abad0a257f99ce73797bc7 懿名 <lilongjiu_lntu@163.com> 1507727824 +0800 commit (initial): initial commit
20ad634e11a6a49e47abad0a257f99ce73797bc7 4d735b09358b4e4d61124336789edfdf3802050b 懿名 <lilongjiu_lntu@163.com> 1507727851 +0800 commit: first commit
4d735b09358b4e4d61124336789edfdf3802050b 7cf1e4b7ac9b36724bcd5d906e48ac4abaca4c51 懿名 <lilongjiu_lntu@163.com> 1507727865 +0800 commit: second commit
7cf1e4b7ac9b36724bcd5d906e48ac4abaca4c51 cbfab806941c47298c43ec1b86b6491e916a04f8 懿名 <lilongjiu_lntu@163.com> 1507727878 +0800 commit: third commit
cbfab806941c47298c43ec1b86b6491e916a04f8 86e7fa413ea7fa8a527daeaae3cdbf9309dd3d5d 懿名 <lilongjiu_lntu@163.com> 1507727893 +0800 commit: fourth commit
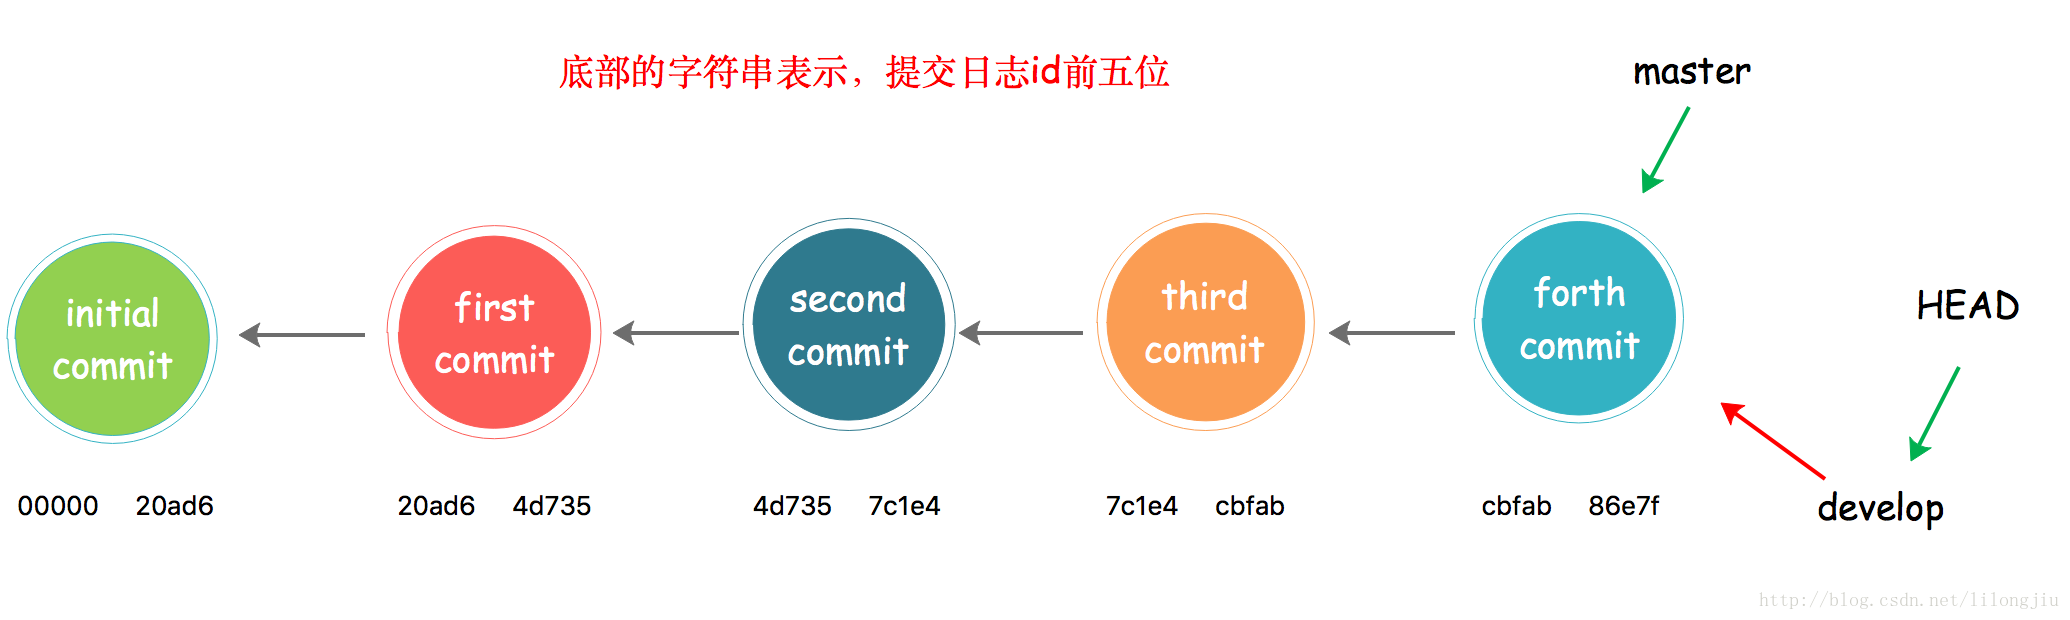
➜ myproject git:(master) 可以画个提交日志示意图:
顺便说一下,之前我们经常用的HEAD,其实就是一个指针(通过.git/HEAD查看),指向当前你所在的位置
➜  myproject git:(master) cat .git/HEAD
ref: refs/heads/master
➜  myproject git:(master)
也就是这个样子
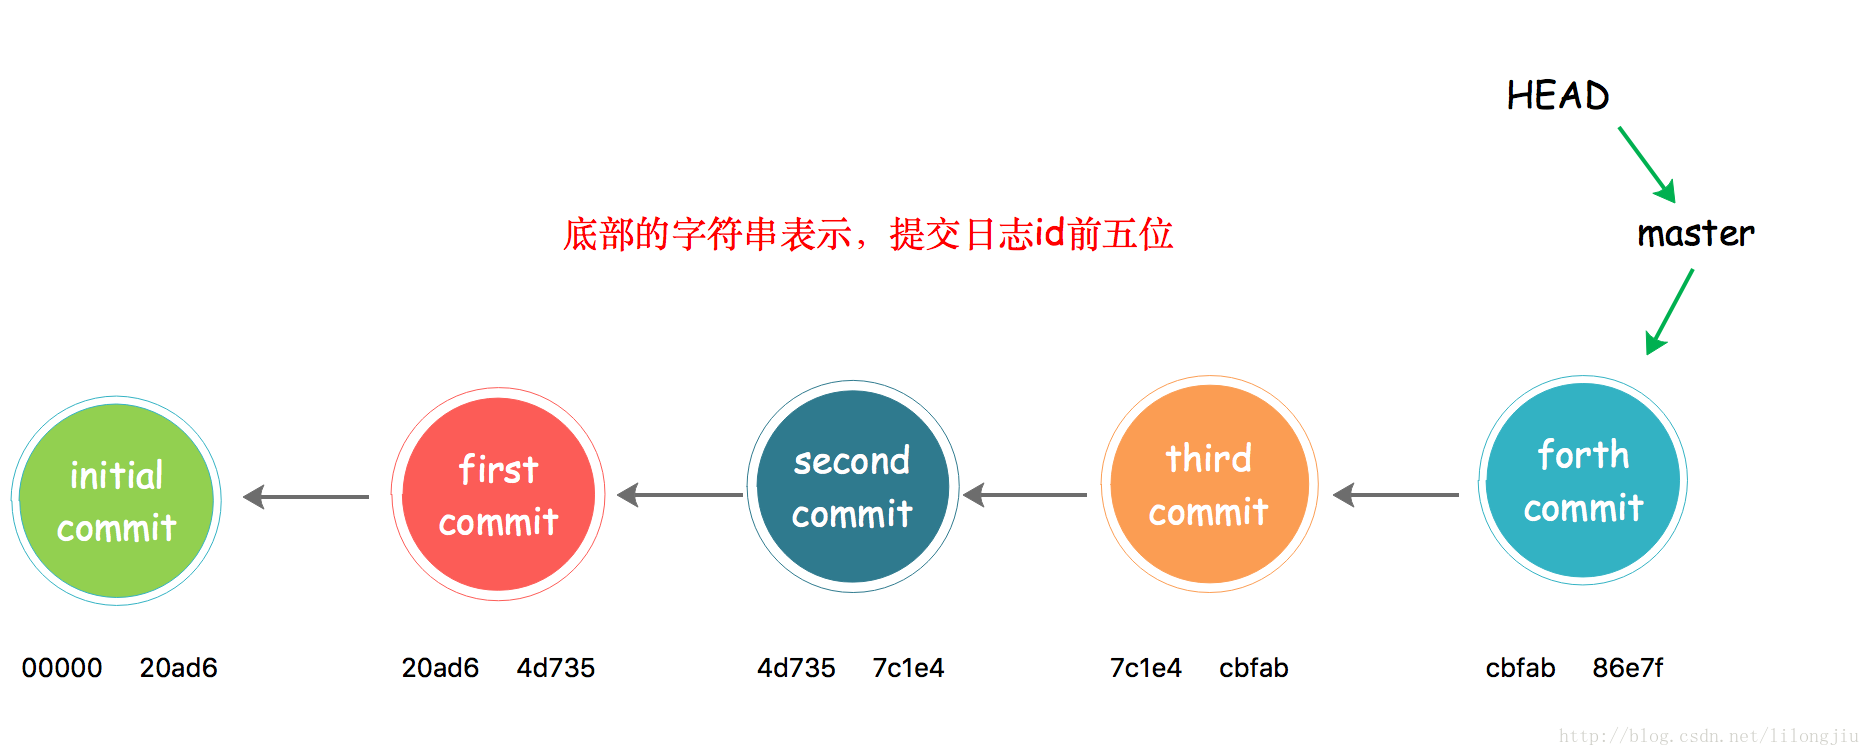
现在,在这个基础上我们创建一个分支develop
➜  myproject git:(master) git branch develop
➜  myproject git:(master) git branch
  develop
* master
➜  myproject git:(master)
在 .git/logs/refs/heads会多出一个文件develop
➜  myproject git:(master) ll .git/logs/refs/heads
total 16
-rw-r--r--  1 lilongjiu  staff   159B 10 11 21:35 develop
-rw-r--r--  1 lilongjiu  staff   774B 10 11 21:18 master
➜  myproject git:(master)
现在查看一下master和develop分支的日志
➜  myproject git:(master) cat .git/logs/refs/heads/master
0000000000000000000000000000000000000000 20ad634e11a6a49e47abad0a257f99ce73797bc7 懿名 <lilongjiu_lntu@163.com> 1507727824 +0800  commit (initial): initial commit
20ad634e11a6a49e47abad0a257f99ce73797bc7 4d735b09358b4e4d61124336789edfdf3802050b 懿名 <lilongjiu_lntu@163.com> 1507727851 +0800  commit: first commit
4d735b09358b4e4d61124336789edfdf3802050b 7cf1e4b7ac9b36724bcd5d906e48ac4abaca4c51 懿名 <lilongjiu_lntu@163.com> 1507727865 +0800  commit: second commit
7cf1e4b7ac9b36724bcd5d906e48ac4abaca4c51 cbfab806941c47298c43ec1b86b6491e916a04f8 懿名 <lilongjiu_lntu@163.com> 1507727878 +0800  commit: third commit
cbfab806941c47298c43ec1b86b6491e916a04f8 86e7fa413ea7fa8a527daeaae3cdbf9309dd3d5d 懿名 <lilongjiu_lntu@163.com> 1507727893 +0800  commit: fourth commit
➜  myproject git:(master)
➜  myproject git:(master) cat .git/logs/refs/heads/develop
0000000000000000000000000000000000000000 86e7fa413ea7fa8a527daeaae3cdbf9309dd3d5d 懿名 <lilongjiu_lntu@163.com> 1507728910 +0800  branch: Created from master
➜  myproject git:(master)
从下面的图,可以看到develop分支的提交id就是master最后一次提交的id,git创建分支是非常轻量级的,仅仅是创建一个指针。
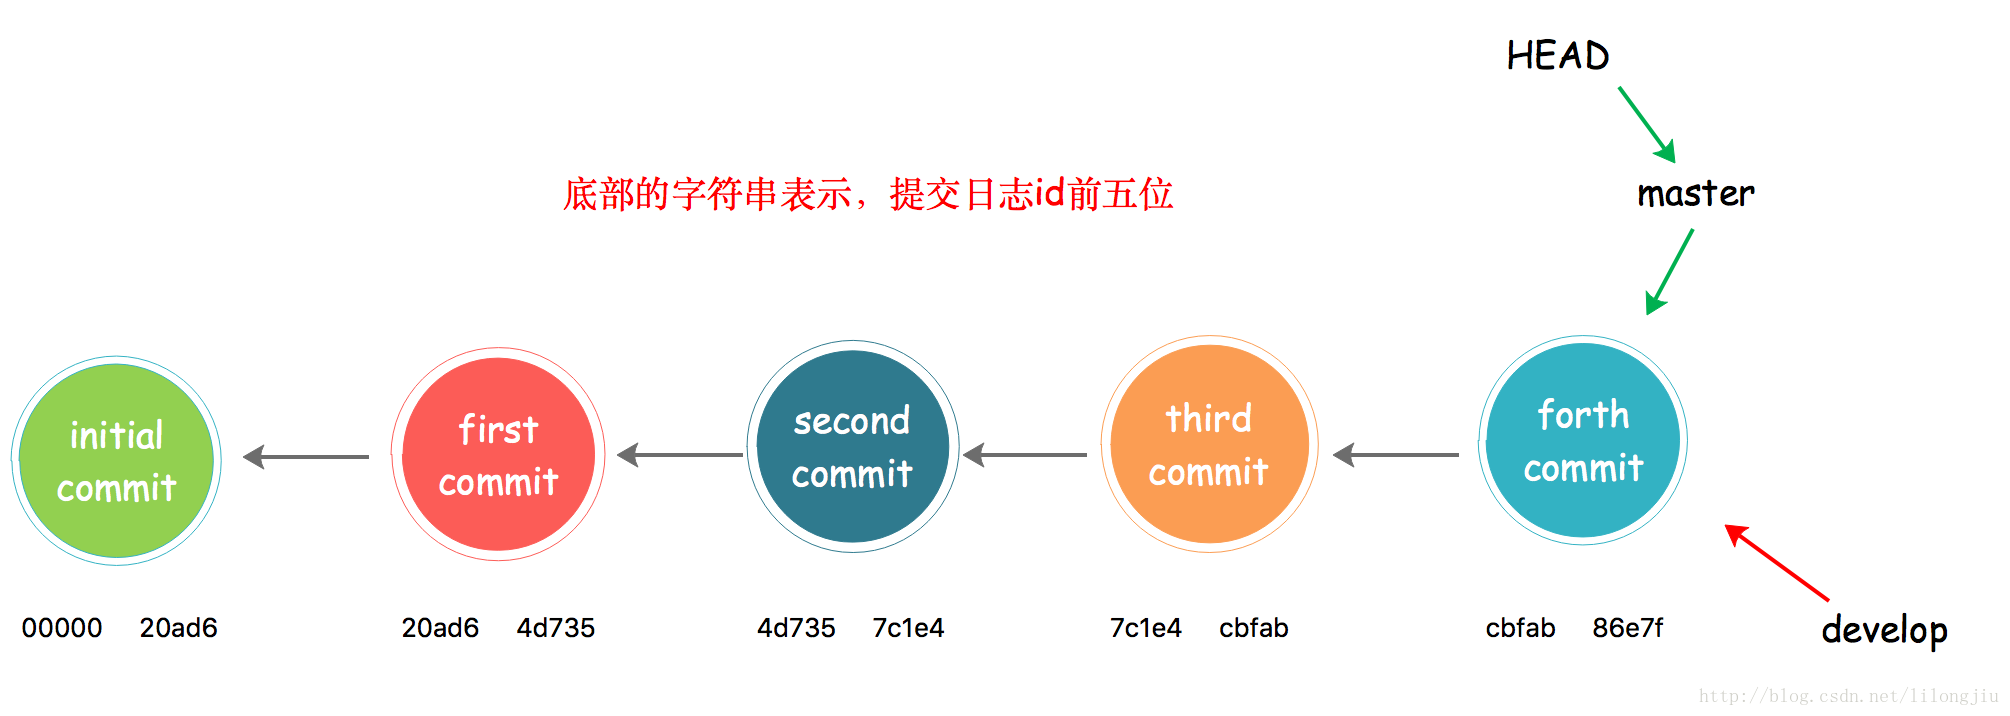
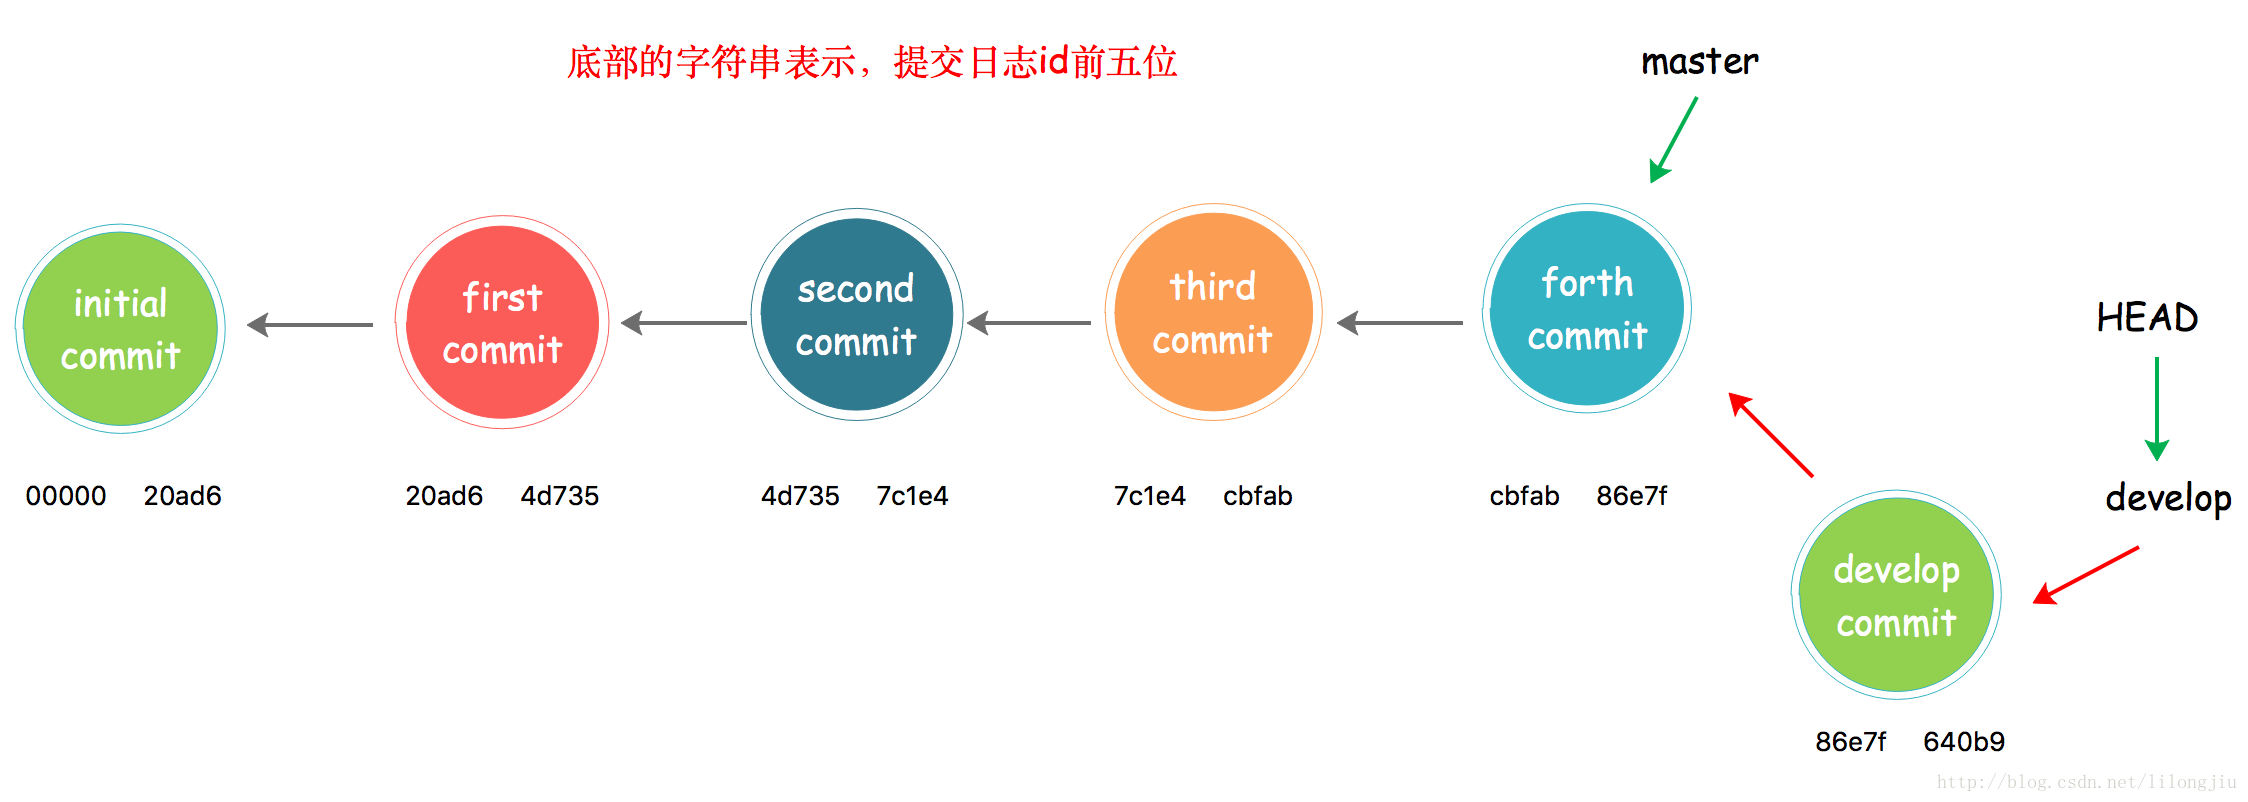
现在我们切换到develop分支
➜  myproject git:(master) git checkout develop
➜  myproject git:(develop) cat .git/HEAD
ref: refs/heads/develop
➜  myproject git:(develop)
可以看到HEAD指向了develop
我们在develop分支上做一次修改,提交,然后查看日志:
➜  myproject git:(develop) echo "add by develop" >> test.txt
➜  myproject git:(develop) ✗ git commit -am "commit by develop"
[develop 640b944] commit by develop
 1 file changed, 1 insertion(+)
➜  myproject git:(develop)
➜ myproject git:(develop) cat .git/logs/refs/heads/master
0000000000000000000000000000000000000000 20ad634e11a6a49e47abad0a257f99ce73797bc7 懿名 <lilongjiu_lntu@163.com> 1507727824 +0800 commit (initial): initial commit
20ad634e11a6a49e47abad0a257f99ce73797bc7 4d735b09358b4e4d61124336789edfdf3802050b 懿名 <lilongjiu_lntu@163.com> 1507727851 +0800 commit: first commit
4d735b09358b4e4d61124336789edfdf3802050b 7cf1e4b7ac9b36724bcd5d906e48ac4abaca4c51 懿名 <lilongjiu_lntu@163.com> 1507727865 +0800 commit: second commit
7cf1e4b7ac9b36724bcd5d906e48ac4abaca4c51 cbfab806941c47298c43ec1b86b6491e916a04f8 懿名 <lilongjiu_lntu@163.com> 1507727878 +0800 commit: third commit
cbfab806941c47298c43ec1b86b6491e916a04f8 86e7fa413ea7fa8a527daeaae3cdbf9309dd3d5d 懿名 <lilongjiu_lntu@163.com> 1507727893 +0800 commit: fourth commit
➜ myproject git:(develop)
➜ myproject git:(develop) cat .git/logs/refs/heads/develop
0000000000000000000000000000000000000000 86e7fa413ea7fa8a527daeaae3cdbf9309dd3d5d 懿名 <lilongjiu_lntu@163.com> 1507728910 +0800 branch: Created from master
86e7fa413ea7fa8a527daeaae3cdbf9309dd3d5d 640b9445b4ab2f3b10eb53b7a02b5c8c6dd1d105 懿名 <lilongjiu_lntu@163.com> 1507729967 +0800 commit: commit by develop
➜ myproject git:(develop)
现在的提交示意图如下:
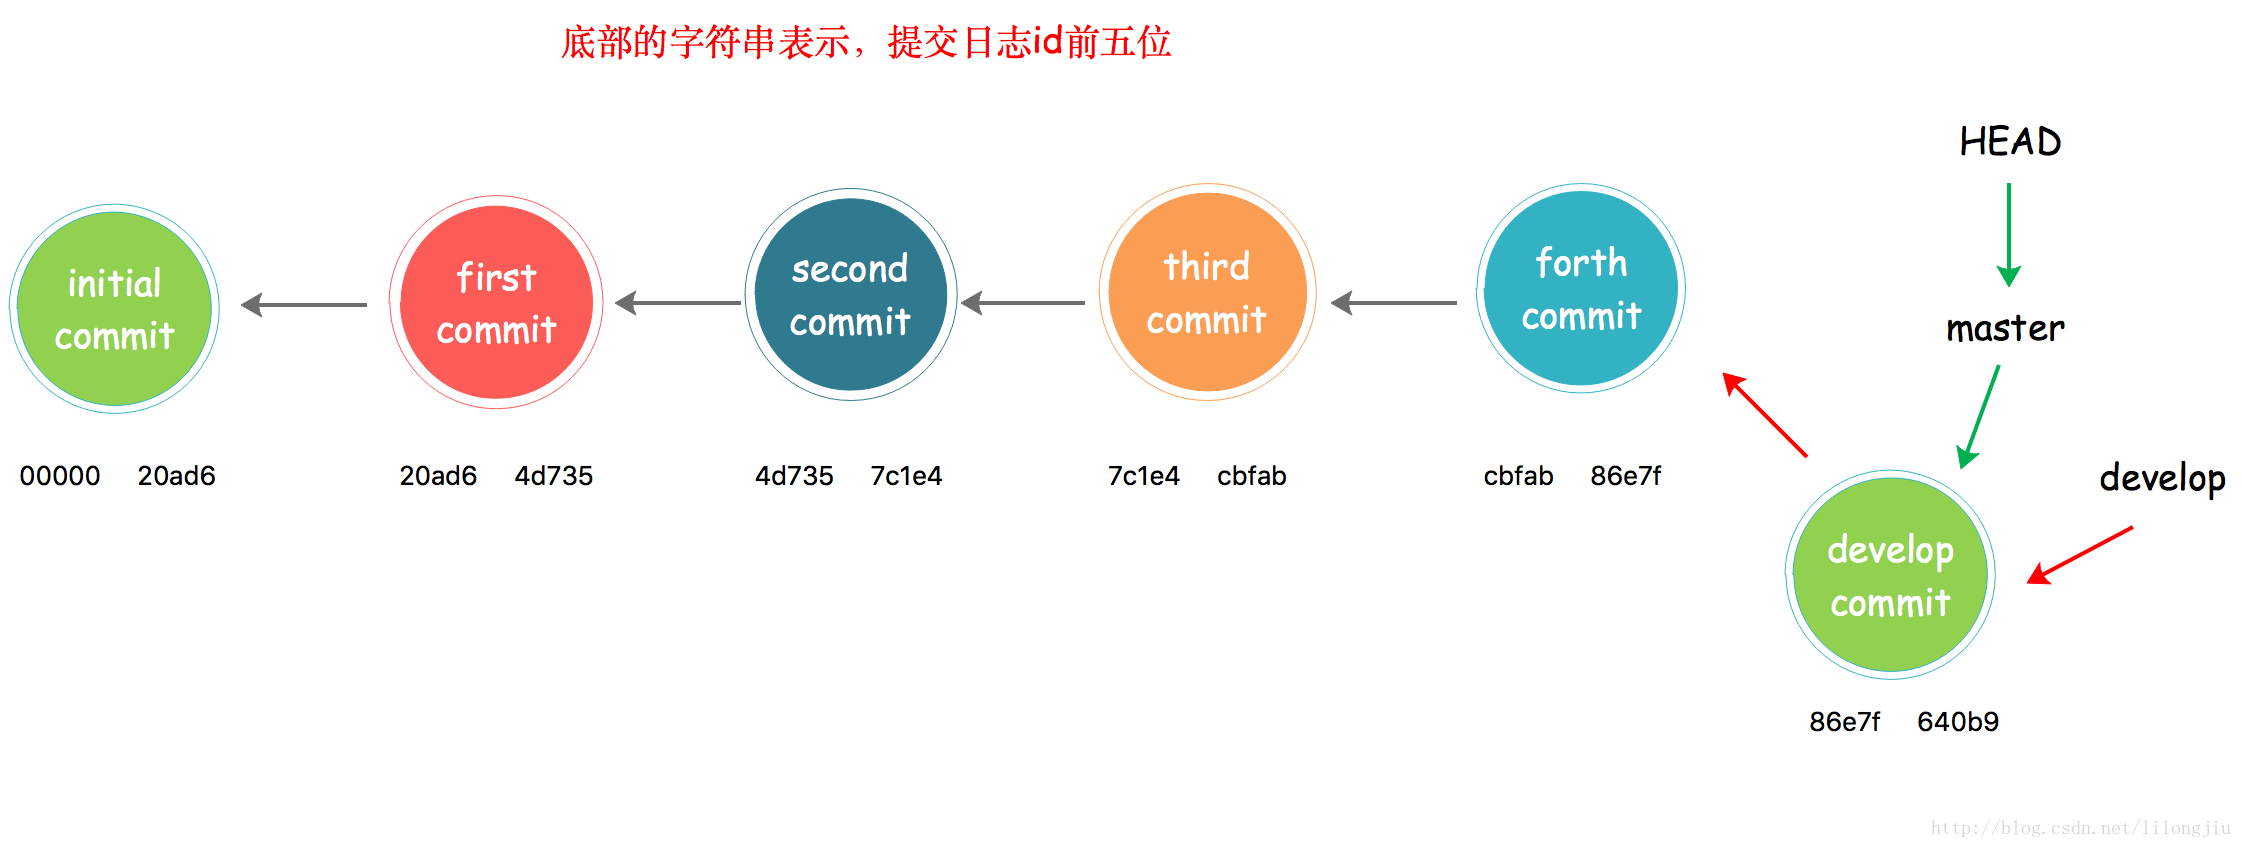
再次理解Fast-forward
在前面的基础下,将develop分支合并到master分支,那么根据之前的讲解,应该是Fast-forward
➜  myproject git:(develop) git checkout master
Switched to branch 'master'
➜  myproject git:(master) git merge develop
Updating 86e7fa4..640b944
Fast-forward
 test.txt | 1 +
 1 file changed, 1 insertion(+)
➜  myproject git:(master)
合并后,我们再看一下日志:
➜  myproject git:(master) cat .git/logs/refs/heads/master
0000000000000000000000000000000000000000 20ad634e11a6a49e47abad0a257f99ce73797bc7 懿名 <lilongjiu_lntu@163.com> 1507727824 +0800  commit (initial): initial commit
20ad634e11a6a49e47abad0a257f99ce73797bc7 4d735b09358b4e4d61124336789edfdf3802050b 懿名 <lilongjiu_lntu@163.com> 1507727851 +0800  commit: first commit
4d735b09358b4e4d61124336789edfdf3802050b 7cf1e4b7ac9b36724bcd5d906e48ac4abaca4c51 懿名 <lilongjiu_lntu@163.com> 1507727865 +0800  commit: second commit
7cf1e4b7ac9b36724bcd5d906e48ac4abaca4c51 cbfab806941c47298c43ec1b86b6491e916a04f8 懿名 <lilongjiu_lntu@163.com> 1507727878 +0800  commit: third commit
cbfab806941c47298c43ec1b86b6491e916a04f8 86e7fa413ea7fa8a527daeaae3cdbf9309dd3d5d 懿名 <lilongjiu_lntu@163.com> 1507727893 +0800  commit: fourth commit
86e7fa413ea7fa8a527daeaae3cdbf9309dd3d5d 640b9445b4ab2f3b10eb53b7a02b5c8c6dd1d105 懿名 <lilongjiu_lntu@163.com> 1507730283 +0800  merge develop: Fast-forward
➜  myproject git:(master)
➜  myproject git:(master) cat .git/logs/refs/heads/develop
0000000000000000000000000000000000000000 86e7fa413ea7fa8a527daeaae3cdbf9309dd3d5d 懿名 <lilongjiu_lntu@163.com> 1507728910 +0800  branch: Created from master
86e7fa413ea7fa8a527daeaae3cdbf9309dd3d5d 640b9445b4ab2f3b10eb53b7a02b5c8c6dd1d105 懿名 <lilongjiu_lntu@163.com> 1507729967 +0800  commit: commit by develop
➜  myproject git:(master)
从上面的的日志可以看到,master分支的最后一条提交id,就是develop分支的最后一次提交id,也就是说Fast-forward仅仅是指针的移动,图示如下:


 6910
6910


 被折叠的 条评论
为什么被折叠?
被折叠的 条评论
为什么被折叠?
 到【灌水乐园】发言


