


-
开篇说明
最近工作有权限控制的需求,所以看了一下spring的security,它提供了很好的安全服务;
参考文章:http://peiquan.blog.51cto.com/7518552/1384168 ;
在这里我使用第三种权限控制方法,即将用户,权限,资源使用数据库存储,并自定义过滤器,在配置文件里进行相应配置。
二、数据准备
--权限表
CREATE TABLE `authorities` (
`id` int(11) NOT NULL AUTO_INCREMENT,
`authority` varchar(20) DEFAULT NULL,
`uid` int(11) DEFAULT NULL, //用户id
PRIMARY KEY (`id`)
) ;
INSERT INTO `authorities` VALUES ('1', 'ROLE_ADMIN', '1');
INSERT INTO `authorities` VALUES ('2', 'ROLE_USER', '2');
--用户表(密码为123,这里已加密)
CREATE TABLE `users` (
`id` int(11) NOT NULL AUTO_INCREMENT,
`username` varchar(20) DEFAULT NULL,
`password` varchar(60) DEFAULT NULL,
`enabled` int(11) DEFAULT NULL,
PRIMARY KEY (`id`)
);
INSERT INTO `users` VALUES ('1', 'admin', 86888061b399e74e30eeead8c7aab922, '1');
INSERT INTO `users` VALUES ('2', 'user', '368703df04cc8d60e2f494a5c244e45a', '1');
--资源表
CREATE TABLE `demo_resources` (
`id` int(10) NOT NULL AUTO_INCREMENT,
`resource_name` varchar(100) NOT NULL,
`resource_type` varchar(100) NOT NULL,
`resource_content` varchar(200) NOT NULL,
`resource_desc` varchar(200) NOT NULL,
`enabled` int(2) DEFAULT NULL,
PRIMARY KEY (`id`),
UNIQUE KEY `resource_name` (`resource_name`),
KEY `resource_name_2` (`resource_name`)
);
INSERT INTO `demo_resources` VALUES ('1', '所有资源', 'requesturl', '/**', '所有页面', '1');
INSERT INTO `demo_resources` VALUES ('2', '管理员资源', 'requesturl', '/admin.jsp', '进入管理员页面', '1');
INSERT INTO `demo_resources` VALUES ('3', 'user资源', 'requesturl', '/', 'user能进入首页', '1');
--资源与权限关联表
CREATE TABLE `resource_authority` (
`id` int(11) NOT NULL AUTO_INCREMENT,
`rid` int(11) DEFAULT NULL, //资源id
`aid` int(11) DEFAULT NULL, //权限id
PRIMARY KEY (`id`)
);
INSERT INTO `resource_authority` VALUES ('1', '1', '1');
INSERT INTO `resource_authority` VALUES ('2', '2', '1');
INSERT INTO `resource_authority` VALUES ('3', '3', '2');
上面的数据说明:
1) admin角色的用户能够访问所有资源(/**,当然我加/admin.jsp这个有点多余,不过没关系) ;
2) user角色的用户只能进入首页(/);
三、security配置
|
1
2
3
4
5
6
7
8
9
10
11
12
13
14
15
16
17
18
19
20
21
22
23
24
25
26
27
28
29
30
31
32
33
34
35
36
|
<
http
pattern
=
"/login.jsp"
security
=
"none"
/>
<
http
auto-config
=
"true"
access-denied-page
=
"/403.jsp"
>
<
form-login
login-page
=
"/login.jsp"
/>
<!-- 自定义filter -->
<
custom-filter
before
=
"FILTER_SECURITY_INTERCEPTOR"
ref
=
"securityInterceptorFilter"
/>
</
http
>
<!-- 配置认证管理器 -->
<
authentication-manager
alias
=
"authenticationManager"
>
<
authentication-provider
user-service-ref
=
'userDetailsService'
>
<!-- 用户加密解密类 -->
<
password-encoder
hash
=
"md5"
>
<
salt-source
user-property
=
"username"
/>
</
password-encoder
>
</
authentication-provider
>
</
authentication-manager
>
<
beans:bean
id
=
"userDetailsService"
class
=
"com.springmvc.security.impl.SpringMvcUserDetailsServiceImpl"
/>
<!-- PasswordEncoder 密码接口 -->
<
beans:bean
id
=
"passwdEcoder"
class
=
"org.springframework.security.authentication.encoding.Md5PasswordEncoder"
/>
<!-- 元数据提供接口 -->
<
beans:bean
id
=
"springMvcInvocationSecurityMetadataSource"
class
=
"com.springmvc.security.impl.SpringMvcInvocationSecurityMetadataSourceImpl"
>
</
beans:bean
>
<!-- 权限抉择接口 -->
<
beans:bean
id
=
"accessDecisionManager"
class
=
"com.springmvc.security.impl.DemoAccessDecisionManager"
/>
<!-- 自定义过滤器 -->
<
beans:bean
id
=
"securityInterceptorFilter"
class
=
"com.springmvc.security.impl.DemoSecurityInterceptor"
>
<
beans:property
name
=
"securityMetadataSource"
ref
=
"springMvcInvocationSecurityMetadataSource"
/>
<!-- FilterInvocationSecurityMetadataSource 接口实现类 -->
<
beans:property
name
=
"authenticationManager"
ref
=
"authenticationManager"
/>
<!-- 鉴定管理类 -->
<
beans:property
name
=
"accessDecisionManager"
ref
=
"accessDecisionManager"
/>
<!-- AccessDecisionManager 接口实现类 -->
</
beans:bean
>
|
四、功能说明
1) springMvcInvocationSecurityMetadataSource
服务器启动时,会将数据库中所有权限和资源提取出来,放在一个map里,等用户登录到该系统时,就会使用到map,从而判断该用户是否有这个权限。
|
1
2
3
4
5
6
7
8
9
10
11
12
13
14
15
16
17
18
19
20
21
22
23
24
25
26
27
28
29
30
31
32
33
34
35
36
37
38
39
40
41
42
43
44
45
46
47
48
49
50
51
52
53
54
55
56
57
58
59
60
61
62
63
64
65
66
67
68
69
70
71
72
73
74
75
76
77
78
79
80
81
82
83
84
85
86
87
88
89
90
91
92
93
94
95
96
97
98
|
public
class
SpringMvcInvocationSecurityMetadataSourceImpl
implements
FilterInvocationSecurityMetadataSource {
private
static
final
Logger logger = LoggerFactory
.getLogger(SpringMvcInvocationSecurityMetadataSourceImpl.
class
);
private
SecurityServiceInf securityService;
@Autowired
public
SpringMvcInvocationSecurityMetadataSourceImpl(
SecurityServiceInf securityService) {
this
.securityService = securityService;
initResources();
}
// 所有的资源和权限的映射就存在这里
private
HashMap<RequestMatcher, Collection<ConfigAttribute>> requestMap =
new
HashMap<RequestMatcher, Collection<ConfigAttribute>>();
private
Collection<ConfigAttribute> allAttribute =
new
HashSet<ConfigAttribute>();
/**
* 初始化所有的资源,这个会在容器运行的时候的构造方法里调用
*/
private
void
initResources() {
logger.debug(
"init SecurityMetadataSource load all resources"
);
// 读取所有的资源,和资源相关联的的权限
// 读取所有权限点
Collection<AuthorityEntity> allAuthority = securityService
.getAllAuthority();
logger.debug(
"start to convert AUthortiyEntity to SercurityConfig"
);
for
(AuthorityEntity authEntity : allAuthority) {
String authString = authEntity.getAuthority();
logger.debug(
"add authroity named:["
+ authString +
"]"
);
SecurityConfig attrConfig =
new
SecurityConfig(authString);
allAttribute.add(attrConfig);
}
// 读取所有资源
Collection<ResourceEntity> allResources = securityService
.findAllResources();
// 循环所有资源
for
(ResourceEntity resourceEntiry : allResources) {
// 按照资源查询和资源相关的权限点
Collection<AuthorityEntity> authEntities = securityService
.getAuthorityByResource(resourceEntiry.getId());
// 把此关系保存到requestMap里
// 获取资源
String resourceContent = resourceEntiry.getResourceContent();
// 把url资源转化为一个spring的工具类,请求匹配器类
logger.debug(
"add new requestmatcher with ["
+ resourceContent
+
"]"
);
RequestMatcher matcher =
new
AntPathRequestMatcher(resourceContent);
// 循环权限 定义一个权限的集合,和此资源对应起来,添加到HashMap里
Collection<ConfigAttribute> array =
new
ArrayList<ConfigAttribute>(
authEntities.size());
for
(AuthorityEntity auth : authEntities) {
// 转化权限对象为SecurityConfig
SecurityConfig securityConfig =
new
SecurityConfig(
auth.getAuthority());
array.add(securityConfig);
}
requestMap.put(matcher, array);
}
}
/**
* 根据资源获取需要的权限名称
*/
@Override
public
Collection<ConfigAttribute> getAttributes(Object object)
throws
IllegalArgumentException {
logger.debug(
"get resource "
+ object +
" authority"
);
// 把对象转化为请求
final
HttpServletRequest request = ((FilterInvocation) object)
.getRequest();
// 循环整个Map 看看有没有可以匹配的,如果有匹配的就立刻返回
Collection<ConfigAttribute> attrHashMap =
new
HashSet<ConfigAttribute>();
for
(Map.Entry<RequestMatcher, Collection<ConfigAttribute>> entry : requestMap
.entrySet()) {
if
(entry.getKey().matches(request)) {
logger.debug(
"request matches :"
+ request.getRequestURL());
attrHashMap.addAll(entry.getValue());
}
}
if
(attrHashMap.size() >
0
) {
// 如果有匹配的就转成ArrayList,然后返回list
Collection<ConfigAttribute> attr =
new
ArrayList<ConfigAttribute>(
attrHashMap);
return
attr;
}
logger.debug(
"request no matches"
);
return
Collections.emptyList();
}
/**
* 获取所有权限点
*/
@Override
public
Collection<ConfigAttribute> getAllConfigAttributes() {
return
this
.allAttribute;
}
@Override
public
boolean
supports(Class<?> clazz) {
// TODO Auto-generated method stub
return
true
;
}
}
|
requestMap里的数据如下:

2) userDetailsService
当用户登录时,会使用输入的用户信息,与数据库中的比较,用户名错误或密码错误,都会有相应的提示(下面会有介绍),都正确的话,会返回一个user实体。
|
1
2
3
4
5
6
7
8
9
10
11
12
13
14
15
16
17
18
19
20
21
22
23
|
public
class
SpringMvcUserDetailsServiceImpl
implements
UserDetailsServiceInf {
@Autowired
private
DemoAuthorityRepository authRepository;
@Autowired
private
UserRepository demoUserReposiroty;
@Override
public
UserDetails loadUserByUsername(String username)
throws
UsernameNotFoundException {
// 读取用户
UsersEntity userEntity = demoUserReposiroty.findByName(username);
// 读取权限
Collection<GrantedAuthority> auths =
new
ArrayList<GrantedAuthority>();
// 这里需要从数据库里读取所有的权限点
Collection<com.springmvc.model.AuthorityEntity> aes = authRepository
.getAuthorityByUser(userEntity.getId());
for
(AuthorityEntity ae : aes) {
auths.add(
new
SimpleGrantedAuthority(ae.getAuthority()));
}
User user =
new
User(userEntity.getUsername(),
userEntity.getPassword(),
true
,
true
,
true
,
true
, auths);
return
user;
}
}
|
3) accessDecisionManager
判断当前用户是否拥有访问该资源的权限。
|
1
2
3
4
5
6
7
8
9
10
11
12
13
14
15
16
17
18
19
20
21
22
23
24
25
26
27
28
29
30
31
32
|
public
class
DemoAccessDecisionManager
implements
AccessDecisionManager {
@Override
public
void
decide(Authentication authentication, Object object,
Collection<ConfigAttribute> configAttributes)
throws
AccessDeniedException, InsufficientAuthenticationException {
if
(
null
== configAttributes) {
return
;
}
Iterator<ConfigAttribute> cons = configAttributes.iterator();
while
(cons.hasNext()) {
ConfigAttribute ca = cons.next();
String needRole = ((SecurityConfig) ca).getAttribute();
// gra 为用户所被赋予的权限,needRole为访问相应的资源应具有的权限
for
(GrantedAuthority gra : authentication.getAuthorities()) {
if
(needRole.trim().equals(gra.getAuthority().trim())) {
return
;
}
}
}
throw
new
AccessDeniedException(
"没有权限"
);
}
@Override
public
boolean
supports(ConfigAttribute attribute) {
// TODO Auto-generated method stub
return
true
;
}
@Override
public
boolean
supports(Class<?> clazz) {
// TODO Auto-generated method stub
return
true
;
}
}
|
五、权限控制
1) 登录
若使用security默认的登录页,则登录时的错误提示信息是在spring-security-core包下面的messages.properties等;
但是一般我们使用自己的登录页,上面security.xml已配置了登陆页的路径login.jsp,那么提示信息就得自己配置了,可以自定义message_zh_CN.properties,放在根路径下的message包里,然后这样配置:
|
1
2
3
4
5
6
7
8
|
<
bean
id
=
"messageSource"
class
=
"org.springframework.context.support.ReloadableResourceBundleMessageSource"
>
<
property
name
=
"defaultEncoding"
value
=
"UTF-8"
/>
<
property
name
=
"basenames"
>
<
list
>
<
value
>classpath:message/message</
value
>
</
list
>
</
property
>
</
bean
>
|
message_zh_CN.properties信息如下:
|
1
|
AbstractUserDetailsAuthenticationProvider.badCredentials=\u5BC6\u7801\u4E0D\u6B63\u786E
|
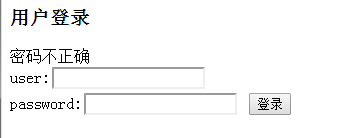
security默认提示:坏的凭证,这里是'密码不正确',当然你可以改成任何提示信息;
若登录时用户名错误,返回的信息是no entity found....
下面使用错误密码登录,提示信息如下:
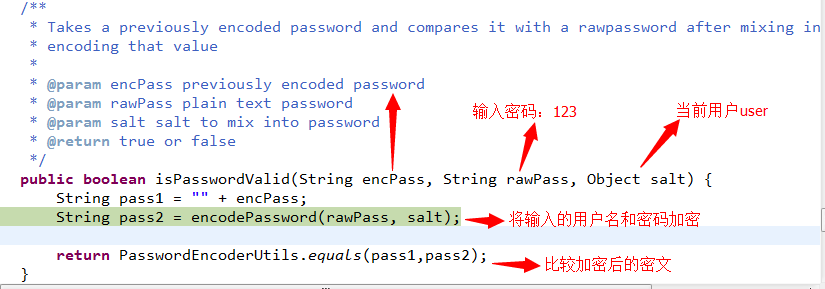
比较密文的代码如下:
2) 登录成功后,访问资源
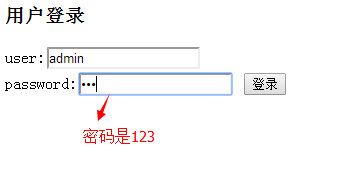
i. 使用admin账号登录,然后访问admin.jsp


ii. 使用user账号登录,然后访问admin.jsp

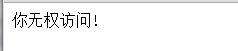
可以看到,user无权访问admin.jsp。
ok,只要权限和资源关系配置好,security会帮我们自动拦截,实现权限控制。


 1882
1882


 被折叠的 条评论
为什么被折叠?
被折叠的 条评论
为什么被折叠?
 到【灌水乐园】发言


