Spring Security
简介
Spring Security是针对Spring项目的安全框架,也是SpringBoot底层安全模块默认的技术选型,他可以实现强大的Web安全控制,对于安全控制,我们仅需要引入spring-boot-starter-security模块,进行少量的配置,即可实现强大的安全管理!- 重要Java类:
WebSecurityConfigurerAdapter:自定义Security策略AuthenticationManagerBuilder:自定义认证策略@EnableWebSecurity:开启WebSecurity模式
Spring Security的两个主要目标是“认证 - Authentication”和“授权 - Authorization”(访问控制)
案例
1. pom.xml
<?xml version="1.0" encoding="UTF-8"?>
<project xmlns="http://maven.apache.org/POM/4.0.0" xmlns:xsi="http://www.w3.org/2001/XMLSchema-instance"
xsi:schemaLocation="http://maven.apache.org/POM/4.0.0 https://maven.apache.org/xsd/maven-4.0.0.xsd">
<modelVersion>4.0.0</modelVersion>
<groupId>com.murphy</groupId>
<artifactId>springsecurity</artifactId>
<version>0.0.1-SNAPSHOT</version>
<name>springsecurity</name>
<parent>
<groupId>org.springframework.boot</groupId>
<artifactId>spring-boot-starter-parent</artifactId>
<version>2.3.0.RELEASE</version>
<relativePath/>
</parent>
<description>Demo project for Spring Boot</description>
<properties>
<java.version>1.8</java.version>
</properties>
<dependencies>
<dependency>
<groupId>org.springframework.boot</groupId>
<artifactId>spring-boot-starter-security</artifactId>
</dependency>
<dependency>
<groupId>org.thymeleaf.extras</groupId>
<artifactId>thymeleaf-extras-springsecurity5</artifactId>
<version>3.0.4.RELEASE</version>
</dependency>
<dependency>
<groupId>org.springframework.boot</groupId>
<artifactId>spring-boot-starter-web</artifactId>
</dependency>
<dependency>
<groupId>org.springframework.boot</groupId>
<artifactId>spring-boot-starter-thymeleaf</artifactId>
</dependency>
<dependency>
<groupId>org.springframework.boot</groupId>
<artifactId>spring-boot-starter-test</artifactId>
<scope>test</scope>
</dependency>
</dependencies>
<build>
<plugins>
<plugin>
<groupId>org.springframework.boot</groupId>
<artifactId>spring-boot-maven-plugin</artifactId>
</plugin>
</plugins>
</build>
</project>
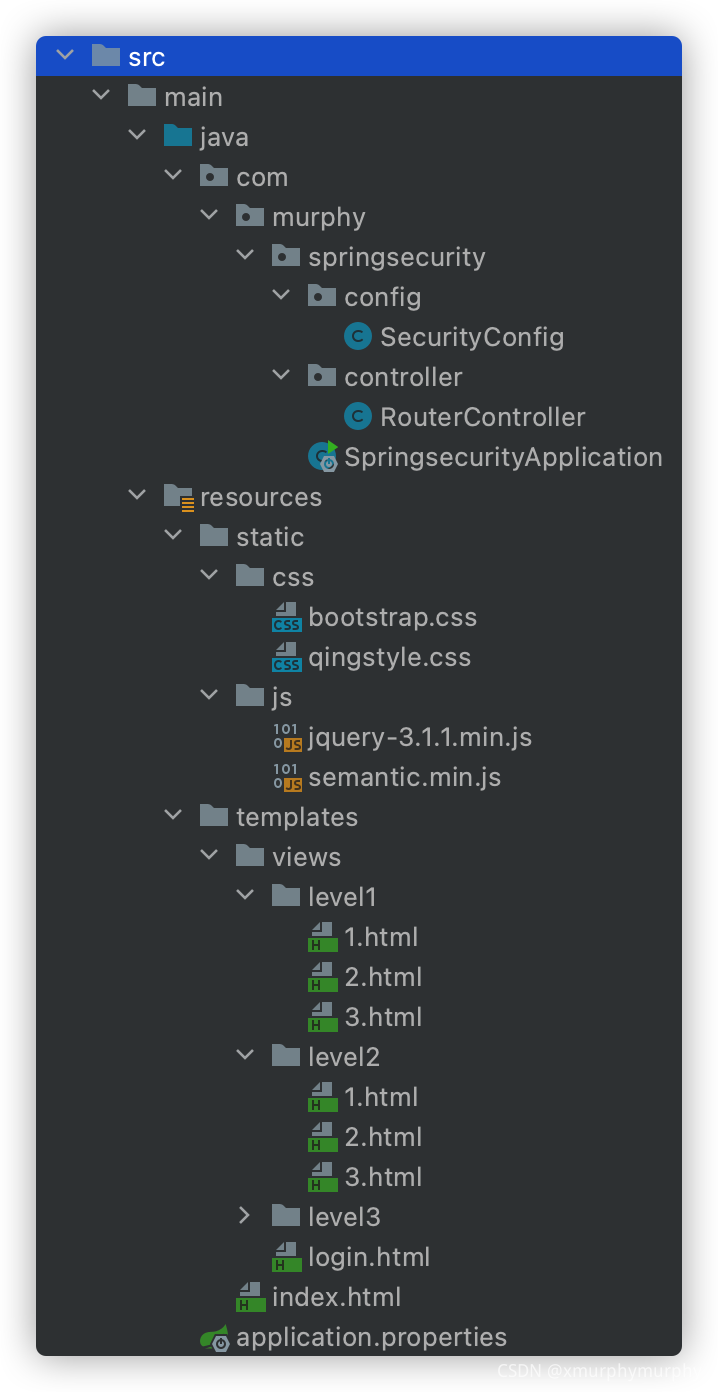
1.1 项目结构
1.2 静态资源 - templates
<!DOCTYPE html>
<html lang="en" xmlns:th="http://www.thymeleaf.org">
<head>
<meta charset="UTF-8">
<meta name="viewport" content="width=device-width, initial-scale=1, maximum-scale=1">
<title>首页</title>
<link href="https://cdn.bootcss.com/semantic-ui/2.4.1/semantic.min.css" rel="stylesheet">
<link th:href="@{/css/qinstyle.css}" rel="stylesheet">
</head>
<body>
<div class="ui container">
<div class="ui segment" id="index-header-nav" th:fragment="nav-menu">
<div class="ui secondary menu">
<a class="item" th:href="@{/index}">首页</a>
<div class="right menu">
<a class="item" th:href="@{/toLogin}">
<i class="address card icon"></i> 登录
</a>
<a class="item" th:href="@{/logout}">
<i class="sign-out icon"></i> 注销
</a>
</div>
</div>
</div>
<div class="ui segment" style="text-align: center">
<h3>Spring Security Study</h3>
</div>
<div>
<br>
<div class="ui three column stackable grid">
<div class="column">
<div class="ui raised segment">
<div class


 最低0.47元/天 解锁文章


 594
594


 被折叠的 条评论
为什么被折叠?
被折叠的 条评论
为什么被折叠?
 到【灌水乐园】发言


