


《信息安全技术》这门课又在讲 DES 加密算法了,以前用纯C写过一次,这次我用 C++ 重新写了一个,写篇文章以备后用。本文介绍了 DES 算法加密的大致步骤和整体流程。
一、DES算法原理
DES算法是一种最通用的对称密钥算法,因为算法本身是公开的,所以其安全性在于密钥的安全性。基于密钥的算法通常有两类:对称算法和公开密钥算法。对称算法的对称性体现在加密密钥能够从解密密钥推算出来,反之亦然。在大多数对称算法中,加解密的密钥是相同的,DES就是这样。可见,对称密钥算法的加解密密钥都是保密的。而公开密钥算法的加密密钥是公开的,解密密钥是保密的。
下面是 DES 加密算法的整体流程图:
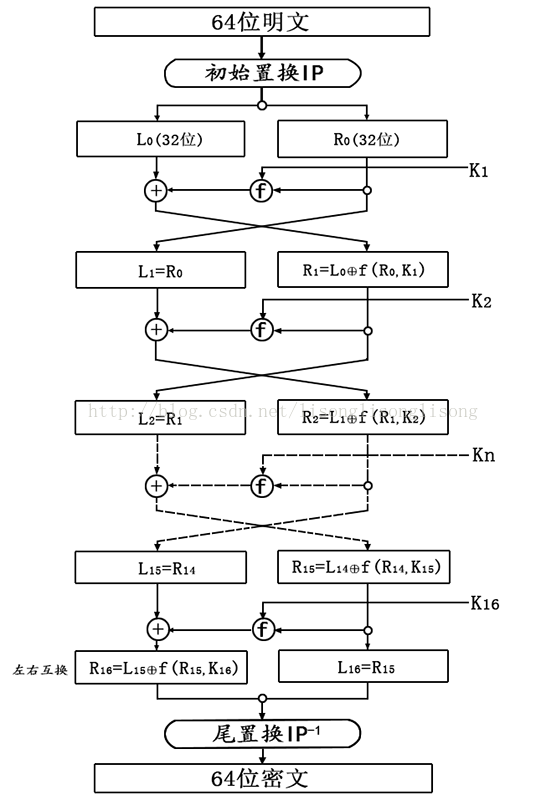
从上面的流程图可以看出,DES加密主要由四个部分完成:
- 初始置换 IP;
- 子密钥 Ki 的获取;
- 密码函数 f ;
- 尾置换 IP-1 ;
其中,第二部分和第三部分是 DES 算法的核心。注意:DES 解密算法与加密算法完全相同,只需要将子密钥的使用顺序反过来就行了。
下面分别讲一下各个部分的大致思路。
1) 初始置换IP
这一部分很简单,IP(initial permutation)是一个 8x8 的置换表:
int IP[] = { 58, 50, 42, 34, 26, 18, 10, 2,
			 60, 52, 44, 36, 28, 20, 12, 4,
			 62, 54, 46, 38, 30, 22, 14, 6,
			 64, 56, 48, 40, 32, 24, 16, 8,
			 57, 49, 41, 33, 25, 17, 9,  1,
			 59, 51, 43, 35, 27, 19, 11, 3,
			 61, 53, 45, 37, 29, 21, 13, 5,
			 63, 55, 47, 39, 31, 23, 15, 7 };
根据表中的规定,将输入的 64 位明文重新进行排序,即将第 58 位放到第 1 位,第 50 位放到第 2 位……以此类推。初始置换以后得到的是一个 64 位的输出。
2) 子密钥 Ki 的获取
下面是获取子密钥 Ki 的流程图:
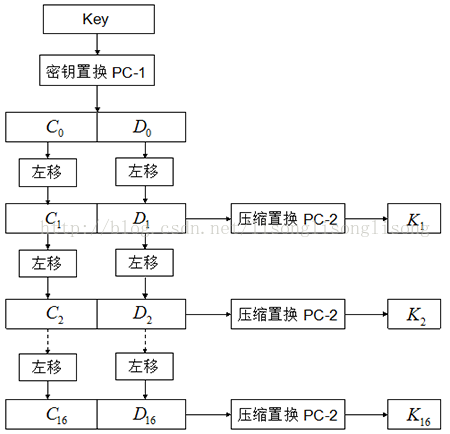
流程图已经把思路很清楚的表达出来了,很简单:
-
用户输出的密钥是 64 位的,根据密钥置换表
PC-1,将 64 位变成 56 位密钥。(去掉了奇偶校验位) -
将 PC-1 置换得到的 56 位密钥,分为前28位 C0 和后28位 D0,分别对它们进行循环左移,C0左移得到 C1,D0 左移得到 D1。
-
将 C1 和 D1 合并成 56 位,然后通过
PC-2表进行压缩置换,得到当前这一轮的 48 位子密钥 K1 。 -
然后对 C1 和 D1 进行左移和压缩置换,获取下一轮的子密钥……一共进行16轮,得到 16 个 48 位的子密钥。
这部分需要用到的表 PC-1 和表 PC-2 如下:
// 密钥置换表,将64位密钥变成56位
int PC_1[] = {57, 49, 41, 33, 25, 17, 9,
			   1, 58, 50, 42, 34, 26, 18,
			  10,  2, 59, 51, 43, 35, 27,
			  19, 11,  3, 60, 52, 44, 36,
			  63, 55, 47, 39, 31, 23, 15,
			   7, 62, 54, 46, 38, 30, 22,
			  14,  6, 61, 53, 45, 37, 29,
			  21, 13,  5, 28, 20, 12,  4};

// 压缩置换,将56位密钥压缩成48位子密钥
int PC_2[] = {14, 17, 11, 24,  1,  5,
			   3, 28, 15,  6, 21, 10,
			  23, 19, 12,  4, 26,  8,
			  16,  7, 27, 20, 13,  2,
			  41, 52, 31, 37, 47, 55,
			  30, 40, 51, 45, 33, 48,
			  44, 49, 39, 56, 34, 53,
			  46, 42, 50, 36, 29, 32};

// 每轮左移的位数
int shiftBits[] = {1, 1, 2, 2, 2, 2, 2, 2, 1, 2, 2, 2, 2, 2, 2, 1};
3) 密码函数 f
下面是密码函数f(R, K)的流程图:
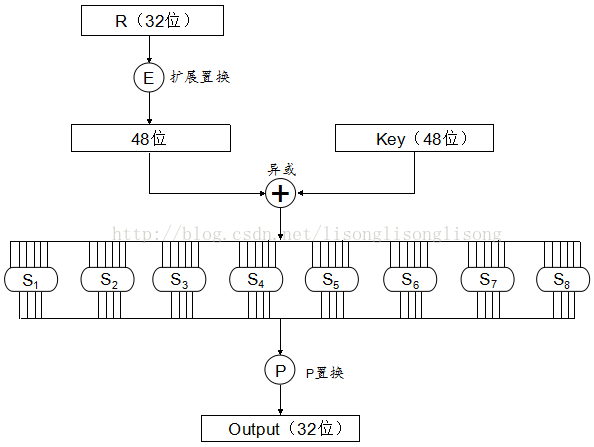
密码函数f(R, K)接受两个输入:32 位的数据和 48 位的子密钥。然后:
-
通过表 E 进行扩展置换,将输入的 32 位数据扩展为 48 位;
-
将扩展后的 48 位数据与 48 位的子密钥进行异或运算;
-
将异或得到的 48 位数据分成 8 个 6 位的块,每一个块通过对应的一个 S 表产生一个 4 位的输出。其中,每个 S 表都是 4 行 16 列。具体的置换过程如下:把 6 位输入中的第 1 位和第 6 位取出来行成一个两位的二进制数 x ,作为 Si 表中的行数(0~3);把 6 位输入的中间 4 位构成另外一个二进制数 y,作为 Si 表的列数(0~15);查出 Si 表中 x 行 y 列所对应的整数,将该整数转换为一个 4 位的二进制数。
-
把通过 S 表置换得到的 8 个 4 位连在一起,形成一个 32 位的数据。然后将该 32 位数据通过表 P 进行置换(称为P-置换),置换后得到一个仍然是 32 位的结果数据,这就是
f(R, K)函数的输出。
这部分用到了扩展置换表E,8个S表以及P-置换表,如下:
// 扩展置换表,将 32位 扩展至 48位
int E[] = {32,  1,  2,  3,  4,  5,
		    4,  5,  6,  7,  8,  9,
		    8,  9, 10, 11, 12, 13,
		   12, 13, 14, 15, 16, 17,
		   16, 17, 18, 19, 20, 21,
		   20, 21, 22, 23, 24, 25,
		   24, 25, 26, 27, 28, 29,
		   28, 29, 30, 31, 32,  1};

// S盒,每个S盒是4x16的置换表,6位 -> 4位
int S_BOX[8][4][16] = {
	{
		{14,4,13,1,2,15,11,8,3,10,6,12,5,9,0,7},
		{0,15,7,4,14,2,13,1,10,6,12,11,9,5,3,8},
		{4,1,14,8,13,6,2,11,15,12,9,7,3,10,5,0},
		{15,12,8,2,4,9,1,7,5,11,3,14,10,0,6,13}
	},
	{
		{15,1,8,14,6,11,3,4,9,7,2,13,12,0,5,10},
		{3,13,4,7,15,2,8,14,12,0,1,10,6,9,11,5},
		{0,14,7,11,10,4,13,1,5,8,12,6,9,3,2,15},
		{13,8,10,1,3,15,4,2,11,6,7,12,0,5,14,9}
	},
	{
		{10,0,9,14,6,3,15,5,1,13,12,7,11,4,2,8},
		{13,7,0,9,3,4,6,10,2,8,5,14,12,11,15,1},
		{13,6,4,9,8,15,3,0,11,1,2,12,5,10,14,7},
		{1,10,13,0,6,9,8,7,4,15,14,3,11,5,2,12}
	},
	{
		{7,13,14,3,0,6,9,10,1,2,8,5,11,12,4,15},
		{13,8,11,5,6,15,0,3,4,7,2,12,1,10,14,9},
		{10,6,9,0,12,11,7,13,15,1,3,14,5,2,8,4},
		{3,15,0,6,10,1,13,8,9,4,5,11,12,7,2,14}
	},
	{
		{2,12,4,1,7,10,11,6,8,5,3,15,13,0,14,9},
		{14,11,2,12,4,7,13,1,5,0,15,10,3,9,8,6},
		{4,2,1,11,10,13,7,8,15,9,12,5,6,3,0,14},
		{11,8,12,7,1,14,2,13,6,15,0,9,10,4,5,3}
	},
	{
		{12,1,10,15,9,2,6,8,0,13,3,4,14,7,5,11},
		{10,15,4,2,7,12,9,5,6,1,13,14,0,11,3,8},
		{9,14,15,5,2,8,12,3,7,0,4,10,1,13,11,6},
		{4,3,2,12,9,5,15,10,11,14,1,7,6,0,8,13}
	},
	{
		{4,11,2,14,15,0,8,13,3,12,9,7,5,10,6,1},
		{13,0,11,7,4,9,1,10,14,3,5,12,2,15,8,6},
		{1,4,11,13,12,3,7,14,10,15,6,8,0,5,9,2},
		{6,11,13,8,1,4,10,7,9,5,0,15,14,2,3,12}
	},
	{
		{13,2,8,4,6,15,11,1,10,9,3,14,5,0,12,7},
		{1,15,13,8,10,3,7,4,12,5,6,11,0,14,9,2},
		{7,11,4,1,9,12,14,2,0,6,10,13,15,3,5,8},
		{2,1,14,7,4,10,8,13,15,12,9,0,3,5,6,11}
	}
};

// P置换,32位 -> 32位
int P[] = {16,  7, 20, 21,
		   29, 12, 28, 17,
		    1, 15, 23, 26,
		    5, 18, 31, 10,
		    2,  8, 24, 14,
		   32, 27,  3,  9,
		   19, 13, 30,  6,
		   22, 11,  4, 25 };
4) 尾置换IP-1
合并 L16 和 R16 得到一个 64 位的数据,再经过尾置换后得到的就是 64 位的密文。注意:要将 L16和 R16 合并成 R16L16(即左右互换)。尾置换表IP-1如下:
// 尾置换表
int IP_1[] = {40, 8, 48, 16, 56, 24, 64, 32,
			  39, 7, 47, 15, 55, 23, 63, 31,
			  38, 6, 46, 14, 54, 22, 62, 30,
			  37, 5, 45, 13, 53, 21, 61, 29,
			  36, 4, 44, 12, 52, 20, 60, 28,
			  35, 3, 43, 11, 51, 19, 59, 27,
			  34, 2, 42, 10, 50, 18, 58, 26,
			  33, 1, 41,  9, 49, 17, 57, 25};
OK!现在我们可以回到本文的开头,去看看 DES 算法的整体流程图,思路就已经很清楚了。
二、C++实现
在 DES 算法的实现中,我用 C++ STL 中的bitset来操作二进制位,另外,这里我没有考虑时间和空间的优化。下面是对一个 64 位数据进行加密解密的源代码:
/*************************************************************************
> File Name: Des.cpp
> Author: SongLee
> E-mail: lisong.shine@qq.com
> Created Time: 2014年06月01日 星期日 19时46分32秒
> Personal Blog: http://songlee24.github.com
************************************************************************/
#include <iostream>
#include <fstream>
#include <bitset>
#include <string>
using namespace std;
bitset<64> key; // 64位密钥
bitset<48> subKey[16]; // 存放16轮子密钥
// 初始置换表
int IP[] = {58, 50, 42, 34, 26, 18, 10, 2,
60, 52, 44, 36, 28, 20, 12, 4,
62, 54, 46, 38, 30, 22, 14, 6,
64, 56, 48, 40, 32, 24, 16, 8,
57, 49, 41, 33, 25, 17, 9, 1,
59, 51, 43, 35, 27, 19, 11, 3,
61, 53, 45, 37, 29, 21, 13, 5,
63, 55, 47, 39, 31, 23, 15, 7};
// 结尾置换表
int IP_1[] = {40, 8, 48, 16, 56, 24, 64, 32,
39, 7, 47, 15, 55, 23, 63, 31,
38, 6, 46, 14, 54, 22, 62, 30,
37, 5, 45, 13, 53, 21, 61, 29,
36, 4, 44, 12, 52, 20, 60, 28,
35, 3, 43, 11, 51, 19, 59, 27,
34, 2, 42, 10, 50, 18, 58, 26,
33, 1, 41, 9, 49, 17, 57, 25};
/*------------------下面是生成密钥所用表-----------------*/
// 密钥置换表,将64位密钥变成56位
int PC_1[] = {57, 49, 41, 33, 25, 17, 9,
1, 58, 50, 42, 34, 26, 18,
10, 2, 59, 51, 43, 35, 27,
19, 11, 3, 60, 52, 44, 36,
63, 55, 47, 39, 31, 23, 15,
7, 62, 54, 46, 38, 30, 22,
14, 6, 61, 53, 45, 37, 29,
21, 13, 5, 28, 20, 12, 4};
// 压缩置换,将56位密钥压缩成48位子密钥
int PC_2[] = {14, 17, 11, 24, 1, 5,
3, 28, 15, 6, 21, 10,
23, 19, 12, 4, 26, 8,
16, 7, 27, 20, 13, 2,
41, 52, 31, 37, 47, 55,
30, 40, 51, 45, 33, 48,
44, 49, 39, 56, 34, 53,
46, 42, 50, 36, 29, 32};
// 每轮左移的位数
int shiftBits[] = {1, 1, 2, 2, 2, 2, 2, 2, 1, 2, 2, 2, 2, 2, 2, 1};
/*------------------下面是密码函数 f 所用表-----------------*/
// 扩展置换表,将 32位 扩展至 48位
int E[] = {32, 1, 2, 3, 4, 5,
4, 5, 6, 7, 8, 9,
8, 9, 10, 11, 12, 13,
12, 13, 14, 15, 16, 17,
16, 17, 18, 19, 20, 21,
20, 21, 22, 23, 24, 25,
24, 25, 26, 27, 28, 29,
28, 29, 30, 31, 32, 1};
// S盒,每个S盒是4x16的置换表,6位 -> 4位
int S_BOX[8][4][16] = {
{
{14,4,13,1,2,15,11,8,3,10,6,12,5,9,0,7},
{0,15,7,4,14,2,13,1,10,6,12,11,9,5,3,8},
{4,1,14,8,13,6,2,11,15,12,9,7,3,10,5,0},
{15,12,8,2,4,9,1,7,5,11,3,14,10,0,6,13}
},
{
{15,1,8,14,6,11,3,4,9,7,2,13,12,0,5,10},
{3,13,4,7,15,2,8,14,12,0,1,10,6,9,11,5},
{0,14,7,11,10,4,13,1,5,8,12,6,9,3,2,15},
{13,8,10,1,3,15,4,2,11,6,7,12,0,5,14,9}
},
{
{10,0,9,14,6,3,15,5,1,13,12,7,11,4,2,8},
{13,7,0,9,3,4,6,10,2,8,5,14,12,11,15,1},
{13,6,4,9,8,15,3,0,11,1,2,12,5,10,14,7},
{1,10,13,0,6,9,8,7,4,15,14,3,11,5,2,12}
},
{
{7,13,14,3,0,6,9,10,1,2,8,5,11,12,4,15},
{13,8,11,5,6,15,0,3,4,7,2,12,1,10,14,9},
{10,6,9,0,12,11,7,13,15,1,3,14,5,2,8,4},
{3,15,0,6,10,1,13,8,9,4,5,11,12,7,2,14}
},
{
{2,12,4,1,7,10,11,6,8,5,3,15,13,0,14,9},
{14,11,2,12,4,7,13,1,5,0,15,10,3,9,8,6},
{4,2,1,11,10,13,7,8,15,9,12,5,6,3,0,14},
{11,8,12,7,1,14,2,13,6,15,0,9,10,4,5,3}
},
{
{12,1,10,15,9,2,6,8,0,13,3,4,14,7,5,11},
{10,15,4,2,7,12,9,5,6,1,13,14,0,11,3,8},
{9,14,15,5,2,8,12,3,7,0,4,10,1,13,11,6},
{4,3,2,12,9,5,15,10,11,14,1,7,6,0,8,13}
},
{
{4,11,2,14,15,0,8,13,3,12,9,7,5,10,6,1},
{13,0,11,7,4,9,1,10,14,3,5,12,2,15,8,6},
{1,4,11,13,12,3,7,14,10,15,6,8,0,5,9,2},
{6,11,13,8,1,4,10,7,9,5,0,15,14,2,3,12}
},
{
{13,2,8,4,6,15,11,1,10,9,3,14,5,0,12,7},
{1,15,13,8,10,3,7,4,12,5,6,11,0,14,9,2},
{7,11,4,1,9,12,14,2,0,6,10,13,15,3,5,8},
{2,1,14,7,4,10,8,13,15,12,9,0,3,5,6,11}
}
};
// P置换,32位 -> 32位
int P[] = {16, 7, 20, 21,
29, 12, 28, 17,
1, 15, 23, 26,
5, 18, 31, 10,
2, 8, 24, 14,
32, 27, 3, 9,
19, 13, 30, 6,
22, 11, 4, 25 };
/**********************************************************************/
/* */
/* 下面是DES算法实现 */
/* */
/**********************************************************************/
/**
* 密码函数f,接收32位数据和48位子密钥,产生一个32位的输出
*/
bitset<32> f(bitset<32> R, bitset<48> k)
{
bitset<48> expandR;
// 第一步:扩展置换,32 -> 48
for(int i=0; i<48; ++i)
expandR[47-i] = R[32-E[i]];
// 第二步:异或
expandR = expandR ^ k;
// 第三步:查找S_BOX置换表
bitset<32> output;
int x = 0;
for(int i=0; i<48; i=i+6)
{
int row = expandR[47-i]*2 + expandR[47-i-5];
int col = expandR[47-i-1]*8 + expandR[47-i-2]*4 + expandR[47-i-3]*2 + expandR[47-i-4];
int num = S_BOX[i/6][row][col];
bitset<4> binary(num);
output[31-x] = binary[3];
output[31-x-1] = binary[2];
output[31-x-2] = binary[1];
output[31-x-3] = binary[0];
x += 4;
}
// 第四步:P-置换,32 -> 32
bitset<32> tmp = output;
for(int i=0; i<32; ++i)
output[31-i] = tmp[32-P[i]];
return output;
}
/**
* 对56位密钥的前后部分进行左移
*/
bitset<28> leftShift(bitset<28> k, int shift)
{
bitset<28> tmp = k;
for(int i=27; i>=0; --i)
{
if(i-shift<0)
k[i] = tmp[i-shift+28];
else
k[i] = tmp[i-shift];
}
return k;
}
/**
* 生成16个48位的子密钥
*/
void generateKeys()
{
bitset<56> realKey;
bitset<28> left;
bitset<28> right;
bitset<48> compressKey;
// 去掉奇偶标记位,将64位密钥变成56位
for (int i=0; i<56; ++i)
realKey[55-i] = key[64 - PC_1[i]];
// 生成子密钥,保存在 subKeys[16] 中
for(int round=0; round<16; ++round)
{
// 前28位与后28位
for(int i=28; i<56; ++i)
left[i-28] = realKey[i];
for(int i=0; i<28; ++i)
right[i] = realKey[i];
// 左移
left = leftShift(left, shiftBits[round]);
right = leftShift(right, shiftBits[round]);
// 压缩置换,由56位得到48位子密钥
for(int i=28; i<56; ++i)
realKey[i] = left[i-28];
for(int i=0; i<28; ++i)
realKey[i] = right[i];
for(int i=0; i<48; ++i)
compressKey[47-i] = realKey[56 - PC_2[i]];
subKey[round] = compressKey;
}
}
/**
* 工具函数:将char字符数组转为二进制
*/
bitset<64> charToBitset(const char s[8])
{
bitset<64> bits;
for(int i=0; i<8; ++i)
for(int j=0; j<8; ++j)
bits[i*8+j] = ((s[i]>>j) & 1);
return bits;
}
/**
* DES加密
*/
bitset<64> encrypt(bitset<64>& plain)
{
bitset<64> cipher;
bitset<64> currentBits;
bitset<32> left;
bitset<32> right;
bitset<32> newLeft;
// 第一步:初始置换IP
for(int i=0; i<64; ++i)
currentBits[63-i] = plain[64-IP[i]];
// 第二步:获取 Li 和 Ri
for(int i=32; i<64; ++i)
left[i-32] = currentBits[i];
for(int i=0; i<32; ++i)
right[i] = currentBits[i];
// 第三步:共16轮迭代
for(int round=0; round<16; ++round)
{
newLeft = right;
right = left ^ f(right,subKey[round]);
left = newLeft;
}
// 第四步:合并L16和R16,注意合并为 R16L16
for(int i=0; i<32; ++i)
cipher[i] = left[i];
for(int i=32; i<64; ++i)
cipher[i] = right[i-32];
// 第五步:结尾置换IP-1
currentBits = cipher;
for(int i=0; i<64; ++i)
cipher[63-i] = currentBits[64-IP_1[i]];
// 返回密文
return cipher;
}
/**
* DES解密
*/
bitset<64> decrypt(bitset<64>& cipher)
{
bitset<64> plain;
bitset<64> currentBits;
bitset<32> left;
bitset<32> right;
bitset<32> newLeft;
// 第一步:初始置换IP
for(int i=0; i<64; ++i)
currentBits[63-i] = cipher[64-IP[i]];
// 第二步:获取 Li 和 Ri
for(int i=32; i<64; ++i)
left[i-32] = currentBits[i];
for(int i=0; i<32; ++i)
right[i] = currentBits[i];
// 第三步:共16轮迭代(子密钥逆序应用)
for(int round=0; round<16; ++round)
{
newLeft = right;
right = left ^ f(right,subKey[15-round]);
left = newLeft;
}
// 第四步:合并L16和R16,注意合并为 R16L16
for(int i=0; i<32; ++i)
plain[i] = left[i];
for(int i=32; i<64; ++i)
plain[i] = right[i-32];
// 第五步:结尾置换IP-1
currentBits = plain;
for(int i=0; i<64; ++i)
plain[63-i] = currentBits[64-IP_1[i]];
// 返回明文
return plain;
}
/**********************************************************************/
/* 测试: */
/* 1.将一个 64 位的字符串加密, 把密文写入文件 a.txt */
/* 2.读取文件 a.txt 获得 64 位密文,解密之后再写入 b.txt */
/**********************************************************************/
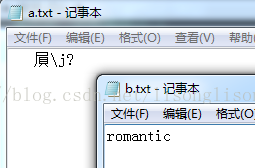
int main() {
string s = "romantic";
string k = "12345678";
bitset<64> plain = charToBitset(s.c_str());
key = charToBitset(k.c_str());
// 生成16个子密钥
generateKeys();
// 密文写入 a.txt
bitset<64> cipher = encrypt(plain);
fstream file1;
file1.open("D://a.txt", ios::binary | ios::out);
file1.write((char*)&cipher,sizeof(cipher));
file1.close();
// 读文件 a.txt
bitset<64> temp;
file1.open("D://a.txt", ios::binary | ios::in);
file1.read((char*)&temp, sizeof(temp));
file1.close();
// 解密,并写入文件 b.txt
bitset<64> temp_plain = decrypt(temp);
file1.open("D://b.txt", ios::binary | ios::out);
file1.write((char*)&temp_plain,sizeof(temp_plain));
file1.close();
return 0;
}运行结果(VS2012):
那么,在对 64 位的数据加解密成功以后,对文件的加解密就很简单了!只需要每次读 64 位,加密以后,将 64 位的密文写入另外一个文件…..如此循环,直到文件尾。下面是对一张图片进行加密和解密的测试代码:
int main() {
	string k = "12345678";
	key = charToBitset(k.c_str());
	generateKeys();   // 生成16个子密钥

	// 将文件 flower.jpg 加密到 cipher.txt 中
	ifstream in;
	ofstream out;
	in.open("D://flower.jpg", ios::binary);
	out.open("D://cipher.txt", ios::binary);
	bitset<64> plain;
	while(in.read((char*)&plain, sizeof(plain)))
	{
		bitset<64> cipher  = encrypt(plain);
		out.write((char*)&cipher, sizeof(cipher));
		plain.reset();  // 置0
	}
	in.close();
	out.close();

	// 解密 cipher.txt,并写入图片 flower1.jpg
	in.open("D://cipher.txt", ios::binary);
	out.open("D://flower1.jpg", ios::binary);
	while(in.read((char*)&plain, sizeof(plain)))
	{
		bitset<64> temp  = decrypt(plain);
		out.write((char*)&temp, sizeof(temp));
		plain.reset();  // 置0
	}
	in.close();
	out.close();

	return 0;
}
(全文完)


 1260
1260

 被折叠的 条评论
为什么被折叠?
被折叠的 条评论
为什么被折叠?
 到【灌水乐园】发言


