


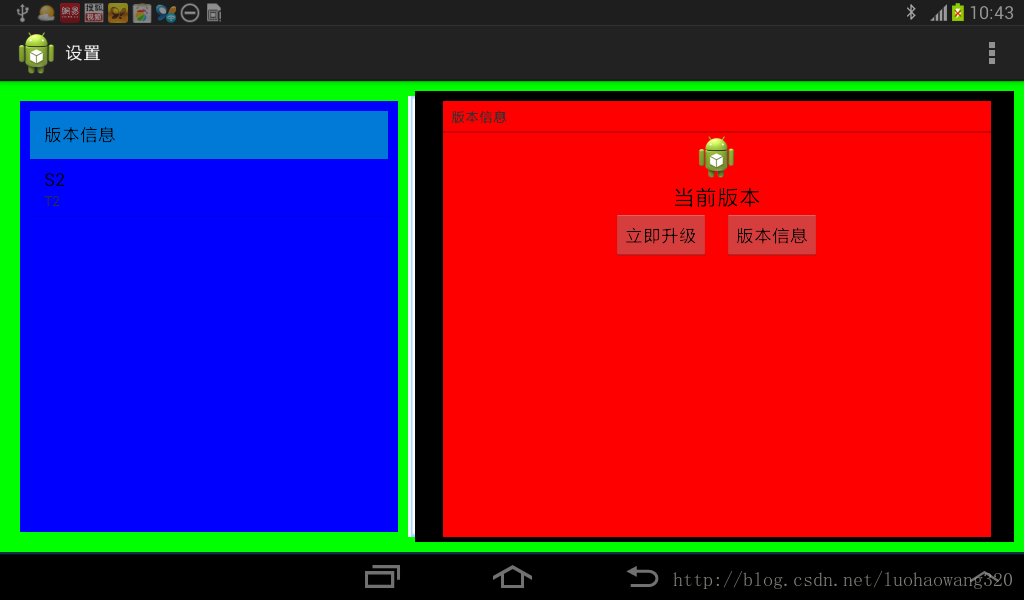
PreferenceActivity 设置代码如下,通过getListView 遍历视图结构,主要调整间距与背景色
package com.example.testsettings;

import java.util.List;

import android.os.Bundle;
import android.preference.PreferenceActivity;
import android.app.Activity;
import android.graphics.Color;
import android.graphics.drawable.ColorDrawable;
import android.util.Log;
import android.view.Menu;
import android.view.View;
import android.view.ViewGroup.LayoutParams;
import android.view.ViewParent;
import android.widget.LinearLayout;

public class MainActivity extends PreferenceActivity {

	@Override
	protected void onCreate(Bundle savedInstanceState) {

		super.onCreate(savedInstanceState);
		DEBUG("onCreate");
		System.out.println(isMultiPane());
		if (onIsMultiPane()) {// 可以分屏
			DEBUG("分屏显示");
		}

		ViewParent viewParent = getListView().getParent().getParent();
		LinearLayout linearLayout = (LinearLayout) viewParent;

		DEBUG(viewParent.toString());

		DEBUG(getListView().toString());
		// 与getListView() 的效果一样
		DEBUG(findViewById(android.R.id.list).toString());
		// ListView 背景
		getListView().setBackgroundColor(Color.BLUE);
		getListView().setPadding(10, 10, 10, 10);

		LinearLayout.LayoutParams params1 = (android.widget.LinearLayout.LayoutParams) getListView()
				.getLayoutParams();
		params1.setMargins(10, 10, 10, 10);

		DEBUG(findViewById(android.R.id.content).toString());
		// 根容器,包括ListView 和 右边
		View view = findViewById(android.R.id.content);
		view.setBackgroundColor(Color.GREEN);// 整个背景色

		// 容纳Listview的linearLayout
		ViewParent parent = getListView().getParent();
		LinearLayout linearLayout2 = (LinearLayout) parent;

		DEBUG(linearLayout2.getChildCount());
		DEBUG(linearLayout2.getChildAt(0).toString());
		DEBUG(linearLayout2.getChildAt(1).toString());

		// LinearLayout 放置 Listview的LinearLayout 和 右边的LinearLayout
		// 水平放置
		ViewParent parent2 = getListView().getParent().getParent();
		LinearLayout linearLayout3 = (LinearLayout) parent2;
		// 设置 水平分割线
		linearLayout3.setDividerDrawable(getResources().getDrawable(
				R.drawable.splite));
		linearLayout3.setDividerPadding(5);
		linearLayout3.setShowDividers(LinearLayout.SHOW_DIVIDER_MIDDLE);
		linearLayout3.setPadding(10, 10, 10, 10);

		DEBUG(linearLayout3.getChildCount());
		// 获取右边 PreferenceFrameLayout 容器的 上级
		View view2 = linearLayout3.getChildAt(1);
		view2.setBackgroundColor(Color.BLACK);// 右边容器的背景色
		view2.setPadding(0, 0, -30, 0);// 调整 内间距

		DEBUG(((LinearLayout) view2).getChildCount());
		LinearLayout linearLayout4 = (LinearLayout) view2;
		DEBUG(linearLayout4.getChildAt(1).toString());
		DEBUG("右边容器");
		// 获取 右边PreferenceFrameLayout 容器
		View view3 = linearLayout4.getChildAt(1);

		LinearLayout.LayoutParams params = (android.widget.LinearLayout.LayoutParams) view3
				.getLayoutParams();
		params.setMargins(-20, 10, 5, 5);// 调整外间距


	}

	@Override
	public boolean onCreateOptionsMenu(Menu menu) {
		// Inflate the menu; this adds items to the action bar if it is present.
		getMenuInflater().inflate(R.menu.main, menu);
		return true;
	}

	@Override
	public void onBuildHeaders(List<Header> target) {
		// TODO Auto-generated method stu
最低0.47元/天 解锁文章


 475
475


 被折叠的 条评论
为什么被折叠?
被折叠的 条评论
为什么被折叠?
 到【灌水乐园】发言


