


好久没有写博客了,今天分享一个用CheckBox实现自定义的Ratingbar,最近在一个小项目中用到了评价的界面,是用星星评价滴,用了Android原生的Ratingbar,发现丑的一逼,而且自带的Ratingbar放进布局中很难调整,不是星星小了,就是大了,星星之内的边距也好难调整。
突然间想到之前看过一个titlebar的例子,瞬间有了灵感,何不自己写一个,又好看,又能满足自己的需求。这个例子的灵感来源于此篇博客Android自定义View之TitleBar,通用标题栏。谢谢这位兄台的博客哈,这里实现主要用了方法二的思路。
首先还是在说说思路吧。
步骤1:自定义个布局文件rating_bar.xml,创建在水平方向上的五个CheckBox,通过属性调整,将CheckBox设置成我们想要的效果。
步骤2:自定义一个RatingBar类继承LinearLayout,在构造函数中,初始化布局文件,同时设置Checkbox的一系列监听事件和逻辑处理。
步骤3: 将自定义RatingBar控件引入到主布局文件中即可,在activity中实现Ratingbar的数量回调接口获得评价的星级数。
话不多少了,让我们开始吧。
1.自定义布局文件ratingbar.xml,达到我们想要的效果。
<?xml version="1.0" encoding="utf-8"?>
<LinearLayout xmlns:android="http://schemas.android.com/apk/res/android"
android:layout_width="match_parent"
android:layout_height="match_parent"
android:orientation="horizontal" >
<CheckBox
android:id="@+id/cb1"
android:layout_width="wrap_content"
android:layout_height="wrap_content"
android:layout_marginRight="15dp"
android:button="@null"
android:background="@drawable/ratingbar_pressed"
android:drawableRight="@drawable/ratingbar_selector" />
<CheckBox
android:id="@+id/cb2"
android:layout_width="wrap_content"
android:layout_height="wrap_content"
android:layout_marginRight="15dp"
android:button="@null"
android:background="@drawable/ratingbar_pressed"
android:drawableRight="@drawable/ratingbar_selector" />
<CheckBox
android:id="@+id/cb3"
android:layout_width="wrap_content"
android:layout_height="wrap_content"
android:layout_marginRight="15dp"
android:button="@null"
android:background="@drawable/ratingbar_pressed"
android:drawableRight="@drawable/ratingbar_selector" />
<CheckBox
android:id="@+id/cb4"
android:layout_width="wrap_content"
android:layout_height="wrap_content"
android:layout_marginRight="15dp"
android:button="@null"
android:background="@drawable/ratingbar_pressed"
android:drawableRight="@drawable/ratingbar_selector" />
<CheckBox
android:id="@+id/cb5"
android:layout_width="wrap_content"
android:layout_height="wrap_content"
android:layout_marginRight="15dp"
android:button="@null"
android:background="@drawable/ratingbar_pressed"
android:drawableRight="@drawable/ratingbar_selector" />
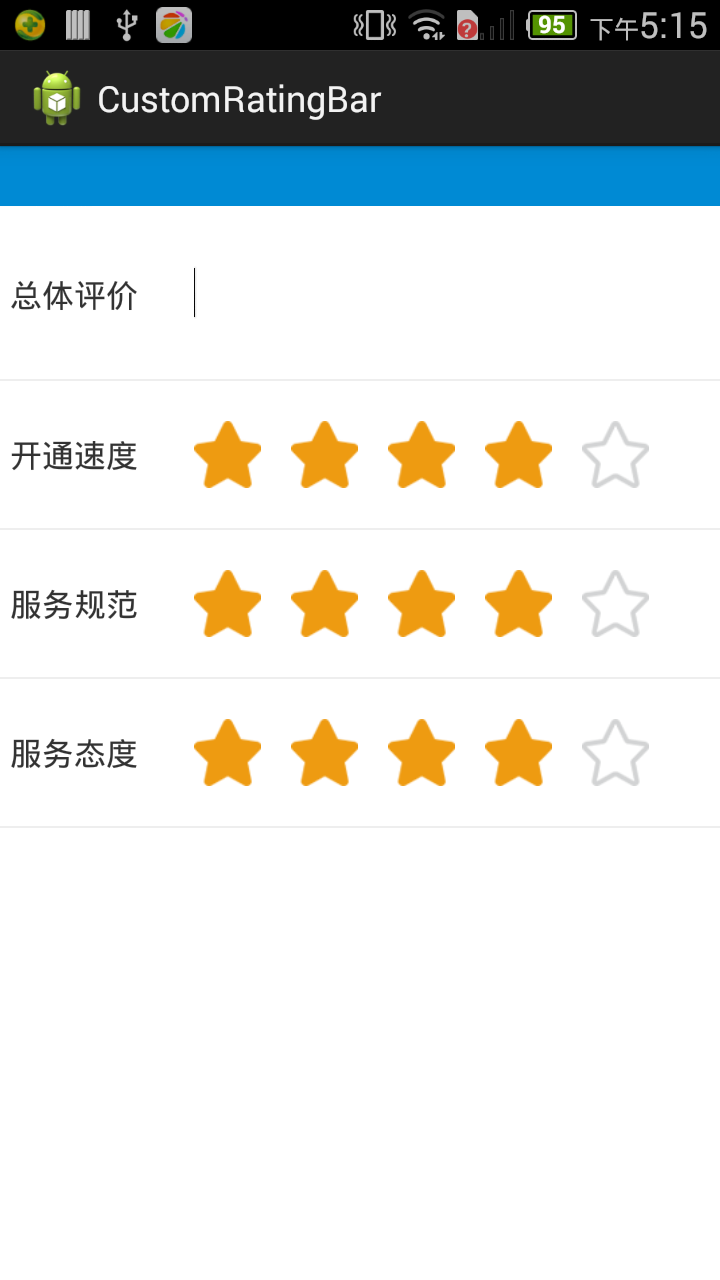
</LinearLayout>此时的效果图:
2.CheckBox引用了两个drawable文件,实现选中、未选中的效果
和按下后和释放后的效果。
图片资源:


选中和未选中的效果ratingbar_selector.xml
<?xml version="1.0" encoding="utf-8"?>
<selector xmlns:android="http://schemas.android.com/apk/res/android">

    <!-- checkbox被选中时候 -->
    <item android:drawable="@drawable/star_select" android:state_checked="true"></item>
    <!-- checkbox未被选中时候 -->
    <item android:drawable="@drawable/star" android:state_checked="false"></item>

</selector>
按下后和释放后的效果ratingbar_pressed.xml
<?xml version="1.0" encoding="utf-8"?>
<selector xmlns:android="http://schemas.android.com/apk/res/android">

    <!-- checkbox按下时的背景色 -->
    <item android:drawable="@color/ratingbar_pressed" android:state_pressed="true"></item>
    <!-- checkbox未按下时的背景色 -->
    <item android:drawable="@color/ratingbar_unpressed" android:state_pressed="false"></item>

</selector>
3.实现我们自己想要的效果后,接下来将此布局文件封装到自定义的一个RatingBar中。这里定义了一个RatingBar继承了LinearLayout,将定义的布局文件加到这个控件中,在此控件中,实现CheckBox的点击监听星星的变化,星星的变化规则是,具体可以看看这个setStarNum()方法。这个效果和微信中京东购物后的评价效果是一样滴。我这里主要用接口回调实现了获得星星的个数。关于这个自定控件,你自己可以扩展一下,比如:动态设置星星支持的数量,改变星星的图片颜色,调整边距之类滴。我这就抛砖引玉一下。如果你修改的更好,通知我一下,让我学习学习。
package org.lxqljc.view;

import org.lxqljc.customratingbar.R;

import android.content.Context;
import android.util.AttributeSet;
import android.view.LayoutInflater;
import android.view.View;
import android.widget.CheckBox;
import android.widget.LinearLayout;
/**
 *
 * @author lxqljc
 *
 */
public class MyRatingBar extends LinearLayout{

    private CheckBox cb1;
    private CheckBox cb2;
    private CheckBox cb3;
    private CheckBox cb4;
    private CheckBox cb5;

    private int starNum;
    private View rootView;

    public MyRatingBar(Context context) {
        super(context);
        init(context);
    }

    public MyRatingBar(Context context, AttributeSet attrs) {
        super(context, attrs);
        init(context);
    }

    public MyRatingBar(Context context, AttributeSet attrs, int defStyle) {
        super(context, attrs, defStyle);
        init(context);
    }

    /**
     * 初始化布局
     */
    private void init(Context context)
    {
        //加载自定义的checkbox布局
        rootView = LayoutInflater.from(context).inflate(R.layout.ratingbar, this);
        cb1 = (CheckBox)findViewById(R.id.cb1);
        cb2 = (CheckBox)findViewById(R.id.cb2);
        cb3 = (CheckBox)findViewById(R.id.cb3);
        cb4 = (CheckBox)findViewById(R.id.cb4);
        cb5 = (CheckBox)findViewById(R.id.cb5);

        //给所有的按钮设置点击事件,记住是点击按钮哦,不是监听变化的按钮,监听变化那个之前试过,貌似区分不了checkbox的id
        cb1.setOnClickListener(new MyOnClickListener());
        cb2.setOnClickListener(new MyOnClickListener());
        cb3.setOnClickListener(new MyOnClickListener());
        cb4.setOnClickListener(new MyOnClickListener());
        cb5.setOnClickListener(new MyOnClickListener());

        //设置默认选择四星
        setStarNum(4);

    }

    /**
     * 按钮监听事件
     */
    class MyOnClickListener implements OnClickListener
    {

        @Override
        public void onClick(View v) {

            switch (v.getId()) {
            case R.id.cb1:
                //选择第一个星
                setStarNum(1);
                starNum = 1;
                break;
            case R.id.cb2:
                //选择第两个星
                setStarNum(2);
                starNum = 2;
                break;
            case R.id.cb3:
                //选择第三个星
                setStarNum(3);
                starNum = 3;
                break;
            case R.id.cb4:
                //选择第四个星
                setStarNum(4);
                starNum = 4;
                break;
            case R.id.cb5:
                //选择第五个星
                setStarNum(5);
                starNum = 5;
                break;

            default:
                break;
            }
            //接口回调
            onStarChecked.getStarNum(starNum,rootView);
        }

    }

    /**
     * 点击后设置星星数
     */
    private void setStarNum(int num)
    {
        boolean b1 = false;
        boolean b2 = false;
        boolean b3 = false;
        boolean b4 = false;
        boolean b5 = false;

        switch (num) {
        case 1:
            b1 = true;
            break;
        case 2:
            b1 = true;
            b2 = true;
            break;
        case 3:
            b1 = true;
            b2 = true;
            b3 = true;
            break;
        case 4:
            b1 = true;
            b2 = true;
            b3 = true;
            b4 = true;
            break;
        case 5:
            b1 = true;
            b2 = true;
            b3 = true;
            b4 = true;
            b5 = true;
            break;

        default:
            break;
        }

        cb1.setChecked(b1);
        cb2.setChecked(b2);
        cb3.setChecked(b3);
        cb4.setChecked(b4);
        cb5.setChecked(b5);
    }

    private OnStarChecked onStarChecked;

    /**
     * @param 实现接口的对象监听
     */
    public void setOnStarChecked(OnStarChecked onStarChecked)
    {
        this.onStarChecked = onStarChecked;
    }

    /**
     * 获得星级数量接口回调
     */
    public interface OnStarChecked
    {
        /**
         *
         * @param num 点击的星星数量
         * @param v 点击星星的父控件
         */
        void getStarNum(int num,View view);
    }


}
4.定义好自己的RatingBar后,接下来时改使用的时候了。
新建一个MainActivity.java
package org.lxqljc.customratingbar;

import org.lxqljc.view.MyRatingBar;
import org.lxqljc.view.MyRatingBar.OnStarChecked;

import android.os.Bundle;
import android.app.Activity;
import android.view.Menu;
import android.view.View;
import android.view.View.OnClickListener;
import android.widget.EditText;

public class MainActivity extends Activity implements OnStarChecked{

    private EditText etEvaluate;
    private MyRatingBar rb_speed;
    private MyRatingBar rb_standard;
    private MyRatingBar rb_attitude;

    @Override
    protected void onCreate(Bundle savedInstanceState) {
        super.onCreate(savedInstanceState);
        setContentView(R.layout.activity_main);

        etEvaluate =     (EditText)findViewById(R.id.etEvaluate);
        rb_speed = (MyRatingBar)findViewById(R.id.rb_speed);
        rb_standard = (MyRatingBar)findViewById(R.id.rb_standard);
        rb_attitude = (MyRatingBar)findViewById(R.id.rb_attitude);

        rb_speed.setOnStarChecked(this);
        rb_standard.setOnStarChecked(this);
        rb_attitude.setOnStarChecked(this);
    }


    @Override
    public void getStarNum(int num,View rootView) {

        String tip = null;
        switch (rootView.getId()) {
        case R.id.rb_speed:
            tip = "开通速度:";
            break;
        case R.id.rb_standard:
            tip = "服务规范:";
            break;
        case R.id.rb_attitude:
            tip = "服务态度:";
            break;

        default:
            break;
        }
        etEvaluate.setText(tip+num+"星级");
    }

}
5.加载主布局文件activity_main.xml
<?xml version="1.0" encoding="utf-8"?>
<LinearLayout xmlns:android="http://schemas.android.com/apk/res/android"
    android:layout_width="match_parent"
    android:layout_height="match_parent"
    android:background="#fff"
    android:orientation="vertical" >

    <LinearLayout
        android:layout_width="match_parent"
        android:layout_height="30dp"
        android:background="#008AD4"
        android:orientation="vertical" >
    </LinearLayout>

    <LinearLayout
        android:layout_width="match_parent"
        android:layout_height="match_parent"
        android:orientation="vertical" >

        <LinearLayout
            android:layout_width="match_parent"
            android:layout_height="wrap_content"
            android:orientation="horizontal"
            android:paddingBottom="10dp"
            android:paddingLeft="5dp"
            android:paddingRight="5dp"
            android:paddingTop="10dp" >

            <TextView
                android:layout_width="wrap_content"
                android:layout_height="wrap_content"
                android:layout_marginRight="20dp"
                android:text="总体评价  "
                android:textSize="16sp" />

            <EditText
                android:id="@+id/etEvaluate"
                android:layout_width="match_parent"
                android:layout_height="wrap_content"
                android:background="@null"
                android:lines="3" />
        </LinearLayout>

        <View
            android:layout_width="match_parent"
            android:layout_height="1dp"
            android:background="#eeeeee" />

        <LinearLayout
            android:layout_width="match_parent"
            android:layout_height="wrap_content"
            android:gravity="center_vertical"
            android:orientation="horizontal"
            android:paddingBottom="20dp"
            android:paddingLeft="5dp"
            android:paddingRight="5dp"
            android:paddingTop="20dp" >

            <TextView
                android:layout_width="wrap_content"
                android:layout_height="wrap_content"
                android:layout_marginRight="20dp"
                android:text="开通速度  "
                android:textSize="16sp" />

            <org.lxqljc.view.MyRatingBar
                android:id="@+id/rb_speed"
                android:layout_width="wrap_content"
                android:layout_height="wrap_content" />
        </LinearLayout>

        <View
            android:layout_width="match_parent"
            android:layout_height="1dp"
            android:background="#eeeeee" />

        <LinearLayout
            android:layout_width="match_parent"
            android:layout_height="wrap_content"
            android:gravity="center_vertical"
            android:orientation="horizontal"
            android:paddingBottom="20dp"
            android:paddingLeft="5dp"
            android:paddingRight="5dp"
            android:paddingTop="20dp" >

            <TextView
                android:layout_width="wrap_content"
                android:layout_height="wrap_content"
                android:layout_marginRight="20dp"
                android:text="服务规范  "
                android:textSize="16sp" />

            <org.lxqljc.view.MyRatingBar
                android:id="@+id/rb_standard"
                android:layout_width="wrap_content"
                android:layout_height="wrap_content" />
        </LinearLayout>

        <View
            android:layout_width="match_parent"
            android:layout_height="1dp"
            android:background="#eeeeee" />

        <LinearLayout
            android:layout_width="match_parent"
            android:layout_height="wrap_content"
            android:gravity="center_vertical"
            android:orientation="horizontal"
            android:paddingBottom="20dp"
            android:paddingLeft="5dp"
            android:paddingRight="5dp"
            android:paddingTop="20dp" >

            <TextView
                android:layout_width="wrap_content"
                android:layout_height="wrap_content"
                android:layout_marginRight="20dp"
                android:text="服务态度  "
                android:textSize="16sp" />

            <org.lxqljc.view.MyRatingBar
                android:id="@+id/rb_attitude"
                android:layout_width="wrap_content"
                android:layout_height="wrap_content" />
        </LinearLayout>

        <View
            android:layout_width="match_parent"
            android:layout_height="1dp"
            android:background="#eeeeee" />
    </LinearLayout>

</LinearLayout>
大功告成。
能自己写出一个小玩意还是挺有成就感的一件事,之前一直想写博客,苦于自己编程基础太渣,加上语言组织能力有限,也不知道表达的请不清晰,如果代码中有什么不足的地方,请指导一下。我会再接再励滴。
分享下源码连接:
RatingBar 密码: r2is


 2万+
2万+

 被折叠的 条评论
为什么被折叠?
被折叠的 条评论
为什么被折叠?
 到【灌水乐园】发言


