 安装与配置MySQL并更改密码


 本文详细介绍了在Ubuntu环境下安装MySQL服务器、客户端,并通过命令行界面更改初始密码的过程。包括使用sudo命令进行安装,阅读依赖关系和状态信息,确认额外磁盘空间使用情况,以及通过MySQL客户端更新root用户的密码。
安装
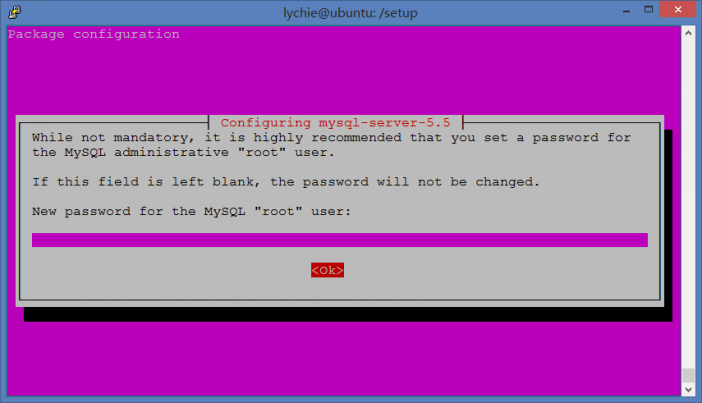
lychie@ubuntu:/setup$ sudo apt-get install mysql-server mysql-client
[sudo] password for lychie: ******
Reading package lists... Done
Building dependency tree
Reading state information... Done
. . . . . . . . . . . .
After this operation, 93.8 MB of additional disk space will be used.
Do you want to continue? [Y/n] y
. . . . . . . . . . . .
[sudo] password for lychie: ******
Reading package lists... Done
Building dependency tree
Reading state information... Done
. . . . . . . . . . . .
After this operation, 93.8 MB of additional disk space will be used.
Do you want to continue? [Y/n] y
. . . . . . . . . . . .
更改密码
mysql -uroot -p登录 MySQL,安装的时候没有设置密码,提示输入密码的时候直接回车就完事
lychie@ubuntu:/setup$ mysql -uroot -p
Enter password:
Welcome to the MySQL monitor. Commands end with ; or \g.
Your MySQL connection id is 42
Server version: 5.5.38-0ubuntu0.14.04.1 (Ubuntu)
Copyright (c) 2000, 2014, Oracle and/or its affiliates. All rights reserved.
Oracle is a registered trademark of Oracle Corporation and/or its
affiliates. Other names may be trademarks of their respective
owners.
Type 'help;' or '\h' for help. Type '\c' to clear the current input statement.
mysql>
Enter password:
Welcome to the MySQL monitor. Commands end with ; or \g.
Your MySQL connection id is 42
Server version: 5.5.38-0ubuntu0.14.04.1 (Ubuntu)
affiliates. Other names may be trademarks of their respective
owners.
update user set password=PASSWORD('******') where user='root';更改密码
mysql> use mysql;
Reading table information for completion of table and column names
You can turn off this feature to get a quicker startup with -A
Database changed
mysql> select host, user, password from user;
+-----------+------------------+--------------+
| host | user | password |
+-----------+------------------+--------------+
| localhost | root | |
| ubuntu | root | |
| 127.0.0.1 | root | |
| ::1 | root | |
| localhost | debian-sys-maint | ****** |
+-----------+------------------+--------------+
5 rows in set (0.00 sec)
mysql> update user set password=PASSWORD('******') where user='root';
Query OK, 4 rows affected (0.00 sec)
Rows matched: 4 Changed: 4 Warnings: 0
mysql> select host, user, password from user;
+-----------+------------------+--------------+
| host | user | password |
+-----------+------------------+--------------+
| localhost | root | ****** |
| ubuntu | root | ****** |
| 127.0.0.1 | root | ****** |
| ::1 | root | ****** |
| localhost | debian-sys-maint | ****** |
+-----------+------------------+--------------+
5 rows in set (0.00 sec)
mysql> flush privileges;
Query OK, 0 rows affected (0.00 sec)
Reading table information for completion of table and column names
You can turn off this feature to get a quicker startup with -A
mysql> select host, user, password from user;
+-----------+------------------+--------------+
| host | user | password |
+-----------+------------------+--------------+
| localhost | root | |
| ubuntu | root | |
| 127.0.0.1 | root | |
| ::1 | root | |
| localhost | debian-sys-maint | ****** |
+-----------+------------------+--------------+
5 rows in set (0.00 sec)
Query OK, 4 rows affected (0.00 sec)
Rows matched: 4 Changed: 4 Warnings: 0
+-----------+------------------+--------------+
| host | user | password |
+-----------+------------------+--------------+
| localhost | root | ****** |
| ubuntu | root | ****** |
| 127.0.0.1 | root | ****** |
| ::1 | root | ****** |
| localhost | debian-sys-maint | ****** |
+-----------+------------------+--------------+
5 rows in set (0.00 sec)
Query OK, 0 rows affected (0.00 sec)
启动 / 停止 MySQL
sudo stop mysql 停止 MySQL
sudo start mysql 启动 MySQL
sudo start mysql 启动 MySQL


 2411
2411

 被折叠的 条评论
为什么被折叠?
被折叠的 条评论
为什么被折叠?
 到【灌水乐园】发言


