


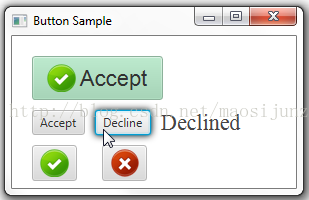
button是为了让开发者在开发javaFX应用过程中处理点击的事件。Button类是Labeled类的扩展,他的内容可以是文本,也可以是图片,或者两者皆有。下图展示了不同效果的Button。这章节我们会学会如何创建这些Button。
创建一个button
你可以使用Button类的构造函数创建一个Button实例。代码如下:
//A button with an empty text caption.
Button button1 = new Button();
//A button with the specified text caption.
Button button2 = new Button("Accept");
//A button with the specified text caption and icon.
Image imageOk = new Image(getClass().getResourceAsStream("ok.png"));
Button button3 = new Button("Accept", new ImageView(imageOk));
因为Button是扩展子Labeled类的,所以一个Button实例创建后,我们可以通过setText或setGraphic来为Button设置文本或图片,就像下面的代码:
Image imageDecline = new Image(getClass().getResourceAsStream("not.png"));
Button button5 = new Button();
button5.setGraphic(new ImageView(imageDecline));
添加事件
代码如下:
button2.setOnAction((ActionEvent e) -> {
    button2.setText("Accepted");
});
当你点击button2的时候,button2的内容会变成Accepted。
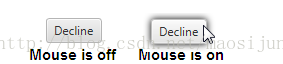
应用效果
我们让鼠标移动到按钮上的时候,按钮显示出阴影效果,代码如下:
DropShadow shadow = new DropShadow();
//Adding the shadow when the mouse cursor is on
button3.addEventHandler(MouseEvent.MOUSE_ENTERED, (MouseEvent e) -> {
    button3.setEffect(shadow);
});

//Removing the shadow when the mouse cursor is off
button3.addEventHandler(MouseEvent.MOUSE_EXITED, (MouseEvent e) -> {
    button3.setEffect(null);
});
运行如下图所示:
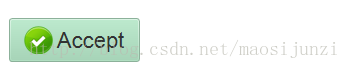
添加样式
我们使用css给按钮添加样式,前面已经提到过如何给组件添加css样式,这里就不再赘述。代码如下:
//Code added to the CSS file
.button1{
    -fx-font: 22 arial;
    -fx-base: #b6e7c9;
}
button1.getStyleClass().add("button1");
如下图所示:


 895
895


 被折叠的 条评论
为什么被折叠?
被折叠的 条评论
为什么被折叠?
 到【灌水乐园】发言


