


1 简介
本文主要介绍通过 shape 来设置 EditText 的圆角。
2 shape 的设置
shape_life_search.xml 放在 res/drawable 文件夹内
<?xml version="1.0" encoding="utf-8"?>
<shape xmlns:android="http://schemas.android.com/apk/res/android" >
    <!-- 角度 -->
    <corners android:radius="100dp"/>
    <!-- 填充色 -->
    <solid android:color="#ffffff"/>
    <!-- 描边 设置线宽及颜色 -->
    <stroke android:color="#cccacb"
        android:width="1dp"/>
</shape>
3 shape 的使用
在 activity_main.xml 主布局中如此使用
<LinearLayout xmlns:android="http://schemas.android.com/apk/res/android"
    xmlns:tools="http://schemas.android.com/tools"
    android:layout_width="match_parent"
    android:layout_height="match_parent"
    android:orientation="vertical"
    android:background="#f5f5f5"
    tools:ignore="HardcodedText,ContentDescription" >

    <!-- Head start -->
    <LinearLayout
        android:layout_width="match_parent"
        android:layout_height="wrap_content"
        android:orientation="horizontal"
        android:padding="10dp"
        android:background="#ff5a54">
        <ImageView
            android:layout_width="wrap_content"
            android:layout_height="match_parent"
            android:src="@drawable/head_left" />
        <TextView
            android:layout_width="0dp"
            android:layout_height="match_parent"
            android:layout_weight="1"
            android:gravity="center"
            android:text="周边生活"
            android:textStyle="bold"
            android:textSize="20sp"
            android:textColor="@android:color/white"/>
        <ImageView
            android:layout_width="wrap_content"
            android:layout_height="match_parent"
            android:src="@drawable/head_right" />
    </LinearLayout>
    <!-- Head end   -->
    <!-- Search start-->
    <LinearLayout
        android:layout_width="match_parent"
        android:layout_height="wrap_content"
        android:orientation="vertical"
        android:layout_margin="10dp">
        <EditText
            android:id="@+id/search_edit"
            android:layout_width="match_parent"
            android:layout_height="wrap_content"
            android:drawableLeft="@drawable/search_left"
              android:background="@drawable/shape_life_search"
              android:hint="请输入商户或地址"
            android:padding="10dp"
            android:textColorHint="#b7b7b7"
            android:textStyle="bold"/>
    </LinearLayout>
    <!-- Search end  -->
    <LinearLayout
        android:layout_width="match_parent"
        android:layout_height="wrap_content"
        android:orientation="vertical" >
        <ImageView
            android:layout_width="match_parent"
            android:layout_height="match_parent" />
    </LinearLayout>
</LinearLayout>
4 用到的资源
head_left.png

head_right.png

search_left.png

5 隐藏标题栏
package com.ui;
import android.app.Activity;
import android.os.Bundle;
import android.view.Window;
public class MainActivity extends Activity {
@Override
protected void onCreate(Bundle savedInstanceState) {
super.onCreate(savedInstanceState);
//隐藏应用程序标题栏 (能看到手机通知栏)
requestWindowFeature(Window.FEATURE_NO_TITLE);
//设置全屏 (手机通知栏也被隐藏)
//this.getWindow().setFlags(WindowManager.LayoutParams.FLAG_FULLSCREEN,WindowManager.LayoutParams.FLAG_FULLSCREEN);
setContentView(R.layout.activity_main);
}
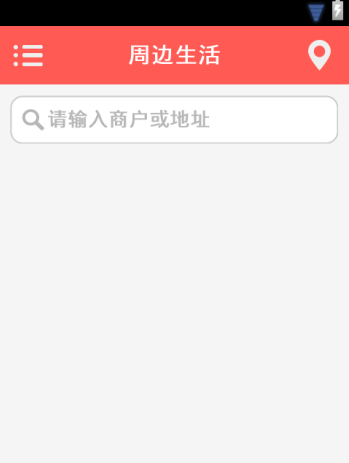
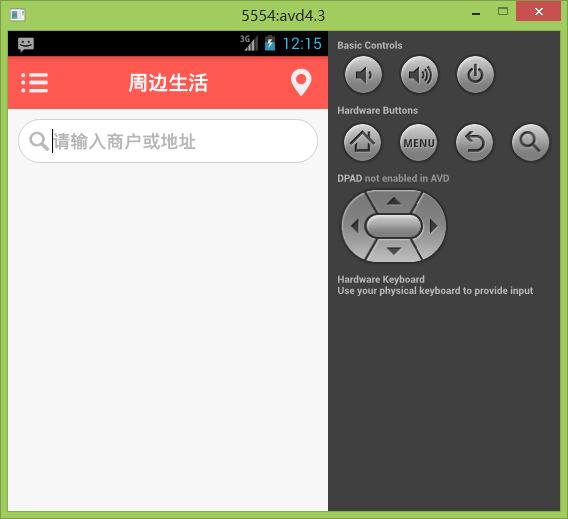
}6 结果预览
注:在 eclipse 的 layout 布局预览功能中,圆角不是很明显,但是安装到模拟器后就正常显示了,具体原因未知。
在 eclipse 中预览结果
在模拟器中的结果
注:转载请注明出处 :) 毕竟代码是一个一个敲出来的啊,O(∩_∩)O~


 1759
1759

 被折叠的 条评论
为什么被折叠?
被折叠的 条评论
为什么被折叠?
 到【灌水乐园】发言


