


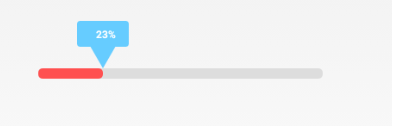
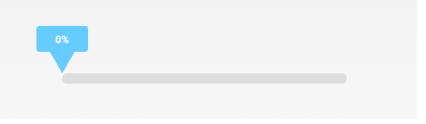
今天利用android自定义view实现了一个带有标识当前进度的水平进度条,先看效果:
实现原理
view的测量
这里我先说下实现该view效果的原理,由于该view是一个不规则的view,所以我们需要自己计算器宽度和高度,看下面的图:
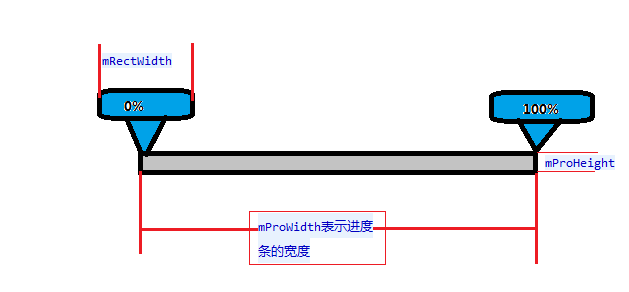
这里我出于简单期间,默认让上面矩形的高度是其宽度的一半,等边三角形的边长也是该矩形的一半,所以到这里我们计算该view高度和宽度如下:
- 高度=mProHeight + mRectWidth / 2 * Math.cos(30deg) +mRectWidth / 2
- 宽度 = mRectWidth / 2 + mProWidth + mRectWidth / 2
view的绘制
先看下面的图:
这里的绘制分为以下几点:
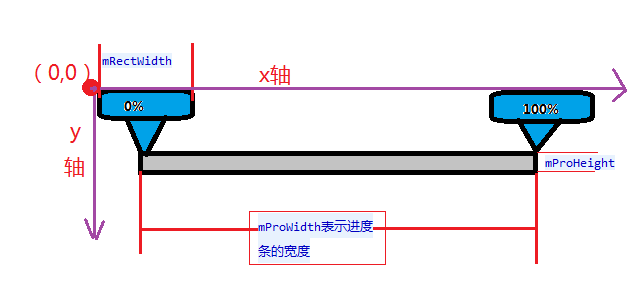
1. 绘制真个灰色的进度条(圆角矩形,需要注意的是该圆角矩形的左上角和右下角坐标需要计算准确,因为我们当前绘制的所有组件的坐标都是依赖于当前view而言的,即当前view的左上角就是(0,0)点)。
2. 绘制等边三角形
3. 绘制圆角矩形
4. 在圆角矩形中绘制当前的进度
对于坐标的计算,我们可以参考下面的图形来计算:
下面看下具体是怎么实现的,先看下所有的属性吧。
属性解释
private Paint mPaint = null;
private int mProWidth; //进度条的宽度
private int mRectWidth; //用来显示文字矩形的宽度
private int mProHeight; //进度条的高度
private int mProColor; //进度条的颜色
private int mRectColor; //显示文字矩形的颜色
private Path mPath; //用来绘制底下的三角形
private Rect mTextBound;  //计算文字的宽度和高度

private int mRectLeftInit; //显示文字的矩形左上角的初始位置,绘制的时候需要动态改变
private int mRectRightInit; //显示文字矩形右下角的初始位置,绘制的时候需要动态改变

private int mTextLeftInit; //文字左边的坐标,需要动态改变


private int mProgressRight; //显示进度条的矩形右边相对于当前view的坐标

private int mRectangleBottomPoint; //三角形底部的x,y坐标
private int mRectangleLeftPoint;  //三角形左上角点的坐标
private int mRectangleRightPoint; //三角形右上角点的坐标
private static final String TAG = "MyProBar";
自定义属性
在res/values目录下新建一个attrs.xml文件,内容如下:
<?xml version="1.0" encoding="utf-8"?>
<resources>

    <attr name="pro_color" format="color" />
    <attr name="rect_color" format="color" />
    <attr name="rect_width" format="dimension" />
    <attr name="pro_width" format="dimension" />
    <attr name="pro_height" format="dimension" />

    <declare-styleable name="self_pro">
        <attr name="pro_color" />
        <attr name="rect_color" />
        <attr name="rect_width" />
        <attr name="pro_width" />
        <attr name="pro_height" />
    </declare-styleable>

</resources>
可以看到这里我定义了五个属性:
- pro_color 表示水平进度条的颜色
- rect_color 表示上面矩形和三角形的填充色
- rect_width 表示上面矩形的宽度
- pro_width 表示水平进度条的宽度
- pro_height 表示水平进度条的高度
获取自定义属性的值
//获取自定义的属性
TypedArray array = context.getTheme().obtainStyledAttributes(attrs, R.styleable.self_pro,defStyleAttr,0);
        try {
            int count = array.getIndexCount();
            for (int i = 0; i < count; i++) {
                int attr = array.getIndex(i);
                switch (attr) {
                case R.styleable.self_pro_pro_color:
                    mProColor = array.getColor(attr, Color.RED);
                    break;
                case R.styleable.self_pro_rect_width:
                    mRectWidth = px2dip(context,array.getDimensionPixelSize(attr,80));
                    break;
                case R.styleable.self_pro_rect_color:
                    mRectColor = array.getColor(attr,Color.GREEN);
                    break;
                case R.styleable.self_pro_pro_width:
                    mProWidth = px2dip(context,array.getDimensionPixelSize(attr, 260));
                    break;
                case R.styleable.self_pro_pro_height:
                    mProHeight = px2dip(context, array.getDimensionPixelSize(attr, 10));
                    Log.d(TAG, "the mProHeight is :"+mProHeight);
                    break;
                default:
                    break;
                }
            }
        } finally {
            //获取属性值完成之后,记得回收
            array.recycle();
        }
这里我逐个遍历所有的自定义属性,获取自定义的值,有一点需要注意,这里我将长度值都转换了一下,px转换成dip,如果不转换,跟我们设置的值存在一定的偏差。转换方法如下:
    /**
     * px转换成dip,如果不转换,跟我们设置的值存在一定的偏差
     * @param context
     * @param pxValue
     * @return
     */
public int px2dip(Context context, float pxValue) {
        final float scale = context.getResources().getDisplayMetrics().density;
        return (int) (pxValue / scale + 0.5f);
}
测量当前view的大小
我们需要重写onMeasure方法,来测量当前view的大小。
    /**
     * 测量当前view的大小
     */
    @Override
    protected void onMeasure(int widthMeasureSpec, int heightMeasureSpec) {

        int widthMode = MeasureSpec.getMode(widthMeasureSpec);
        int heightMode = MeasureSpec.getMode(heightMeasureSpec);

        int widthSize = MeasureSpec.getSize(widthMeasureSpec);
        int heightSize = MeasureSpec.getSize(heightMeasureSpec);

        int width = 0;
        int height = 0;

        if (widthMode == MeasureSpec.EXACTLY) {
            width = widthSize;
        } else {
            //宽度是 mRectWidth / 2 + mProWidth + mProWidth / 2
            width = mProWidth + mRectWidth;
            if (widthMode == MeasureSpec.AT_MOST) {
                width = Math.min(width, widthSize);
            }
        }

        if (heightMode == MeasureSpec.EXACTLY) {
            height = heightSize;
        } else {
            //height = 进度条的高度 + 矩形的高度 + 三角形的高度   ,这里我默认将三角形的边长= 矩形宽度 / 2 ,矩形高度 = 矩形宽度 / 2
            height = (int) (mProHeight + (mRectWidth / 2) * Math.cos(Math.PI / 6) + mRectWidth / 2);
            if (widthMode == MeasureSpec.AT_MOST) {
                height = Math.min(height,heightSize);
            }
        }
        Log.d(TAG, "the width in onmeasure is :"+width+"===the height in onmeasure is :"+height);
        //计算完成宽度和高度,记得调用setMeasuredDimension
        setMeasuredDimension(width, height);
    }
可以看到和上面提到的一样,都是测试的宽度和高度都是按照坐标计算的那样。
- width= mRectWidth / 2 + mProWidth + mProWidth / 2
- height = 进度条的高度 + 矩形的高度 + 三角形的高度
初始化参数
在获得完成自定义属性的值以后,就可以初始化一些参数,由于对于该view有一些坐标(其实全是x坐标需要改变)需要改变,所以我们可以将这些参数设定为其初始位置,然后通过程序不断的改变这些参数的值,并不断重绘。
/**
 1. 初始化一些数值
 */
private void init() {
        mPaint = new Paint(Paint.ANTI_ALIAS_FLAG | Paint.DITHER_FLAG);
        mTextBound = new Rect();
        mPath = new Path();

        mRectangleBottomPoint = mRectWidth / 2;
        mRectangleLeftPoint = mRectWidth / 4;
        mRectangleRightPoint = mRectWidth * 3 / 4;

        mPaint.getTextBounds(text,0,text.length(),mTextBound);
        mTextLeftInit = mRectWidth / 2 - mTextBound.width() / 2;

        mRectRightInit = mRectWidth;

        mProgressRight = mRectWidth / 2;
}
再看下坐标图吧,这样好理解一些:

1. mRectangleBottomPoint
三角形底部的x轴坐标,可以看到其值=mRectWidth / 2
2. mRectangleLeftPoint
三角形左上角x轴坐标,由于我们是等边三角形,因此其值=mRectWidth / 4
3. mRectangleRightPoint
三角形右上角x轴坐标,这里和左上角的计算方式其实是一样的,只不过在加上mRectWidth / 4,所以,其值=mRectWidth * 3 / 4
4. mTextLeftInit
描述进度的文本的左边的坐标,其值=mRectWidth / 2 - mTextBound.width() / 2
5. mRectRightInit
矩形的右下角x轴坐标
6. mProgressRight
红色进度的右下角x轴坐标,为了不让其一开始就显示,我们将其设置为mRectWidth / 2,也就是相对进度条的起始点。
重写onDraw方法
下面就是正式的绘制操作了,我们需要重写view的onDraw方法来绘制具体的图形。
@Override
protected void onDraw(Canvas canvas) {
        super.onDraw(canvas);

        int width = getMeasuredWidth();
        int height = getMeasuredHeight();
        Log.d(TAG, "the width is :"+width+"===the height is :"+height);

        //绘制灰色的底部进度条轨迹
        mPaint.setColor(Color.parseColor("#dddddd"));
        mPaint.setStyle(Paint.Style.FILL);
        canvas.drawRoundRect(new RectF(mRectWidth / 2,height - mProHeight,width - mRectWidth / 2,height),5,5,mPaint);

        //绘制进度条的进度,这里由于mRectWidth初始值=0,所以是看不到的
        mPaint.setColor(mProColor);
        canvas.drawRoundRect(new RectF(mRectWidth / 2,height - mProHeight,mProgressRight,height),5,5,mPaint);


        //设置当前的三角和矩形的颜色为获取的自定义属性的值
        mPaint.setColor(mRectColor);
        mPaint.setStyle(Paint.Style.FILL_AND_STROKE);

        //这里记得调用reset方法,否则上一次绘制的三角形是不会消失的
        mPath.reset();
        //绘制三角形,这里的三角形三个点的x坐标会一直变化,y坐标则保持不变
        mPath.moveTo(mRectangleBottomPoint, height - mProHeight);
        mPath.lineTo(mRectangleLeftPoint,(float) (height - mProHeight-(mRectWidth / 2) * Math.cos(Math.PI / 6)));
        mPath.lineTo(mRectangleRightPoint, (float) (height - mProHeight-(mRectWidth / 2) * Math.cos(Math.PI / 6)));
        //调用close()方法,自动将三个点连接起来
        mPath.close();
        canvas.drawPath(mPath, mPaint);

        //绘制显示文字的矩形
        canvas.drawRoundRect(new RectF(mRectLeftInit,0, mRectRightInit, mRectWidth / 2), 3, 3,mPaint);

        //重新设置颜色
        mPaint.setColor(Color.WHITE);
        mPaint.setTypeface(Typeface.DEFAULT_BOLD);
        //绘制百分比
        canvas.drawText(text,mTextLeftInit,mRectWidth / 4 + mTextBound.height() / 2, mPaint);
    }
注释比较详细,我就不多说了,此时由于我们所有的坐标都是初始值,所以如果此时运行该view,效果如下:
这说明我们的基本坐标计算还是正确的,下面开启一个线程,来不断改变该部分图形的x坐标来实现一个动态的过程。
new Thread(new Runnable() {

            @Override
            public void run() {
                while (true) {
                    //在10%之内随机生成一个当前需要增加的进度,
                    int step = (int) (Math.random() * (mProWidth / 100) * 10);
                    //改变所有需要改变x轴坐标
                    mRectangleBottomPoint += step;
                    mRectangleLeftPoint += step;
                    mRectangleRightPoint += step;
                    mProgressRight += step;
                    mTextLeftInit += step;

                    mRectLeftInit += step;
                    mRectRightInit += step;

                    //如果当前包含文字的矩形左上角的坐标大于 + 本身的宽度 > 真个view的宽度,重新设置其最大值
                    if (mRectLeftInit + mRectWidth >= mProWidth + mRectWidth) {
                        mRectLeftInit = mProWidth;
                    }

                    //如果当前包含文字的矩形右上角的x轴坐标 > 真个view的宽度,重新设置其最大值
                    if (mRectRightInit >= mProWidth + mRectWidth) {
                        mRectRightInit = mProWidth + mRectWidth;
                    }

                    //对进度条的右下角x轴坐标进行限制
                    if (mProgressRight >= mProWidth + mRectWidth / 2) {
                        mProgressRight = mProWidth + mRectWidth / 2;
                    }

                    //限制三角形三个点的x轴坐标
                    if (mRectangleBottomPoint >= mProWidth + mRectWidth / 2) {
                        mRectangleBottomPoint = mProWidth + mRectWidth / 2;
                        mRectangleLeftPoint = mRectangleBottomPoint - mRectWidth / 4;
                        mRectangleRightPoint = mRectangleBottomPoint + mRectWidth / 4;
                    }

                    //计算当前进度的百分比
                    int first = mRectangleBottomPoint - mRectWidth / 2;
                    int percent = (int) Math.round(first / (mProWidth * 1.0) * 100);
                    percent = percent >= 100 ? 100 : percent;
                    Log.d("haha", "the first is :"+first+"====the second is :"+mProWidth+"====percent is :"+percent);
                    text =  percent+ "%";
                    //绘制当前进度内容
                    mPaint.getTextBounds(text,0,text.length(),mTextBound);
                    if (mTextLeftInit >= (mProWidth + mRectWidth / 2 - mTextBound.width() / 2)) {
                        mTextLeftInit = mProWidth + mRectWidth / 2 - mTextBound.width() / 2;
                    }

                    //睡眠半秒,这样才会看到效果
                    try {
                        Thread.sleep(500);
                    } catch (InterruptedException e) {
                        e.printStackTrace();
                    }
                    //重绘,这里是在新线程里,所以需要调用postInvalidate();
                    postInvalidate();

                    //判断三角形底部的坐标如果 达到进度条末尾的x节点,说明绘制结束了,此时跳出当前循环。
                    if (mRectangleBottomPoint == mProWidth + mRectWidth / 2) {
                        break;
                    }
                }
            }
        }).start();
可以看到,在当前的线程中,核心内容就是不断改变需要重绘的x轴坐标点,这里的坐标不是很好想清楚,最好拿一个笔,在本子上画一画,就清楚了,没有什么难度的,其次就是对边界条件进行判断和限制,当当前进度条绘制到达结尾的时候,通过break结束当前的绘制。
将该view引入布局
<RelativeLayout xmlns:android="http://schemas.android.com/apk/res/android"
    xmlns:pro="http://schemas.android.com/apk/res/com.example.progresstext"
    xmlns:tools="http://schemas.android.com/tools"
    android:layout_width="match_parent"
    android:layout_height="match_parent" >

    <com.example.progresstext.MyProBar
        android:id="@+id/pro_id"
        android:layout_width="wrap_content"
        android:layout_height="wrap_content"
        android:layout_centerInParent="true"
        pro:rect_width ="60dp"
        pro:pro_height="12dp"
        pro:pro_width="330dp"
        pro:pro_color="#FF5050"
        pro:rect_color="#66CCFF"
        />

</RelativeLayout>
ok,今天就到这里了,希望大家喜欢。


 8189
8189


 被折叠的 条评论
为什么被折叠?
被折叠的 条评论
为什么被折叠?
 到【灌水乐园】发言


