


android持久化操作 android数据交互 android中的文件存储、sharedreferences存储、数据库存储(SQLite、LitePal)
2017/3/9 记载
持久化技术:就是指将内存中的瞬时数据保存到存储设备当中去。
android中有三种技术可实现:文件存储、ShardPrenference存储、SD卡存储前两者还可以,对于SD卡有着安全性的问题。
所有的文件存储都是放在/data/data/<packagename>/files目录下的
会文件IO流的就会使用第一种方式,这里说说第二种方式ShardPrenference方式
ShardPrenference:要使用首先得得到SaredPreference对象
1.Context类中的getShardPreference()方法2.Activity类中的getPreference()方法
3.PreferenceManager类中getDefaultShardPreference()方法
(1)调用SaredPreference对象的edit()方法获取一个SaredPreference.Editor对象
(2)向SaredPreference.Editor对象中加数据,如:putBoolean() 得到getBoolean(),一次类推
(3)调用apply()方法添加数据提交,从而完成数据存储
就这个流程,很简单的,比文件存储用IO流简单多了。
例子:
activity_main.xml
<?xml version="1.0" encoding="utf-8"?>
<LinearLayout xmlns:android="http://schemas.android.com/apk/res/android"
    android:layout_width="match_parent"
    android:layout_height="match_parent">


    <Button
        android:id="@+id/save_data"
        android:text="Save Data"
        android:layout_width="match_parent"
        android:layout_height="wrap_content" />
</LinearLayout>
MainActivity.java
package com.example.ldp.com.saredpreferencetest;
import android.content.SharedPreferences;
import android.support.v7.app.AppCompatActivity;
import android.os.Bundle;
import android.view.View;
import android.widget.Button;
public class MainActivity extends AppCompatActivity {
@Override
protected void onCreate(Bundle savedInstanceState) {
super.onCreate(savedInstanceState);
setContentView(R.layout.activity_main);
/*开启SharedPreference存储*/
Button button = (Button) findViewById(R.id.save_data);
button.setOnClickListener(new View.OnClickListener() {
@Override
public void onClick(View v) {
//得到SharedPreferences.Editor对象,通过它来操作
SharedPreferences.Editor editor = getSharedPreferences("data",MODE_PRIVATE).edit();
editor.putString("name","Tome");
editor.putInt("age",22);
editor.putBoolean("married",false);
editor.apply();//提交数据
}
});
}
}
然后打开android studio 中打开File Exporer /data/data/com.example.saredpreferencetest/shared_prefs
看data.xml文件就可以看到数据,是xml文件格式的。
相应的看一下取值:修改两个文件即可
<?xml version="1.0" encoding="utf-8"?>
<LinearLayout xmlns:android="http://schemas.android.com/apk/res/android"
    android:orientation="vertical"
    android:layout_width="match_parent"
    android:layout_height="match_parent">


    <!--这是写入数据用的-->
    <Button
        android:id="@+id/save_data"
        android:text="Save Data"
        android:layout_width="match_parent"
        android:layout_height="wrap_content" />


    <!--这个按钮是恢复数据用的-->
    <Button
        android:id="@+id/restore_data"
        android:text="Restore data"
        android:layout_width="match_parent"
        android:layout_height="wrap_content" />


</LinearLayout>
package com.example.ldp.com.saredpreferencetest;
import android.content.SharedPreferences;
import android.support.v7.app.AppCompatActivity;
import android.os.Bundle;
import android.util.Log;
import android.view.View;
import android.widget.Button;
public class MainActivity extends AppCompatActivity {
@Override
protected void onCreate(Bundle savedInstanceState) {
super.onCreate(savedInstanceState);
setContentView(R.layout.activity_main);
/*开启SharedPreference存储*/
Button button = (Button) findViewById(R.id.save_data);
button.setOnClickListener(new View.OnClickListener() {
@Override
public void onClick(View v) {
//得到SharedPreferences.Editor对象,通过它来操作
SharedPreferences.Editor editor = getSharedPreferences("data",MODE_PRIVATE).edit();
editor.putString("name","Tome");
editor.putInt("age",22);
editor.putBoolean("married",false);
editor.apply();//提交数据
}
});
/*读出数据*/
Button button1 = (Button)findViewById(R.id.restore_data);
button1.setOnClickListener(new View.OnClickListener() {
@Override
public void onClick(View v) {
SharedPreferences pref = getSharedPreferences("data",MODE_PRIVATE);
String name = pref.getString("name","--");
int age = pref.getInt("age",0);
boolean married = pref.getBoolean("married",false);
Log.d("MainActivity","name id "+name);
Log.d("MainActivity","age is "+age);
Log.d("MainActivity","married is "+married);
}
});
}
}效果图:

写完了后我们就要沉思一下问题了,这样安全吗?这样写是不安全的,在正式项目里面是不允许用明文写的
使用加密算法来加密是最好的。
SQLite数据库存储
android系统自带的一个小型数据库(800Kb-1M)左右。它支持SQL语法,数据库的ACID事务会其他数据库的这个会很快上手的。
1.使用SQLiteOpenHelper(抽象类)来创建和升级数据库
2.实现两个抽象方法,onCreate()和onUograde() ,创建升级和实现数据库逻辑
3.getReadableDatabase()和geyWriteDatabase()创建和打开一个数据库,当磁盘满了只能读,写会报错。
数据库文件放在/data/data/<packagename>/database/目录下
建库建表会吧,这是第一步,SQLite数据库中有以下类型数据:
integer(整形)、real(浮点型)、text(文本)、blob(二进制)、autoincrement主键自增长
例子:创建数据库
activity_main.xml
<?xml version="1.0" encoding="utf-8"?>
<LinearLayout xmlns:android="http://schemas.android.com/apk/res/android"
    android:orientation="vertical"
    android:layout_width="match_parent"
    android:layout_height="match_parent">


    <Button
        android:id="@+id/create_database"
        android:text="Create database"
        android:layout_width="match_parent"
        android:layout_height="wrap_content" />
</LinearLayout>
新建一个类MydataaseHelper用来继承SQLiteOpenHelper这个抽象类来实现数据库的创建
package com.example.ldp.com.databasetest;


import android.content.Context;
import android.database.DatabaseErrorHandler;
import android.database.sqlite.SQLiteDatabase;
import android.database.sqlite.SQLiteOpenHelper;
import android.widget.Toast;


/**
 * Created by Administrator on 2017/3/9.
 */


public class MyDataseHelper extends SQLiteOpenHelper {


    //建表语句
    public static final String CREATE_BOOK="create table Book("
            +"id integer primary key autoincrement,"+"author text,"+"price real,"+"pages integer,"
            +"name text)";
    private Context mContext;


    //第一个参数:表示上下文  第二个参数:数据库名称  第三个参数:查询数据库的时候返回的Cursor(一般为空)  第四个参数:数据库版本号
    public MyDataseHelper(Context context, String name, SQLiteDatabase.CursorFactory factory, int version) {
        super(context, name, factory, version);
        this.mContext = context;
    }


    /*执行SQL语句的方法*/
    @Override
    public void onCreate(SQLiteDatabase db) {
        db.execSQL(CREATE_BOOK);
        Toast.makeText(mContext,"建表成功!!",Toast.LENGTH_SHORT).show();
    }


    @Override
    public void onUpgrade(SQLiteDatabase db, int oldVersion, int newVersion) {


    }
}
MainActivity
package com.example.ldp.com.databasetest;


import android.support.v7.app.AppCompatActivity;
import android.os.Bundle;
import android.view.View;
import android.widget.Button;


public class MainActivity extends AppCompatActivity {


    private MyDataseHelper myDataseHelper;


    @Override
    protected void onCreate(Bundle savedInstanceState) {
        super.onCreate(savedInstanceState);
        setContentView(R.layout.activity_main);


        myDataseHelper = new MyDataseHelper(this,"BookStore.db",null,1);
        Button button = (Button)findViewById(R.id.create_database);
        button.setOnClickListener(new View.OnClickListener() {
            @Override
            public void onClick(View v) {
                //调用onCreate方法中构建的MydatabaseHelper对象创建数据库并创建表
                myDataseHelper.getWritableDatabase();
            }
        });
    }
}
效果图:
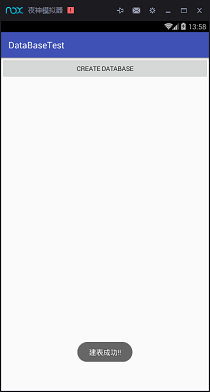
添加表呢?别忘了我们还有一个函数onUpgrade()没用呢
    public static String CREATE_CATEGORY = "create table Category("+
            "id integer primary key autoincrement,"+"category_name text,"+"category_code integer)";
/*升级数据库用的方法,也就是以后添加表格就要在这个方法里面写逻辑,
在创建表格的时候把之前创建的表删除,再建表表即可,问题是怎么才能在onCreate方法之前执行呢
跟之前传入参数1那个有关,只要比1大的参数,就可以*/
    @Override
    public void onUpgrade(SQLiteDatabase db, int oldVersion, int newVersion) {
        db.execSQL("drop table if exists Book");
        db.execSQL("drop table if exists Category");
        onCreate(db);
    }

 myDataseHelper = new MyDataseHelper(this,"BookStore.db",null,2);
把这三步弄弄就可以成功加入表了,其实就是全部重新删除了再创建的。
SQLite的 增删改查,这个绝对不陌生啊!用SQL语句啊,那你就想多了,
android中已经给开发者准备了类似 hibernate似的的封装方法
在以前的例子上改例子:
activity_main
<?xml version="1.0" encoding="utf-8"?>
<LinearLayout xmlns:android="http://schemas.android.com/apk/res/android"
    android:orientation="vertical"
    android:layout_width="match_parent"
    android:layout_height="match_parent">


    <Button
        android:id="@+id/create_database"
        android:text="Create database"
        android:textAllCaps="false"
        android:layout_width="match_parent"
        android:layout_height="wrap_content" />


    <Button
        android:id="@+id/add_data"
        android:text="Add Data"
        android:textAllCaps="false"
        android:layout_width="match_parent"
        android:layout_height="wrap_content" />


    <Button
        android:id="@+id/update_data"
        android:text="Update Date"
        android:textAllCaps="false"
        android:layout_width="match_parent"
        android:layout_height="wrap_content" />
    <Button
        android:id="@+id/delete_data"
        android:text="Delete Data"
        android:textAllCaps="false"
        android:layout_width="match_parent"
        android:layout_height="wrap_content" />


    <Button
        android:id="@+id/query_data"
        android:text="Query Data"
        android:textAllCaps="false"
        android:layout_width="match_parent"
        android:layout_height="wrap_content" />
</LinearLayout>
MainActivity
package com.example.ldp.com.databasetest;
import android.content.ContentValues;
import android.database.Cursor;
import android.database.sqlite.SQLiteDatabase;
import android.support.v7.app.AppCompatActivity;
import android.os.Bundle;
import android.util.Log;
import android.view.View;
import android.widget.Button;
public class MainActivity extends AppCompatActivity {
private MyDataseHelper myDataseHelper;
@Override
protected void onCreate(Bundle savedInstanceState) {
super.onCreate(savedInstanceState);
setContentView(R.layout.activity_main);
myDataseHelper = new MyDataseHelper(this,"BookStore.db",null,2);
/**
*创建数据库
* */
Button button = (Button)findViewById(R.id.create_database);
button.setOnClickListener(new View.OnClickListener() {
@Override
public void onClick(View v) {
//调用onCreate方法中构建的MydatabaseHelper对象创建数据库并创建表
myDataseHelper.getWritableDatabase();
}
});
/**
*添加
* */
Button button1 = (Button)findViewById(R.id.add_data);
button1.setOnClickListener(new View.OnClickListener() {
@Override
public void onClick(View v) {
SQLiteDatabase db = myDataseHelper.getWritableDatabase();
ContentValues contentValues = new ContentValues();
//存储数据
//第二行数据
contentValues.put("name","The Vinci Code");
contentValues.put("author","Dan Brow");
contentValues.put("pages",454);
contentValues.put("price",16.96);
db.insert("Book",null,contentValues);//插入一行数据
contentValues.clear();
//第二条数据
contentValues.put("name","The Vinci Symple");
contentValues.put("author","Dan Brow");
contentValues.put("pages",567);
contentValues.put("price",16.95);
db.insert("Book",null,contentValues);//插入二行数据
contentValues.clear();
}
});
/**
*更新
* */
Button button2 = (Button)findViewById(R.id.update_data);
button2.setOnClickListener(new View.OnClickListener() {
@Override
public void onClick(View v) {
SQLiteDatabase db = myDataseHelper.getWritableDatabase();
ContentValues values = new ContentValues();
values.put("price",10.99);
db.update("Book",values,"name=?",new String[]{"The Vinci Code"});
}
});
/**
*删除
* */
Button button3 = (Button)findViewById(R.id.delete_data);
button3.setOnClickListener(new View.OnClickListener() {
@Override
public void onClick(View v) {
SQLiteDatabase db = myDataseHelper.getWritableDatabase();
db.delete("Book","pages>?",new String[]{"500"});
}
});
/**
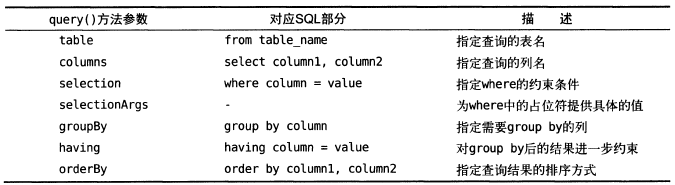
*查询。查询是CRUD操作中最复杂的,相对SQLite来说,有一个query()方法,最短的一个方法要传入7个参数
* */
Button button4 = (Button)findViewById(R.id.query_data);
button4.setOnClickListener(new View.OnClickListener() {
@Override
public void onClick(View v) {
SQLiteDatabase db = myDataseHelper.getWritableDatabase();
//查询Book表中的所有数据
Cursor cursor = db.query("Book",null,null,null,null,null,null);
if(cursor.moveToFirst()){
//遍历Cursor对象,取出数据打印
do{
String name = cursor.getString(cursor.getColumnIndex("name"));
String author = cursor.getString(cursor.getColumnIndex("author"));
int pages = cursor.getInt(cursor.getColumnIndex("pages"));
double price = cursor.getDouble(cursor.getColumnIndex("price"));
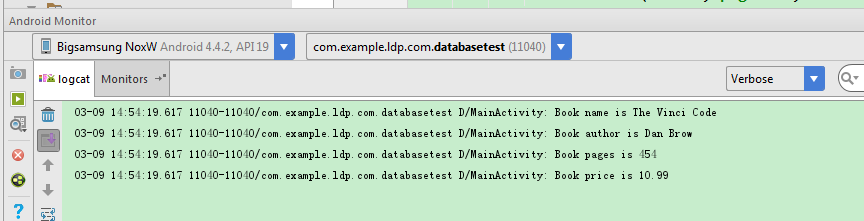
Log.d("MainActivity","Book name is "+name);
Log.d("MainActivity","Book author is "+author);
Log.d("MainActivity","Book pages is "+pages);
Log.d("MainActivity","Book price is "+price);
}while (cursor.moveToNext());
}
cursor.close();
}
});
}
}
另外一个MyDataseHelper不动
效果图:
Query()方法参数列表
效果图:
LitePal
比SQLite更好使用的数据库需要引库:compile 'org.litepal.android:core:1.3.2'
优缺点比较,SQLite艰苦需要手动建库建表,而LitePal用到面向对象的思想,进行对象关系映射将bean类
直接对应表,bean名就是表明,bean属性就是表列名。
在活动oncreate方法中Connector.getDatabase();这条语句就可以创建数据库了。
在前面SQLite更新版本的时候,也就是增加库表的时候,会先删除前面的表才能新建表格,这样的行为会造成数据的损失,是很危险的。
而LitePal不需要那么麻烦,只需要建立bean类(也就是映射库表),然后记得把类放到映射模型列表中,改版本号为1即可。
LitePal的增删改查想当的简单,具体的操作看网络资料,很多的。
部分方法效果图:


 817
817

 被折叠的 条评论
为什么被折叠?
被折叠的 条评论
为什么被折叠?
 到【灌水乐园】发言


