


 本文介绍如何使用MyBatis自动生成代码工具快速构建基于SpringMVC的应用程序,包括配置环境、整合流程及示例代码。
项目说明:
(1) 本例采用 maven web 工程做例子讲解
(2) 利用mybaits 提供的代码生成工具自动生成代码(dao接口,sql mapper映射文件,pojo数据库映射类)
(3) 数据库用 mysql
项目构建:
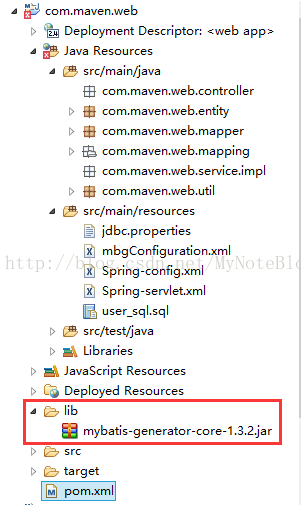
一,新建maven web 工程
网上有很多详细的教程,初学者可以点这里跳转学习:eclipse创建maven工程
本例项目结构如下,待会再一步一步讲解:
二,引入需要的jar包到pom.xml中,配置如下:
<project xmlns="http://maven.apache.org/POM/4.0.0" xmlns:xsi="http://www.w3.org/2001/XMLSchema-instance"
	xsi:schemaLocation="http://maven.apache.org/POM/4.0.0 http://maven.apache.org/maven-v4_0_0.xsd">
	<modelVersion>4.0.0</modelVersion>
	<groupId>com.maven.web</groupId>
	<artifactId>com.maven.web</artifactId>
	<packaging>war</packaging>
	<version>0.0.1-SNAPSHOT</version>
	<name>com.maven.web Maven Webapp</name>

	<properties>
		<spring.version>4.3.0.RELEASE</spring.version>
		<jackson.version>2.6.5</jackson.version>
		<fastjson.version>1.2.23</fastjson.version>
		<mybatis.version>3.3.0</mybatis.version>
		<mybatis-spring.version>1.2.3</mybatis-spring.version>
		<mysql.connector.version>5.1.29</mysql.connector.version>
	</properties>

	<repositories>
		<repository>
			<id>spring-milestones</id>
			<name>Spring Milestones</name>
			<url>https://repo.spring.io/libs-milestone</url>
			<snapshots>
				<enabled>false</enabled>
			</snapshots>
		</repository>
	</repositories>

	<dependencies>
		<dependency>
			<groupId>junit</groupId>
			<artifactId>junit</artifactId>
			<version>3.8.1</version>
			<scope>test</scope>
		</dependency>

		<dependency>
			<groupId>javax.annotation</groupId>
			<artifactId>javax.annotation-api</artifactId>
			<version>1.2</version>
		</dependency>

		<!-- Spring -->
		<dependency>
			<groupId>org.springframework</groupId>
			<artifactId>spring-core</artifactId>
			<version>${spring.version}</version>
		</dependency>
		<dependency>
			<groupId>org.springframework</groupId>
			<artifactId>spring-expression</artifactId>
			<version>${spring.version}</version>
		</dependency>
		<dependency>
			<groupId>org.springframework</groupId>
			<artifactId>spring-beans</artifactId>
			<version>${spring.version}</version>
		</dependency>
		<dependency>
			<groupId>org.springframework</groupId>
			<artifactId>spring-aop</artifactId>
			<version>${spring.version}</version>
		</dependency>
		<dependency>
			<groupId>org.springframework</groupId>
			<artifactId>spring-context</artifactId>
			<version>${spring.version}</version>
		</dependency>
		<dependency>
			<groupId>org.springframework</groupId>
			<artifactId>spring-context-support</artifactId>
			<version>${spring.version}</version>
		</dependency>
		<dependency>
			<groupId>org.springframework</groupId>
			<artifactId>spring-orm</artifactId>
			<version>${spring.version}</version>
		</dependency>
		<dependency>
			<groupId>org.springframework</groupId>
			<artifactId>spring-oxm</artifactId>
			<version>${spring.version}</version>
		</dependency>
		<dependency>
			<groupId>org.springframework</groupId>
			<artifactId>spring-tx</artifactId>
			<version>${spring.version}</version>
		</dependency>
		<dependency>
			<groupId>org.springframework</groupId>
			<artifactId>spring-web</artifactId>
			<version>${spring.version}</version>
		</dependency>
		<dependency>
			<groupId>org.springframework</groupId>
			<artifactId>spring-webmvc</artifactId>
			<version>${spring.version}</version>
		</dependency>

		<dependency>
			<groupId>commons-dbcp</groupId>
			<artifactId>commons-dbcp</artifactId>
			<version>1.4</version>
		</dependency>

		<!-- mybatis start -->
		<dependency>
			<groupId>org.mybatis</groupId>
			<artifactId>mybatis</artifactId>
			<version>${mybatis.version}</version>
		</dependency>
		<dependency>
			<groupId>org.mybatis</groupId>
			<artifactId>mybatis-spring</artifactId>
			<version>${mybatis-spring.version}</version>
		</dependency>
		<dependency>
			<groupId>org.mybatis</groupId>
			<artifactId>mybatis-generator-core</artifactId>
			<version>1.3.2</version>
		</dependency>
		<dependency>
			<groupId>mysql</groupId>
			<artifactId>mysql-connector-java</artifactId>
			<version>${mysql.connector.version}</version>
		</dependency>

		<dependency>
			<groupId>org.apache.commons</groupId>
			<artifactId>commons-lang3</artifactId>
			<version>3.4</version>
		</dependency>

		<!-- jackson -->
		<dependency>
			<groupId>com.fasterxml.jackson.core</groupId>
			<artifactId>jackson-core</artifactId>
			<version>${jackson.version}</version>
		</dependency>
		<dependency>
			<groupId>com.fasterxml.jackson.core</groupId>
			<artifactId>jackson-databind</artifactId>
			<version>${jackson.version}</version>
		</dependency>
		<dependency>
			<groupId>com.fasterxml.jackson.core</groupId>
			<artifactId>jackson-annotations</artifactId>
			<version>${jackson.version}</version>
		</dependency>

		<!-- fastjson -->
		<dependency>
			<groupId>com.alibaba</groupId>
			<artifactId>fastjson</artifactId>
			<version>${fastjson.version}</version>
		</dependency>
		<!-- fastjson -->

		<dependency>
			<groupId>javax.servlet</groupId>
			<artifactId>javax.servlet-api</artifactId>
			<version>3.1.0</version>
			<scope>provided</scope>
		</dependency>

	</dependencies>

	<build>
		<finalName>com.maven.web</finalName>
	</build>


</project>
=== 这里需要注意的是,mybaits自动生成代码的工具包我是放在本地的,项目源码会在文末分享。
找到lib包下面的mybatis-generator-core-1.3.2.jar,按照pom.xml中配置的路径放到自己本地即可。
同时需要在同目录下新建mybatis-generator-core-1.3.2.pom,然后加入以下配置内容。
<dependency>
	<groupId>org.mybatis</groupId>
	<artifactId>mybatis-generator-core</artifactId>
	<version>1.3.2</version>
</dependency><?xml version="1.0" encoding="UTF-8"?>
<web-app xmlns:xsi="http://www.w3.org/2001/XMLSchema-instance"
xmlns="http://java.sun.com/xml/ns/javaee"
xsi:schemaLocation="http://java.sun.com/xml/ns/javaee http://java.sun.com/xml/ns/javaee/web-app_3_0.xsd"
version="3.0">
<!-- 设置Spring容器加载所有的配置文件的路径 -->
<context-param>
<param-name>contextConfigLocation</param-name>
<param-value>classpath:Spring-config.xml</param-value>
</context-param>
<!-- 加载Spring容器配置 -->
<listener>
<listener-class>org.springframework.web.context.ContextLoaderListener</listener-class>
</listener>
<!-- 防止Spring内存溢出监听器 -->
<listener>
<listener-class> org.springframework.web.context.ContextCleanupListener</listener-class>
</listener>
<!-- 字符编码过滤器 -->
<filter>
<filter-name>encodingFilter</filter-name>
<filter-class>org.springframework.web.filter.CharacterEncodingFilter</filter-class>
<async-supported>true</async-supported>
<init-param>
<param-name>encoding</param-name>
<param-value>UTF-8</param-value>
</init-param>
<init-param>
<param-name>forceEncoding</param-name>
<param-value>true</param-value>
</init-param>
</filter>
<filter-mapping>
<filter-name>encodingFilter</filter-name>
<url-pattern>/*</url-pattern>
</filter-mapping>
<!-- 配置SpringMVC核心控制器 -->
<servlet>
<servlet-name>SpringMVC</servlet-name>
<servlet-class>org.springframework.web.servlet.DispatcherServlet</servlet-class>
<init-param>
<param-name>contextConfigLocation</param-name>
<param-value>classpath:Spring-servlet.xml</param-value>
</init-param>
<load-on-startup>1</load-on-startup>
<async-supported>true</async-supported>
</servlet>
<servlet-mapping>
<servlet-name>SpringMVC</servlet-name>
<url-pattern>/</url-pattern>
</servlet-mapping>
<!-- session超时设置 -->
<session-config>
<session-timeout>30</session-timeout>
</session-config>
<!-- 项目启动首页 -->
<welcome-file-list>
<welcome-file>index.jsp</welcome-file>
</welcome-file-list>
</web-app>classpath:Spring-config.xml :这个是Spring的核心配置文件,用于管理bean,集成其他框架等等
classpath:Spring-servlet.xml:这个是SpringMvc的核心配置文件
四,Spring-config.xml ,,与mybatis集成,配置如下:
<?xml version="1.0" encoding="UTF-8"?>
<beans xmlns="http://www.springframework.org/schema/beans"
	xmlns:xsi="http://www.w3.org/2001/XMLSchema-instance"
	xmlns:context="http://www.springframework.org/schema/context"
	xmlns:tx="http://www.springframework.org/schema/tx"
	xsi:schemaLocation="http://www.springframework.org/schema/beans
         http://www.springframework.org/schema/beans/spring-beans-4.0.xsd
         http://www.springframework.org/schema/context
         http://www.springframework.org/schema/context/spring-context-4.0.xsd
          http://www.springframework.org/schema/tx
          http://www.springframework.org/schema/tx/spring-tx-4.0.xsd">

	<!-- 扫描注解 -->
	<context:component-scan base-package="com.maven.web">
		<context:exclude-filter type="annotation"
			expression="org.springframework.stereotype.Controller" />
	</context:component-scan>

	<!-- 1. 数据源 : DriverManagerDataSource -->
	<bean id="dataSource" class="org.apache.commons.dbcp.BasicDataSource"
		destroy-method="close">
		<property name="driverClassName" value="com.mysql.jdbc.Driver" />
		<property name="url" value="jdbc:mysql://127.0.0.1:3306/yun?characterEncoding=utf8" />
		<property name="username" value="root" />
		<property name="password" value="centos" />
		<!-- 从池中获取连接前进行验证 -->
		<property name="testOnBorrow" value="false" />
		<!-- 向池中还回连接前进行验证 -->
		<property name="testOnReturn" value="false" />
		<!-- 连接空闲时验证 -->
		<property name="testWhileIdle" value="true" />
		<!-- 运行判断连接超时任务(evictor)的时间间隔,单位为毫秒,默认为-1,即不执行任务。 -->
		<property name="timeBetweenEvictionRunsMillis" value="300000" />
		<!-- 连接的超时时间,默认为半小时。 -->
		<property name="minEvictableIdleTimeMillis" value="1800000" />
		<!-- 每次evictor启动检查的空闲连接数,-2标识1/2的总空闲连接 -->
		<property name="numTestsPerEvictionRun" value="-1"></property>
		<!-- 线程池初始数量 -->
		<property name="initialSize" value="10"></property>
		<!-- 最大线程数量 -->
		<property name="maxActive" value="50"></property>
		<!-- 最大空闲线程数量 -->
		<property name="maxIdle" value="20"></property>
		<!-- 最小空闲线程数量 -->
		<property name="minIdle" value="10"></property>
		<!-- 从线程池获取一个mysql连接的最大等待时间,单位毫秒 -->
		<property name="maxWait" value="1000"></property>
	</bean>

	<!-- 2. mybatis的SqlSession的工厂-->
	<bean id="sqlSessionFactory" class="org.mybatis.spring.SqlSessionFactoryBean">
		<property name="dataSource" ref="dataSource" />
		<!-- 所有配置的mybatis映射文件 -->
		<property name="mapperLocations" value="classpath:com/maven/web/mapping/*.xml" />
	</bean>

	<!-- 3. mybatis自动扫描加载Sql接口 -->
	<bean class="org.mybatis.spring.mapper.MapperScannerConfigurer">
		<property name="basePackage" value="com.maven.web.mapper"></property>
		<property name="sqlSessionFactory" ref="sqlSessionFactory"></property>
	</bean>

	<!-- 4. 事务管理  -->
	<bean id="transactionManager"
		class="org.springframework.jdbc.datasource.DataSourceTransactionManager">
		<property name="dataSource" ref="dataSource"></property>
	</bean>

	<tx:annotation-driven transaction-manager="transactionManager" />

</beans>
五, Spring-servlet.xml , 配置如下:
<?xml version="1.0" encoding="UTF-8"?>
<beans xmlns="http://www.springframework.org/schema/beans"
	xmlns:xsi="http://www.w3.org/2001/XMLSchema-instance" xmlns:p="http://www.springframework.org/schema/p"
	xmlns:context="http://www.springframework.org/schema/context"
	xmlns:mvc="http://www.springframework.org/schema/mvc"
	xsi:schemaLocation="http://www.springframework.org/schema/beans
                        http://www.springframework.org/schema/beans/spring-beans-4.2.xsd
                        http://www.springframework.org/schema/context
                        http://www.springframework.org/schema/context/spring-context-4.2.xsd
                        http://www.springframework.org/schema/mvc
                        http://www.springframework.org/schema/mvc/spring-mvc-4.2.xsd">

	 <!-- 自动扫描该包,使SpringMVC认为包下用了@controller注解的类是控制器  -->
    <context:component-scan base-package="com.maven.web.controller" />

	<mvc:annotation-driven>
		<mvc:message-converters>
			<bean class="com.alibaba.fastjson.support.spring.FastJsonHttpMessageConverter">
				<description>JSON转换器</description>
				<property name="supportedMediaTypes">
					<list>
						<value>application/json;charset=UTF-8</value>
		             	<value>text/html;charset=UTF-8</value>
					</list>
				</property>
			</bean>
		</mvc:message-converters>
	</mvc:annotation-driven>

	<!-- 定义ViewResolver组件, 实现根据视图标识获取JSP响应 -->
	<mvc:view-resolvers>
	    <mvc:jsp cache-views="false" prefix="/WEB-INF/html/" suffix=".jsp" />
	</mvc:view-resolvers>

	<!-- 静态资源访问,不被DispatcherServlet处理 -->
	<mvc:resources mapping="jsp/**" location="/WEB-INF/jsp/" />
	<mvc:resources mapping="/js/**" location="/js/" />

	<!-- 开启默认处理 -->
    <mvc:default-servlet-handler />

</beans>
=== 这里需要注意的是,两个配置文件中都开启了扫描注解包,
其中SpringMvc配置文件只扫描controller包,
而Spring配置文件则扫描除controller包以外的所有包。
六,mybatis 自动生成代码工具
这款自动生成代码的工具使用很方便,可以集成到自己的工程里面,也可以单独使用,简单来说只有三部分:
(1) 引入jar包,上文已经在pom.xml中引入了,请回顾查看
(2) 加入配置文件,mbgConfiguration.xml ,
主要是对数据库的连接配置,代码生成后的存放目录配置,以及需要生成代码的数据库对应表的配置
(3) 编写java类,加载配置文件,生成代码
七,mbgConfiguration.xml,配置如下:
<?xml version="1.0" encoding="UTF-8"?>
<!DOCTYPE generatorConfiguration
PUBLIC "-//mybatis.org//DTD MyBatis Generator Configuration 1.0//EN"
"http://mybatis.org/dtd/mybatis-generator-config_1_0.dtd">
<generatorConfiguration>
	<!-- 配置mysql 驱动jar包路径.用了绝对路径 -->
	<classPathEntry
		location="H:/repository/org/mybatis/mybatis/3.3.0/mybatis-3.3.0.jar" />
	<context id="mysql_tables " targetRuntime="MyBatis3">
		<!-- 为了防止生成的代码中有很多注释,比较难看,加入下面的配置控制 -->
		<commentGenerator>
			<property name="suppressAllComments" value="true" />
			<property name="suppressDate" value="true" />
		</commentGenerator>
		<!-- 注释控制完毕 -->
		<!-- 数据库连接 -->
		<jdbcConnection driverClass="com.mysql.jdbc.Driver"
			connectionURL="jdbc:mysql://127.0.0.1:3306/yun?characterEncoding=utf8"
			userId="root" password="centos">
		</jdbcConnection>
		<javaTypeResolver>
			<property name="forceBigDecimals" value="false" />
		</javaTypeResolver>
		<!-- 数据表对应的model 层 -->
		<javaModelGenerator targetPackage="com.maven.web.entity"
			targetProject="H:\project\com.maven.web\src\main\java">
			<property name="enableSubPackages" value="true" />
			<property name="trimStrings" value="true" />
		</javaModelGenerator>
		<!-- sql mapper 隐射配置文件 -->
		<sqlMapGenerator targetPackage="com.maven.web.mapping"
			targetProject="H:\project\com.maven.web\src\main\java">
			<property name="enableSubPackages" value="true" />
		</sqlMapGenerator>
		<!-- 在ibatis2 中是dao层,但在mybatis3中,其实就是mapper接口 -->
		<javaClientGenerator type="XMLMAPPER"
			targetPackage="com.maven.web.mapper" targetProject="H:\project\com.maven.web\src\main\java">
			<property name="enableSubPackages" value="true" />
		</javaClientGenerator>
		<!-- 要对那些数据表进行生成操作,必须要有一个. -->
		<table schema="mybatis" tableName="USER_INFO" domainObjectName="UserInfo"
			enableCountByExample="false" enableUpdateByExample="false"
			enableDeleteByExample="false" enableSelectByExample="false"
			selectByExampleQueryId="false">
		</table>
	</context>
</generatorConfiguration>package com.maven.web.util;
import java.io.File;
import java.io.IOException;
import java.sql.SQLException;
import java.util.ArrayList;
import java.util.List;
import org.mybatis.generator.api.MyBatisGenerator;
import org.mybatis.generator.config.Configuration;
import org.mybatis.generator.config.xml.ConfigurationParser;
import org.mybatis.generator.exception.InvalidConfigurationException;
import org.mybatis.generator.exception.XMLParserException;
import org.mybatis.generator.internal.DefaultShellCallback;
public class GenMain {
public static void main(String[] args) {
List<String> warnings = new ArrayList<String>();
boolean overwrite = true;
String genCfg = "/mbgConfiguration.xml";
File configFile = new File(GenMain.class.getResource(genCfg).getFile());
ConfigurationParser cp = new ConfigurationParser(warnings);
Configuration config = null;
try {
config = cp.parseConfiguration(configFile);
} catch (IOException e) {
e.printStackTrace();
} catch (XMLParserException e) {
e.printStackTrace();
}
DefaultShellCallback callback = new DefaultShellCallback(overwrite);
MyBatisGenerator myBatisGenerator = null;
try {
myBatisGenerator = new MyBatisGenerator(config, callback, warnings);
} catch (InvalidConfigurationException e) {
e.printStackTrace();
}
try {
myBatisGenerator.generate(null);
} catch (SQLException e) {
e.printStackTrace();
} catch (IOException e) {
e.printStackTrace();
} catch (InterruptedException e) {
e.printStackTrace();
}
}
}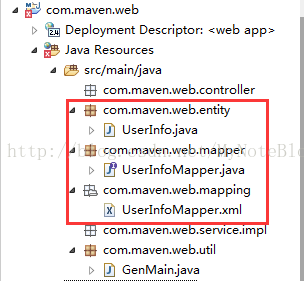
默认生成的代码已经实现基本的增删改查操作,如果需要,用户可以再自行添加方法并实现。
代码展示如下:
(1) UserInfo
package com.maven.web.entity;

import java.util.Date;

public class UserInfo {
    private Long id;

    private String userName;

    private String password;

    private String email;

    private String phone;

    private String sex;

    private String status;

    private Date createTime;

    private Date updateTime;

    public Long getId() {
        return id;
    }

    public void setId(Long id) {
        this.id = id;
    }

    public String getUserName() {
        return userName;
    }

    public void setUserName(String userName) {
        this.userName = userName == null ? null : userName.trim();
    }

    public String getPassword() {
        return password;
    }

    public void setPassword(String password) {
        this.password = password == null ? null : password.trim();
    }

    public String getEmail() {
        return email;
    }

    public void setEmail(String email) {
        this.email = email == null ? null : email.trim();
    }

    public String getPhone() {
        return phone;
    }

    public void setPhone(String phone) {
        this.phone = phone == null ? null : phone.trim();
    }

    public String getSex() {
        return sex;
    }

    public void setSex(String sex) {
        this.sex = sex == null ? null : sex.trim();
    }

    public String getStatus() {
        return status;
    }

    public void setStatus(String status) {
        this.status = status == null ? null : status.trim();
    }

    public Date getCreateTime() {
        return createTime;
    }

    public void setCreateTime(Date createTime) {
        this.createTime = createTime;
    }

    public Date getUpdateTime() {
        return updateTime;
    }

    public void setUpdateTime(Date updateTime) {
        this.updateTime = updateTime;
    }
}
(2) UserInfoMapper
package com.maven.web.mapper;

import org.springframework.stereotype.Repository;

import com.maven.web.entity.UserInfo;

@Repository
public interface UserInfoMapper {
    int deleteByPrimaryKey(Long id);

    int insert(UserInfo record);

    int insertSelective(UserInfo record);

    UserInfo selectByPrimaryKey(Long id);

    int updateByPrimaryKeySelective(UserInfo record);

    int updateByPrimaryKey(UserInfo record);
}
(3) UserInfoMapper.xml
<?xml version="1.0" encoding="UTF-8" ?>
<!DOCTYPE mapper PUBLIC "-//mybatis.org//DTD Mapper 3.0//EN" "http://mybatis.org/dtd/mybatis-3-mapper.dtd" >
<mapper namespace="com.maven.web.mapper.UserInfoMapper" >
  <resultMap id="BaseResultMap" type="com.maven.web.entity.UserInfo" >
    <id column="id" property="id" jdbcType="BIGINT" />
    <result column="user_name" property="userName" jdbcType="VARCHAR" />
    <result column="password" property="password" jdbcType="VARCHAR" />
    <result column="email" property="email" jdbcType="VARCHAR" />
    <result column="phone" property="phone" jdbcType="VARCHAR" />
    <result column="sex" property="sex" jdbcType="VARCHAR" />
    <result column="status" property="status" jdbcType="VARCHAR" />
    <result column="create_time" property="createTime" jdbcType="TIMESTAMP" />
    <result column="update_time" property="updateTime" jdbcType="TIMESTAMP" />
  </resultMap>
  <sql id="Base_Column_List" >
    id, user_name, password, email, phone, sex, status, create_time, update_time
  </sql>
  <select id="selectByPrimaryKey" resultMap="BaseResultMap" parameterType="java.lang.Long" >
    select
    <include refid="Base_Column_List" />
    from user_info
    where id = #{id,jdbcType=BIGINT}
  </select>
  <delete id="deleteByPrimaryKey" parameterType="java.lang.Long" >
    delete from user_info
    where id = #{id,jdbcType=BIGINT}
  </delete>
  <insert id="insert" parameterType="com.maven.web.entity.UserInfo" >
    insert into user_info (id, user_name, password,
      email, phone, sex,
      status, create_time, update_time
      )
    values (#{id,jdbcType=BIGINT}, #{userName,jdbcType=VARCHAR}, #{password,jdbcType=VARCHAR},
      #{email,jdbcType=VARCHAR}, #{phone,jdbcType=VARCHAR}, #{sex,jdbcType=VARCHAR},
      #{status,jdbcType=VARCHAR}, #{createTime,jdbcType=TIMESTAMP}, #{updateTime,jdbcType=TIMESTAMP}
      )
  </insert>
  <insert id="insertSelective" parameterType="com.maven.web.entity.UserInfo" >
    insert into user_info
    <trim prefix="(" suffix=")" suffixOverrides="," >
      <if test="id != null" >
        id,
      </if>
      <if test="userName != null" >
        user_name,
      </if>
      <if test="password != null" >
        password,
      </if>
      <if test="email != null" >
        email,
      </if>
      <if test="phone != null" >
        phone,
      </if>
      <if test="sex != null" >
        sex,
      </if>
      <if test="status != null" >
        status,
      </if>
      <if test="createTime != null" >
        create_time,
      </if>
      <if test="updateTime != null" >
        update_time,
      </if>
    </trim>
    <trim prefix="values (" suffix=")" suffixOverrides="," >
      <if test="id != null" >
        #{id,jdbcType=BIGINT},
      </if>
      <if test="userName != null" >
        #{userName,jdbcType=VARCHAR},
      </if>
      <if test="password != null" >
        #{password,jdbcType=VARCHAR},
      </if>
      <if test="email != null" >
        #{email,jdbcType=VARCHAR},
      </if>
      <if test="phone != null" >
        #{phone,jdbcType=VARCHAR},
      </if>
      <if test="sex != null" >
        #{sex,jdbcType=VARCHAR},
      </if>
      <if test="status != null" >
        #{status,jdbcType=VARCHAR},
      </if>
      <if test="createTime != null" >
        #{createTime,jdbcType=TIMESTAMP},
      </if>
      <if test="updateTime != null" >
        #{updateTime,jdbcType=TIMESTAMP},
      </if>
    </trim>
  </insert>
  <update id="updateByPrimaryKeySelective" parameterType="com.maven.web.entity.UserInfo" >
    update user_info
    <set >
      <if test="userName != null" >
        user_name = #{userName,jdbcType=VARCHAR},
      </if>
      <if test="password != null" >
        password = #{password,jdbcType=VARCHAR},
      </if>
      <if test="email != null" >
        email = #{email,jdbcType=VARCHAR},
      </if>
      <if test="phone != null" >
        phone = #{phone,jdbcType=VARCHAR},
      </if>
      <if test="sex != null" >
        sex = #{sex,jdbcType=VARCHAR},
      </if>
      <if test="status != null" >
        status = #{status,jdbcType=VARCHAR},
      </if>
      <if test="createTime != null" >
        create_time = #{createTime,jdbcType=TIMESTAMP},
      </if>
      <if test="updateTime != null" >
        update_time = #{updateTime,jdbcType=TIMESTAMP},
      </if>
    </set>
    where id = #{id,jdbcType=BIGINT}
  </update>
  <update id="updateByPrimaryKey" parameterType="com.maven.web.entity.UserInfo" >
    update user_info
    set user_name = #{userName,jdbcType=VARCHAR},
      password = #{password,jdbcType=VARCHAR},
      email = #{email,jdbcType=VARCHAR},
      phone = #{phone,jdbcType=VARCHAR},
      sex = #{sex,jdbcType=VARCHAR},
      status = #{status,jdbcType=VARCHAR},
      create_time = #{createTime,jdbcType=TIMESTAMP},
      update_time = #{updateTime,jdbcType=TIMESTAMP}
    where id = #{id,jdbcType=BIGINT}
  </update>
</mapper><insert id="insertSelective" parameterType="com.maven.web.entity.UserInfo" >
insert into user_info
<trim prefix="(" suffix=")" suffixOverrides="," >
<if test="id != null" >
id,
</if>
<if test="userName != null" >
user_name,
</if>
<if test="password != null" >
password,
</if>
<if test="email != null" >
email,
</if>
<if test="phone != null" >
phone,
</if>
<if test="sex != null" >
sex,
</if>
<if test="status != null" >
status,
</if>
<if test="createTime != null" >
create_time,
</if>
<if test="updateTime != null" >
update_time,
</if>
</trim>
<trim prefix="values (" suffix=")" suffixOverrides="," >
<if test="id != null" >
#{id,jdbcType=BIGINT},
</if>
<if test="userName != null" >
#{userName,jdbcType=VARCHAR},
</if>
<if test="password != null" >
#{password,jdbcType=VARCHAR},
</if>
<if test="email != null" >
#{email,jdbcType=VARCHAR},
</if>
<if test="phone != null" >
#{phone,jdbcType=VARCHAR},
</if>
<if test="sex != null" >
#{sex,jdbcType=VARCHAR},
</if>
<if test="status != null" >
#{status,jdbcType=VARCHAR},
</if>
<if test="createTime != null" >
now(),
</if>
<if test="updateTime != null" >
now(),
</if>
</trim>
</insert>**************************************************************************************************************************
到此,基本框架就已经搭建好了,下面我们来做简单的前后端交互,大家可以自行体会采用这种框架的便利之处。
本例采用的注解注入方式,简化xml配置文件。
九,新建controller,service 完成简单的增删查操作,代码如下:
(1) UserController
package com.maven.web.controller;

import javax.annotation.Resource;

import org.springframework.stereotype.Controller;
import org.springframework.web.bind.annotation.RequestBody;
import org.springframework.web.bind.annotation.RequestMapping;
import org.springframework.web.bind.annotation.RequestMethod;
import org.springframework.web.bind.annotation.RequestParam;
import org.springframework.web.bind.annotation.ResponseBody;

import com.maven.web.entity.UserInfo;
import com.maven.web.service.impl.UserService;

@Controller
@RequestMapping("/user")
public class UserController {

	@Resource
	private UserService userService;

	@ResponseBody
	@RequestMapping(value="/insert", method=RequestMethod.POST)
	public String insert(@RequestBody UserInfo userInfo){
		if(userInfo.getStatus()==null){
			userInfo.setStatus("0");
		}
		Integer count = userService.insert(userInfo);
		if(count>0){
			return "保存用户信息成功";
		}
		return "保存用户信息失败";
	}

	@ResponseBody
	@RequestMapping(value="/select", method=RequestMethod.GET)
	public String select(@RequestParam Long uid){
		UserInfo userInfo = userService.select(uid);
		if(userInfo!=null){
			return "您要查找的用户名是"+userInfo.getUserName();
		}
		return "查找用户失败";
	}

	@ResponseBody
	@RequestMapping(value="/delete", method=RequestMethod.DELETE)
	public String delete(@RequestParam Long uid){
		Integer count = userService.delete(uid);
		if(count>0){
			return "删除用户信息成功";
		}
		return "删除用户信息失败";
	}

}
package com.maven.web.service.impl;

import com.maven.web.entity.UserInfo;

public interface UserService {

	Integer insert(UserInfo userInfo);

	Integer delete(Long uid);

	UserInfo select(Long uid);

}
package com.maven.web.service.impl;

import javax.annotation.Resource;

import org.springframework.stereotype.Service;
import org.springframework.transaction.annotation.Transactional;

import com.maven.web.entity.UserInfo;
import com.maven.web.mapper.UserInfoMapper;

@Service
@Transactional
public class UserServiceImpl implements UserService {

	@Resource
	private UserInfoMapper userInfoMapper;

	public Integer insert(UserInfo userInfo) {
		return userInfoMapper.insertSelective(userInfo);
	}

	public Integer delete(Long uid) {
		return userInfoMapper.deleteByPrimaryKey(uid);
	}

	public UserInfo select(Long uid) {
		return userInfoMapper.selectByPrimaryKey(uid);
	}

}
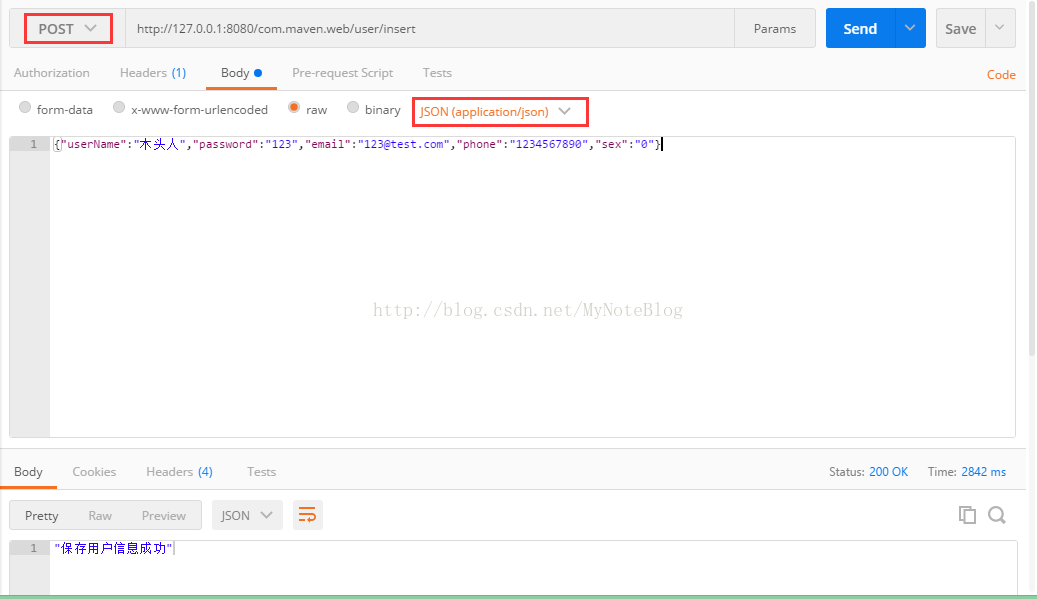
十,启动tomcat,测试,这里我用的是google应用插件,postman
(1) 新增用户信息,插入数据,这里传递的参数是JSON字符串格式,POST请求
后台用@RequestBody会自动将接收到的JSON格式转换成UserInfo对象,返回结果如下:
(2) 查询用户信息,GET请求

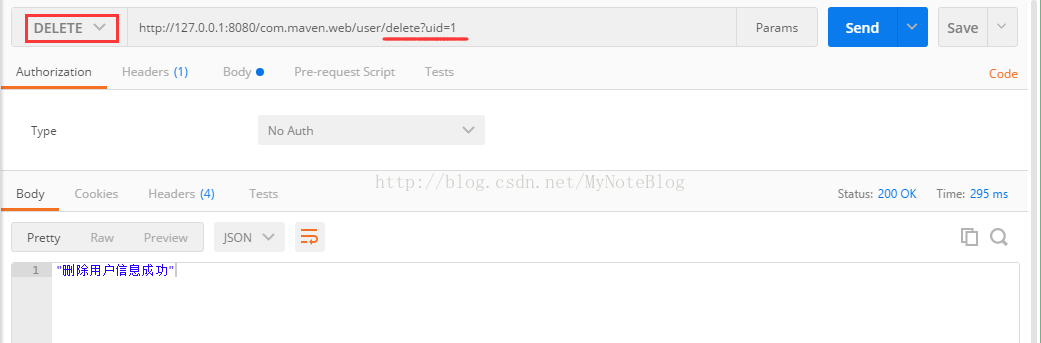
(3) 删除用户请求,DELETE请求
到此演示就全部结束了,关于SpringMvc接收参数的方式,大家可以跳转链接进行学习:点击打开链接
本例源码下载地址:http://download.csdn.net/download/mynoteblog/10213091


 1552
1552


 被折叠的 条评论
为什么被折叠?
被折叠的 条评论
为什么被折叠?
 到【灌水乐园】发言


