


原文地址:http://www.jamiekurtz.com/2014/11/25/5-keys-to-web-app-token-authentication/
5 KEYS TO WEB APP TOKEN AUTHENTICATION
Web App Token验证的5个要点
There are many scenarios where using token-based authentication is desired, but leveraging OAuth-based authentication against Facebook or Twitter in your web application or RESTful API isn’t possible.
很多情况下使用基于taken的验证服务是有必要的,但是在你的网站应用中利用对Facebook或Twitter的OAuth的验证却不是必须的。
As a consultant, where the bulk(大量) of the sites and web APIs we build are line-of-business applications over existing databases (specifically, existing users), most of the time we can’t simply forgo our own custom authentication. In fact, I don’t believe I’ve ever seen an enterprise application where taking a user’s Twitter-provided OAuth token would have been an acceptable solution. We simply aren’t working on social-enabled web applications. Nor are we building mobile apps where customers want their users to log in with social accounts.
作为参考,我们创建的大量的网站和web APIs都是在现有数据库(特别是现存的用户)之上的业务应用层,大部分时候我们不能简单地放弃我们自己的自定义验证。事实上,我相信我还没有见过一个企业应用使用用的Twitter OAuth认证作为可接受的解决方案。我们没有实现社交功能的网页应用。我们也不会创建让用户想要通过他们社交账号登录的手机应用。
But that doesn’t mean we need to completely throw out token-based authentication. In fact, I much prefer leveraging JSON Web Tokens for traditional server-rendered web sites, Single Page Applications making AJAX calls, and RESTful APIs supporting mobile applications. In the end, I believe claims-based tokens are an excellent way to know who’s accessing your application and what they are allowed to do – even for the cases where you need to utilize existing usernames and passwords in an existing database or other credential store.
但是这并不意味着我们需要完全抛弃基于token的验证机制。事实上,我更喜欢在传统服务器渲染的网页,单页应用使用AJAX请求和提供移动应用的RESTful APIs上使用JSON Web Tokens。最后,我相信基于声明的tokens是一个不错的方式去知道是谁访问了你的应用,并且他们能够做些什么,甚至是其它你需要使用到数据库或其它凭据存储中用户名和密码的地方。
In this post I want to share five keys to understanding token-based authentication in your web and mobile applications. This is not an explanation of how OAuth works, nor is it instructions for implementing one of the OAuth grant types. In fact, I’m not going to show you any code! Crazy, I know. But as I spend time helping developers architect and implement authentication/authorization, the main gap seems to be an understanding of the basic idea of token-based authentication. There doesn’t seem to be much trouble finding an appropriate library or blocks of code on Stack Overflow.
在这篇文章中,我想分享在你的网页和移动应用中使用基于Token验证的5个要点。这里不会解释OAuth认证是如何工作的,也不会说明如何实现一个OAuth授权类型的。其实,我不会向你展示任何代码!我知道这听上去很不可思议。但是在我花费了大量时间帮助开发人员构建和实现了认证或授权时,最主要的鸿沟还是对于基于token认证机制基本概念的理解。
As such, the purpose of this post is to help you understand the underlying flow of data involved in utilizing tokens in those cases where you need to validate user credentials against an existing set of usernames and passwords in some internal database. I.e. those cases where OAuth with Facebook simply isn’t an option.
这篇文章的目的是帮助你了解当你需要使用token在某个内部数据库中通过用户名和密码来验证用户凭证时相关数据的潜在的流程。
FIVE KEYS
5个要点
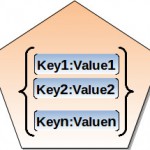
Let’s look at what I consider to be five keys to understanding token-based authentication. First, in this context, a token is just a collection of claims. A claim is simply a key-value pair. For example, username: bsmith, or email: bsmith@example.com. To see an example of and create your own JSON Web Token (JWT), you can visit my Online JSON Web Token Builder. On that page you will see that the format of a JWT is very simple – again, just a collection of key-value pairs that “claim” something about the caller: “My name is Bob Smith, and my email address is bsmith@example.com”, etc. Some claims are special (e.g. expiration date). My online token builder includes a handful of these special claims. You can see them all here.
让我们看看我所认为的了解基于token认证机制的5个要点。首先,在这篇文中,token只是一个声明的集合。一个声明只是一个简单的键值对。比如,username:bsmith或者email: bsmith@example.com。想要看示例或者创建你自己的JSON Web Token,你可以访问我的Online JSON Web Token Builder。在那里你将看到一个JWT的格式是如此简单,当然也是一个键值对的集合,这个声明就类似于“My name is Bob Smith, and my email address is bsmith@example.com”等等。有些声明十分特别(比如,到期日期)。我的在线token生成器包含了少部分这样特别的声明。你可以在那里看到它们。
Here’s an example token (in raw form, prior to signing and base64 encoding):
这里有一个token示例:
{
        "iss": "Online JWT Builder",
        "iat": 1416797419,
        "exp": 1448333419,
        "aud": "www.example.com",
        "sub": "jrocket@example.com",
        "GivenName": "Johnny",
        "Surname": "Rocket",
        "Email": "jrocket@example.com",
        "Role": [
            "Manager",
            "Project Administrator"
        ]
}
The first five claims in that token are a subset of the special – or, reserved – claims. Most libraries used in processing JSON Web Tokens will understand these special claims.
在这个token中前五个声明是特别或者保留声明的子集。大部分用于处理JSON Web Tokens的库都会理解这些特别的声明。
Now that we know a JWT is just a collection of claims, the second key is to make sure these claims include enough user properties sufficient to avoid hitting the database on subsequent requests. This is important for a couple of reasons. First, and most obvious, you can avoid the performance hit of performing the exact same database call on every single web or AJAX request. The idea here is that the user’s properties (e.g. email address, first and last name, roles) will likely not change from one request to another. So we don’t really need to take the database hit on every request.
现在我们知道了一个JWT只是一个声明的集合,第二个要点是保证这些声明包含了足够的用户信息能够避免在接下来的请求中去访问数据库。这点十分重要是有多个原因的。首先,且最明显的,你可以避免在每个网页或AJAX请求重复执行相同数据库请求时带来的性能问题。这儿的思路是用户的属性(比如,email address, first and last name, roles)在重复的请求中可能不会改变。所以我们没有必要每个请求都去访问数据库。
Second, you will find that a stand-alone token – one that contains all relevent claims for the user – is much easier to work with in development, testing, and production troubleshooting. And since our token includes all that we need to know the identity and roles of the caller, we can simply convert the claims to a User (e.g. an IUserPrincipal in .NET, a simple User object literal in NodeJS). This operation is a mere copying of claims from the token to properties on a user object. Remember, a database call to get more information is not required.
第二,你会发现一个独立的token——包含了用户所有相关声明——在开发,测试和生产排除故障时更加方便使用。当我们的token包含了所有我们需要了解的关于请求的身份和角色信息时,我们可以很容易地将声明转换成一个用户(比如,.NET中的一个 IUserPrincipal,NodeJS中一个简单的User对象)。这个操作仅仅是从token中复制声明到用户对象的属性中。请记住,一个想要获得更多信息的数据库请求是不被允许的。
At this point we have a token that contains claims that tell us all we need to know about a user/caller. Exactly how you validate a user’s credentials and generate the token will depend on your platform and selected library. But in the end, you authenticate the user, generate a token, and associate it with the caller. For a web site, this is typically done with a browser cookie. For a non-browser client, we simply provide the token for them to submit in the header of subsequent HTTP requests. The third key, then, is that your web site will examine the incoming cookie collection and the HTTP Authorization header for the expected token. We don’t really care where it is, as long as the token is present on all HTTP requests.
基于这一点,我们已经有了一个token,它包含我们对于一个用户或请求所需要知道的全部信息。你如何验证用户的凭据或生成token取决于你的平台和所选的库。最后,你认证用户,生成token,将它和请求关键到一起。对于一个网站而言,这通常都是靠浏览器cookie来完成的。对于非浏览器的客户端,我们会在它们提交的的HTTP请求头文件中提供token信息。然后,你的网站会检查这些进来的cookie集合和HTTP授权头文件中的token。我们不关心它在哪,正如token会在所有的HTTP请求中一样。
And with that, we arrive at the fourth key. Because we are checking both the cookie collection and the HTTP Authorization header, we can support both browser and non-browser clients all with the same token and same token validation code. Any HTTP GET or POST, for example, a page request or a form submission, will include the cookie that contains the token that identifies the user. The same applies to AJAX requests from JavaScript/jQuery code – i.e. AJAX requests automatically include all cookies for the web site. And finally, any non-browser clients calling into your site – e.g. a mobile application consuming your REST API – will submit the token via the HTTP AUthorization header. Same token, same token validation code, just a different spot in the HTTP request.
然后我们到了第四部。因为我们同时检查了cookie集合和HTTP授权头文件,我们可以给浏览器或非浏览器提供相同的token和验证码。比如任何HTTP的GET或POST请求,一个页面请求或表单提交都会在cookie中包含拥有用户认证信息的token。这也应用到了JavaScript/jQuery代码中的AJAX请求中。比如,AJAX请求会自动包含所有的网站cookies。最后,你网站中任何非浏览器客户端请求,比如一个手机应用的REST API请求,会通过HTTP授权的头文件来提交token信息。相同的token,相同的token验证码,只是在HTTP请求的不同位置。
Now, you maybe wondering… if any caller can just toss a token on an HTTP request to our web site, how do we know it is valid? Or, more accurately, how do we know that we generated the token? In essence, how do we know the token’s content (i.e. its claims) can be trusted? In the world of web site security, trust is paramount. We absolutely must be able to trust that the claims in the token are true and haven’t been tampered with. For this, we sign the token. If a token is signed, then we can trust it was created by our own site. This is our fifth and final key. Validation of the token’s signature is typically left to a 3rd party library of some kind, so we won’t go into those details here.
现在,你可能会想,如果一个请求只是在向我们网站中的HTTP请求中扔了一个token信息,我们怎么知道它是否合法呢?或者更准确的说,我们怎么知道是我们生成的这个token信息?本质上就是我们如何知道token的内容是可以被信任的?在网站安全领域,信任至上。我们绝对必须能够相信token中的声明是可以被信任的,没有被篡改过的。所以,我们会对token签名。如果token被签名了,我们就可以相信它是由我们的网站生成的。这是我们的第五也是最后的要点。验证token的签名回流到后面的第三部分来说明,所以我们在这里不会细说。
To summarize the five keys… we are using what’s called a JSON Web Token (JWT), which is simply a collection of claims the caller is making about himself. Because the token includes all claims necessary to both identify and authorize the caller, we can avoid querying the database on every request in order to fetch user properties. We will examine the HTTP request’s cookie collection and Authorization header for the token, which allows both browser-based and non browser-based clients to securely use our web site and API. And finally, because the token was signed by our own site, and we can easily verify its signature on every HTTP request, we can take the token’s claims as truth, and simply copy those individual claims to a user object associated with the request. In this way all downstream code will have access to the caller’s name, email address, roles, favorite color, date of birth, whatever is needed.
总结一下这五个要点,我们使用被称为JSON Web Token (JWT)的简单声明集合来让请求表明自己的身份。因为token包含了对于这个请求所有必要识别和授权声明,我们可以避免每次为了查询用户信息而重复请求数据库。我们会检查HTTP请求cookie和头文件中token信息,使得浏览器或非浏览器客户端都能安全的使用我们网站和API。最后,因为token被我们的网站签名了,所以我们可以很容易验证每个HTTP请求的严明,我们可以相信token声明中的信息,并且在请求中复制这些单个声明到用户对象中。正因如此,所有接下来的代码都可以访问用户的姓名,电子邮件地址,角色,最喜欢的颜色,生日等任何需要的信息。
LOGGING IN
登录
The first thing a user is going to do on your site is log in. As such, we need to make sure the login process not only validates the user’s credentials, but also creates our signed JWT with all necessary claims. Then the application just needs to set the newly created JWT as a cookie on the HTTP response. This process is shown below. Note that I haven’t referenced any specific language or library. This is intentional as the process is the same no matter your underlying platform.
用户在你的网站做的第一件事就是登录。所以,我们不仅需要确认登录过程中的用户凭证,也需要创建包含了所有必要声明信息的签名JWT。然后,应用只需要把最新创建的JWT放入HTTP请求的cookie中。流程如下。需要注意的是我这里没有指明任何语言和库。这是一个通用的流程,不论你使用的何种平台。
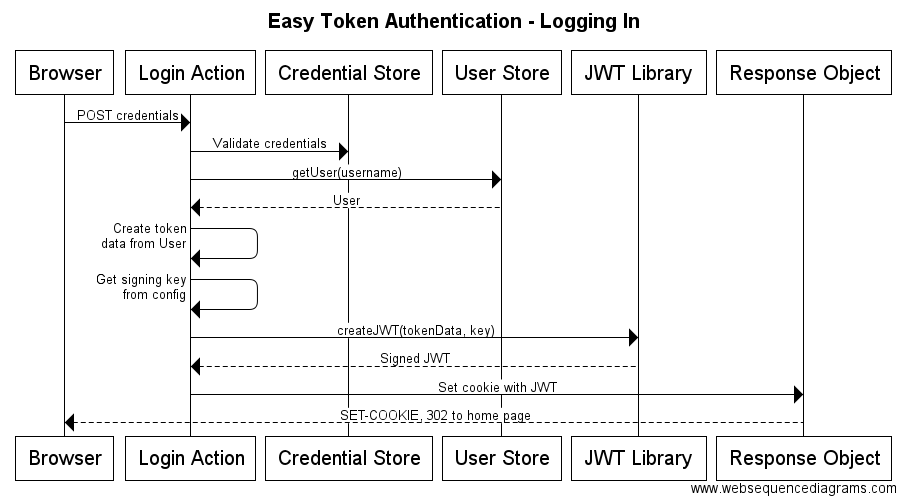
To start the login process, the user’s browser posts his/her credentials to your server code – i.e. some kind of login route or action. The route or action will validate those credentials against the existing credential store. Assuming the credentials are valid, the server code will then get the user information from the database (or, other user store) – for example, a Users table in a database, or a user record in Active Directory.
在登录开始时,用户的浏览器提交他/她的凭证到你的服务器。比如某种登录路由或操作。它会通过现存的凭证库来验证这些凭证。假设这些凭证合法,服务器会从数据库(或其他用户存储)中获得用户的信息。比如,一个数据库中的用户表或者一条活动目录中的用户记录。
Using the various properties on the new user object, your code will create claims for a token, accumulating the claims into token data. Remember, the claims are just name-value pairs. And those claims should include enough information for you to simply convert them into a full-blown user object on subsequent requests (which we’ll look at shortly). If working within a NodeJS application, these claims would look similar to the raw JSON text shown earlier in this post. Don’t forget to set the “special” reserved claims – e.g. iss, exp, aud, sub.
使用新用户对象上的各种信息,你的代码会生成一个token声明,并将其加入到token数据中。请记住,声明仅仅是键值对。并且,这些声明包含了足够的信息让你在接下来的请求中将其转换成一个完整的用户对象。如果是使用的NodeJS应用,那么这些声明看上去会和上文中提交的JSON文本类似。不要忘了设置那些特别的保留声明,比如 iss, exp, aud, sub。
Next, in order to create a signed JWT, we need a signing key. In most cases, this key can be just about anything. Some libraries are pickier than others, so make sure you use a key that is appropriate for your given platform and JWT library. My own Online JSON Web Token Builder web site allow you to create 32, 64, and 128 byte keys. Some libraries will also support the use of asymmetric private keys – e.g. from an X.509 certificate. The JwtAuthForWebAPI .NET Nuget package I created allows for either symmetric keys or certificates. Regardless, you would typically use the platform’s config system to retrieve a signing key.
下一步,为了创建一个签名的JWT,我们需要一个签名密钥。在大多数情况下,这个密钥可以是任何东西。一些库可能比其他的更加挑剔,所以确定你使用的密钥适用于你的平台和JWT库。我自己的 Online JSON Web Token Builder网站允许你创建32,64和128位的密钥。一些库也支持使用不对称的私钥,比如X.509凭证。我创建的JwtAuthForWebAPI .NET Nuget包可以使用对成加密证书。无论如何,你通常会使用平台的配置系统来得到一个签名密钥。
Then we use some kind of library to create the actual signed and base64-encoded JWT – given the signing key we just retrieved from config. Finally, we use the current request’s response object to set a cookie whose value is our signed JWT. I usually name the cookie “usertoken” or “ut” or something similar. Remember to set the HttpOnly and Secure flags on the cookie!
接着我们使用某些库配置中得到的签名密钥来创建实际的签名和base64编码的JWT。最后,我们使用当前请求的响应对象来设置我们签名JWT的cookie。我通常将这个cookie命名为“usertoken”或者“ut”等类似的名称。记住要在cookie中设置HttpOnly和安全标志。
At the conclusion of this login process, the user’s browser contains a cookie that will grant them access to your web site – both web page browsing and jQuery AJAX calls (since all AJAX calls automatically include the site’s cookies). And the cookie’s value – i.e. the JWT – is signed, so you know you can trust it. If anyone tampers with the token’s claims, signature validation will fail, and you can prevent the user from further access.
对于登录过程的总结,用户的浏览器包含了一个被授予的cookie来有权访问你的网站,包括了页面请求和JQuery AJAX请求(自从所有的AJAX请求会自动包含所有的网站cookie后)。cookie的值是被签名过得,所以你知道你可以相信它。如果有任何人修改了token的声明,签名就会失效,并且你可以防止用户进一步地访问。
NON-BROWSER SUPPORT
非浏览器支持
At this point, in order to support non-browser clients, you simply need to provide a RESTful endpoint that accepts a caller’s credentials, and returns the same signed JWT we just created above. Only this time, we aren’t using the request’s response object to set a cookie. We merely want to return the token to the caller as part of a JSON response (or similar). The non-browser client will then set an HTTP Authorization header on all subsequent requests, with the header’s value being of the form: “Bearer the_jwt” – sans quotes.
就这一点而言,为了支持非浏览器客户端,你只需要提供一个RESTful的节点来接受请求的凭证,并返回一个我们创建的签名JWT即可。只有这个时候,我们不会使用请求的响应对象来设置cookie。我们仅仅需要将token信息作为JSON响应的一部分返回给请求即可。非浏览器客户端会在所有接下来的请求中设置包含了JWT值得HTTP授权头文件。
RESOURCE PROTECTION
资源保护
Now let’s examine the process of protecting your site’s resources using the signed JWT from above. Per one of our five keys defined previously, we can expect the token to exist in either the request’s cookie collection, or, in the HTTP Authorization header. Either way, we don’t care – as long as one of those slots contains the token.
现在让我们检查使用上述签名JWT来保护你网站资源的过程。通过上述提到的5个要点,我们知道token信息存在于每个请求的cookie或HTTP头文件中。无论何种方式,我们都不关心,只要其中一个包含了token信息即可。
The entire validation and protection process is shown below.
整个验证和保护过程如下所示。
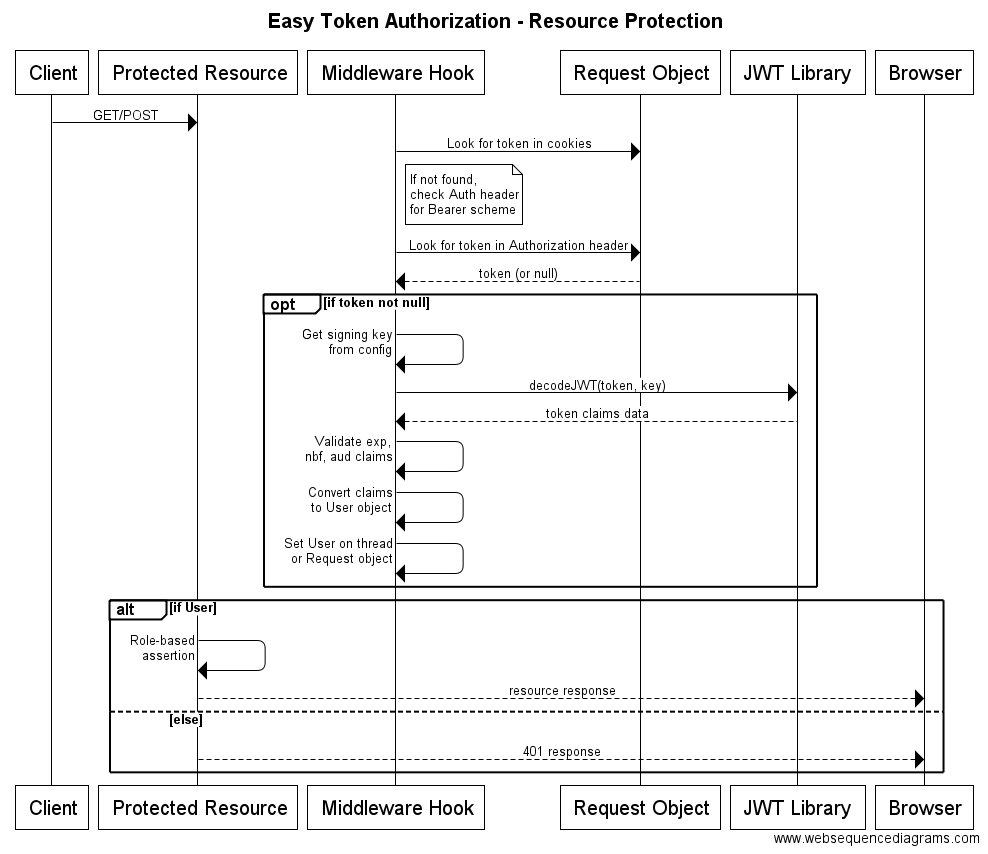
The start, the client (e.g. browser, mobile application) makes an HTTP request to our server, trying to access a protected resource. By that we just mean a web page or other resource for which the caller must be authorized to view.
一开始,客户端(比如浏览器,手机应用)会向我们的服务器发出一个HTTP请求,试图访问受保护的资源。因此我们有必要让网页和其他的资源必须在被认证后才可以查看。
THE MIDDLEWARE HOOK
中间件HOOK
Per the platform we’re working with, we will have some sort of middleware hook in place to intercept the request and do some token-based validation. In ASP.NET Web API this would be a DelegatingHandler. If writing a NodeJS/ExpressJS application, a simple function callback will do.
每一个我们创建的平台,我们都会有一些中间件hook用来拦截请求并做一些基于token的验证。在ASP.NET Web API中,它是DelegatingHandler。如果是一个NodeJS/ExpressJS应用,一个简单的函数回调便足以。
As mentioned previously, we need to check first in the request’s cookie collection for our JWT. If not found, then we look for our token in the Authorization header. If neither location contains the token we expect, then we’re done and we let the processing of the request continue. Note that we don’t want to generate a 401 HTTP response at this point – because we don’t actually know that the requested resource even requires an authorized user.
正如之前所提到的,我们需要先检查请求cookie中的JWT。如果没有找到,那么我们再在头文件中查找。如果其中之一的地方我们找到了需要的token,那么我们就可以让请求过程继续进行。需要注意的是我们不希望在这里生成一个401的HTTP响应,因为我们不知道所需要请求的资源是什么。
Conversely, if the token is present, then we need to do some validation. First we retrieve our signing key from the config system. Then we use it to decode the signed and based64-encoded token string. If the signature is valid, we will end up with a token object of some kind that includes the original claims data we created during the login process (described in the previous section).
相反,如果token存在,我们需要进行一些验证。首先我们从配置系统中检索我们的签名密钥。如果签名是有效的,我们会结束包含了我们在登录过程中创建的原始声明的token对象。
Next we need to validate some of the claims – namely, the expiration date (exp), intended audience (aud), not valid before value (nbf), and any other claims information we feel necessary to validate. If any of the validation fails, we simple halt the validation process and let the request process continue. Again, we aren’t interested in preventing a caller from accessing a resource just yet. We’re only trying to create a valid User object.
下一步我们需要验证某些声明,即过期时间,目标用户,无效前值等任何我们感觉有必要验证的信息。如果任意一个验证失败了,我们停止验证过程,并让请求继续。同样的,在这里我们不关心去保护请求访问某些资源。我们只是要创建一个有效的用户对象。
Assuming validation succeeds, we then convert the token’s claims to a User object, and then set the new User object on the request thread or request object (depending on the underlying platform). Now all downstream code will have access to a User object – including any checks of the caller’s roles.
假设验证成功了,我们将token声明转换成用户对象,然后设置新的用户对象到请求线程或对象中(取决于使用的平台)。现在下面所有的代码都能访问包含了用户角色检验信息的用户对象。
All of the steps we just covered typically happen within the site’s middleware hook, which is intended to intercept every single HTTP request. So we haven’t yet gotten into any application routes or resources or API endpoints.
所有上述我们提到的步骤通常都发生在网站的中用于连接所有单独HTTP请求的中间件hook中。所以我们不用深入到任何应用路由,资源或API节点中。
RESOURCE AUTHORIZATION
资源授权
Once the process above completes, the actual resource or route code can execute. And since we should have a valid User object at this point, we can check that its roles allow it to access the resource. For example, in an ASP.NET MVC or Web API application this is usually accomplished with an attribute on a route or controller action. Regardless, if the user’s roles don’t allow access; or, if a user object doesn’t even exist (i.e. if the middleware code wasn’t able to successfully validate the incoming token), then we can at this point return a 401 HTTP response to the caller. Or, sometimes a 403.
一旦过程完成,实际的资源或者代码就可以执行了。因为在这里我们需要有一个有效的用户对象,我们可以检查它的角色是否可以访问这些资源。比如,在ASP.NET MVC或Web API应用中,他们通常都是由一个路由或控制器操作完成的。无论如何,如果用户角色不允许访问,或者用户对象根本不存在(比如,中间件代码没有能够成功的验证输入的token),那么我们可以在这时向请求返回401或者403HTTP响应.
It is important to realize that the process of looking for and converting a token into a User object is separate from that of authorizing the user for the requested resource. In some cases, for example resources that are allowed to be accessed by an anonmyous user, not finding a valid token is ok – it’s up to the resource to decide.
需要意识到查询和转换token为用户对象和验证用户请求资源权限是分开的过程。在一些时候,比如资源可以被匿名用户访问时,不用查询有效token也是可以的,这由资源决定。
IN CLOSING
关闭
I want to close by saying again that it is generally preferable to use a 3rd party token issuer or sign-on server of some kind. Leveraging a user’s Facebook or Twitter account to obtain an OAuth token is definitely a great way to go. But as I stated above, I haven’t seen too many enterprise applications where the client wanted its users to sign in with a social account. And many times an old legacy application has already been running for quite some time, and so they already have users and users’ credentials – and they don’t want to mess with those. So this post was really about using JWT-based authentication in those scenarios where you have to work with a custom credential store (e.g. a Users table in a database).
在结尾,我想再说一次,通常使用第三方的token或签名服务是一个更好的选择。利用用户的Facebook或Twitter账号来获得一个OAuth账号是一个不错的方式。但是正如我之前所说的,我还没有见过很多企业应用程序的客户端希望它的用户通过一个社会帐户来登录。很多时候,那些旧的应用已经运行了相当长的一段时间,所以他们已经有了足够的用户和用户凭证,他们不想将其混淆。所以这篇文章真是说明如何在这种你需要使用自定义凭证库的情况下使用基于JWT的认证。
Here again are my five keys to remember for token authentication:
这里再强调一下记住token认证的5个要点:
A token is just a collection of claims
Include enough user properties sufficient to avoid hitting the database on subsequent requests
Your web site will examine both the request’s cookie collection and HTTP Authorization header for the expected token
Because of this, you can support both browser and non-browser clients with the same token and same token validation code
Since the token is signed, you can trust that it was created by your own site, and so can accept the token’s claims as truth
token只是一个声明集合
包含了足够用户的信息,以避免在接下来的请求中访问数据库
你的网站要同时检查请求的cookie集合和HTTP授权头文件来查找所需的token
正因如此,你可以用相同的token和token验证码,同时支持浏览器和非浏览器客户端
因为token是被签名的,你可以确认它是被你的网站创建的,所以它可以访问token的声明
As promised, I didn’t show any code in this post. If you have trouble finding code or libraries that turn this information into something that works, please let me know in the comments below and I’ll put some examples together.
正如之前提到的,我没有在这片文章中展示任何的代码。如果你对于选择代码或工具库将这些信息运用到工作中还有疑问,请在下面的留言中让我知道,我会一并举例。


 5206
5206


 被折叠的 条评论
为什么被折叠?
被折叠的 条评论
为什么被折叠?
 到【灌水乐园】发言


